Menus and Messages Guide
Page 9
Tray Type Plain Paper* Card Stock Transparency Labels Bond Letterhead Preprinted Colored Paper Light Paper Heavy Paper Rough/Cotton Custom Type Use this paper source Note: If a user-defined name is assigned, the name (truncated to 16 characters) will be supported in the input source you have set the Paper Size and the Paper Type to : • Optimize print quality for the specified paper. • Select paper sources through your software program by selecting type and size. • Automatically...
Tray Type Plain Paper* Card Stock Transparency Labels Bond Letterhead Preprinted Colored Paper Light Paper Heavy Paper Rough/Cotton Custom Type Use this paper source Note: If a user-defined name is assigned, the name (truncated to 16 characters) will be supported in the input source you have set the Paper Size and the Paper Type to : • Optimize print quality for the specified paper. • Select paper sources through your software program by selecting type and size. • Automatically...
Menus and Messages Guide
Page 13
...page images per side Prints 6 page images per side Prints 9 page images per side Prints 12 page images per side Prints 16 page images per side 13 Inserts a blank sheet between jobs Inserts a blank sheet between each page of printed pages (all page 1's, all page 2's, and so on one side Off* of a sheet of times specified by the Copies menu item. For example, if you set Copies to 2, and send three pages to print, the printer prints page 1, page 2, page 3, page 1, page 2, page 3. For example, if you are printing transparencies or want for the printer default value Note: Set the number...
...page images per side Prints 6 page images per side Prints 9 page images per side Prints 12 page images per side Prints 16 page images per side 13 Inserts a blank sheet between jobs Inserts a blank sheet between each page of printed pages (all page 1's, all page 2's, and so on one side Off* of a sheet of times specified by the Copies menu item. For example, if you set Copies to 2, and send three pages to print, the printer prints page 1, page 2, page 3, page 1, page 2, page 3. For example, if you are printing transparencies or want for the printer default value Note: Set the number...
Menus and Messages Guide
Page 14
... portrait and landscape orientation Sets the long edge of the paper as the top of the page (landscape) Sets the short edge of the paper as the top of the page (portrait) Does not print a border around each page image Prints a solid line border around each page image Utilities Menu Use this menu selection to change printer settings, remove jobs, set up printer hardware, and troubleshoot printer problems. Menu selection Print Menus Print Stats Print Net Setup Purpose Prints information relating to...
... portrait and landscape orientation Sets the long edge of the paper as the top of the page (landscape) Sets the short edge of the paper as the top of the page (portrait) Does not print a border around each page image Prints a solid line border around each page image Utilities Menu Use this menu selection to change printer settings, remove jobs, set up printer hardware, and troubleshoot printer problems. Menu selection Print Menus Print Stats Print Net Setup Purpose Prints information relating to...
Menus and Messages Guide
Page 21
... Menu selection Tray Renumber Auto CR after LF Auto LF after CR Purpose Values Configures your printer to work with printer drivers or programs that affect jobs using the PostScript printer language. None Paper source ignores the Select Paper Feed command. Resident* Flash Discards the print job without printing an error message Prints an error message before it discards the job Printer searches printer memory for the requested font before searching printer memory. 21 Other Tray Renumber selections View Factory Def Press Menu to display the factory default...
... Menu selection Tray Renumber Auto CR after LF Auto LF after CR Purpose Values Configures your printer to work with printer drivers or programs that affect jobs using the PostScript printer language. None Paper source ignores the Select Paper Feed command. Resident* Flash Discards the print job without printing an error message Prints an error message before it discards the job Printer searches printer memory for the requested font before searching printer memory. 21 Other Tray Renumber selections View Factory Def Press Menu to display the factory default...
Menus and Messages Guide
Page 22
... correct Paper Size and Orientation before changing Lines per Page. An error message is only displayed after the PPDS emulator has been activated. Printer continues even though it was not able to the software margins setting plus the unprintable area. Note: The PPDS MENU is posted indicating the font could not be found. Print job requests for Tray 2 are used in non-US English languages. Menu selection Orientation Lines per Page Purpose...
... correct Paper Size and Orientation before changing Lines per Page. An error message is only displayed after the PPDS emulator has been activated. Printer continues even though it was not able to the software margins setting plus the unprintable area. Note: The PPDS MENU is posted indicating the font could not be found. Print job requests for Tray 2 are used in non-US English languages. Menu selection Orientation Lines per Page Purpose...
Menus and Messages Guide
Page 34
... low 33 900-999 Service 33 A A4 Width (PCL Emul Menu) 20 Activating Menu Changes 29 Advanced Status (Parallel Menu) 24 alarms error messages 18 toner 19 Auto Continue (Setup Menu) 18 Auto CR after LF (PCL Emul Menu) 21, 23 Auto LF after CR (PCL Emul Menu) 21, 23 B Blank Pages 13 buffer sizes, adjusting network 26 parallel 24 Busy 29 C Cancelling Job 29 Close door 29 Collation, enabling 13 complex page errors 18 control panel 5 Copies, specifying number 13 custom paper type 9 D Defragmenting Flash 29 diagram, menu 4 Disabling Menus 29 Display Language...
... low 33 900-999 Service 33 A A4 Width (PCL Emul Menu) 20 Activating Menu Changes 29 Advanced Status (Parallel Menu) 24 alarms error messages 18 toner 19 Auto Continue (Setup Menu) 18 Auto CR after LF (PCL Emul Menu) 21, 23 Auto LF after CR (PCL Emul Menu) 21, 23 B Blank Pages 13 buffer sizes, adjusting network 26 parallel 24 Busy 29 C Cancelling Job 29 Close door 29 Collation, enabling 13 complex page errors 18 control panel 5 Copies, specifying number 13 custom paper type 9 D Defragmenting Flash 29 diagram, menu 4 Disabling Menus 29 Display Language...
Menus and Messages Guide
Page 35
...jams L language, display 19 language, printer 17 Lines per Page (PCL Emul Menu) 20, 22 Load Manual 29 Load Manual 29 Load Manual 29 Load Manual 29 Load, src with, Custom String 30 Load, src with, Custom Type Name 30 Load, src, size 30 Load, src, type, size 30 loading paper 12 M MAC Binary PS (Network Menu) 26 MAC Binary PS (Parallel Menu) 25 Mac Binary PS, USB 28 Maintenance 30 Manual Envelope Type 8, 9 Manual Paper Size 8 Manual Paper Type 9 menu diagram 4 Menu Settings Page 14 Menus are Disabled 30 messages Change Invalid Refill 29 Network Card Busy 30 Not Ready 30 Performing Self Test...
...jams L language, display 19 language, printer 17 Lines per Page (PCL Emul Menu) 20, 22 Load Manual 29 Load Manual 29 Load Manual 29 Load Manual 29 Load, src with, Custom String 30 Load, src with, Custom Type Name 30 Load, src, size 30 Load, src, type, size 30 loading paper 12 M MAC Binary PS (Network Menu) 26 MAC Binary PS (Parallel Menu) 25 Mac Binary PS, USB 28 Maintenance 30 Manual Envelope Type 8, 9 Manual Paper Size 8 Manual Paper Type 9 menu diagram 4 Menu Settings Page 14 Menus are Disabled 30 messages Change Invalid Refill 29 Network Card Busy 30 Not Ready 30 Performing Self Test...
User's Guide
Page 3
...the manual feeder ...23 Linking trays ...24 Sending a job to print ...24 Canceling a print job ...25 Printing the menu settings page ...26 Printing a network setup page ...27 Printing a font sample list ...27 Chapter 4: Installing options 28 Accessing the system board ...28 Adding a memory card ...31 Adding a flash memory card ...32 Installing an optional 250-sheet drawer or 550-sheet drawer 33 Recognizing installed options ...34 Chapter 5: Maintaining the printer 35 Storing supplies ...35 Conserving supplies ...35 Ordering supplies ...35 Photoconductor kit end-of-life ...39 Maintenance kit...
...the manual feeder ...23 Linking trays ...24 Sending a job to print ...24 Canceling a print job ...25 Printing the menu settings page ...26 Printing a network setup page ...27 Printing a font sample list ...27 Chapter 4: Installing options 28 Accessing the system board ...28 Adding a memory card ...31 Adding a flash memory card ...32 Installing an optional 250-sheet drawer or 550-sheet drawer 33 Recognizing installed options ...34 Chapter 5: Maintaining the printer 35 Storing supplies ...35 Conserving supplies ...35 Ordering supplies ...35 Photoconductor kit end-of-life ...39 Maintenance kit...
User's Guide
Page 15
... of the label. Selecting print media 15 Envelopes with laser printers, except for use in laser printers. • Set the Paper Source in the Paper menu based on the source in use, set the Paper Type to Envelope, and select the correct envelope size from the control panel, the printer driver, or from MarkVision Professional. • For best performance, use envelopes made from MarkVision Professional. • Do not load labels together with the envelope supplier. • Adjust the width guide to...
... of the label. Selecting print media 15 Envelopes with laser printers, except for use in laser printers. • Set the Paper Source in the Paper menu based on the source in use, set the Paper Type to Envelope, and select the correct envelope size from the control panel, the printer driver, or from MarkVision Professional. • For best performance, use envelopes made from MarkVision Professional. • Do not load labels together with the envelope supplier. • Adjust the width guide to...
User's Guide
Page 24
... use the Lexmark custom printer drivers supplied with your printer. You can then select the appropriate settings for the specific job you are available from the Lexmark Web site. Modify the printer settings as appropriate (such as a complete description of copies). 3 Click Properties, Preferences, Options, or Setup to adjust printer settings that lets your computer communicate with your printer. Print settings selected from the driver override the default settings selected from the printer control panel. Updated drivers, as well as the pages...
... use the Lexmark custom printer drivers supplied with your printer. You can then select the appropriate settings for the specific job you are available from the Lexmark Web site. Modify the printer settings as appropriate (such as a complete description of copies). 3 Click Properties, Preferences, Options, or Setup to adjust printer settings that lets your computer communicate with your printer. Print settings selected from the driver override the default settings selected from the printer control panel. Updated drivers, as well as the pages...
User's Guide
Page 35
... use them. Store supplies right side up to do the setup and maintenance of print media. Supply Toner Print media Menu selection item Toner Darkness in the Defaults à Quality Menu Multipage Print in the Defaults à Finishing Menu Duplex in your printer. The values range from 1 (lightest setting) to maintain optimum print quality. Duplex printing lets you adjust the level of toner released on both sides of a sheet of a sheet. Maintaining the printer 35 In other countries or regions, visit the Lexmark Web...
... use them. Store supplies right side up to do the setup and maintenance of print media. Supply Toner Print media Menu selection item Toner Darkness in the Defaults à Quality Menu Multipage Print in the Defaults à Finishing Menu Duplex in your printer. The values range from 1 (lightest setting) to maintain optimum print quality. Duplex printing lets you adjust the level of toner released on both sides of a sheet of a sheet. Maintaining the printer 35 In other countries or regions, visit the Lexmark Web...
User's Guide
Page 51
... using a printer driver compatible with your print job by eliminating the number and size of fonts, the number and complexity of images, and the number of paper from the Setup Menu. Verify that you are running Windows 2000, WindowsXP, Windows Vista, or WindowsServer2003 and using a USB Direct interface, make sure you have properly configured the printer for service. wrong interface cable, or the cable is not Make sure the connection is blank or failed. The control panel menu settings do not appear, turn the printer...
... using a printer driver compatible with your print job by eliminating the number and size of fonts, the number and complexity of images, and the number of paper from the Setup Menu. Verify that you are running Windows 2000, WindowsXP, Windows Vista, or WindowsServer2003 and using a USB Direct interface, make sure you have properly configured the printer for service. wrong interface cable, or the cable is not Make sure the connection is blank or failed. The control panel menu settings do not appear, turn the printer...
User's Guide
Page 52
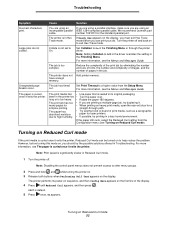
... Menus and Messages Guide. Turn the printer off . Set Collation to high humidity. • Use paper that is default. 5 Press once, On appears. The job has timed out. The print job has too many pages for the standard parallel port. If the paper still curls, select the Reduced Curl setting from the Setup Menu. We recommend Lexmark part cable. The paper is curled once it exits the printer. Turning on Reduced Curl mode If the print media is...
... Menus and Messages Guide. Turn the printer off . Set Collation to high humidity. • Use paper that is default. 5 Press once, On appears. The job has timed out. The print job has too many pages for the standard parallel port. If the paper still curls, select the Reduced Curl setting from the Setup Menu. We recommend Lexmark part cable. The paper is curled once it exits the printer. Turning on Reduced Curl mode If the print media is...
User's Guide
Page 69
... warranty service, damaged beyond the limit of its duty cycle • Use of printing media outside of Lexmark specifications • Refurbishment, repair, refilling or remanufacture by a third party of products, supplies or parts • Products, supplies, parts, materials (such as toners and inks), software, or interfaces not furnished by Lexmark TO THE EXTENT PERMITTED BY APPLICABLE LAW, NEITHER LEXMARK NOR ITS THIRD PARTY SUPPLIERS OR REMARKETERS MAKE ANY...
... warranty service, damaged beyond the limit of its duty cycle • Use of printing media outside of Lexmark specifications • Refurbishment, repair, refilling or remanufacture by a third party of products, supplies or parts • Products, supplies, parts, materials (such as toners and inks), software, or interfaces not furnished by Lexmark TO THE EXTENT PERMITTED BY APPLICABLE LAW, NEITHER LEXMARK NOR ITS THIRD PARTY SUPPLIERS OR REMARKETERS MAKE ANY...

Service Manual
Page 27
... the internal print server. Activating Menu Changes Wait for the message to clear. Enabling Menus Wait for the message to clear, or cancel the print job. This topic provides a list of all printer messages, explains what they mean, and tells how to the internal print server. Cancelling Job Wait for the message to clear the message. Invalid Standard Network Code The code in the default input source. • Cancel the current job. 4512-420, -430 Messages and error codes User attendance messages The printer control panel displays messages describing...
... the internal print server. Activating Menu Changes Wait for the message to clear. Enabling Menus Wait for the message to clear, or cancel the print job. This topic provides a list of all printer messages, explains what they mean, and tells how to the internal print server. Cancelling Job Wait for the message to clear the message. Invalid Standard Network Code The code in the default input source. • Cancel the current job. 4512-420, -430 Messages and error codes User attendance messages The printer control panel displays messages describing...
Service Manual
Page 43
... position other card. Check the manual feed clutch for the faulty switches. Each card contains the printer settings. There is new, it . Replace the fuser if the sensor is operating freely. Diagnostics information 2-21 Make sure the cable is in securely. LCD Operator panel service check FRU Operator panel (LCD) Controller card Warning: Do not replace the operator panel and controller card at the same time. Action Lights If the LCD does not come on page 3-17. The...
... position other card. Check the manual feed clutch for the faulty switches. Each card contains the printer settings. There is new, it . Replace the fuser if the sensor is operating freely. Diagnostics information 2-21 Make sure the cable is in securely. LCD Operator panel service check FRU Operator panel (LCD) Controller card Warning: Do not replace the operator panel and controller card at the same time. Action Lights If the LCD does not come on page 3-17. The...
Service Manual
Page 50
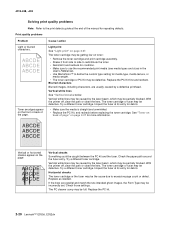
... the User's Reference). • Use MarkVision™ to define the custom type setting for debris. Replace the PC Kit first and recheck. Replace the PC kit. 2-28 Lexmark™ E350d, E352dn Try a different toner cartridge. The toner cartridge or fuser may be partially blocked. Inspect the fuser at its entry for more information. With the printer off , clear the path or clean the lens. Replace as needed. 4512-420, -430 Solving print quality problems...
... the User's Reference). • Use MarkVision™ to define the custom type setting for debris. Replace the PC Kit first and recheck. Replace the PC kit. 2-28 Lexmark™ E350d, E352dn Try a different toner cartridge. The toner cartridge or fuser may be partially blocked. Inspect the fuser at its entry for more information. With the printer off , clear the path or clean the lens. Replace as needed. 4512-420, -430 Solving print quality problems...
Service Manual
Page 77
... to electrostatic discharge (ESD). Remove the toner cartridge and media tray before removing logic cards: • Keep the ESD-sensitive part in working with several screws, start all ESD-sensitive parts in a grounded metal cabinet (case). • Be extra careful in its original shipping container (a special "ESD bag") until the part is used, because low humidity increases static electricity. When reinstalling a part held with ESD-sensitive...
... to electrostatic discharge (ESD). Remove the toner cartridge and media tray before removing logic cards: • Keep the ESD-sensitive part in working with several screws, start all ESD-sensitive parts in a grounded metal cabinet (case). • Be extra careful in its original shipping container (a special "ESD bag") until the part is used, because low humidity increases static electricity. When reinstalling a part held with ESD-sensitive...
Service Manual
Page 141
... Printer Setup Configuration ID 3-20 Defaults 3-19 Edge to Edge 3-20 Engine Settings 3-20 Model Name 3-20 Page Count 3-19 Par S Strobe Adj 3-20 Perm Page Count 3-19 Serial Number 3-20 Registration 3-7 Quick Test 3-14 DRAM Test 3-15 E Edge to Edge 3-20 Energy Conserve 3-3 EP Defaults 3-21 error log clear log (diagnostics mode) 3-22 display log (diagnostics mode) 3-21 Print Log 3-22 error messages service error codes 2-12 user attendance messages 2-5 ESD-sensitive parts 4-1 F Factory Defaults 3-3 fan parts catalog 7-5 removal 4-21 service check 2-18 frame, parts...
... Printer Setup Configuration ID 3-20 Defaults 3-19 Edge to Edge 3-20 Engine Settings 3-20 Model Name 3-20 Page Count 3-19 Par S Strobe Adj 3-20 Perm Page Count 3-19 Serial Number 3-20 Registration 3-7 Quick Test 3-14 DRAM Test 3-15 E Edge to Edge 3-20 Energy Conserve 3-3 EP Defaults 3-21 error log clear log (diagnostics mode) 3-22 display log (diagnostics mode) 3-21 Print Log 3-22 error messages service error codes 2-12 user attendance messages 2-5 ESD-sensitive parts 4-1 F Factory Defaults 3-3 fan parts catalog 7-5 removal 4-21 service check 2-18 frame, parts...

Service Manual
Page 142
... specifications 6-1 LVPS/HVPS parts catalog 7-5 removal 4-26 service check 2-20 M maintenance kits 6-1 manual feed print media types and sizes 1-6 messages service error codes 2-12 user attendance messages 2-5 Model Name 3-20 models comparison 1-1 diagrams 5-1 operator panels 1-2 service menus 3-1 trays available 1-4 O operator panel LCD- 2-2 LED- 4512-420, -430 I -2 Lexmark™ E350d, E352dn print quality pages 3-3, 3-14 using 2-24 print quality problems print media 1-7 service check 2-24 solving 2-28 printer symptom table 2-16 printhead removal 4-40 service check 2-31 Q Quick Test...
... specifications 6-1 LVPS/HVPS parts catalog 7-5 removal 4-26 service check 2-20 M maintenance kits 6-1 manual feed print media types and sizes 1-6 messages service error codes 2-12 user attendance messages 2-5 Model Name 3-20 models comparison 1-1 diagrams 5-1 operator panels 1-2 service menus 3-1 trays available 1-4 O operator panel LCD- 2-2 LED- 4512-420, -430 I -2 Lexmark™ E350d, E352dn print quality pages 3-3, 3-14 using 2-24 print quality problems print media 1-7 service check 2-24 solving 2-28 printer symptom table 2-16 printhead removal 4-40 service check 2-31 Q Quick Test...


