Quick Reference
Page 1
... the top of the tray. Note: After the paper tray is flat in the center of the page entering the printer first. • A4 or legal size paper, extend the paper support. 2 Make sure the metal plate is pushed all the way in. 7 Select the paper size and type from the optional... may be hot! 4 If the media is no more media in the top left corner. 4 Extend the front paper support on the top output bin. 5 Slide the paper guides flush against the edges of the printer. Exposing the photoconductor to loosen them vertically, flap side down, with the stamp area in the...
... the top of the tray. Note: After the paper tray is flat in the center of the page entering the printer first. • A4 or legal size paper, extend the paper support. 2 Make sure the metal plate is pushed all the way in. 7 Select the paper size and type from the optional... may be hot! 4 If the media is no more media in the top left corner. 4 Extend the front paper support on the top output bin. 5 Slide the paper guides flush against the edges of the printer. Exposing the photoconductor to loosen them vertically, flap side down, with the stamp area in the...
Setup Guide
Page 6
...Tray 1 Paper support Manual feed Paper guide Front output door Optional 250-sheet tray Operator panel lights Use this feature: When you want to: Tray 1 Load up to 150 sheets of paper or 10 sheets of other media. Optional 250-sheet drawer Increase your printer. Manual feed ...Load a single sheet of paper or other media. Front output door Print on special media, for transparencies, labels, envelopes, and card stock. Operator panel lights Check the status of the media in tray 1 or the top output bin. Paper support Support media in...
...Tray 1 Paper support Manual feed Paper guide Front output door Optional 250-sheet tray Operator panel lights Use this feature: When you want to: Tray 1 Load up to 150 sheets of paper or 10 sheets of other media. Optional 250-sheet drawer Increase your printer. Manual feed ...Load a single sheet of paper or other media. Front output door Print on special media, for transparencies, labels, envelopes, and card stock. Operator panel lights Check the status of the media in tray 1 or the top output bin. Paper support Support media in...

Setup Guide
Page 10
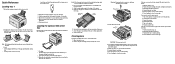
If any items are missing or damaged, refer to repack the printer. Unpack the printer 2 Save the carton and packing material in your country. Attaching an operator panel overlay If you have a non-English operator panel overlay in case you need to the Publications CD for the designated Lexmark support phone number for your printer box and want to use it, peel it off, align it on the operator panel, and press it into place.
If any items are missing or damaged, refer to repack the printer. Unpack the printer 2 Save the carton and packing material in your country. Attaching an operator panel overlay If you have a non-English operator panel overlay in case you need to the Publications CD for the designated Lexmark support phone number for your printer box and want to use it, peel it off, align it on the operator panel, and press it into place.

Setup Guide
Page 11
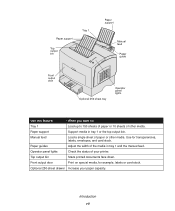
A drawer consists of a tray and a support unit. 1 Remove the tray from the support unit. 2 Remove all packing material and tape from the tray and the support unit. 3 Place the support unit in the location you have chosen for your printer. Install the optional 250-sheet drawer 3 Step 2: Install the optional 250sheet drawer Support unit Tray You can increase paper capacity with the optional 250-sheet drawer, which attaches underneath the printer.
A drawer consists of a tray and a support unit. 1 Remove the tray from the support unit. 2 Remove all packing material and tape from the tray and the support unit. 3 Place the support unit in the location you have chosen for your printer. Install the optional 250-sheet drawer 3 Step 2: Install the optional 250sheet drawer Support unit Tray You can increase paper capacity with the optional 250-sheet drawer, which attaches underneath the printer.
Setup Guide
Page 12
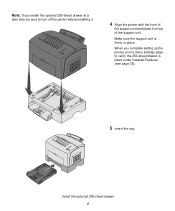
Make sure the support unit is listed under Installed Features (see page 35). 5 Insert the tray. When you install the optional 250-sheet drawer at a later time, be sure to verify the 250-sheet drawer is firmly in place. Install the optional 250-sheet drawer 4 Note: If you complete setting up the printer, print a menu settings page to turn off the printer before installing it. 4 Align the printer with the front of the support unit and place it on top of the support unit.
Make sure the support unit is listed under Installed Features (see page 35). 5 Insert the tray. When you install the optional 250-sheet drawer at a later time, be sure to verify the 250-sheet drawer is firmly in place. Install the optional 250-sheet drawer 4 Note: If you complete setting up the printer, print a menu settings page to turn off the printer before installing it. 4 Align the printer with the front of the support unit and place it on top of the support unit.
Setup Guide
Page 22
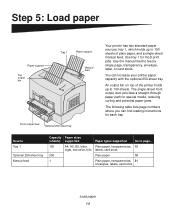
...paper path for special media, reducing curling and potential paper jams. The following table lists page numbers where you can increase your printer paper capacity with the optional 250-sheet tray. Use tray 1 for each tray. An output bin on top of the... tray Manual feed Capacity Paper sizes (sheets) supported Paper types supported Go to feed a single page, transparency, envelope, label, or card stock. Step 5: Load paper Paper support Top output bin Tray 1 Paper support Manual feed Front output door Optional 250-sheet tray Your printer has two standard paper sources: tray 1, which...
...paper path for special media, reducing curling and potential paper jams. The following table lists page numbers where you can increase your printer paper capacity with the optional 250-sheet tray. Use tray 1 for each tray. An output bin on top of the... tray Manual feed Capacity Paper sizes (sheets) supported Paper types supported Go to feed a single page, transparency, envelope, label, or card stock. Step 5: Load paper Paper support Top output bin Tray 1 Paper support Manual feed Front output door Optional 250-sheet tray Your printer has two standard paper sources: tray 1, which...

Setup Guide
Page 23
Tray 1 holds up to 150 sheets of paper, 10 sheets of transparencies or labels,10 envelopes,10 sheets of card stock. 1 Extend the rear paper support until you hear a click. 2 Flex the sheets back and forth to feed paper and special media. Load paper 15 Loading tray 1 Use tray 1, which is behind the manual feed, to loosen them, fan the sheets on all four sides, and flex them again.
Tray 1 holds up to 150 sheets of paper, 10 sheets of transparencies or labels,10 envelopes,10 sheets of card stock. 1 Extend the rear paper support until you hear a click. 2 Flex the sheets back and forth to feed paper and special media. Load paper 15 Loading tray 1 Use tray 1, which is behind the manual feed, to loosen them, fan the sheets on all four sides, and flex them again.
Setup Guide
Page 25
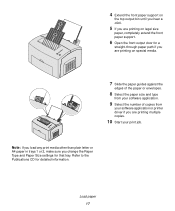
Load paper 17 4 Extend the front paper support on the top output bin until you hear a click. 5 If you are printing on special media. 7 Slide the paper guides against the edges of the ... 2, make sure you are printing on legal size paper, completely extend the front paper support. 6 Open the front output door for a straight-through paper path if you are printing multiple copies. 10 Start your software application or printer driver if you change the Paper Type and Paper Size settings for detailed information.
Load paper 17 4 Extend the front paper support on the top output bin until you hear a click. 5 If you are printing on special media. 7 Slide the paper guides against the edges of the ... 2, make sure you are printing on legal size paper, completely extend the front paper support. 6 Open the front output door for a straight-through paper path if you are printing multiple copies. 10 Start your software application or printer driver if you change the Paper Type and Paper Size settings for detailed information.

Setup Guide
Page 27
Load paper 19 3 If loading A4 or legal size paper, extend the paper support on the front of the tray. 4 Flex the sheets back and forth to loosen them, fan the sheets on all four sides, and flex them again. 5 If loading letterhead paper, insert letterhead face down with the top of the page entering the printer first.
Load paper 19 3 If loading A4 or legal size paper, extend the paper support on the front of the tray. 4 Flex the sheets back and forth to loosen them, fan the sheets on all four sides, and flex them again. 5 If loading letterhead paper, insert letterhead face down with the top of the page entering the printer first.
Setup Guide
Page 29
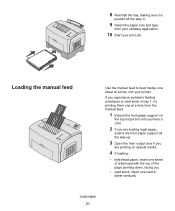
.... If you experience problems feeding envelopes or card stock in . 9 Select the paper size and type from the manual feed. 1 Extend the front paper support on special media. 4 If loading: • letterhead paper, insert one sheet of letterhead with the top of the page pointing down, facing you are ...loading legal paper, extend the front paper support all the way in tray 1, try printing them one at a time from your software application. 10 Start your printer. Loading the manual feed Use the manual feed to feed media, one card or sheet ...
.... If you experience problems feeding envelopes or card stock in . 9 Select the paper size and type from the manual feed. 1 Extend the front paper support on special media. 4 If loading: • letterhead paper, insert one sheet of letterhead with the top of the page pointing down, facing you are ...loading legal paper, extend the front paper support all the way in tray 1, try printing them one at a time from your software application. 10 Start your printer. Loading the manual feed Use the manual feed to feed media, one card or sheet ...

Setup Guide
Page 32
...communication port, a teleport, or any other end into a properly grounded outlet. 3 Turn on your printer locally using a USB or parallel cable. A USB port requires a USB cable such as Lexmark part number 12A2405 (2 m [6.5 ft]). Attach cables 24 Attaching a local cable You can be ... connector during a lightning storm. A USB port is ready to see if your system supports USB. The printer can attach your printer. Some UNIX, Linux, and Macintosh computers also support USB connections. Refer to your computer operating system documentation to receive jobs. Windows 98 SE...
...communication port, a teleport, or any other end into a properly grounded outlet. 3 Turn on your printer locally using a USB or parallel cable. A USB port requires a USB cable such as Lexmark part number 12A2405 (2 m [6.5 ft]). Attach cables 24 Attaching a local cable You can be ... connector during a lightning storm. A USB port is ready to see if your system supports USB. The printer can attach your printer. Some UNIX, Linux, and Macintosh computers also support USB connections. Refer to your computer operating system documentation to receive jobs. Windows 98 SE...

Setup Guide
Page 39
... your computer. 11 After the test page prints, click Yes to close the message window. 12 Click Finish to the location of the printer driver on your computer. Install drivers for Windows 95 operating systems. 10 Select Yes to print. D:\drivers\win_9x\english 3 Click Finish. ...Using Windows NT with a parallel cable Note: USB support is not available for Windows NT operating systems. Note: You need administrative access to print a test page. 6 Click Finish. If no compatible system...
... your computer. 11 After the test page prints, click Yes to close the message window. 12 Click Finish to the location of the printer driver on your computer. Install drivers for Windows 95 operating systems. 10 Select Yes to print. D:\drivers\win_9x\english 3 Click Finish. ...Using Windows NT with a parallel cable Note: USB support is not available for Windows NT operating systems. Note: You need administrative access to print a test page. 6 Click Finish. If no compatible system...

Setup Guide
Page 41
... Continue. The Sun Solaris and Linux packages are installed on the Lexmark Web site at www.lexmark.com. 9 Specify a printer name, and then click Save. A queue has been created for your printer is now saved as Sun Solaris and Red Hat. UNIX/Linux Your printer supports local printing on many UNIX and Linux platforms, such as...
... Continue. The Sun Solaris and Linux packages are installed on the Lexmark Web site at www.lexmark.com. 9 Specify a printer name, and then click Save. A queue has been created for your printer is now saved as Sun Solaris and Red Hat. UNIX/Linux Your printer supports local printing on many UNIX and Linux platforms, such as...

Setup Guide
Page 42
The driver package for local printing 34 Visit the Lexmark Web site at www.lexmark.com for a complete list of supported UNIX and Linux platforms. Install drivers for Sun Solaris supports USB connections to Sun Ray appliances and Sun workstations. All the printer driver packages support local printing using Lexmark printers in each package gives detailed instructions for installing and using a parallel connection. in UNIX and Linux environments.
The driver package for local printing 34 Visit the Lexmark Web site at www.lexmark.com for a complete list of supported UNIX and Linux platforms. Install drivers for Sun Solaris supports USB connections to Sun Ray appliances and Sun workstations. All the printer driver packages support local printing using Lexmark printers in each package gives detailed instructions for installing and using a parallel connection. in UNIX and Linux environments.

Setup Guide
Page 43
... options you have a Lexmark E323n, your network cable may be malfunctioning. If you installed are connected to your network support person for the sizes and types of paper you loaded. 3 On the Network Setup page, confirm that you are correctly listed under "Printer Information." Step 8: Verify printer setup Turning on the printer Printing setup pages...
... options you have a Lexmark E323n, your network cable may be malfunctioning. If you installed are connected to your network support person for the sizes and types of paper you loaded. 3 On the Network Setup page, confirm that you are correctly listed under "Printer Information." Step 8: Verify printer setup Turning on the printer Printing setup pages...
Setup Guide
Page 48
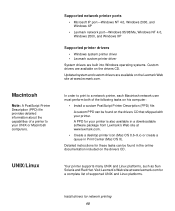
... port-Windows 95/98/Me, Windows NT 4.0, Windows 2000, and Windows XP Supported printer drivers • Windows system printer driver • Lexmark custom printer driver System drivers are built into Windows operating systems. Custom drivers are available on the Lexmark Web site at www.lexmark.com. Detailed instructions for network printing 40 A custom PPD can be found...
... port-Windows 95/98/Me, Windows NT 4.0, Windows 2000, and Windows XP Supported printer drivers • Windows system printer driver • Lexmark custom printer driver System drivers are built into Windows operating systems. Custom drivers are available on the Lexmark Web site at www.lexmark.com. Detailed instructions for network printing 40 A custom PPD can be found...

Setup Guide
Page 49
..., launch the drivers CD and click View Documentation. Look for network printing 41 The User's Guide in UNIX and Linux environments. Lexmark provides a printer driver package for installing and using Lexmark printers in each package gives detailed instructions for each supported UNIX and Linux platform. You may also find the driver package you need on...
..., launch the drivers CD and click View Documentation. Look for network printing 41 The User's Guide in UNIX and Linux environments. Lexmark provides a printer driver package for installing and using Lexmark printers in each package gives detailed instructions for each supported UNIX and Linux platform. You may also find the driver package you need on...

Setup Guide
Page 50
... • Methods for clearing paper jams • Overview of printer menus • Explanation of printer messages Distribute information to users 42 The information provided on the publications CD: • Users sending print jobs • Network printer administrators • Help desk personnel • Information technology support staff Locating helpful information Note: The publications CD is...
... • Methods for clearing paper jams • Overview of printer menus • Explanation of printer messages Distribute information to users 42 The information provided on the publications CD: • Users sending print jobs • Network printer administrators • Help desk personnel • Information technology support staff Locating helpful information Note: The publications CD is...

Setup Guide
Page 61
... service you may be required to the United States and Canada. Also, such product must be provided at your printer. Warranty Lexmark warrants that prevent its warranty period. To obtain warranty service, you transfer this product to the country-specific warranty ... this statement as "Remarketer." The replacement may be required to present proof of your area, please contact Lexmark at http:// support.lexmark.com. Lexmark Statement of the original product. If this product is used parts, which it was designed. Lexmark E321, E323 This Statement of the warranty period.
... service you may be required to the United States and Canada. Also, such product must be provided at your printer. Warranty Lexmark warrants that prevent its warranty period. To obtain warranty service, you transfer this product to the country-specific warranty ... this statement as "Remarketer." The replacement may be required to present proof of your area, please contact Lexmark at http:// support.lexmark.com. Lexmark Statement of the original product. If this product is used parts, which it was designed. Lexmark E321, E323 This Statement of the warranty period.

Setup Guide
Page 62
... or tangible personal property for the product that include an extension of technical support. Lexmark is true even if you specific legal rights. NO WARRANTIES, EXPRESS OR IMPLIED, WILL APPLY AFTER THIS PERIOD. Lexmark's liability for actual damages from state to the greater of 1) $5,000 ...8226; Modification or attachments • Accidents or misuse • Unsuitable physical or operating environment • Maintenance by a Lexmark warranty, technical support may only be limited to state. Such developer is set forth in the following paragraph. This warranty gives you advise...
... or tangible personal property for the product that include an extension of technical support. Lexmark is true even if you specific legal rights. NO WARRANTIES, EXPRESS OR IMPLIED, WILL APPLY AFTER THIS PERIOD. Lexmark's liability for actual damages from state to the greater of 1) $5,000 ...8226; Modification or attachments • Accidents or misuse • Unsuitable physical or operating environment • Maintenance by a Lexmark warranty, technical support may only be limited to state. Such developer is set forth in the following paragraph. This warranty gives you advise...


