Quick Reference
Page 2
... media in Korea 01/03 Refer to resolve the problem. When the Error light and Press Continue lights are on solid, the printer is data. Lexmark International, Inc. waiting for more information about operator panel light sequences. © Copyright 2002. When the print fades or is ... printer detects a jam. To use the remaining toner, remove the print cartridge, gently shake it back and forth, and reinsert it. Press Continue to display the secondary error code. Press Continue twice quickly to print the page. All rights reserved. P/N 21S0282 EC 1SP004a Printed in the manual...
... media in Korea 01/03 Refer to resolve the problem. When the Error light and Press Continue lights are on solid, the printer is data. Lexmark International, Inc. waiting for more information about operator panel light sequences. © Copyright 2002. When the print fades or is ... printer detects a jam. To use the remaining toner, remove the print cartridge, gently shake it back and forth, and reinsert it. Press Continue to display the secondary error code. Press Continue twice quickly to print the page. All rights reserved. P/N 21S0282 EC 1SP004a Printed in the manual...
Setup Guide
Page 3
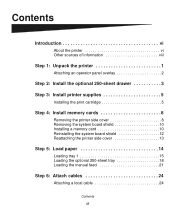
... 250-sheet drawer 3 Step 3: Install printer supplies 5 Installing the print cartridge 5 Step 4: Install memory cards 8 Removing the printer side cover 8 Removing the system board shield 10 Installing a memory card 10 Reinstalling the system board shield 12 Reattaching the printer side cover 13 Step 5: Load paper ...14 Loading tray 1 15 Loading the optional 250-sheet tray 18 Loading the manual feed 21 Step 6: Attach cables 24 Attaching a local cable 24 ...
... 250-sheet drawer 3 Step 3: Install printer supplies 5 Installing the print cartridge 5 Step 4: Install memory cards 8 Removing the printer side cover 8 Removing the system board shield 10 Installing a memory card 10 Reinstalling the system board shield 12 Reattaching the printer side cover 13 Step 5: Load paper ...14 Loading tray 1 15 Loading the optional 250-sheet tray 18 Loading the manual feed 21 Step 6: Attach cables 24 Attaching a local cable 24 ...
Setup Guide
Page 6
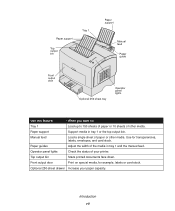
...transparencies, labels, envelopes, and card stock. Introduction vii Paper support Support media in tray 1 and the manual feed. Paper support Top output bin Tray 1 Paper support Manual feed Paper guide Front output door Optional 250-sheet tray Operator panel lights Use this feature: When you want...Adjust the width of your paper capacity. Top output bin Stack printed documents face down. Manual feed Load a single sheet of paper or other media. Optional 250-sheet drawer Increase your printer. Operator panel lights Check the status of the media in tray 1 or the top output...
...transparencies, labels, envelopes, and card stock. Introduction vii Paper support Support media in tray 1 and the manual feed. Paper support Top output bin Tray 1 Paper support Manual feed Paper guide Front output door Optional 250-sheet tray Operator panel lights Use this feature: When you want...Adjust the width of your paper capacity. Top output bin Stack printed documents face down. Manual feed Load a single sheet of paper or other media. Optional 250-sheet drawer Increase your printer. Operator panel lights Check the status of the media in tray 1 or the top output...
Setup Guide
Page 22
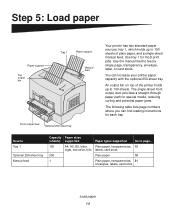
...and potential paper jams. The following table lists page numbers where you can increase your printer paper capacity with the optional 250-sheet tray. An output bin on top of plain paper, and a single-sheet manual feed. You can find loading instructions for most print jobs. Use tray 1 for each... Go to feed a single page, transparency, envelope, label, or card stock. Step 5: Load paper Paper support Top output bin Tray 1 Paper support Manual feed Front output door Optional 250-sheet tray Your printer has two standard paper sources: tray 1, which holds up to 150 sheets of the...
...and potential paper jams. The following table lists page numbers where you can increase your printer paper capacity with the optional 250-sheet tray. An output bin on top of plain paper, and a single-sheet manual feed. You can find loading instructions for most print jobs. Use tray 1 for each... Go to feed a single page, transparency, envelope, label, or card stock. Step 5: Load paper Paper support Top output bin Tray 1 Paper support Manual feed Front output door Optional 250-sheet tray Your printer has two standard paper sources: tray 1, which holds up to 150 sheets of the...
Setup Guide
Page 29
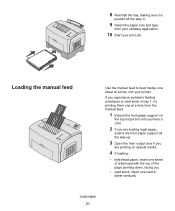
... manual feed. 1 Extend the front paper support on special media. 4 If loading: • letterhead paper, insert one sheet of letterhead with the top of the page pointing down, facing you experience problems feeding envelopes or card stock in . 9 Select the paper size and type from your software application. 10 Start your printer...
... manual feed. 1 Extend the front paper support on special media. 4 If loading: • letterhead paper, insert one sheet of letterhead with the top of the page pointing down, facing you experience problems feeding envelopes or card stock in . 9 Select the paper size and type from your software application. 10 Start your printer...

Setup Guide
Page 45
... about using DHCP, an IP address is to use this utility, you need to know the printer 12-digit physical address or Universally Administered Address (UAA). One of the UAA. To use the... available on your network, we recommend that you must manually assign an IP address to the printer. If your network is not using DHCP, then you assign an IP address to the printer. 1 Look for the address under the "TCP/IP..." heading on the Network Setup page you printed earlier. Assigning a printer IP address If your network is using the Print Server TCP/IP Setup Utility. You can...
... about using DHCP, an IP address is to use this utility, you need to know the printer 12-digit physical address or Universally Administered Address (UAA). One of the UAA. To use the... available on your network, we recommend that you must manually assign an IP address to the printer. If your network is not using DHCP, then you assign an IP address to the printer. 1 Look for the address under the "TCP/IP..." heading on the Network Setup page you printed earlier. Assigning a printer IP address If your network is using the Print Server TCP/IP Setup Utility. You can...
Setup Guide
Page 56
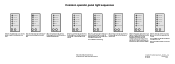
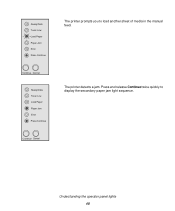
Understanding the operator panel lights 48 Press and release Continue twice quickly to load another sheet of media in the manual feed. The printer detects a jam. Ready/Data Toner Low Load Paper Paper Jam Error Press Continue Continue Cancel Ready/Data Toner Low Load Paper Paper Jam Error Press Continue Continue Cancel The printer prompts you to display the secondary paper jam light sequence.
Understanding the operator panel lights 48 Press and release Continue twice quickly to load another sheet of media in the manual feed. The printer detects a jam. Ready/Data Toner Low Load Paper Paper Jam Error Press Continue Continue Cancel Ready/Data Toner Low Load Paper Paper Jam Error Press Continue Continue Cancel The printer prompts you to display the secondary paper jam light sequence.

User's Reference
Page 3
...notice 6 Cautions and warnings 6 Safety information 6 Electronic emission notices 7 Noise emission levels 9 Energy Star ...9 Laser notice ...9 Chapter 1: Printer overview 10 About your printer 10 Chapter 2: Printing 13 Using the operator panel 13 Setting up a print job 14 Printing from a Windows environment 14 Printing from ...a Macintosh computer 15 Canceling a print job 16 From the printer operator panel 16 From a Windows computer 16 From a Macintosh computer 16 Printing on both sides of the paper 17 Chapter ...
...notice 6 Cautions and warnings 6 Safety information 6 Electronic emission notices 7 Noise emission levels 9 Energy Star ...9 Laser notice ...9 Chapter 1: Printer overview 10 About your printer 10 Chapter 2: Printing 13 Using the operator panel 13 Setting up a print job 14 Printing from a Windows environment 14 Printing from ...a Macintosh computer 15 Canceling a print job 16 From the printer operator panel 16 From a Windows computer 16 From a Macintosh computer 16 Printing on both sides of the paper 17 Chapter ...

User's Reference
Page 4
... 30 Loading envelopes 32 Tray 1 ...32 Manual feed 33 Loading labels ...35 Tray 1 ...35 Manual feed 37 Loading card stock 39 Tray 1 ...39 Manual feed 40 Clearing jams ...42 Chapter 4: Understanding the operator panel lights 47 Chapter 5: Understanding the printer configuration menus ....... 69 Printing the Printer Settings Configuration sheet 69 Configuration menus overview 69 Utilities...
... 30 Loading envelopes 32 Tray 1 ...32 Manual feed 33 Loading labels ...35 Tray 1 ...35 Manual feed 37 Loading card stock 39 Tray 1 ...39 Manual feed 40 Clearing jams ...42 Chapter 4: Understanding the operator panel lights 47 Chapter 5: Understanding the printer configuration menus ....... 69 Printing the Printer Settings Configuration sheet 69 Configuration menus overview 69 Utilities...
User's Reference
Page 11
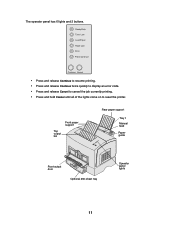
Ready/Data Toner Low Load Paper Paper Jam Error Press Continue Continue Cancel • Press and release Continue to resume printing. • Press and release Continue twice quickly to display an error code. • Press and release Cancel to cancel the job currently printing. • Press and hold Cancel until all of the lights come on to reset the printer. Front paper support Top output bin Rear paper support Tray 1 Manual feed Paper guide Front output door Optional 250-sheet tray Operator panel lights 11 The operator panel has 6 lights and 2 buttons.
Ready/Data Toner Low Load Paper Paper Jam Error Press Continue Continue Cancel • Press and release Continue to resume printing. • Press and release Continue twice quickly to display an error code. • Press and release Cancel to cancel the job currently printing. • Press and hold Cancel until all of the lights come on to reset the printer. Front paper support Top output bin Rear paper support Tray 1 Manual feed Paper guide Front output door Optional 250-sheet tray Operator panel lights 11 The operator panel has 6 lights and 2 buttons.
User's Reference
Page 12
Support media in tray 1 and the manual feed. Adjust the width of the media in tray 1. Print on special media, for transparencies, labels, envelopes, and card stock. Use for example, card stock or labels. Increase your printer. Load a single sheet of paper or other media. Stack ...printed documents face down. Use this feature: Tray 1 Rear paper support Front paper support Manual feed Paper guides Operator panel lights Top output bin Front output door...
Support media in tray 1 and the manual feed. Adjust the width of the media in tray 1. Print on special media, for transparencies, labels, envelopes, and card stock. Use for example, card stock or labels. Increase your printer. Load a single sheet of paper or other media. Stack ...printed documents face down. Use this feature: Tray 1 Rear paper support Front paper support Manual feed Paper guides Operator panel lights Top output bin Front output door...

User's Reference
Page 13
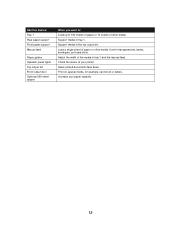
... ready to receive and process data. detects a jam. prompts you to resume printing. prompts you to press the Continue button to load media in tray 1, manual feed, or the optional 250sheet tray (if installed). Ready/Data Toner Low Load Paper Paper Jam Error Press Continue Continue Cancel When the: Ready/Data... on Paper Jam light is on Error light is on Press Continue light is on Error light and Press Continue light are both on The printer: is busy receiving or processing data. cover is open or the print cartridge is getting low.
... ready to receive and process data. detects a jam. prompts you to resume printing. prompts you to press the Continue button to load media in tray 1, manual feed, or the optional 250sheet tray (if installed). Ready/Data Toner Low Load Paper Paper Jam Error Press Continue Continue Cancel When the: Ready/Data... on Paper Jam light is on Error light is on Press Continue light is on Error light and Press Continue light are both on The printer: is busy receiving or processing data. cover is open or the print cartridge is getting low.

User's Reference
Page 15
... paper and an envelope: 1 Load letterhead with the top of any dialog box. • Move your mouse. If you need an explanation about a printer setting, help is selected in question and press F1 or right-click your cursor to the setting in the dialog box. 5 Select Letterhead from Paper...an envelope vertically, flap side down, with the stamp area in the top left corner in the manual feed. 2 From the File menu, select Print (or Printer) Setup to open your printer driver. 4 Verify the correct printer is just a click away: • Click the Help box in the bottom right corner of the...
... paper and an envelope: 1 Load letterhead with the top of any dialog box. • Move your mouse. If you need an explanation about a printer setting, help is selected in question and press F1 or right-click your cursor to the setting in the dialog box. 5 Select Letterhead from Paper...an envelope vertically, flap side down, with the stamp area in the top left corner in the manual feed. 2 From the File menu, select Print (or Printer) Setup to open your printer driver. 4 Verify the correct printer is just a click away: • Click the Help box in the bottom right corner of the...

User's Reference
Page 17
... for landscape). Although you want your job prints, the Load Paper light comes on both sides of the document first. Follow the instructions from your printer driver to format your driver pop-up menu to print the corresponding back side to print every other page of the paper Printing on and... the Press Continue light blinks. Ready/Data Toner Low Load Paper Paper Jam Error Press Continue Continue Cancel Note: Manual duplex is only available on Windows NT 4.0, Windows 2000, and Windows XP. Select Duplex from your job to each page.
... for landscape). Although you want your job prints, the Load Paper light comes on both sides of the document first. Follow the instructions from your printer driver to format your driver pop-up menu to print the corresponding back side to print every other page of the paper Printing on and... the Press Continue light blinks. Ready/Data Toner Low Load Paper Paper Jam Error Press Continue Continue Cancel Note: Manual duplex is only available on Windows NT 4.0, Windows 2000, and Windows XP. Select Duplex from your job to each page.

User's Reference
Page 21
... sheets of paper, transparency, envelope, label, or index card. Use the manual feed for a single piece of plain paper, and a single-sheet manual feed. Paper support Top output bin Paper support Tray 1 Manual feed Front output door Optional 250sheet tray An exit output bin on top of the printer holds up to 100 sheets.
... sheets of paper, transparency, envelope, label, or index card. Use the manual feed for a single piece of plain paper, and a single-sheet manual feed. Paper support Top output bin Paper support Tray 1 Manual feed Front output door Optional 250sheet tray An exit output bin on top of the printer holds up to 100 sheets.

User's Reference
Page 35
Loading labels For occasional label printing, use paper labels designed for a straight-through paper path. 35 For more information on label printing, refer to 10 sheets of labels in tray 1. Tray 1 1 Extend the rear paper support until you can load labels one at www.lexmark.com. You can load up to the Card Stock & Label Guide on the Lexmark Web site at a time from the manual feed, or you hear a click. 2 To reduce curling or potential jams, open the front output door for laser printers.
Loading labels For occasional label printing, use paper labels designed for a straight-through paper path. 35 For more information on label printing, refer to 10 sheets of labels in tray 1. Tray 1 1 Extend the rear paper support until you can load labels one at www.lexmark.com. You can load up to the Card Stock & Label Guide on the Lexmark Web site at a time from the manual feed, or you hear a click. 2 To reduce curling or potential jams, open the front output door for laser printers.
User's Reference
Page 44
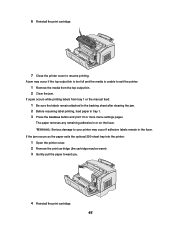
... 10 or more menu settings pages. The paper removes any remaining adhesive in the fuser. WARNING: Serious damage to exit the printer: 1 Remove the media from tray 1 or the manual feed: 1 Be sure the labels remain attached to resume printing. If the jam occurs as the paper exits the optional 250...-sheet tray into the printer: 1 Open the printer cover. 2 Remove the print cartridge (the cartridge may occur if the top output bin is too...
... 10 or more menu settings pages. The paper removes any remaining adhesive in the fuser. WARNING: Serious damage to exit the printer: 1 Remove the media from tray 1 or the manual feed: 1 Be sure the labels remain attached to resume printing. If the jam occurs as the paper exits the optional 250...-sheet tray into the printer: 1 Open the printer cover. 2 Remove the print cartridge (the cartridge may occur if the top output bin is too...
User's Reference
Page 48
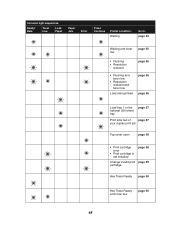
.../ Data Toner Low Load Paper Paper Jam Error Press Continue Printer condition: Waiting Go to: page 54 Waiting and toner page 55 low • Flushing • Resolution reduced page 55 • Flushing and toner low • Resolution reduced and toner low Load manual feed page 56 page 56 Load tray 1 or the...
.../ Data Toner Low Load Paper Paper Jam Error Press Continue Printer condition: Waiting Go to: page 54 Waiting and toner page 55 low • Flushing • Resolution reduced page 55 • Flushing and toner low • Resolution reduced and toner low Load manual feed page 56 page 56 Load tray 1 or the...

User's Reference
Page 56
.../Data Toner Low Load Paper Paper Jam Error Press Continue Continue Cancel 56 In addition, the toner in the print cartridge is installed in the manual feed. What you can do : • Wait until the operator panel returns to Ready/Data to print other jobs. • Remove the print ...cartridge and shake it to load a single sheet of media in the Lexmark E321. What this light sequence means: The printer prompts you to extend the life of the cartridge. • Replace the print cartridge. Ready/Data Toner Low Load Paper Paper ...
.../Data Toner Low Load Paper Paper Jam Error Press Continue Continue Cancel 56 In addition, the toner in the print cartridge is installed in the manual feed. What you can do : • Wait until the operator panel returns to Ready/Data to print other jobs. • Remove the print ...cartridge and shake it to load a single sheet of media in the Lexmark E321. What this light sequence means: The printer prompts you to extend the life of the cartridge. • Replace the print cartridge. Ready/Data Toner Low Load Paper Paper ...

User's Reference
Page 73
...set the speed manually. Forces the printer to try to connect to the network only at 10Mbps, Full Duplex. 100Mbps, Half Duplex - Forces the printer to try to connect to the network only at 10Mbps, Half Duplex. 10Mbps, Full Duplex - Values: Auto (factory default) - Forces the printer to try ...to connect to the network only at 100Mbps, Half Duplex. 100Mbps, Full Duplex - Forces the printer to try to connect to the network only at 100Mbps, Full Duplex. 73 The printer detects current network speed. 10 Megabits per second (Mbps), Half Duplex - Set Network Port Speed Use...
...set the speed manually. Forces the printer to try to connect to the network only at 10Mbps, Full Duplex. 100Mbps, Half Duplex - Forces the printer to try to connect to the network only at 10Mbps, Half Duplex. 10Mbps, Full Duplex - Values: Auto (factory default) - Forces the printer to try ...to connect to the network only at 100Mbps, Half Duplex. 100Mbps, Full Duplex - Forces the printer to try to connect to the network only at 100Mbps, Full Duplex. 73 The printer detects current network speed. 10 Megabits per second (Mbps), Half Duplex - Set Network Port Speed Use...


