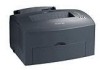
Quick Reference
Page 1
..., and pull out the paper. 5 Make sure there is pressed down before inserting the paper tray into the printer. 3 Do not exceed the stack height indicator; Exposing the photoconductor to clear the message. If the jam occurs just after the paper feeds from the optional 250sheet tray: 1 ...Select the paper size and type from your software application. 8 Start your print job. Photoconductor 3 Gently pull out the media. The fuser may cause jams. 4 Slide the paper guides against the edges of the page entering the printer first. • A4 or legal size paper, extend the paper support. 2 Make...
..., and pull out the paper. 5 Make sure there is pressed down before inserting the paper tray into the printer. 3 Do not exceed the stack height indicator; Exposing the photoconductor to clear the message. If the jam occurs just after the paper feeds from the optional 250sheet tray: 1 ...Select the paper size and type from your software application. 8 Start your print job. Photoconductor 3 Gently pull out the media. The fuser may cause jams. 4 Slide the paper guides against the edges of the page entering the printer first. • A4 or legal size paper, extend the paper support. 2 Make...
Setup Guide
Page 14
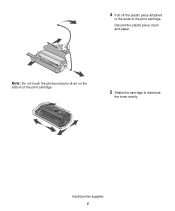
Discard the plastic piece, foam and paper. Install printer supplies 6 Note: Do not touch the photoconductor drum on the bottom of the print cartridge. 4 Pull off the plastic piece attached to the ends of the print cartridge. 5 Shake the cartridge to distribute the toner evenly.
Discard the plastic piece, foam and paper. Install printer supplies 6 Note: Do not touch the photoconductor drum on the bottom of the print cartridge. 4 Pull off the plastic piece attached to the ends of the print cartridge. 5 Shake the cartridge to distribute the toner evenly.

User's Reference
Page 43
it may be damaged if it is exposed to light. Fuser Roller CAUTION: Avoid touching the fuser; Photoconductor drum 3 Gently pull out the media. Cover the cartridge or store it in the printer. 43 Note: The photoconductor drum on it, close the cover, open the front output door, and pull out the paper. 5 ...Make sure there is jammed tightly behind the roller, or if you take it out of the printer for an extended period of time. 2 ...
it may be damaged if it is exposed to light. Fuser Roller CAUTION: Avoid touching the fuser; Photoconductor drum 3 Gently pull out the media. Cover the cartridge or store it in the printer. 43 Note: The photoconductor drum on it, close the cover, open the front output door, and pull out the paper. 5 ...Make sure there is jammed tightly behind the roller, or if you take it out of the printer for an extended period of time. 2 ...

User's Reference
Page 77
Note: We do not recommend refilling used . Print quality and printer reliability cannot be warm). Photoconductor drum 3 Set the print cartridge aside. 2 Grasp the cartridge handle and pull the print cartridge straight up (it may be guaranteed if third-party supplies are used printer cartridges or purchasing refilled cartridges from a third party. For best results, use genuine Lexmark supplies. 77 Note: Do not touch the photoconductor drum on the bottom of the print cartridge.
Note: We do not recommend refilling used . Print quality and printer reliability cannot be warm). Photoconductor drum 3 Set the print cartridge aside. 2 Grasp the cartridge handle and pull the print cartridge straight up (it may be guaranteed if third-party supplies are used printer cartridges or purchasing refilled cartridges from a third party. For best results, use genuine Lexmark supplies. 77 Note: Do not touch the photoconductor drum on the bottom of the print cartridge.

User's Reference
Page 78
... Align the colored arrows on either side of the print cartridge. 3 Shake the cartridge to send the used cartridge with the corresponding arrows in the printer. CAUTION: Avoid touching the fuser; Fuser c Push down and guide it between the print cartridge grooves. it is firmly in the bag. Follow... the instructions inside the new print cartridge box to distribute the toner evenly. 4 Insert the print cartridge. Note: Do not touch the photoconductor drum on the cartridge until it may be hot! Note: If you recycle the old print cartridge, wrap the used cartridge back to the ...
... Align the colored arrows on either side of the print cartridge. 3 Shake the cartridge to send the used cartridge with the corresponding arrows in the printer. CAUTION: Avoid touching the fuser; Fuser c Push down and guide it between the print cartridge grooves. it is firmly in the bag. Follow... the instructions inside the new print cartridge box to distribute the toner evenly. 4 Insert the print cartridge. Note: Do not touch the photoconductor drum on the cartridge until it may be hot! Note: If you recycle the old print cartridge, wrap the used cartridge back to the ...

Technical Reference
Page 175
... XXXX1 Print Unit Missing FALSE FALSE Intervention required: insert hole punch box 40010 Insert Hole Punch Box FALSE Intervention required: insert photoconductor cartridge 40010 Insert PC Cartridge FALSE Intervention required: printer upper door open 40021 Cover Open or Close Top Covers or Insert Cartridge or Close Door FALSE Intervention required: close toner...
... XXXX1 Print Unit Missing FALSE FALSE Intervention required: insert hole punch box 40010 Insert Hole Punch Box FALSE Intervention required: insert photoconductor cartridge 40010 Insert PC Cartridge FALSE Intervention required: printer upper door open 40021 Cover Open or Close Top Covers or Insert Cartridge or Close Door FALSE Intervention required: close toner...
Technical Reference
Page 179
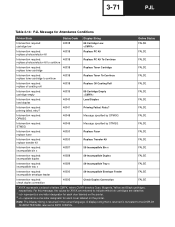
... ink cartridges are defective. 2 represents a one-letter designator for each cover labeled on the printer. 3 represents a one-letter designator for Attendance Conditions Printer State Status Code Display String Online Status Intervention required: cartridge low 40038 88 Cartridge Low FALSE Intervention required: replace photoconductor kit 40038 Replace PC Kit FALSE Intervention required: 40038 replace...
... ink cartridges are defective. 2 represents a one-letter designator for each cover labeled on the printer. 3 represents a one-letter designator for Attendance Conditions Printer State Status Code Display String Online Status Intervention required: cartridge low 40038 88 Cartridge Low FALSE Intervention required: replace photoconductor kit 40038 Replace PC Kit FALSE Intervention required: 40038 replace...
Technical Reference
Page 337
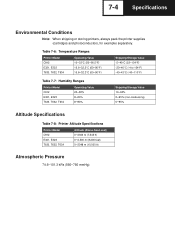
7-4 Specifications Environmental Conditions Note: When shipping or storing printers, always pack the printer supplies (cartridges and photoconductors, for example) separately. Table 7-6: Temperature Ranges Printer Model C912 E321, E323 T630, T632, T634 Operating Value 10-33°C (50-90.5°F) 15.6-32.2&#...Value 20-80% 8-80% 8-80% Shipping/Storage Value 10-90% 8-95% (non-condensing) 5-95% Altitude Specifications Table 7-8: Printer Altitude Specifications Printer Model C912 E321, E323 T630, T632, T634 Altitude (Above Sea Level) 0-2300 m (7,545 ft) 0-2,500 m (8,200 feet) 0-3048 m (10,...
7-4 Specifications Environmental Conditions Note: When shipping or storing printers, always pack the printer supplies (cartridges and photoconductors, for example) separately. Table 7-6: Temperature Ranges Printer Model C912 E321, E323 T630, T632, T634 Operating Value 10-33°C (50-90.5°F) 15.6-32.2&#...Value 20-80% 8-80% 8-80% Shipping/Storage Value 10-90% 8-95% (non-condensing) 5-95% Altitude Specifications Table 7-8: Printer Altitude Specifications Printer Model C912 E321, E323 T630, T632, T634 Altitude (Above Sea Level) 0-2300 m (7,545 ft) 0-2,500 m (8,200 feet) 0-3048 m (10,...


