
User's Guide
Page 3
... operator panel 7 Chapter 3: Canceling a print job 9 From the printer operator panel 9 From a Windows computer 9 From a Macintosh computer 9 Chapter 4: Setting up a print job 10 Printing from a Windows environment 10 Printing from a Macintosh computer 11 Chapter 5: Choosing the right print media 13 Media types and sizes 13 Chapter 6: Printer media sources 15 Chapter 7: Loading paper 17 In tray...
... operator panel 7 Chapter 3: Canceling a print job 9 From the printer operator panel 9 From a Windows computer 9 From a Macintosh computer 9 Chapter 4: Setting up a print job 10 Printing from a Windows environment 10 Printing from a Macintosh computer 11 Chapter 5: Choosing the right print media 13 Media types and sizes 13 Chapter 6: Printer media sources 15 Chapter 7: Loading paper 17 In tray...

User's Guide
Page 12
... from a Windows environment For example, let's say you have plain paper loaded in tray 1, but you want to print a letter on the application) to change the paper setting to Letterhead, and then click OK. 6 Click OK or Print to send the job to print. 10 Just choose the printer setting in your printer driver...
... from a Windows environment For example, let's say you have plain paper loaded in tray 1, but you want to print a letter on the application) to change the paper setting to Letterhead, and then click OK. 6 Click OK or Print to send the job to print. 10 Just choose the printer setting in your printer driver...
User's Guide
Page 15
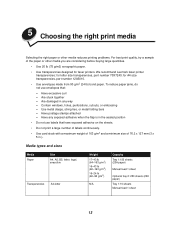
We recommend Lexmark laser printer transparencies: for A4 size transparencies, part number 12A5010. • Use...150 sheets (20# paper) Manual feed:1 sheet Optional tray 2: 250 sheets (20# paper) Tray 1:10 sheets Manual feed:1 sheet 13 Contain windows, holes, perforations, cutouts, or embossing - Have any exposed adhesive when the flap is in the sealed .... • Use 20 lb (75 g/m2) xerographic paper. • Use transparencies designed for laser printers. Have postage stamps attached - for letter size transparencies, part number 70X7240; Use metal clasps, string ties, or ...
We recommend Lexmark laser printer transparencies: for A4 size transparencies, part number 12A5010. • Use...150 sheets (20# paper) Manual feed:1 sheet Optional tray 2: 250 sheets (20# paper) Tray 1:10 sheets Manual feed:1 sheet 13 Contain windows, holes, perforations, cutouts, or embossing - Have any exposed adhesive when the flap is in the sealed .... • Use 20 lb (75 g/m2) xerographic paper. • Use transparencies designed for laser printers. Have postage stamps attached - for letter size transparencies, part number 70X7240; Use metal clasps, string ties, or ...

User's Guide
Page 93
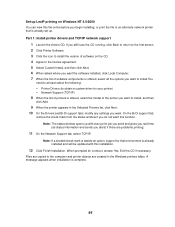
.... The DHCP server or a forwarding agent must be attached to the same IP subnet as 9.10.8.250) IP address of WINS server If you are automatically assigned. Ensure that the DHCP server ...IP Setup Utility The Print Server TCP/IP Setup Utility is a simple way to physically visit the printers. You can use to manually assign the address, such as your workstation. DHCP This method automatically...of router (such as the print server. The print server must be on a Windows 95/98/Me, Windows NT 4.0, or Windows 2000 workstation. In other network devices to find it on the network. •...
.... The DHCP server or a forwarding agent must be attached to the same IP subnet as 9.10.8.250) IP address of WINS server If you are automatically assigned. Ensure that the DHCP server ...IP Setup Utility The Print Server TCP/IP Setup Utility is a simple way to physically visit the printers. You can use to manually assign the address, such as your workstation. DHCP This method automatically...of router (such as the print server. The print server must be on a Windows 95/98/Me, Windows NT 4.0, or Windows 2000 workstation. In other network devices to find it on the network. •...
User's Guide
Page 96
... copied to an alternate network printer that environment is already set up. Printer Drivers (to install, and then click Add. 9 When the printer appears in the Selected Printers list, click Next. 10 On the Drivers and Bi-Di support tabs, modify any settings you alerts if there are created in the Windows printers folder. Note: If a shaded...
... copied to an alternate network printer that environment is already set up. Printer Drivers (to install, and then click Add. 9 When the printer appears in the Selected Printers list, click Next. 10 On the Drivers and Bi-Di support tabs, modify any settings you alerts if there are created in the Windows printers folder. Note: If a shaded...
User's Guide
Page 98
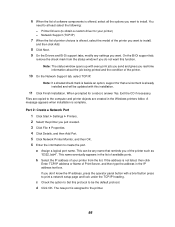
... real-time information about the job being printed and the condition of the printer. 10 On the Network Support tab, select TCP/IP. A message appears when installation is complete. b Select the IP address of your printer) - Note: The status window opens up with this installation. 11 Click Finish Installation. c Check the.... 9 On the Drivers and Bi-Di support tabs, modify any name that reminds you want to obtain a custom driver for your printer from the status window if you want to install. This can be updated with every print job you send and gives you want. On the Bi-Di support...
... real-time information about the job being printed and the condition of the printer. 10 On the Network Support tab, select TCP/IP. A message appears when installation is complete. b Select the IP address of your printer) - Note: The status window opens up with this installation. 11 Click Finish Installation. c Check the.... 9 On the Drivers and Bi-Di support tabs, modify any name that reminds you want to obtain a custom driver for your printer from the status window if you want to install. This can be updated with every print job you send and gives you want. On the Bi-Di support...

User's Guide
Page 99
...least select the following : a Click Start Settings Printers. b Click File Properties. Install a shared printer on a Windows NT 4.0/2000 server You can view this type of printing, you must install the printer on a server and set it up . Printer Drivers (to centrally manage network printers. On the Bi-Di support tab, remove the...of software on the General tab. 7 Press the operator panel with a brief button press to install, and then click Add. 9 When the printer appears in the Selected Printers list, click Next. 10 On the Drivers and Bi-Di support tabs, modify any settings you want.
...least select the following : a Click Start Settings Printers. b Click File Properties. Install a shared printer on a Windows NT 4.0/2000 server You can view this type of printing, you must install the printer on a server and set it up . Printer Drivers (to centrally manage network printers. On the Bi-Di support tab, remove the...of software on the General tab. 7 Press the operator panel with a brief button press to install, and then click Add. 9 When the printer appears in the Selected Printers list, click Next. 10 On the Drivers and Bi-Di support tabs, modify any settings you want.

Technical Reference
Page 6
... 6-13 Creating a Partition 6-14 Enabling Job Buffering 6-14 Disabling Job Buffering 6-15 Recovering from a Power Loss 6-15 Printer Specifications 7-1 Airflow Requirement 7-1 Noise Emission Levels 7-1 Electrical Specifications 7-2 Power Requirements 7-3 Physical Specifications 7-5 Clearance Requirements 7-6 Environmental...First Page 7-10 Printer Interfaces 8-1 Setting Up the Communications Port 8-2 Setting Up the Communications Port Using Windows 95/98/Me 8-2 Setting Up the Communications Port Using Windows NT 4.0 8-3 Setting Up the Communications Port Using Windows 2000 8-4...
... 6-13 Creating a Partition 6-14 Enabling Job Buffering 6-14 Disabling Job Buffering 6-15 Recovering from a Power Loss 6-15 Printer Specifications 7-1 Airflow Requirement 7-1 Noise Emission Levels 7-1 Electrical Specifications 7-2 Power Requirements 7-3 Physical Specifications 7-5 Clearance Requirements 7-6 Environmental...First Page 7-10 Printer Interfaces 8-1 Setting Up the Communications Port 8-2 Setting Up the Communications Port Using Windows 95/98/Me 8-2 Setting Up the Communications Port Using Windows NT 4.0 8-3 Setting Up the Communications Port Using Windows 2000 8-4...

Technical Reference
Page 28
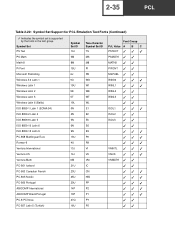
Table 2-10: Key 26 PCL Emulation Symbol Sets Windows 3.1 Latin 5 Windows 3.1 Latin 2 Windows 3.1 Latin 1 Windows 3.0 Latin 1 6J PB MSPUBL Microsoft Publishing 13J VI VNINTL Ventura International 11U PD PC8DN PC-8 Danish/Norwegian (437N) PC-8, Code Page 437 PC-858 Multilingual... Roman Italic Times New Roman Bold Times New Roman BoldItalic Arial Arial Italic Arial Bold Arial Bold Italic Line Printer 16 2-16 PCL 15U PI PIFONT Pi font Selecting Symbol Sets for Lexmark E320 To determine if a font or typeface supports a symbol set, see the complete listing of PCL emulation fonts and ...
Table 2-10: Key 26 PCL Emulation Symbol Sets Windows 3.1 Latin 5 Windows 3.1 Latin 2 Windows 3.1 Latin 1 Windows 3.0 Latin 1 6J PB MSPUBL Microsoft Publishing 13J VI VNINTL Ventura International 11U PD PC8DN PC-8 Danish/Norwegian (437N) PC-8, Code Page 437 PC-858 Multilingual... Roman Italic Times New Roman Bold Times New Roman BoldItalic Arial Arial Italic Arial Bold Arial Bold Italic Line Printer 16 2-16 PCL 15U PI PIFONT Pi font Selecting Symbol Sets for Lexmark E320 To determine if a font or typeface supports a symbol set, see the complete listing of PCL emulation fonts and ...

Technical Reference
Page 29
2-17 PCL 19L WL Windows Baltic 6N E6 ISO 8859-10 Latin 6 26U PV PC-775 Baltic 9J PU PC-1004 OS/2 21U IC PC-...PC-857 Latin 5, Turkey 8T TK Turkish-8 18U P3 PC-853 Latin 3 24Q PL PC-8 Polish Mazovia 9R WR Windows Cyrillic 10N ER ISO 8859-5 Latin/Cyrillic 3R CP PC-866 Cyrillic 10R PK PC-855 Cyrillic 12R RG Russian-GOST... 13R BG PC-8 Bulgarian 14R CU PC Ukrainian 9G WG Windows Greek 12N EG ISO 8859-7 Latin/Greek 11G IG PC-869 Greece 10G PG PC-851 Greece 12G GK PC...Bold Times New Roman BoldItalic Arial Arial Italic Arial Bold Arial Bold Italic Line Printer 16
2-17 PCL 19L WL Windows Baltic 6N E6 ISO 8859-10 Latin 6 26U PV PC-775 Baltic 9J PU PC-1004 OS/2 21U IC PC-...PC-857 Latin 5, Turkey 8T TK Turkish-8 18U P3 PC-853 Latin 3 24Q PL PC-8 Polish Mazovia 9R WR Windows Cyrillic 10N ER ISO 8859-5 Latin/Cyrillic 3R CP PC-866 Cyrillic 10R PK PC-855 Cyrillic 12R RG Russian-GOST... 13R BG PC-8 Bulgarian 14R CU PC Ukrainian 9G WG Windows Greek 12N EG ISO 8859-7 Latin/Greek 11G IG PC-869 Greece 10G PG PC-851 Greece 12G GK PC...Bold Times New Roman BoldItalic Arial Arial Italic Arial Bold Arial Bold Italic Line Printer 16

Technical Reference
Page 35
...Italic Garamond Antiqua Garamond Kursiv Garamond Halbfett Garamond Kursiv Halbfett CG Omega 2-23 PCL 19L WL Windows Baltic 6N E6 ISO 8859-10 Latin 6 26U PV PC-775 Baltic 9J PU PC-1004 OS/2 21U IC PC-861...Latin 5, Turkey 8T TK Turkish-8 18U P3 PC-853 Latin 3 24Q PL PC-8 Polish Mazovia 9R WR Windows Cyrillic 10N ER ISO 8859-5 Latin/Cyrillic 3R CP PC-866 Cyrillic 10R PK PC-855 Cyrillic 12R RG Russian...-GOST 13R BG PC-8 Bulgarian 14R CU PC Ukrainian 9G WG Windows Greek 12N EG ISO 8859-7 Latin/Greek 11G IG PC-869 Greece 10G PG PC-851 Greece 12G ...
...Italic Garamond Antiqua Garamond Kursiv Garamond Halbfett Garamond Kursiv Halbfett CG Omega 2-23 PCL 19L WL Windows Baltic 6N E6 ISO 8859-10 Latin 6 26U PV PC-775 Baltic 9J PU PC-1004 OS/2 21U IC PC-861...Latin 5, Turkey 8T TK Turkish-8 18U P3 PC-853 Latin 3 24Q PL PC-8 Polish Mazovia 9R WR Windows Cyrillic 10N ER ISO 8859-5 Latin/Cyrillic 3R CP PC-866 Cyrillic 10R PK PC-855 Cyrillic 12R RG Russian...-GOST 13R BG PC-8 Bulgarian 14R CU PC Ukrainian 9G WG Windows Greek 12N EG ISO 8859-7 Latin/Greek 11G IG PC-869 Greece 10G PG PC-851 Greece 12G ...

Technical Reference
Page 36
...Roman Bold Times New Roman BoldItalic Arial Arial Italic Arial Bold Arial Bold Italic Line Printer 16 2-24 PCL 19L WL Windows Baltic 6N E6 ISO 8859-10 Latin 6 26U PV PC-775 Baltic 9J PU PC-1004 OS/2 21U IC ...-857 Latin 5, Turkey 8T TK Turkish-8 18U P3 PC-853 Latin 3 24Q PL PC-8 Polish Mazovia 9R WR Windows Cyrillic 10N ER ISO 8859-5 Latin/Cyrillic 3R CP PC-866 Cyrillic 10R PK PC-855 Cyrillic 12R RG Russian-GOST... 13R BG PC-8 Bulgarian 14R CU PC Ukrainian 9G WG Windows Greek 12N EG ISO 8859-7 Latin/Greek 11G IG PC-869 Greece 10G PG PC-851 Greece 12G GK ...
...Roman Bold Times New Roman BoldItalic Arial Arial Italic Arial Bold Arial Bold Italic Line Printer 16 2-24 PCL 19L WL Windows Baltic 6N E6 ISO 8859-10 Latin 6 26U PV PC-775 Baltic 9J PU PC-1004 OS/2 21U IC ...-857 Latin 5, Turkey 8T TK Turkish-8 18U P3 PC-853 Latin 3 24Q PL PC-8 Polish Mazovia 9R WR Windows Cyrillic 10N ER ISO 8859-5 Latin/Cyrillic 3R CP PC-866 Cyrillic 10R PK PC-855 Cyrillic 12R RG Russian-GOST... 13R BG PC-8 Bulgarian 14R CU PC Ukrainian 9G WG Windows Greek 12N EG ISO 8859-7 Latin/Greek 11G IG PC-869 Greece 10G PG PC-851 Greece 12G GK ...
Technical Reference
Page 47
Symbol Set PS Text PS Math Math-8 Pi Font Microsoft Publishing Windows 3.0 Latin 1 Windows Latin 1 Windows Latin 2 Windows Latin 5 Windows Latin 6 (Baltic) ISO 8859-1 Latin 1 (ECMA-94) ISO 8859-2 Latin 2 ISO 8859-9 Latin 5 ISO 8859-10 Latin 6 ISO 8859-15 Latin 9 PC-858 Multilingual Euro Roman-9 Ventura International Ventura US Ventura Math PC-861 Iceland PC-863...
Symbol Set PS Text PS Math Math-8 Pi Font Microsoft Publishing Windows 3.0 Latin 1 Windows Latin 1 Windows Latin 2 Windows Latin 5 Windows Latin 6 (Baltic) ISO 8859-1 Latin 1 (ECMA-94) ISO 8859-2 Latin 2 ISO 8859-9 Latin 5 ISO 8859-10 Latin 6 ISO 8859-15 Latin 9 PC-858 Multilingual Euro Roman-9 Ventura International Ventura US Ventura Math PC-861 Iceland PC-863...

Technical Reference
Page 57
Symbol Set PS Math Math-8 Pi Font Microsoft Publishing Windows 3.0 Latin 1 Windows Latin 1 Windows Latin 2 Windows Latin 5 Windows Latin 6 (Baltic) ISO 8859-1 Latin 1 (ECMA-94) ISO 8859-2 Latin 2 ISO 8859-9 Latin 5 ISO 8859-10 Latin 6 ISO 8859-15 Latin 9 PC-858 Multilingual Euro Roman-9 Ventura International Ventura US Ventura Math PC-861 Iceland PC-863 Canadian French...
Symbol Set PS Math Math-8 Pi Font Microsoft Publishing Windows 3.0 Latin 1 Windows Latin 1 Windows Latin 2 Windows Latin 5 Windows Latin 6 (Baltic) ISO 8859-1 Latin 1 (ECMA-94) ISO 8859-2 Latin 2 ISO 8859-9 Latin 5 ISO 8859-10 Latin 6 ISO 8859-15 Latin 9 PC-858 Multilingual Euro Roman-9 Ventura International Ventura US Ventura Math PC-861 Iceland PC-863 Canadian French...
Technical Reference
Page 60
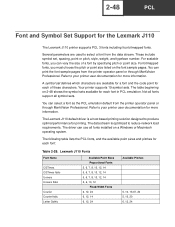
...the Lexmark J110 The Lexmark J110 printer supports PCL 3 fonts including four...Lexmark J110 default driver is optimized to your printer user documentation for each font: Table 2-28: Lexmark... J110 Fonts Font Name CGTimes CGTimes Italic Univers Univers Italic Courier Courier Italic Letter Gothic Available Point Sizes Proportional Fonts 5, 6, 7, 8, 10, 12, 14 5, 6, 7, 8, 10, 12, 14 5, 6, 7, 8, 10, 12, 14 5, 6, 10.... Refer to select a font from the printer operator panel or through MarkVision Professional. Several parameters...
...the Lexmark J110 The Lexmark J110 printer supports PCL 3 fonts including four...Lexmark J110 default driver is optimized to your printer user documentation for each font: Table 2-28: Lexmark... J110 Fonts Font Name CGTimes CGTimes Italic Univers Univers Italic Courier Courier Italic Letter Gothic Available Point Sizes Proportional Fonts 5, 6, 7, 8, 10, 12, 14 5, 6, 7, 8, 10, 12, 14 5, 6, 7, 8, 10, 12, 14 5, 6, 10.... Refer to select a font from the printer operator panel or through MarkVision Professional. Several parameters...
Technical Reference
Page 214
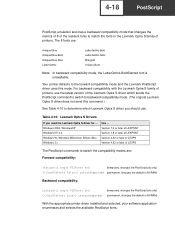
... setsystemparams (permanent, changes the default in the Lexmark Optra S family of printers. Your printer defaults to the forward compatibility mode and the Lexmark PostScript driver uses this command.) See Table 4-10 to determine which sends the PostScript command to switch...-BoldSlanted font is unavailable. Windows 2000, WindowsXP Windows NT 4.0 Windows 9x, Windows Millennium Edition (Me) Windows 3.x Use ... Table 4-10: Lexmark Optra S Drivers If you should use the latest version of the Lexmark Optra S driver which Lexmark Optra S driver you need the Lexmark Optra S driver for ......
... setsystemparams (permanent, changes the default in the Lexmark Optra S family of printers. Your printer defaults to the forward compatibility mode and the Lexmark PostScript driver uses this command.) See Table 4-10 to determine which sends the PostScript command to switch...-BoldSlanted font is unavailable. Windows 2000, WindowsXP Windows NT 4.0 Windows 9x, Windows Millennium Edition (Me) Windows 3.x Use ... Table 4-10: Lexmark Optra S Drivers If you should use the latest version of the Lexmark Optra S driver which Lexmark Optra S driver you need the Lexmark Optra S driver for ......

Technical Reference
Page 340
...Ports and click the + once to expand the list of the screen. Instructions for Xon/Xoff protocol. Setting Up the Communications Port Using Windows 95/98/Me In your communications port in the application you are as follows. To do this specific port displays. For example, if ...you select the COM1 port, then the Communications Port [COM1] Properties screen displays. 9 Select the Port Settings tab. 10 Fill out the fields for the following printer settings to configure. 8 Click the Properties button at the bottom of available Ports. 7 Select the communications port you want DTR ...
...Ports and click the + once to expand the list of the screen. Instructions for Xon/Xoff protocol. Setting Up the Communications Port Using Windows 95/98/Me In your communications port in the application you are as follows. To do this specific port displays. For example, if ...you select the COM1 port, then the Communications Port [COM1] Properties screen displays. 9 Select the Port Settings tab. 10 Fill out the fields for the following printer settings to configure. 8 Click the Properties button at the bottom of available Ports. 7 Select the communications port you want DTR ...

Technical Reference
Page 342
..., if you select the COM1 port, then the Communications Port [COM1] Properties screen displays. 9 Select the Port Settings tab. 10 Fill out the fields for the following printer settings to make them match your Windows 2000 application: 1 On the Menu bar, click Start. 2 Click Settings. 3 Click Control Panel. The System Properties screen displays...
..., if you select the COM1 port, then the Communications Port [COM1] Properties screen displays. 9 Select the Port Settings tab. 10 Fill out the fields for the following printer settings to make them match your Windows 2000 application: 1 On the Menu bar, click Start. 2 Click Settings. 3 Click Control Panel. The System Properties screen displays...

Technical Reference
Page 343
...COM1] Properties screen displays. 8 Select the Port Settings tab. 9 Fill out the fields for the following printer settings to make them match your Windows XP application: 1 On the Menu bar, click Start. 2 Click Control Panel. 8-5 Interfaces Setting Up the Communications ...printer settings: • Bits per second • Data bits • Parity • Stop bits • Flow Control Note: For Flow Control, select Hardware if you want DTR protocol or Xon/Xoff for this specific port displays. The Communications Port Properties screen for Xon/Xoff protocol. 10 Click OK. 11 Close all windows...
...COM1] Properties screen displays. 8 Select the Port Settings tab. 9 Fill out the fields for the following printer settings to make them match your Windows XP application: 1 On the Menu bar, click Start. 2 Click Control Panel. 8-5 Interfaces Setting Up the Communications ...printer settings: • Bits per second • Data bits • Parity • Stop bits • Flow Control Note: For Flow Control, select Hardware if you want DTR protocol or Xon/Xoff for this specific port displays. The Communications Port Properties screen for Xon/Xoff protocol. 10 Click OK. 11 Close all windows...


