

Quick Reference
Page 5
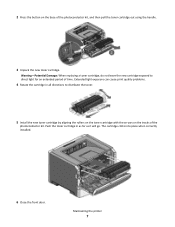
... feeder while the printer is the unit housing the toner cartridge and photoconductor kit. 2 Standard exit bin 3 Front door 4 Manual feeder door 5 Standard 250-sheet tray (Tray 1) 6 Optional tray (Tray 2) 7 Rear door Understanding jam lights and access locations The following illustration shows possible jam areas...messages and provides brief instructions for the light to access jam areas. On - Clearing jams Avoiding jams The following : • Remove Tray 1. • Open the front door, and then remove the photoconductor kit and toner cartridge unit. 201.yy Paper jam...
... feeder while the printer is the unit housing the toner cartridge and photoconductor kit. 2 Standard exit bin 3 Front door 4 Manual feeder door 5 Standard 250-sheet tray (Tray 1) 6 Optional tray (Tray 2) 7 Rear door Understanding jam lights and access locations The following illustration shows possible jam areas...messages and provides brief instructions for the light to access jam areas. On - Clearing jams Avoiding jams The following : • Remove Tray 1. • Open the front door, and then remove the photoconductor kit and toner cartridge unit. 201.yy Paper jam...

Maintenance Guide
Page 5
... model, the printer issues a message or a light sequence to redistribute toner. 3 Reinsert the cartridge and continue printing. Note: Repeat this time, order a photoconductor kit. Maintaining the printer 5 Ordering toner cartridges When 88 Toner is low appears or when the print becomes faded...kit by printing a network setup page. Part name Regular cartridge Lexmark Return Program Cartridge For the US and Canada Toner cartridge E260A21A E260A11A For Europe, the Middle East, and Africa Toner cartridge E260A21E E260A11E For the Asia Pacific Region, including Australia, New...
... model, the printer issues a message or a light sequence to redistribute toner. 3 Reinsert the cartridge and continue printing. Note: Repeat this time, order a photoconductor kit. Maintaining the printer 5 Ordering toner cartridges When 88 Toner is low appears or when the print becomes faded...kit by printing a network setup page. Part name Regular cartridge Lexmark Return Program Cartridge For the US and Canada Toner cartridge E260A21A E260A11A For Europe, the Middle East, and Africa Toner cartridge E260A21E E260A11E For the Asia Pacific Region, including Australia, New...

Maintenance Guide
Page 6
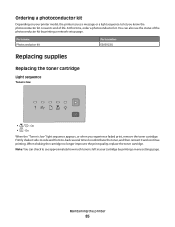
...longer improves the print quality, replace the toner cartridge. To replace the toner cartridge: 1 Open the front door by printing a menu settings page. Maintaining the printer 6 Part name Photoconductor kit Replacing supplies Replacing the toner cartridge Light sequence Toner is low Part number E260X22G • ...‑ On • ‑ On When the "Toner is left in your cartridge by pressing the button on the left ...
...longer improves the print quality, replace the toner cartridge. To replace the toner cartridge: 1 Open the front door by printing a menu settings page. Maintaining the printer 6 Part name Photoconductor kit Replacing supplies Replacing the toner cartridge Light sequence Toner is low Part number E260X22G • ...‑ On • ‑ On When the "Toner is left in your cartridge by pressing the button on the left ...
Maintenance Guide
Page 7
...on the tracks of the photoconductor kit, and then pull the toner cartridge out using the handle. 3 Unpack the new toner cartridge. The cartridge clicks into place when correctly installed. 6 Close the front door. Extended light exposure can cause print quality problems. 4 Rotate the cartridge in ...as far as it will go. Push the toner cartridge in all directions to direct light for an extended period of time. Maintaining the printer 7 ...
...on the tracks of the photoconductor kit, and then pull the toner cartridge out using the handle. 3 Unpack the new toner cartridge. The cartridge clicks into place when correctly installed. 6 Close the front door. Extended light exposure can cause print quality problems. 4 Rotate the cartridge in ...as far as it will go. Push the toner cartridge in all directions to direct light for an extended period of time. Maintaining the printer 7 ...
User Guide
Page 2
... environmental impact 26 Saving paper and toner...26 Using recycled paper and other office papers ...26 Conserving supplies...26 Saving energy...27 Adjusting Power Saver...27 Recycling...27 Recycling Lexmark products...28 Recycling Lexmark packaging...28 Returning Lexmark cartridges for the printer...10 Printer ...Finding information about the printer...9 Selecting a location for reuse or recycling...28 Interpreting the printer control panel lights 29 Understanding the printer control panel light sequences 29 Understanding the primary light sequences...29 Understanding the secondary error...
... environmental impact 26 Saving paper and toner...26 Using recycled paper and other office papers ...26 Conserving supplies...26 Saving energy...27 Adjusting Power Saver...27 Recycling...27 Recycling Lexmark products...28 Recycling Lexmark packaging...28 Returning Lexmark cartridges for the printer...10 Printer ...Finding information about the printer...9 Selecting a location for reuse or recycling...28 Interpreting the printer control panel lights 29 Understanding the printer control panel light sequences 29 Understanding the primary light sequences...29 Understanding the secondary error...
User Guide
Page 5
...the factory default settings...92 Clearing jams 93 Avoiding jams...93 Accessing jam areas...93 Understanding jam lights and access locations...94 Clearing jams behind the photoconductor kit and toner cartridge 98 Clearing jams from the standard exit bin...100 Clearing jams from Tray 1...100 Clearing jams... cartridge ...107 58 Too many flash options installed ...107 58 Too many trays attached ...108 59 Incompatible tray ...108 88 Replace toner ...108 Solving basic printer problems...108 Solving printing problems...109 Jobs do not print...109 Multiple-language PDFs do not print...110 Job...
...the factory default settings...92 Clearing jams 93 Avoiding jams...93 Accessing jam areas...93 Understanding jam lights and access locations...94 Clearing jams behind the photoconductor kit and toner cartridge 98 Clearing jams from the standard exit bin...100 Clearing jams from Tray 1...100 Clearing jams... cartridge ...107 58 Too many flash options installed ...107 58 Too many trays attached ...108 59 Incompatible tray ...108 88 Replace toner ...108 Solving basic printer problems...108 Solving printing problems...109 Jobs do not print...109 Multiple-language PDFs do not print...110 Job...
User Guide
Page 6
...or quits after it is installed 112 Drawers...112 Memory card ...113 Solving paper feed problems...113 Paper frequently jams ...113 Paper jam lights remain on after jam is cleared ...113 Page that jammed does not reprint after the jam is cleared 114 Solving print quality problems.........116 Incorrect margins...117 Paper curl...117 Print is too dark...117 Print is too light ...118 Skewed print...119 Toner fog or background shading appears on the page 119 Toner rubs off...119 Toner specks...120 Transparency print quality is poor...120 Streaked horizontal lines...121 Streaked vertical lines ...
...or quits after it is installed 112 Drawers...112 Memory card ...113 Solving paper feed problems...113 Paper frequently jams ...113 Paper jam lights remain on after jam is cleared ...113 Page that jammed does not reprint after the jam is cleared 114 Solving print quality problems.........116 Incorrect margins...117 Paper curl...117 Print is too dark...117 Print is too light ...118 Skewed print...119 Toner fog or background shading appears on the page 119 Toner rubs off...119 Toner specks...120 Transparency print quality is poor...120 Streaked horizontal lines...121 Streaked vertical lines ...
User Guide
Page 15
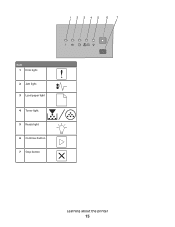
Item 1 Error light 2 Jam light 3 Load paper light 4 Toner light 5 Ready light 6 Continue button 7 Stop button Learning about the printer 15
Item 1 Error light 2 Jam light 3 Load paper light 4 Toner light 5 Ready light 6 Continue button 7 Stop button Learning about the printer 15
User Guide
Page 29
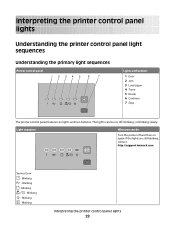
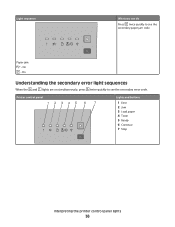
... Error - Blinking - Blinking Interpreting the printer control panel lights 29 If the lights are still blinking, contact http://support.lexmark.com. Interpreting the printer control panel lights Understanding the printer control panel light sequences Understanding the primary light sequences Printer control panel Lights and buttons 1 Error 2 Jam 3 Load paper 4 Toner 5 Ready 6 Continue 7 Stop The printer control panel features...
... Error - Blinking - Blinking Interpreting the printer control panel lights 29 If the lights are still blinking, contact http://support.lexmark.com. Interpreting the printer control panel lights Understanding the printer control panel light sequences Understanding the primary light sequences Printer control panel Lights and buttons 1 Error 2 Jam 3 Load paper 4 Toner 5 Ready 6 Continue 7 Stop The printer control panel features...
User Guide
Page 33
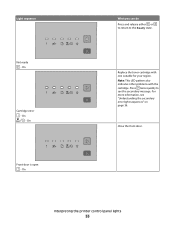
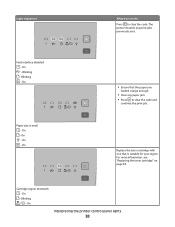
Light sequence Not ready - On What you can do Press and release either or to return to see "Understanding the secondary error light sequences" on page 36. For more information, see the secondary message. Replace the toner cartridge with the cartridge. Close the front door. Interpreting the printer control panel lights 33 Press twice quickly to the Ready state. On Front door is open - On Cartridge error - Note: This LED pattern also indicates other problems with one suitable for your region. On -
Light sequence Not ready - On What you can do Press and release either or to return to see "Understanding the secondary error light sequences" on page 36. For more information, see the secondary message. Replace the toner cartridge with the cartridge. Close the front door. Interpreting the printer control panel lights 33 Press twice quickly to the Ready state. On Front door is open - On Cartridge error - Note: This LED pattern also indicates other problems with one suitable for your region. On -
User Guide
Page 35
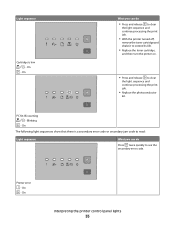
... What you can do • Press and release to clear the light sequence and continue processing the print job. • With the printer turned off, remove the toner cartridge and shake it to extend its life. • Replace the toner cartridge, and then turn the printer on. • Press and ...release to see the secondary error code. On - On - On What you can do Press twice quickly to clear the light sequence and continue processing the print job. • Replace...
... What you can do • Press and release to clear the light sequence and continue processing the print job. • With the printer turned off, remove the toner cartridge and shake it to extend its life. • Replace the toner cartridge, and then turn the printer on. • Press and ...release to see the secondary error code. On - On - On What you can do Press twice quickly to clear the light sequence and continue processing the print job. • Replace...
User Guide
Page 36
Light sequence What you can do Press twice quickly to see the secondary paper jam code. Paper jam - Printer control panel Lights and buttons 1 Error 2 Jam 3 Load paper 4 Toner 5 Ready 6 Continue 7 Stop Interpreting the printer control panel lights 36 On Understanding the secondary error light sequences When the and lights are on simultaneously, press twice quickly to see the secondary error code. On -
Light sequence What you can do Press twice quickly to see the secondary paper jam code. Paper jam - Printer control panel Lights and buttons 1 Error 2 Jam 3 Load paper 4 Toner 5 Ready 6 Continue 7 Stop Interpreting the printer control panel lights 36 On Understanding the secondary error light sequences When the and lights are on simultaneously, press twice quickly to see the secondary error code. On -
User Guide
Page 38
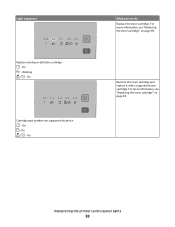
...Clear any print jobs previously sent. On - On - Blinking - Light sequences What you loaded is small - On - For more information, see "Replacing the toner cartridge" on page 85. On Interpreting the printer control panel lights 38 The printer discards any paper jam. • Press to clear... the code. Host interface disabled - Replace the toner cartridge with one that the paper you can...
...Clear any print jobs previously sent. On - On - Blinking - Light sequences What you loaded is small - On - For more information, see "Replacing the toner cartridge" on page 85. On Interpreting the printer control panel lights 38 The printer discards any paper jam. • Press to clear... the code. Host interface disabled - Replace the toner cartridge with one that the paper you can...
User Guide
Page 39
On Cartridge part number not supported by device - For more information, see "Replacing the toner cartridge" on page 85. For more information, see "Replacing the toner cartridge" on page 85. On - On - Remove the toner cartridge and replace it with a supported toner cartridge. On - Blinking - Interpreting the printer control panel lights 39 Light sequences Replace missing or defective cartridge - On What you can do Replace the toner cartridge.
On Cartridge part number not supported by device - For more information, see "Replacing the toner cartridge" on page 85. For more information, see "Replacing the toner cartridge" on page 85. On - On - Remove the toner cartridge and replace it with a supported toner cartridge. On - Blinking - Interpreting the printer control panel lights 39 Light sequences Replace missing or defective cartridge - On What you can do Replace the toner cartridge.
User Guide
Page 62
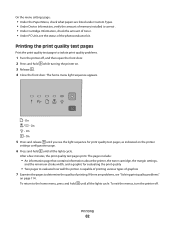
... print quality test pages print. Printing 62 On - On 5 Press and release until you see the light sequence for evaluating the print quality • Two pages to determine the quality of toner. • Under PC Unit, see "Solving print quality problems" on page 114. To exit the ... turning the printer on the printer settings configuration page. 6 Press and hold until all the lights cycle. The pages include: • An information page that contains information about the printer, the toner cartridge, the margin settings, and the minimum stroke width, and a graphic for print quality ...
... print quality test pages print. Printing 62 On - On 5 Press and release until you see the light sequence for evaluating the print quality • Two pages to determine the quality of toner. • Under PC Unit, see "Solving print quality problems" on page 114. To exit the ... turning the printer on the printer settings configuration page. 6 Press and hold until all the lights cycle. The pages include: • An information page that contains information about the printer, the toner cartridge, the margin settings, and the minimum stroke width, and a graphic for print quality ...

User Guide
Page 74
... message will blink red. Understanding printer menus 74 The display shows a message when the toner is low Notes: • Off is low message will appear and the indicator light will appear as a warning. • Single means the Toner is the factory default setting. Settings menu General Settings menu Menu item Display Language English...
... message will blink red. Understanding printer menus 74 The display shows a message when the toner is low Notes: • Off is low message will appear and the indicator light will appear as a warning. • Single means the Toner is the factory default setting. Settings menu General Settings menu Menu item Display Language English...
User Guide
Page 85
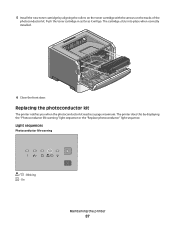
... low • - Part name Photoconductor kit Part number E260X22G Replacing supplies Replacing the toner cartridge Light sequence Toner is left in your printer model, the printer issues a message or a light sequence to redistribute the toner, and then reinsert it side-to-side and front-to-back several times to let you experience faded print, remove...
... low • - Part name Photoconductor kit Part number E260X22G Replacing supplies Replacing the toner cartridge Light sequence Toner is left in your printer model, the printer issues a message or a light sequence to redistribute the toner, and then reinsert it side-to-side and front-to-back several times to let you experience faded print, remove...

User Guide
Page 86
To replace the toner cartridge: 1 Open the front door by pressing the button on the left side of the printer and lowering the door. 2 Press the button on the base of time. Extended light exposure can cause print quality problems. 4 Rotate the cartridge in all directions to direct light for an extended period of the photoconductor kit, and then pull the toner cartridge out using the handle. 3 Unpack the new toner cartridge. Maintaining the printer 86 Warning-Potential Damage: When replacing a toner cartridge, do not leave the new cartridge exposed to distribute the toner.
To replace the toner cartridge: 1 Open the front door by pressing the button on the left side of the printer and lowering the door. 2 Press the button on the base of time. Extended light exposure can cause print quality problems. 4 Rotate the cartridge in all directions to direct light for an extended period of the photoconductor kit, and then pull the toner cartridge out using the handle. 3 Unpack the new toner cartridge. Maintaining the printer 86 Warning-Potential Damage: When replacing a toner cartridge, do not leave the new cartridge exposed to distribute the toner.
User Guide
Page 87
... the photoconductor kit reaches a page maximum. The printer does this by aligning the rollers on the toner cartridge with the arrows on the tracks of the photoconductor kit. The cartridge clicks into place when correctly installed. 6 Close the front door. Light sequences Photoconductor life warning - On Maintaining the printer 87 Push the...
... the photoconductor kit reaches a page maximum. The printer does this by aligning the rollers on the toner cartridge with the arrows on the tracks of the photoconductor kit. The cartridge clicks into place when correctly installed. 6 Close the front door. Light sequences Photoconductor life warning - On Maintaining the printer 87 Push the...
Service Manual
Page 28
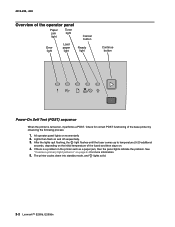
The printer cycles down into standby mode, and lights solid. 2-2 Lexmark™ E260d, E260dn Lights then flash on momentarily 2. If there is turned on, it performs a POST. Check for more information. 5. See "Common primary light patterns" on page 2-4 for correct POST functioning of the fuser...temperature (5-20 additional seconds, depending on . 4. 4513-220, -230 Overview of the operator panel Paper jam light Toner light Error light Load paper light Cancel button Ready light Continue button Power-On Self Test (POST) sequence When the printer is a problem in the printer such as ...
The printer cycles down into standby mode, and lights solid. 2-2 Lexmark™ E260d, E260dn Lights then flash on momentarily 2. If there is turned on, it performs a POST. Check for more information. 5. See "Common primary light patterns" on page 2-4 for correct POST functioning of the fuser...temperature (5-20 additional seconds, depending on . 4. 4513-220, -230 Overview of the operator panel Paper jam light Toner light Error light Load paper light Cancel button Ready light Continue button Power-On Self Test (POST) sequence When the printer is a problem in the printer such as ...


