

User Guide
Page 30
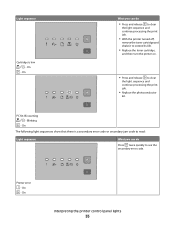
Blinking - Replace PC Kit - On (yellow) Interpreting the printer control panel lights 30 On Send a job to print. On (green) Send a job to print. Light sequence What you can do Replace the photoconductor kit. Blinking - Power Saver - Ready -
Blinking - Replace PC Kit - On (yellow) Interpreting the printer control panel lights 30 On Send a job to print. On (green) Send a job to print. Light sequence What you can do Replace the photoconductor kit. Blinking - Power Saver - Ready -
User Guide
Page 35
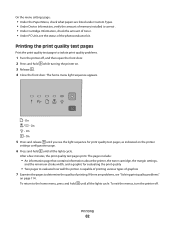
... - On Interpreting the printer control panel lights 35 PC Kit life warning - On The following light sequences show that there is low - On What you can do Press twice quickly to clear the light sequence and continue processing the print job. • Replace the photoconductor kit. On - Blinking - On - Light sequence Cartridge is...
... - On Interpreting the printer control panel lights 35 PC Kit life warning - On The following light sequences show that there is low - On What you can do Press twice quickly to clear the light sequence and continue processing the print job. • Replace the photoconductor kit. On - Blinking - On - Light sequence Cartridge is...
User Guide
Page 62
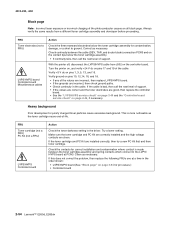
...the print quality test pages to evaluate how well the printer is correct . • Under Cartridge Information, check the amount of toner. • Under PC Unit, see the status of printing. On the menu settings page: • Under the Paper Menu, check what papers are problems, see the light ... until you see "Solving print quality problems" on . 3 Release . 4 Close the front door. On - To return to determine the quality of the photoconductor kit . On - To exit the menus, turn the printer off , and then open the front door. 2 Press and hold until all the lights cycle.
...the print quality test pages to evaluate how well the printer is correct . • Under Cartridge Information, check the amount of toner. • Under PC Unit, see the status of printing. On the menu settings page: • Under the Paper Menu, check what papers are problems, see the light ... until you see "Solving print quality problems" on . 3 Release . 4 Close the front door. On - To return to determine the quality of the photoconductor kit . On - To exit the menus, turn the printer off , and then open the front door. 2 Press and hold until all the lights cycle.

Service Manual
Page 79
..., the printer returns to expose the photoconductor, resulting in the opening for solutions to initiate printing the quality test pages. Try a different PC kit. • With the cartridge out, check the spring loaded contacts on the lens. A gap in a 'dirty' print. Extreme environmental... printhead assembly, LVPS/HVPS, or controller board. • Printhead errors typically result in that order. Try a different toner cartridge and PC kit. • If those fail, then replace the LVPS/HVPS, controller board, or the printhead in printer service errors unless there is blank...
..., the printer returns to expose the photoconductor, resulting in the opening for solutions to initiate printing the quality test pages. Try a different PC kit. • With the cartridge out, check the spring loaded contacts on the lens. A gap in a 'dirty' print. Extreme environmental... printhead assembly, LVPS/HVPS, or controller board. • Printhead errors typically result in that order. Try a different toner cartridge and PC kit. • If those fail, then replace the LVPS/HVPS, controller board, or the printhead in printer service errors unless there is blank...
Service Manual
Page 80
...time in the order shown: • LVPS/HVPS board (See "Black page" on page 3-54 for pin values.) • Controller board 2-54 Lexmark™ E260d, E260dn Correct as the toner cartridge nears end-of the cable. Verify +5 V dc on pins 17 and 19 of -life. If this does not ...development or poorly charged toner particles cause excessive background. Clean as necessary. Verify ground on the controller board. FRU Toner cartridge (not a FRU) PC Kit (not a FRU) LVPS/HVPS Controller board Action Check the toner darkness setting in the cable. Always verify the same results from J502 on ...
...time in the order shown: • LVPS/HVPS board (See "Black page" on page 3-54 for pin values.) • Controller board 2-54 Lexmark™ E260d, E260dn Correct as the toner cartridge nears end-of the cable. Verify +5 V dc on pins 17 and 19 of -life. If this does not ...development or poorly charged toner particles cause excessive background. Clean as necessary. Verify ground on the controller board. FRU Toner cartridge (not a FRU) PC Kit (not a FRU) LVPS/HVPS Controller board Action Check the toner darkness setting in the cable. Always verify the same results from J502 on ...
Service Manual
Page 81
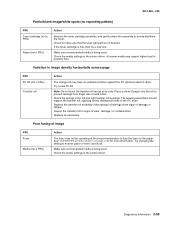
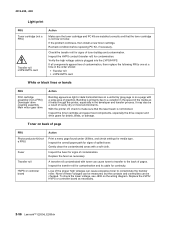
... in the printer driver. Make sure recommended media is being used . Try a new PC Kit. Try changing the setting to evenly distribute the toner. A heavier media may have an unbalanced force against the PC (photoconductor) drum. Check the springs in the printer driver. Make sure recommended media is...assembly, and gently shake the assembly to heavier paper or even card stock. Check the media settings in image density horizontally across page FRU PC Kit (not a FRU) Transfer roll Action The charge roll may require higher heat to make sure that the laser light path is low, ...
... in the printer driver. Make sure recommended media is being used . Try a new PC Kit. Try changing the setting to evenly distribute the toner. A heavier media may have an unbalanced force against the PC (photoconductor) drum. Check the springs in the printer driver. Make sure recommended media is...assembly, and gently shake the assembly to heavier paper or even card stock. Check the media settings in image density horizontally across page FRU PC Kit (not a FRU) Transfer roll Action The charge roll may require higher heat to make sure that the laser light path is low, ...
Service Manual
Page 82
...220, -230 Light print FRU Toner cartridge (not a FRU) Transfer roll LVPS/HVPS card Action Make sure the toner cartridge and PC Kit are installed correctly and that the laser beam is plugged into the LVPS/HVPS. Toner on toner. Inspect the fuser for debris, ...with a soft cloth. Replace the LVPS/ HVPS or controller board as necessary. Recheck condition before replacing PC Kit, if necessary. Replace the fuser as necessary. 2-56 Lexmark™ E260d, E260dn Inspect the toner cartridge and paper feed components, especially the drive coupler and drive gears for signs of ...
...220, -230 Light print FRU Toner cartridge (not a FRU) Transfer roll LVPS/HVPS card Action Make sure the toner cartridge and PC Kit are installed correctly and that the laser beam is plugged into the LVPS/HVPS. Toner on toner. Inspect the fuser for debris, ...with a soft cloth. Replace the LVPS/ HVPS or controller board as necessary. Recheck condition before replacing PC Kit, if necessary. Replace the fuser as necessary. 2-56 Lexmark™ E260d, E260dn Inspect the toner cartridge and paper feed components, especially the drive coupler and drive gears for signs of ...

Service Manual
Page 83
...Cause/action Light print See "Light print" on the front or back of page" on the page. Replace the PC Kit first and recheck. Replace the PC kit. Toner smudges appear on page 2-56. Blurred characters Blurred images, including characters, are parallel and match the two intended...; Professional to define the custom type setting for debris. • Make sure the media is straight and unwrinkled. • Replace the PC Kit, and recheck before replacing the toner cartridge. Try a different toner cartridge. Print quality problems Problem Light or blurred characters. See "Toner ...
...Cause/action Light print See "Light print" on the front or back of page" on the page. Replace the PC Kit first and recheck. Replace the PC kit. Toner smudges appear on page 2-56. Blurred characters Blurred images, including characters, are parallel and match the two intended...; Professional to define the custom type setting for debris. • Make sure the media is straight and unwrinkled. • Replace the PC Kit, and recheck before replacing the toner cartridge. Try a different toner cartridge. Print quality problems Problem Light or blurred characters. See "Toner ...


