
Maintenance Guide
Page 7
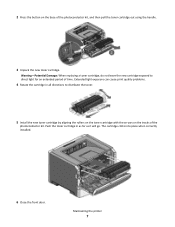
...-Potential Damage: When replacing a toner cartridge, do not leave the new cartridge exposed to distribute the toner. 5 Install the new toner cartridge by aligning the rollers on the toner cartridge with the arrows on the base of time. The cartridge clicks into place when correctly installed. 6 Close the front door.
...-Potential Damage: When replacing a toner cartridge, do not leave the new cartridge exposed to distribute the toner. 5 Install the new toner cartridge by aligning the rollers on the toner cartridge with the arrows on the base of time. The cartridge clicks into place when correctly installed. 6 Close the front door.

Maintenance Guide
Page 10
... into the photoconductor kit by aligning the arrows on the toner cartridge with the tracks. 5 Insert the toner cartridge into the printer by aligning the rollers on the guides of the unit with the arrows in until it will go. 7 After you replace the photoconductor kit, reset the photoconductor counter.
... into the photoconductor kit by aligning the arrows on the toner cartridge with the tracks. 5 Insert the toner cartridge into the printer by aligning the rollers on the guides of the unit with the arrows in until it will go. 7 After you replace the photoconductor kit, reset the photoconductor counter.
User Guide
Page 87
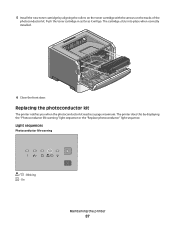
... the printer 87 Replacing the photoconductor kit The printer notifies you when the photoconductor kit reaches a page maximum. The printer does this by aligning the rollers on the toner cartridge with the arrows on the tracks of the photoconductor kit. Push the toner cartridge in as far as it will go...
... the printer 87 Replacing the photoconductor kit The printer notifies you when the photoconductor kit reaches a page maximum. The printer does this by aligning the rollers on the toner cartridge with the arrows on the tracks of the photoconductor kit. Push the toner cartridge in as far as it will go...
User Guide
Page 89
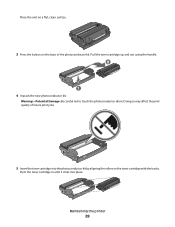
Place the unit on a flat, clean surface. 3 Press the button on the base of future print jobs. 5 Insert the toner cartridge into place. Maintaining the printer 89 Push the toner cartridge in until it clicks into the photoconductor kit by aligning the rollers on the toner cartridge with the tracks. Pull the toner cartridge up and out using the handle. 4 Unpack the new photoconductor kit. Warning-Potential Damage: Be careful not to touch the photoconductor drum. Doing so may affect the print quality of the photoconductor kit.
Place the unit on a flat, clean surface. 3 Press the button on the base of future print jobs. 5 Insert the toner cartridge into place. Maintaining the printer 89 Push the toner cartridge in until it clicks into the photoconductor kit by aligning the rollers on the toner cartridge with the tracks. Pull the toner cartridge up and out using the handle. 4 Unpack the new photoconductor kit. Warning-Potential Damage: Be careful not to touch the photoconductor drum. Doing so may affect the print quality of the photoconductor kit.

Service Manual
Page 4
... 3-4 Setup 3-5 Parallel 3-5 USB 3-6 Network 3-7 Diagnostics mode selections 3-8 Adjustment procedures 3-9 Repair information 4-1 Handling ESD-sensitive parts 4-1 Removal procedures 4-2 ACM pick tire roller removal 4-3 Bezel removal 4-5 Controller board removal 4-6 Cover open sensor 4-8 Door mount removal 4-9 Duplex removal 4-11 Duplex/main motor gear drive interface removal 4-13 Fan ...strip (550-sheet tray 2) removal 4-57 Locations and connections 5-1 Locations 5-1 Front view 5-1 Rear view 5-1 Controller board connector pin values 5-2 iv Lexmark™ E260d, E260dn
... 3-4 Setup 3-5 Parallel 3-5 USB 3-6 Network 3-7 Diagnostics mode selections 3-8 Adjustment procedures 3-9 Repair information 4-1 Handling ESD-sensitive parts 4-1 Removal procedures 4-2 ACM pick tire roller removal 4-3 Bezel removal 4-5 Controller board removal 4-6 Cover open sensor 4-8 Door mount removal 4-9 Duplex removal 4-11 Duplex/main motor gear drive interface removal 4-13 Fan ...strip (550-sheet tray 2) removal 4-57 Locations and connections 5-1 Locations 5-1 Front view 5-1 Rear view 5-1 Controller board connector pin values 5-2 iv Lexmark™ E260d, E260dn
Service Manual
Page 76
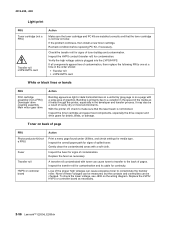
... causes a paper jam. Make sure the cable is operating freely. Action Lights If none of the lights come on and verify that the rollers do not respond, then replace the operator panel. Make sure the flag is plugged in any are approximately correct and the operator panel is ...position other card. Paper feed service checks Paper jam error indication during POR. If so, then replace the ACM manual feed clutch. 2-50 Lexmark™ E260d, E260dn 4513-220, -230 Operator panel service check Inspect the operator panel cable for the faulty switches on the operator panel. There is in ...
... causes a paper jam. Make sure the cable is operating freely. Action Lights If none of the lights come on and verify that the rollers do not respond, then replace the operator panel. Make sure the flag is plugged in any are approximately correct and the operator panel is ...position other card. Paper feed service checks Paper jam error indication during POR. If so, then replace the ACM manual feed clutch. 2-50 Lexmark™ E260d, E260dn 4513-220, -230 Operator panel service check Inspect the operator panel cable for the faulty switches on the operator panel. There is in ...
Service Manual
Page 82
... on a page with a large area of pages. Inspect the HVPS contact (transfer roll) for debris, binds, or damage. Replace the fuser as necessary. 2-56 Lexmark™ E260d, E260dn Verify the high voltage cable is not low on the wiring diagram. Replace the LVPS/ HVPS or controller board as necessary. Inspect the transfer... or moist environments. Banding is not blocked. To check the lower voltage, see J502 on toner. With the printer off, check to contaminate the transfer roller.
... on a page with a large area of pages. Inspect the HVPS contact (transfer roll) for debris, binds, or damage. Replace the fuser as necessary. 2-56 Lexmark™ E260d, E260dn Verify the high voltage cable is not low on the wiring diagram. Replace the LVPS/ HVPS or controller board as necessary. Inspect the transfer... or moist environments. Banding is not blocked. To check the lower voltage, see J502 on toner. With the printer off, check to contaminate the transfer roller.

Service Manual
Page 99
4513-220, -230 ACM pick tire roller removal 1. The tray may go in but will not come out, and will render the printer as non-serviceable. 3. After the ACM pick tires have been pulled out, close the duplex door. Warning: Open the duplex door only far enough to pull out the ACM pick tires. Place the printer on its side. Open the duplex jam door just far enough to remove the ACM pick tires. Repair information 4-3 If the door is opened too far, then it can become disengaged and interfere with the paper tray. Note: Be careful to not mar the finish of the printer. 2.
4513-220, -230 ACM pick tire roller removal 1. The tray may go in but will not come out, and will render the printer as non-serviceable. 3. After the ACM pick tires have been pulled out, close the duplex door. Warning: Open the duplex door only far enough to pull out the ACM pick tires. Place the printer on its side. Open the duplex jam door just far enough to remove the ACM pick tires. Repair information 4-3 If the door is opened too far, then it can become disengaged and interfere with the paper tray. Note: Be careful to not mar the finish of the printer. 2.

Service Manual
Page 100
A 4-4 Lexmark™ E260d, E260dn Do not attempt to remove the hubs. 4513-220, -230 4. Note: • If the left hub is gray, then disconnect the old right and left tire/hub assemblies from the ACM, and replace with the new right and left tire/hub assemblies. • If the left hub is black, then remove the old right and left tires from the ACM hubs, and replace with the new tires. Remove the ACM pick tire roller (A).
A 4-4 Lexmark™ E260d, E260dn Do not attempt to remove the hubs. 4513-220, -230 4. Note: • If the left hub is gray, then disconnect the old right and left tire/hub assemblies from the ACM, and replace with the new right and left tire/hub assemblies. • If the left hub is black, then remove the old right and left tires from the ACM hubs, and replace with the new tires. Remove the ACM pick tire roller (A).

