

Maintenance Guide
Page 9
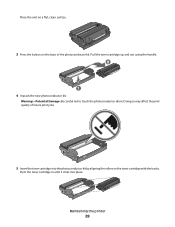
.... 2 Pull the photoconductor kit and toner cartridge together as a unit out of the photoconductor kit. Warning-Potential Damage: Be careful not to touch the photoconductor drum. Doing so may affect the print quality of future print jobs. Maintaining the printer 9
.... 2 Pull the photoconductor kit and toner cartridge together as a unit out of the photoconductor kit. Warning-Potential Damage: Be careful not to touch the photoconductor drum. Doing so may affect the print quality of future print jobs. Maintaining the printer 9
User Guide
Page 89
Doing so may affect the print quality of the photoconductor kit. Push the toner cartridge in until it clicks into the photoconductor kit by aligning the rollers on the base of future print jobs. 5 Insert the toner cartridge into place. Pull the toner cartridge up and out using the handle. 4 Unpack the new photoconductor kit. Maintaining the printer 89 Place the unit on a flat, clean surface. 3 Press the button on the toner cartridge with the tracks. Warning-Potential Damage: Be careful not to touch the photoconductor drum.
Doing so may affect the print quality of the photoconductor kit. Push the toner cartridge in until it clicks into the photoconductor kit by aligning the rollers on the base of future print jobs. 5 Insert the toner cartridge into place. Pull the toner cartridge up and out using the handle. 4 Unpack the new photoconductor kit. Maintaining the printer 89 Place the unit on a flat, clean surface. 3 Press the button on the toner cartridge with the tracks. Warning-Potential Damage: Be careful not to touch the photoconductor drum.
Service Manual
Page 81
... PC Kit. Check the media settings in the printer driver. A heavier media may have an unbalanced force against the PC (photoconductor) drum. Try changing the setting to the PC drum. Make sure recommended media is not blocked. Check to prevent damage from finger oils or hand lotion. Poor fusing of wear, damage...
... PC Kit. Check the media settings in the printer driver. A heavier media may have an unbalanced force against the PC (photoconductor) drum. Try changing the setting to the PC drum. Make sure recommended media is not blocked. Check to prevent damage from finger oils or hand lotion. Poor fusing of wear, damage...
Service Manual
Page 86
... damage from J8 and J100 on pin 4 at J8 and on the controller board. Place a sheet of damage or fatigue. Replace as necessary. 2-60 Lexmark™ E260d, E260dn On the controller board, verify +5 V dc on pin 10 at J15. See "Controller board service check" on pins 1 and 2 at J8 and +5 V dc on... is. • Restore factory defaults. • Make sure the parallel cable or USB cable is being used . • Select hex trace mode to the PC drum. Jobs are incorrect, then check the controller board. Check the springs in at its ends. Action Turn the printer off.
... damage from J8 and J100 on pin 4 at J8 and on the controller board. Place a sheet of damage or fatigue. Replace as necessary. 2-60 Lexmark™ E260d, E260dn On the controller board, verify +5 V dc on pin 10 at J15. See "Controller board service check" on pins 1 and 2 at J8 and +5 V dc on... is. • Restore factory defaults. • Make sure the parallel cable or USB cable is being used . • Select hex trace mode to the PC drum. Jobs are incorrect, then check the controller board. Check the springs in at its ends. Action Turn the printer off.


