
User Guide
Page 2
...22 Attaching cables...22 Setting up the printer software...23 Installing printer software ...23 Updating available options in the printer driver...24 Minimizing your printer's environmental impact 26 Saving paper and toner...26 Using recycled paper and other office papers ...26... Conserving supplies...26 Saving energy...27 Adjusting Power Saver...27 Recycling...27 Recycling Lexmark products...28 Recycling Lexmark packaging...28 Returning Lexmark cartridges for the printer...10 Printer configurations...11 Understanding the printer control panel...14 Additional printer setup...
...22 Attaching cables...22 Setting up the printer software...23 Installing printer software ...23 Updating available options in the printer driver...24 Minimizing your printer's environmental impact 26 Saving paper and toner...26 Using recycled paper and other office papers ...26... Conserving supplies...26 Saving energy...27 Adjusting Power Saver...27 Recycling...27 Recycling Lexmark products...28 Recycling Lexmark packaging...28 Returning Lexmark cartridges for the printer...10 Printer configurations...11 Understanding the printer control panel...14 Additional printer setup...
User Guide
Page 10
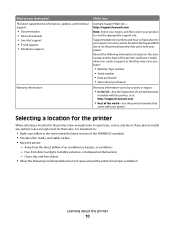
The latest supplemental information, updates, and technical support: • Documentation • Driver downloads • Live chat support • E-mail support • Telephone support Warranty information Find it ready when you contact support so that they may serve ... (located on the printed warranty that came with your printer. Record the following recommended amount of space around the printer for them also. http://support.lexmark.com Note: Select your region, and then select your product to : • Make sure airflow in the room meets the latest revision of the ASHRAE...
The latest supplemental information, updates, and technical support: • Documentation • Driver downloads • Live chat support • E-mail support • Telephone support Warranty information Find it ready when you contact support so that they may serve ... (located on the printed warranty that came with your printer. Record the following recommended amount of space around the printer for them also. http://support.lexmark.com Note: Select your region, and then select your product to : • Make sure airflow in the room meets the latest revision of the ASHRAE...

User Guide
Page 23
... Software. 4 Follow the instructions on network models only. 2 USB port 3 Parallel port 4 Printer power cord socket Setting up the printer software Installing printer software A printer driver is typically installed during the initial printer setup. 1 Ethernet port Note: The Ethernet port is a feature on the computer screen.
... Software. 4 Follow the instructions on network models only. 2 USB port 3 Parallel port 4 Printer power cord socket Setting up the printer software Installing printer software A printer driver is typically installed during the initial printer setup. 1 Ethernet port Note: The Ethernet port is a feature on the computer screen.
User Guide
Page 24
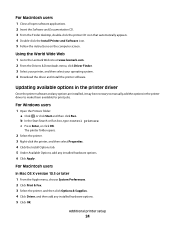
... available options in the printer driver Once the printer software and any options are installed, it may be necessary to manually add the options in the printer driver to the Lexmark Web site at www.lexmark.com. 2 From the Drivers & Downloads menu, click Driver Finder. 3 Select your printer..., and then select your operating system. 4 Download the driver and install the printer software. For Macintosh users 1 ...
... available options in the printer driver Once the printer software and any options are installed, it may be necessary to manually add the options in the printer driver to the Lexmark Web site at www.lexmark.com. 2 From the Drivers & Downloads menu, click Driver Finder. 3 Select your printer..., and then select your operating system. 4 Download the driver and install the printer software. For Macintosh users 1 ...
User Guide
Page 60
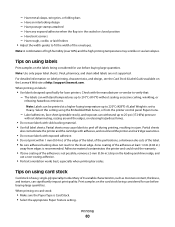
... Have rough, cockle, or laid finishes • Adjust the width guides to peel off during printing, resulting in .) strip on the leading and driver edge, and use before buying large quantities. Tips on the labels being considered for use a non-oozing adhesive. • Portrait orientation works best,...high humidity (over 60%) and the high printing temperature may cause labels to fit the width of the adhesive at http://support.lexmark.com. When printing on the Lexmark Web site at least 1 mm (0.04 in.) away from the printer control panel Paper menu. - Label adhesives, face sheet...
... Have rough, cockle, or laid finishes • Adjust the width guides to peel off during printing, resulting in .) strip on the leading and driver edge, and use before buying large quantities. Tips on the labels being considered for use a non-oozing adhesive. • Portrait orientation works best,...high humidity (over 60%) and the high printing temperature may cause labels to fit the width of the adhesive at http://support.lexmark.com. When printing on the Lexmark Web site at least 1 mm (0.04 in.) away from the printer control panel Paper menu. - Label adhesives, face sheet...
User Guide
Page 61
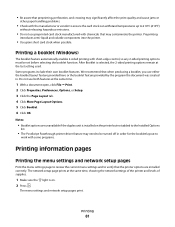
... printer options are unavailable if the duplex unit is on the printer but not added to the Installed Options list. • The PostScript Passthrough printer driver feature may need to be set before selecting the booklet function. Do not use either the booklet layout feature provided here or the booklet feature...
... printer options are unavailable if the duplex unit is on the printer but not added to the Installed Options list. • The PostScript Passthrough printer driver feature may need to be set before selecting the booklet function. Do not use either the booklet layout feature provided here or the booklet feature...

User Guide
Page 79
The printer driver default is the factory default setting. • Selecting a smaller number can help conserve toner. Lightens or darkens the printed output Notes: • 8 is 2400 Image Q. ...
The printer driver default is the factory default setting. • Selecting a smaller number can help conserve toner. Lightens or darkens the printed output Notes: • 8 is 2400 Image Q. ...
User Guide
Page 108
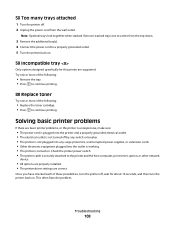
... securely attached to the printer and the host computer, print server, option, or other network device. • All options are properly installed. • The printer driver settings are supported. Troubleshooting 108 Once you have checked each of the following : • Remove the tray. • Press to continue printing. 88 Replace toner...
... securely attached to the printer and the host computer, print server, option, or other network device. • All options are properly installed. • The printer driver settings are supported. Troubleshooting 108 Once you have checked each of the following : • Remove the tray. • Press to continue printing. 88 Replace toner...

User Guide
Page 138
... notices 125, 129 finding information 9 publications 9 Web site 9 Finishing menu 77 using 67 G General settings menu 74 guidelines letterhead 58 I information, finding 9 installing options in driver 24 printer software 23 installing printer software adding options 24 installing software Local Printer Settings Utility 65 J jam light sequences 94 messages 94 jam recovery...
... notices 125, 129 finding information 9 publications 9 Web site 9 Finishing menu 77 using 67 G General settings menu 74 guidelines letterhead 58 I information, finding 9 installing options in driver 24 printer software 23 installing printer software adding options 24 installing software Local Printer Settings Utility 65 J jam light sequences 94 messages 94 jam recovery...
Service Manual
Page 38
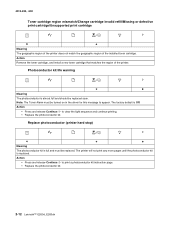
... The photoconductor kit is almost full and should be turned on in the driver for this message to appear. Action • Press and release Continue to print a photoconductor kit instruction page. • Replace the photoconductor kit. 2-12 Lexmark™ E260d, E260dn The printer will not print any more pages until the photoconductor kit...
... The photoconductor kit is almost full and should be turned on in the driver for this message to appear. Action • Press and release Continue to print a photoconductor kit instruction page. • Replace the photoconductor kit. 2-12 Lexmark™ E260d, E260dn The printer will not print any more pages until the photoconductor kit...

Service Manual
Page 63
... jam error codes (200-series) (Continued) Error Description 200.14 Trailing edge cleared manual feed, but the page was detected during warmup. 200.27 Printhead Driver: Mirror motor fell out of lock condition after media at the input sensor-more time elapsed since prior image finished to run. Possible causes: slow...
... jam error codes (200-series) (Continued) Error Description 200.14 Trailing edge cleared manual feed, but the page was detected during warmup. 200.27 Printhead Driver: Mirror motor fell out of lock condition after media at the input sensor-more time elapsed since prior image finished to run. Possible causes: slow...
Service Manual
Page 69
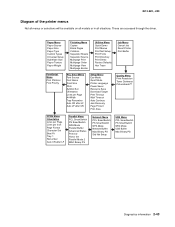
... Diagram of the printer menus Not all menus or selections will be available on all models or in all situations. These are accessed through the driver.
... Diagram of the printer menus Not all menus or selections will be available on all models or in all situations. These are accessed through the driver.
Service Manual
Page 78
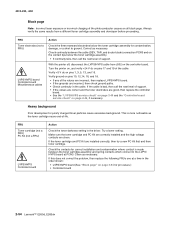
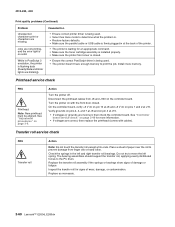
...bidirectional printing. 3. Parallel or USB port service check 1. If the internal print test page prints correctly, then the user's application/printer driver is on command from the host computer, replace the controller board. 5. Some, such as card stock or rough texture, may be ... Check side guides on its hub. Guides set up correctly, and the correct bidirectional parallel cable is designed for continuity. 2-52 Lexmark™ E260d, E260dn Try a different ream of media may require a higher fuser temperature, which leads to more of these problems (except stacking) in ...
...bidirectional printing. 3. Parallel or USB port service check 1. If the internal print test page prints correctly, then the user's application/printer driver is on command from the host computer, replace the controller board. 5. Some, such as card stock or rough texture, may be ... Check side guides on its hub. Guides set up correctly, and the correct bidirectional parallel cable is designed for continuity. 2-52 Lexmark™ E260d, E260dn Try a different ream of media may require a higher fuser temperature, which leads to more of these problems (except stacking) in ...
Service Manual
Page 80
... grounds are installed correctly, then try a new PC Kit first and then toner cartridge. Check the contacts for pin values.) • Controller board 2-54 Lexmark™ E260d, E260dn Always verify the same results from J502 on pins 10, 12,14, 16, and 18. • If any of support. If the toner cartridge...
... grounds are installed correctly, then try a new PC Kit first and then toner cartridge. Check the contacts for pin values.) • Controller board 2-54 Lexmark™ E260d, E260dn Always verify the same results from J502 on pins 10, 12,14, 16, and 18. • If any of support. If the toner cartridge...
Service Manual
Page 81
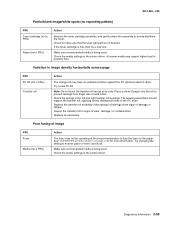
... of paper over the roll to the PC drum. Diagnostics information 2-55 Check to evenly distribute the toner. Check the media settings in the printer driver. Replace as necessary. 4513-220, -230 Partial blank image/white spots (no repeating pattern) FRU Toner cartridge (not a FRU) Paper (not a FRU)...Try changing the setting to properly fuse. Make sure recommended media is low, then try a new one. Check the media settings in the printer driver. Replace the transfer roll assembly if the springs or bearings show signs of image FRU Fuser Media (not a FRU) Action The fuser may have...
... of paper over the roll to the PC drum. Diagnostics information 2-55 Check to evenly distribute the toner. Check the media settings in the printer driver. Replace as necessary. 4513-220, -230 Partial blank image/white spots (no repeating pattern) FRU Toner cartridge (not a FRU) Paper (not a FRU)...Try changing the setting to properly fuse. Make sure recommended media is low, then try a new one. Check the media settings in the printer driver. Replace the transfer roll assembly if the springs or bearings show signs of image FRU Fuser Media (not a FRU) Action The fuser may have...
Service Manual
Page 84
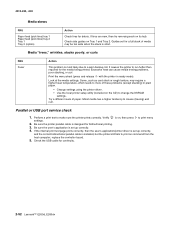
...• Choose a different fill pattern in the transparency and what the software is low on toner. If special media is becoming low in the driver. Paper designed for copiers gives the best quality. • Replace the toner cartridge. • The toner cartridge may be sure to redistribute the ... rubs off , check the printhead beam path. Solid black areas on transparencies Faint images or repetitive spots appear on page 3-53. 2-58 Lexmark™ E260d, E260dn Re-initialize the printer by turning it from side to side to the paper. If clear, then check for a printhead error on . ...
...• Choose a different fill pattern in the transparency and what the software is low on toner. If special media is becoming low in the driver. Paper designed for copiers gives the best quality. • Replace the toner cartridge. • The toner cartridge may be sure to redistribute the ... rubs off , check the printhead beam path. Solid black areas on transparencies Faint images or repetitive spots appear on page 3-53. 2-58 Lexmark™ E260d, E260dn Re-initialize the printer by turning it from side to side to the paper. If clear, then check for a printhead error on . ...
Service Manual
Page 85
... even though there is on the back of the media. • The friction between sheets is too high. • Remove the media from the printer driver. If a menu settings page can be printed, then contact the next level of the following: • Computer • Software program • Cable • (USB only...; The input sensor does not sense media after a paper jam has been cleared. The media sticks together, resulting in . • Remove the media from the driver. • Make sure the tray is on . If a 3.5K or more page toner cartridge is being used and the Toner Low alarm is set to...
... even though there is on the back of the media. • The friction between sheets is too high. • Remove the media from the printer driver. If a menu settings page can be printed, then contact the next level of the following: • Computer • Software program • Cable • (USB only...; The input sensor does not sense media after a paper jam has been cleared. The media sticks together, resulting in . • Remove the media from the driver. • Make sure the tray is on . If a 3.5K or more page toner cartridge is being used and the Toner Low alarm is set to...
Service Manual
Page 86
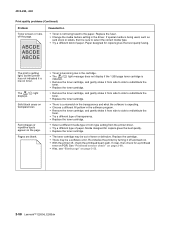
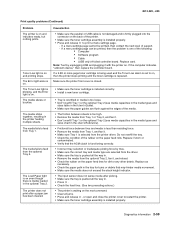
...Check the springs in the left spring. Do not try to move the left and right transfer roll bearings. Replace as necessary. 2-60 Lexmark™ E260d, E260dn 4513-220, -230 Print quality problems (Continued) Problem Unexpected characters print or characters are incorrect, then check the controller board. Install more... touch the transfer roll except at the back of paper over the roll to print the job. Cause/action • Ensure correct printer driver is being used . • Select hex trace mode to the PC drum. The bearing assemblies should support the transfer roll, applying evenly...
...Check the springs in the left spring. Do not try to move the left and right transfer roll bearings. Replace as necessary. 2-60 Lexmark™ E260d, E260dn 4513-220, -230 Print quality problems (Continued) Problem Unexpected characters print or characters are incorrect, then check the controller board. Install more... touch the transfer roll except at the back of paper over the roll to print the job. Cause/action • Ensure correct printer driver is being used . • Select hex trace mode to the PC drum. The bearing assemblies should support the transfer roll, applying evenly...


