
Quick Reference
Page 7
...Printer Settings Utility from your drivers CD, you want the printer to your printer driver (for instructions on installing and using the Local Printer Settings Utility: Finishing Settings • Copies • Blank Pages • Collation • Separator Sheets • Separator Source • Multipage Print ...PS SmartSwitch • USB Buffer Using the Local Printer Settings Utility 7 Using the Local Printer Settings Utility The Local Printer Settings Utility lets you change the following settings using the Local Printer Settings Utility. If you selected the Custom install path...
...Printer Settings Utility from your drivers CD, you want the printer to your printer driver (for instructions on installing and using the Local Printer Settings Utility: Finishing Settings • Copies • Blank Pages • Collation • Separator Sheets • Separator Source • Multipage Print ...PS SmartSwitch • USB Buffer Using the Local Printer Settings Utility 7 Using the Local Printer Settings Utility The Local Printer Settings Utility lets you change the following settings using the Local Printer Settings Utility. If you selected the Custom install path...

User's Guide
Page 75
...drivers CD, you want the printer to your printer driver (for instructions on installing and using the Local Printer Settings Utility: Finishing Settings • Copies • Blank Pages • Collation • Separator Sheets • Separator Source • Multipage Print • Multipage Order •... • USB Buffer 75 You can change printer settings not available from the computer software application, select Start à All Programs à Lexmark à Local Printer Settings Utility. To access the Local Printer Settings Utility from your drivers CD and click ...
...drivers CD, you want the printer to your printer driver (for instructions on installing and using the Local Printer Settings Utility: Finishing Settings • Copies • Blank Pages • Collation • Separator Sheets • Separator Source • Multipage Print • Multipage Order •... • USB Buffer 75 You can change printer settings not available from the computer software application, select Start à All Programs à Lexmark à Local Printer Settings Utility. To access the Local Printer Settings Utility from your drivers CD and click ...
User's Guide
Page 89
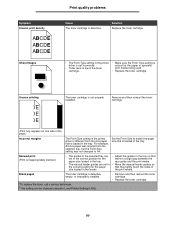
..., but the Form Size setting was not changed using the Local Printer Settings Utility. • Remove and then reinsert the toner cartridge. • Replace the toner cartridge. 89 Blank pages The toner cartridge is defective. Symptom Uneven print density ABCDE ABCDE ABCDE Ghost Images Print quality problems Cause The toner cartridge is defective, empty, or...
..., but the Form Size setting was not changed using the Local Printer Settings Utility. • Remove and then reinsert the toner cartridge. • Replace the toner cartridge. 89 Blank pages The toner cartridge is defective. Symptom Uneven print density ABCDE ABCDE ABCDE Ghost Images Print quality problems Cause The toner cartridge is defective, empty, or...
Service Manual
Page 60
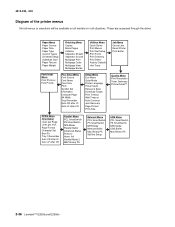
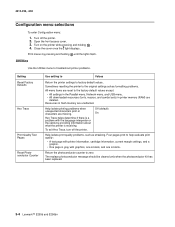
... Diagram of the printer menus Not all menus or selections will be available on all models or in all situations. Paper Menu Paper Source Paper Size Paper Type Custom Types Universal Setup Substitute Size Paper Texture Paper Weight Finishing Menu Copies Blank Pages Collation Separator Sheets Separator Source Multipage Print Multipage Order Multipage View... SmartSwitch NPA Mode Network Buffer Mac Binary PS Std Net Setup USB Menu PCL SmartSwitch PS SmartSwitch NPA Mode USB Buffer Mac Binary PS 2-36 Lexmark™ E250d and E250dn
... Diagram of the printer menus Not all menus or selections will be available on all models or in all situations. Paper Menu Paper Source Paper Size Paper Type Custom Types Universal Setup Substitute Size Paper Texture Paper Weight Finishing Menu Copies Blank Pages Collation Separator Sheets Separator Source Multipage Print Multipage Order Multipage View... SmartSwitch NPA Mode Network Buffer Mac Binary PS Std Net Setup USB Menu PCL SmartSwitch PS SmartSwitch NPA Mode USB Buffer Mac Binary PS 2-36 Lexmark™ E250d and E250dn

Service Manual
Page 62
...; Blank pages Action See "Dead machine service check" on page 2-47. Fan noisy or fan not working. White or black lines or bands. Operator panel lights are off or very dim. Printer not communicating with host. Print quality problems • Light print • Blurred characters • Toner on both sides of page" on page 3-50. 2-38 Lexmark™ E250d and...
...; Blank pages Action See "Dead machine service check" on page 2-47. Fan noisy or fan not working. White or black lines or bands. Operator panel lights are off or very dim. Printer not communicating with host. Print quality problems • Light print • Blurred characters • Toner on both sides of page" on page 3-50. 2-38 Lexmark™ E250d and...
Service Manual
Page 70
... lights flash to these problems. To exit print quality test pages, turn the printer off the printer. See "POST symptom table" on page 2-37 for solutions to initiate printing the quality test pages. Unplug the printer, and check the cable continuity between the ...print quality. a. b. When light stays on page 3-50. 2-46 Lexmark™ E250d and E250dn The first page has various fonts and a graphic, the second page is gray with graphics, the third page is black, and the last page is blockage of the beam or dust on . 3. Use the test pages to evenly distribute the toner. Blank page...
... lights flash to these problems. To exit print quality test pages, turn the printer off the printer. See "POST symptom table" on page 2-37 for solutions to initiate printing the quality test pages. Unplug the printer, and check the cable continuity between the ...print quality. a. b. When light stays on page 3-50. 2-46 Lexmark™ E250d and E250dn The first page has various fonts and a graphic, the second page is gray with graphics, the third page is black, and the last page is blockage of the beam or dust on . 3. Use the test pages to evenly distribute the toner. Blank page...

Service Manual
Page 75
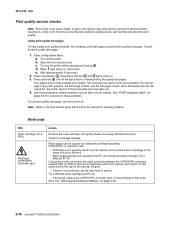
...toner cartridge. • There is a mismatch in the transparency and what the software is becoming low in the driver. The print is getting light, but the printer has not indicated it from side to side to redistribute the toner. • Try a different type of transparency. •... of toner or defective. Re-initialize the printer by turning it from the printer driver. • Try a different type of paper. If clear, check for copiers gives the best quality fusing. See "Printhead service check" on page 2-53. • Also, see "Blank page" on POR. Diagnostic information 2-51 Paper ...
...toner cartridge. • There is a mismatch in the transparency and what the software is becoming low in the driver. The print is getting light, but the printer has not indicated it from side to side to redistribute the toner. • Try a different type of transparency. •... of toner or defective. Re-initialize the printer by turning it from the printer driver. • Try a different type of paper. If clear, check for copiers gives the best quality fusing. See "Printhead service check" on page 2-53. • Also, see "Blank page" on POR. Diagnostic information 2-51 Paper ...
Service Manual
Page 82
...Print Quality Test Pages Reset Photoconductor Counter Use setting to Values Return the printer settings to zero. Turn on the printer while pressing and holding until the lights flash. The replace photoconductor message should be cleared only when the photoconductor kit has been replaced. 3-4 Lexmark™ E250d and E250dn Turn off the printer... in printer memory (RAM) are reset to help evaluate print quality: • A text page with printer information, cartridge information, current margin settings, and a graphic. • One page is blank. Four pages print to the...
...Print Quality Test Pages Reset Photoconductor Counter Use setting to Values Return the printer settings to zero. Turn on the printer while pressing and holding until the lights flash. The replace photoconductor message should be cleared only when the photoconductor kit has been replaced. 3-4 Lexmark™ E250d and E250dn Turn off the printer... in printer memory (RAM) are reset to help evaluate print quality: • A text page with printer information, cartridge information, current margin settings, and a graphic. • One page is blank. Four pages print to the...

Service Manual
Page 86
... Simplex Tray 1 Continuously print pages containing cross lines, printer information, and margin settings. None Cont Prt Duplex Tray 2 Continuously print pages containing cross lines, printer information, and margin settings. Print the menu page by pressing and holding until the lights flash to begin . Press and hold until the lights flash. Press to stop . None 3-8 Lexmark™ E250d and E250dn U.S. (default...
... Simplex Tray 1 Continuously print pages containing cross lines, printer information, and margin settings. None Cont Prt Duplex Tray 2 Continuously print pages containing cross lines, printer information, and margin settings. Print the menu page by pressing and holding until the lights flash to begin . Press and hold until the lights flash. Press to stop . None 3-8 Lexmark™ E250d and E250dn U.S. (default...

Service Manual
Page 158
...pages 3-4 using 2-46 print quality problems print media 1-7 service check 2-46 solving 2-50 printer symptom table 2-38 printhead removal 4-40 service check 2-53 Protocol 3-5 R removals controller card 4-13 cover open sensor 4-15 covers front access cover 4-2 left side cover 4-4 right side cover 4-5 top cover 4-7 developer drive coupling assembly 4-16 fan 4-21 fuser 4-22 I-2 Lexmark™ E250d...port 2-45 print quality 2-46 black page 2-47 blank page 2-46 heavy background 2-47 image density 2-48 light print 2-49 partial blank image 2-48 poor fusing of image 2-48 toner on back of page 2-49 white ...
...pages 3-4 using 2-46 print quality problems print media 1-7 service check 2-46 solving 2-50 printer symptom table 2-38 printhead removal 4-40 service check 2-53 Protocol 3-5 R removals controller card 4-13 cover open sensor 4-15 covers front access cover 4-2 left side cover 4-4 right side cover 4-5 top cover 4-7 developer drive coupling assembly 4-16 fan 4-21 fuser 4-22 I-2 Lexmark™ E250d...port 2-45 print quality 2-46 black page 2-47 blank page 2-46 heavy background 2-47 image density 2-48 light print 2-49 partial blank image 2-48 poor fusing of image 2-48 toner on back of page 2-49 white ...


