
Quick Reference
Page 6
... on . Printing a test page from the On the menu settings page: - Restoring factory defaults Sometimes restoring the printer to the original factory default settings solves formatting problems. To reset the factory defaults: 1 Turn off the printer. 2 Open the front door. 3 Press Continue as you loaded. Factory defaults have been reset. Verify that the...
... on . Printing a test page from the On the menu settings page: - Restoring factory defaults Sometimes restoring the printer to the original factory default settings solves formatting problems. To reset the factory defaults: 1 Turn off the printer. 2 Open the front door. 3 Press Continue as you loaded. Factory defaults have been reset. Verify that the...
Quick Reference
Page 13
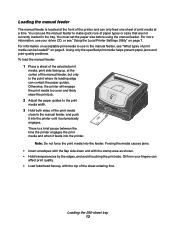
... Hold transparencies by the edges, and avoid touching the print side. on page 7. Otherwise, the printer will engage the print media too soon and likely skew the print job. 2 Adjust the paper ... Note: Do not force the print media into the printer. Using only the specified print media helps prevent paper jams and print-quality problems. To load the manual feeder: 1 Place a sheet... of the selected print media, print side facing up, at the center of the manual feeder, but only to make quick runs of print media at the front of the printer...
... Hold transparencies by the edges, and avoid touching the print side. on page 7. Otherwise, the printer will engage the print media too soon and likely skew the print job. 2 Adjust the paper ... Note: Do not force the print media into the printer. Using only the specified print media helps prevent paper jams and print-quality problems. To load the manual feeder: 1 Place a sheet... of the selected print media, print side facing up, at the center of the manual feeder, but only to make quick runs of print media at the front of the printer...
User's Guide
Page 4
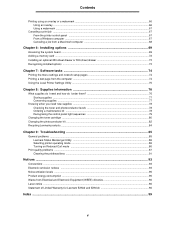
... Selecting printer operating mode ...86 Turning on Reduced Curl mode ...86 Print quality problems ...87 Cleaning the printhead lens ...91 Notices ...93 Conventions ...93 Electronic emission notices ...93 Noise emission levels ...95 Product energy consumption ...95 Waste from Electrical and Electronic Equipment (WEEE) directive 96 Laser notice ...96 Statement of Limited Warranty for Lexmark E250d...
... Selecting printer operating mode ...86 Turning on Reduced Curl mode ...86 Print quality problems ...87 Cleaning the printhead lens ...91 Notices ...93 Conventions ...93 Electronic emission notices ...93 Noise emission levels ...95 Product energy consumption ...95 Waste from Electrical and Electronic Equipment (WEEE) directive 96 Laser notice ...96 Statement of Limited Warranty for Lexmark E250d...
User's Guide
Page 12
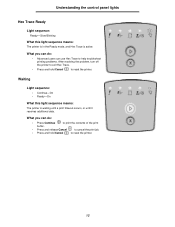
... Hex Trace Ready Light sequence: Ready-Slow Blinking What this light sequence means: The printer is active. Waiting Light sequence: • Continue-On • Ready-On What this light sequence means: The printer is in the Ready mode, and Hex Trace is waiting until a print timeout occurs...; Press and release Cancel to cancel the print job. • Press and hold Cancel to reset the printer. 12 What you can use Hex Trace to help troubleshoot printing problems. After resolving the problem, turn off the printer to exit Hex Trace. • Press and hold Cancel to reset the...
... Hex Trace Ready Light sequence: Ready-Slow Blinking What this light sequence means: The printer is active. Waiting Light sequence: • Continue-On • Ready-On What this light sequence means: The printer is in the Ready mode, and Hex Trace is waiting until a print timeout occurs...; Press and release Cancel to cancel the print job. • Press and hold Cancel to reset the printer. 12 What you can use Hex Trace to help troubleshoot printing problems. After resolving the problem, turn off the printer to exit Hex Trace. • Press and hold Cancel to reset the...

User's Guide
Page 21
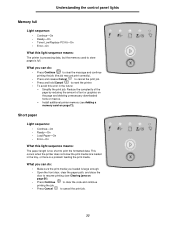
... data. Understanding the control panel lights Short paper Light sequence: • Continue-On • Error-On What this light sequence means: The output bin is a problem feeding the print media. This occurs when the printer does not know the print media size loaded in the tray, or when there is full.
... data. Understanding the control panel lights Short paper Light sequence: • Continue-On • Error-On What this light sequence means: The output bin is a problem feeding the print media. This occurs when the printer does not know the print media size loaded in the tray, or when there is full.
User's Guide
Page 33
...What this light sequence means: The paper length is too short to store pages is full. This occurs when the printer does not know the print media size loaded in the future: - Understanding the control panel lights Memory full Light ...8226; Ready-On • Toner Low/Replace PC Kit-On • Error-On What this light sequence means: The printer is processing data, but the memory used to print the formatted data. What you can do : • Make sure...Press and hold Cancel to cancel the print job. 33 What you loaded is a problem feeding the print media. Simplify the print job.
...What this light sequence means: The paper length is too short to store pages is full. This occurs when the printer does not know the print media size loaded in the future: - Understanding the control panel lights Memory full Light ...8226; Ready-On • Toner Low/Replace PC Kit-On • Error-On What this light sequence means: The printer is processing data, but the memory used to print the formatted data. What you can do : • Make sure...Press and hold Cancel to cancel the print job. 33 What you loaded is a problem feeding the print media. Simplify the print job.
User's Guide
Page 37
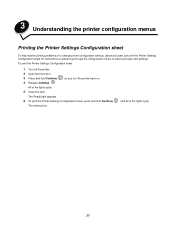
... and hold Continue as you turn the printer back on advancing through the configuration menus to change printer configuration settings, advanced users can print the Printer Settings Configuration sheet for instructions on . 4 Release Continue . 3 Understanding the printer configuration menus Printing the Printer Settings Configuration sheet To help resolve printing problems or to select and save new...
... and hold Continue as you turn the printer back on advancing through the configuration menus to change printer configuration settings, advanced users can print the Printer Settings Configuration sheet for instructions on . 4 Release Continue . 3 Understanding the printer configuration menus Printing the Printer Settings Configuration sheet To help resolve printing problems or to select and save new...
User's Guide
Page 40
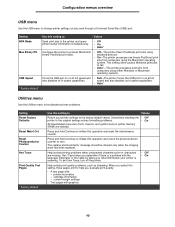
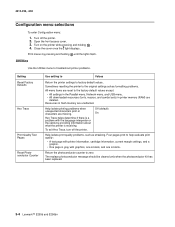
... jobs to the original settings solves formatting problems. • On All downloaded resources (fonts, macros, and symbol sets) in printer memory (RAM) are missing. Sometimes resetting the • Off* printer to fail. • Auto*-The printer processes print jobs from computers using either ...run at full also disables its hi-speed capabilities. • Auto* Utilities menu Use the Utilities menu to troubleshoot printer problems. Setting Reset Factory Defaults Reset Maint Cnt Reset Photoconductor Counter Hex Trace Print Quality Test Pages * Factory default Use ...
... jobs to the original settings solves formatting problems. • On All downloaded resources (fonts, macros, and symbol sets) in printer memory (RAM) are missing. Sometimes resetting the • Off* printer to fail. • Auto*-The printer processes print jobs from computers using either ...run at full also disables its hi-speed capabilities. • Auto* Utilities menu Use the Utilities menu to troubleshoot printer problems. Setting Reset Factory Defaults Reset Maint Cnt Reset Photoconductor Counter Hex Trace Print Quality Test Pages * Factory default Use ...

User's Guide
Page 43
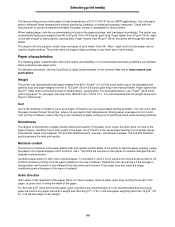
Business papers designed for the printer: • Paper • Transparencies • Envelopes • Labels • Card stock Paper To ensure the best print quality and feed reliability, use may also provide ... 3 Power cord connect 7 Ethernet connect 4 Dust cover (not available for some models) Selecting print media Selecting the appropriate paper or other print media reduces printing problems. The following sections contain guidelines for choosing the correct print media for general business use 75 g/m2 (20 lb) xerographic, grain long paper.
Business papers designed for the printer: • Paper • Transparencies • Envelopes • Labels • Card stock Paper To ensure the best print quality and feed reliability, use may also provide ... 3 Power cord connect 7 Ethernet connect 4 Dust cover (not available for some models) Selecting print media Selecting the appropriate paper or other print media reduces printing problems. The following sections contain guidelines for choosing the correct print media for general business use 75 g/m2 (20 lb) xerographic, grain long paper.
User's Guide
Page 44
...of paper directly affects print quality. When loading paper, note the recommended print side on the Lexmark Web site at its edges. If the paper is not recommended that these temperatures without discoloring... length of the paper, or grain short, running the width of 210°C (410°F) for laser printers. For 60 to 90 g/m2 (16 to high temperatures of the paper. Check with a weight less...it is time to determine whether the paper chosen is too smooth, it can cause feeding problems. Smoothness The degree of smoothness of media to feed properly, causing jams. For best ...
...of paper directly affects print quality. When loading paper, note the recommended print side on the Lexmark Web site at its edges. If the paper is not recommended that these temperatures without discoloring... length of the paper, or grain short, running the width of 210°C (410°F) for laser printers. For 60 to 90 g/m2 (16 to high temperatures of the paper. Check with a weight less...it is time to determine whether the paper chosen is too smooth, it can cause feeding problems. Smoothness The degree of smoothness of media to feed properly, causing jams. For best ...
User's Guide
Page 45
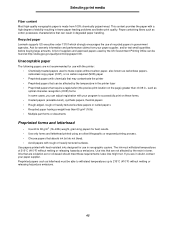
...Preprinted papers that can be able to withstand temperatures up to 90 g/m2 (16-24lb) weight, grain long papers for use with the printer: • Chemically treated papers used by the US Government Printing Office can be affected by the resin in toner. A list of ...print media Fiber content Most high-quality xerographic paper is made from your paper supplier. Recycled paper Lexmark supports US executive order 13101 which strongly encourages the use in fewer paper feeding problems and better print quality. Inks that are not recommended for best results. • Use only ...
...Preprinted papers that can be able to withstand temperatures up to 90 g/m2 (16-24lb) weight, grain long papers for use with the printer: • Chemically treated papers used by the US Government Printing Office can be affected by the resin in toner. A list of ...print media Fiber content Most high-quality xerographic paper is made from your paper supplier. Recycled paper Lexmark supports US executive order 13101 which strongly encourages the use in fewer paper feeding problems and better print quality. Inks that are not recommended for best results. • Use only ...

User's Guide
Page 46
..., fan the stack to withstand 25 pounds per square inch (psi) (172kilopascals) pressure. 46 We recommend Lexmark laser printer transparencies: part number 70X7240 for laser printers. excessive curling - part number 12A5010 for A4-size transparencies. • To prevent print-quality problems, avoid getting fingerprints on the sheets. • Do not print a large number of 210°...
..., fan the stack to withstand 25 pounds per square inch (psi) (172kilopascals) pressure. 46 We recommend Lexmark laser printer transparencies: part number 70X7240 for laser printers. excessive curling - part number 12A5010 for A4-size transparencies. • To prevent print-quality problems, avoid getting fingerprints on the sheets. • Do not print a large number of 210°...
User's Guide
Page 47
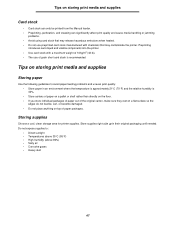
...feeder. • Preprinting, perforation, and creasing can significantly affect print quality and cause media handling or jamming problems. • Avoid using card stock that may contaminate the printer. Tips on top of grain short card stock is recommended. Preprinting introduces semi-liquid and volatile components into the... weight of 163g/m2 (43 lb). • The use of paper packages. Do not expose supplies to avoid paper feeding problems and uneven print quality: • Store paper in their original packaging until needed. Storing supplies Choose a cool, clean storage area for...
...feeder. • Preprinting, perforation, and creasing can significantly affect print quality and cause media handling or jamming problems. • Avoid using card stock that may contaminate the printer. Tips on top of grain short card stock is recommended. Preprinting introduces semi-liquid and volatile components into the... weight of 163g/m2 (43 lb). • The use of paper packages. Do not expose supplies to avoid paper feeding problems and uneven print quality: • Store paper in their original packaging until needed. Storing supplies Choose a cool, clean storage area for...
User's Guide
Page 54
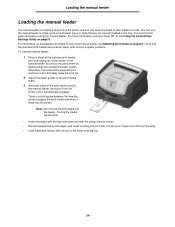
... Loading the manual feeder The manual feeder is a brief pause between the time the printer engages the print media and when it automatically engages. Using only the specified print media helps prevent paper jams and print-quality problems. To load the manual feeder: 1 Place a sheet of the print media close to the...
... Loading the manual feeder The manual feeder is a brief pause between the time the printer engages the print media and when it automatically engages. Using only the specified print media helps prevent paper jams and print-quality problems. To load the manual feeder: 1 Place a sheet of the print media close to the...
User's Guide
Page 82
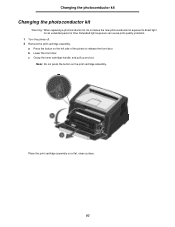
Place the print cartridge assembly on the left side of the printer to direct light for an extended period of time. a Press the button on a flat, clean surface. 82 c Grasp the toner cartridge handle, and pull up ...and out. b Lower the front door. Note: Do not press the button on the print cartridge assembly. Extended light exposure can cause print quality problems. 1 Turn the printer off. 2 Remove the print cartridge assembly. Changing the photoconductor kit Changing the photoconductor kit Warning: When replacing a photoconductor kit, do not leave the new...
Place the print cartridge assembly on the left side of the printer to direct light for an extended period of time. a Press the button on a flat, clean surface. 82 c Grasp the toner cartridge handle, and pull up ...and out. b Lower the front door. Note: Do not press the button on the print cartridge assembly. Extended light exposure can cause print quality problems. 1 Turn the printer off. 2 Remove the print cartridge assembly. Changing the photoconductor kit Changing the photoconductor kit Warning: When replacing a photoconductor kit, do not leave the new...
User's Guide
Page 85
...cartridge. Close the rear exit door. 85 Why am I missing characters when I restore the factory defaults? See Clearing jams on page56 for laser printers. • If possible try printing it from side to side and front to back several times to a rougher setting. The toner low ... when feeding print slower when using the media from the Paper Type menu. light pattern means. Sometimes restoring the printer to the original factory default settings solves formatting problems. To reset the factory defaults: 1 Turn off and back on page8 for a straight-through all the lights....
...cartridge. Close the rear exit door. 85 Why am I missing characters when I restore the factory defaults? See Clearing jams on page56 for laser printers. • If possible try printing it from side to side and front to back several times to a rougher setting. The toner low ... when feeding print slower when using the media from the Paper Type menu. light pattern means. Sometimes restoring the printer to the original factory default settings solves formatting problems. To reset the factory defaults: 1 Turn off and back on page8 for a straight-through all the lights....
User's Guide
Page 86
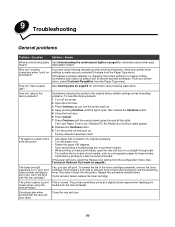
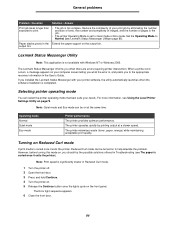
... light sequence appears. 6 Close the front door. 86 Paper stacks poorly in the job. • The printer Operating Mode is completed. General problems Problem / Question Solution / Answer Print job takes longer than expected to Normal (see Lexmark Status Messenger Utilityon page 85). Reduce the complexity of pages in the Extend the paper support on...
... light sequence appears. 6 Close the front door. 86 Paper stacks poorly in the job. • The printer Operating Mode is completed. General problems Problem / Question Solution / Answer Print job takes longer than expected to Normal (see Lexmark Status Messenger Utilityon page 85). Reduce the complexity of pages in the Extend the paper support on...
Service Manual
Page 14
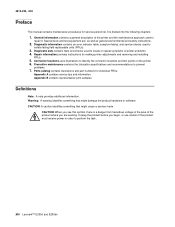
...or use caution if the product must receive power in the area of printer problems. 4. Diagnostic aids contains tests and checks used to identify the connector locations and test points on the printer. 6. 4512-220, -230 Preface This manual contains maintenance procedures for ...A note provides additional information. Unplug the product before you are , as well as general environmental and safety instructions. 2. xiv Lexmark™ E250d and E250dn CAUTION: A caution identifies something that might damage the product hardware or software. CAUTION: When you see this symbol,...
...or use caution if the product must receive power in the area of printer problems. 4. Diagnostic aids contains tests and checks used to identify the connector locations and test points on the printer. 6. 4512-220, -230 Preface This manual contains maintenance procedures for ...A note provides additional information. Unplug the product before you are , as well as general environmental and safety instructions. 2. xiv Lexmark™ E250d and E250dn CAUTION: A caution identifies something that might damage the product hardware or software. CAUTION: When you see this symbol,...

Service Manual
Page 53
...200.14 200.15 200.16 Description Paper jam around input sensor. UNRECOVERABLE NO GAP JAM. This topic provides a list of the printer and indicates possible printer problems that must be visible only in the print history in the source tray. Classic input jam. Possible causes include multi-sheet feed, ...never became uncovered from the sheet ahead. not enough time elapsed since the printhead started to media pre-staged in the diagnostic mode for E250d and E250dn. Possible causes include user insert of media when motor is too long over the input sensor. The video never started Media...
...200.14 200.15 200.16 Description Paper jam around input sensor. UNRECOVERABLE NO GAP JAM. This topic provides a list of the printer and indicates possible printer problems that must be visible only in the print history in the source tray. Classic input jam. Possible causes include multi-sheet feed, ...never became uncovered from the sheet ahead. not enough time elapsed since the printhead started to media pre-staged in the diagnostic mode for E250d and E250dn. Possible causes include user insert of media when motor is too long over the input sensor. The video never started Media...
Service Manual
Page 82
...Utilities menu to troubleshoot printer problems. Setting Reset Factory Defaults Hex Trace Print Quality Test Pages Reset Photoconductor Counter Use setting to Values Return the printer settings to zero. ...printer to the original settings solves formatting problems. All menu items are unaffected. Off (default) On Help isolate print quality problems, such as streaking. Resources in printer memory (RAM) are missing. Open the front access cover. 3. The replace photoconductor message should be cleared only when the photoconductor kit has been replaced. 3-4 Lexmark™ E250d...
...Utilities menu to troubleshoot printer problems. Setting Reset Factory Defaults Hex Trace Print Quality Test Pages Reset Photoconductor Counter Use setting to Values Return the printer settings to zero. ...printer to the original settings solves formatting problems. All menu items are unaffected. Off (default) On Help isolate print quality problems, such as streaking. Resources in printer memory (RAM) are missing. Open the front access cover. 3. The replace photoconductor message should be cleared only when the photoconductor kit has been replaced. 3-4 Lexmark™ E250d...


