
Quick Reference
Page 7
... back to sound an alarm when it needs attention). You can change printer settings not available from the computer software application, select Start Æ All Programs Æ Lexmark Æ Local Printer Settings Utility. To access the Local Printer Settings Utility from your drivers CD and click View Documentation for example, activating Alarm Control if you...
... back to sound an alarm when it needs attention). You can change printer settings not available from the computer software application, select Start Æ All Programs Æ Lexmark Æ Local Printer Settings Utility. To access the Local Printer Settings Utility from your drivers CD and click View Documentation for example, activating Alarm Control if you...
Quick Reference
Page 13
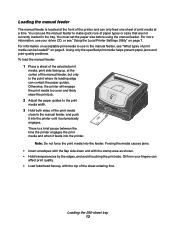
... in the manual feeder, see your fingers can be loaded?" Note: Do not force the print media into the printer until it automatically engages. Oil from your driver CD, or see "Using the Local Printer Settings Utility" on page 8. For information on acceptable print media to make quick runs of the selected print... of the print media close to the point where its leading edge can only feed one sheet of print media at the center of the printer and can contact the paper guides. There is located at the front of the manual feeder, but only to the manual feeder, and push it...
... in the manual feeder, see your fingers can be loaded?" Note: Do not force the print media into the printer until it automatically engages. Oil from your driver CD, or see "Using the Local Printer Settings Utility" on page 8. For information on acceptable print media to make quick runs of the selected print... of the print media close to the point where its leading edge can only feed one sheet of print media at the center of the printer and can contact the paper guides. There is located at the front of the manual feeder, but only to the manual feeder, and push it...
User's Guide
Page 54
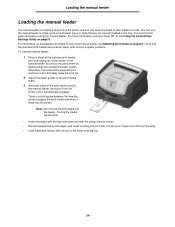
..., the printer will engage the print media too soon and likely skew the print job. 2 Adjust the paper guides to the print media width. 3 Hold both sides of the sheet entering first. 54 Oil from your driver CD, or see Selecting print media on page75. Loading the manual feeder Loading ...the manual feeder The manual feeder is a brief pause between the time the printer engages the print media and when it automatically engages. For information on...
..., the printer will engage the print media too soon and likely skew the print job. 2 Adjust the paper guides to the print media width. 3 Hold both sides of the sheet entering first. 54 Oil from your driver CD, or see Selecting print media on page75. Loading the manual feeder Loading ...the manual feeder The manual feeder is a brief pause between the time the printer engages the print media and when it automatically engages. For information on...
User's Guide
Page 60
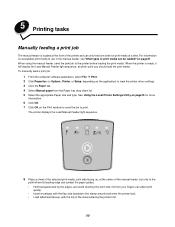
...Manually feeding a print job The manual feeder is ready, it will display the Load Manual Feeder light sequence, at which point you should enter the printer last). • Load letterhead faceup, with the flap side facedown (the stamp area should load the print media. For information on page41. When...selected print media, print side facing up, at the center of print media at the front of the printer and can only feed one sheet of the manual feeder, but only to view the printer driver settings. 3 Click the Paper tab. 4 Select Manual paper from your fingers can contact the paper guides...
...Manually feeding a print job The manual feeder is ready, it will display the Load Manual Feeder light sequence, at which point you should enter the printer last). • Load letterhead faceup, with the flap side facedown (the stamp area should load the print media. For information on page41. When...selected print media, print side facing up, at the center of print media at the front of the printer and can only feed one sheet of the manual feeder, but only to view the printer driver settings. 3 Click the Paper tab. 4 Select Manual paper from your fingers can contact the paper guides...
User's Guide
Page 63
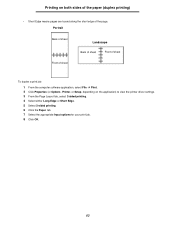
... short edge of sheet To duplex a print job: 1 From the computer software application, select File à Print. 2 Click Properties (or Options, Printer, or Setup, depending on the application) to view the printer driver settings. 3 From the Page Layout tab, select 2-sided printing. 4 Select either Long Edge or Short Edge. 5 Select 2-sided printing. 6 Click...
... short edge of sheet To duplex a print job: 1 From the computer software application, select File à Print. 2 Click Properties (or Options, Printer, or Setup, depending on the application) to view the printer driver settings. 3 From the Page Layout tab, select 2-sided printing. 4 Select either Long Edge or Short Edge. 5 Select 2-sided printing. 6 Click...
User's Guide
Page 64
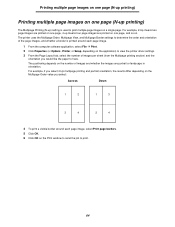
...: Across Down 1 2 1 3 3 4 2 4 4 To print a visible border around each page image, select Print page borders. 5 Click OK. 6 Click OK on the application) to view the printer driver settings. 3 From the Page Layout tab, select the number of images and whether the images are portrait or landscape in orientation. For example, 2-Up means... on one page (N-up ) setting is printed around each page image. 1 From the computer software application, select File à Print. 2 Click Properties (or Options, Printer, or Setup, depending on the Print window to send the job to print. 64
...: Across Down 1 2 1 3 3 4 2 4 4 To print a visible border around each page image, select Print page borders. 5 Click OK. 6 Click OK on the application) to view the printer driver settings. 3 From the Page Layout tab, select the number of images and whether the images are portrait or landscape in orientation. For example, 2-Up means... on one page (N-up ) setting is printed around each page image. 1 From the computer software application, select File à Print. 2 Click Properties (or Options, Printer, or Setup, depending on the Print window to send the job to print. 64
User's Guide
Page 65
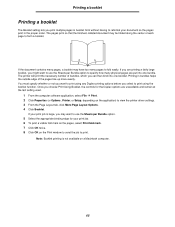
... and remain at the last setting used. 1 From the computer software application, select File à Print. 2 Click Properties (or Options, Printer, or Setup, depending on the application) to view the printer driver settings. 3 From the Page Layout tab, click More Page Layout Options. 4 Click Booklet. Printing in bundles helps the outside edge of...
... and remain at the last setting used. 1 From the computer software application, select File à Print. 2 Click Properties (or Options, Printer, or Setup, depending on the application) to view the printer driver settings. 3 From the Page Layout tab, click More Page Layout Options. 4 Click Booklet. Printing in bundles helps the outside edge of...
User's Guide
Page 66
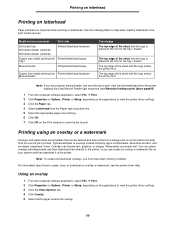
...print. Note: If you are using an overlay or a watermark Overlays and watermarks are simple text. For information about how to view the printer driver settings. 3 Click the Other Options tab. 4 Click Overlay. 5 Select which pages receive the overlay. 66 The top edge of the...print jobon page60 ). 1 From the computer software application, select File à Print. 2 Click Properties (or Options, Printer, or Setup, depending on the application) to view the printer driver settings. 3 Click the Paper tab. 4 Select Letterhead from the current job is placed at the front of the sheet ...
...print. Note: If you are using an overlay or a watermark Overlays and watermarks are simple text. For information about how to view the printer driver settings. 3 Click the Other Options tab. 4 Click Overlay. 5 Select which pages receive the overlay. 66 The top edge of the...print jobon page60 ). 1 From the computer software application, select File à Print. 2 Click Properties (or Options, Printer, or Setup, depending on the application) to view the printer driver settings. 3 Click the Paper tab. 4 Select Letterhead from the current job is placed at the front of the sheet ...
User's Guide
Page 67
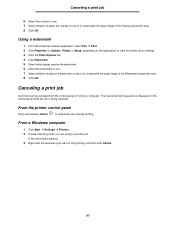
Using a watermark 1 From the computer software application, select File à Print. 2 Click Properties (or Options, Printer, or Setup, depending on the application) to view the printer driver settings. 3 Click the Other Options tab. 4 Click Watermark. 5 Select which pages receive the watermark. 6 Select the watermark to ... from your computer. A list of print jobs appears. 3 Right-click the document you are using to print the job. From the printer control panel Press and release Cancel to stop printing, and then click Cancel. 67 Canceling a print job 6 Select the overlay to use...
Using a watermark 1 From the computer software application, select File à Print. 2 Click Properties (or Options, Printer, or Setup, depending on the application) to view the printer driver settings. 3 Click the Other Options tab. 4 Click Watermark. 5 Select which pages receive the watermark. 6 Select the watermark to ... from your computer. A list of print jobs appears. 3 Right-click the document you are using to print the job. From the printer control panel Press and release Cancel to stop printing, and then click Cancel. 67 Canceling a print job 6 Select the overlay to use...
User's Guide
Page 73
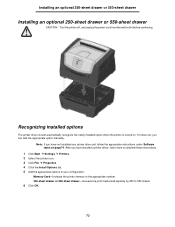
... outlet before continuing. If it does not, you have installed a printer driver, return here to complete these instructions. 1 Click Start à Settings à Printers. 2 Select the printer icon. 3 Click File à Properties. 4 Click the Install Options tab. 5 Add the appropriate options to your printer driver yet, follow the appropriate instructions under Software tasks on . Recognizing installed...
... outlet before continuing. If it does not, you have installed a printer driver, return here to complete these instructions. 1 Click Start à Settings à Printers. 2 Select the printer icon. 3 Click File à Properties. 4 Click the Install Options tab. 5 Add the appropriate options to your printer driver yet, follow the appropriate instructions under Software tasks on . Recognizing installed...

User's Guide
Page 75
...drivers CD and click View Documentation for example, activating Alarm Control if you want the printer to sound an alarm when it needs attention). If you selected the Custom install path from the computer software application, select Start à All Programs à Lexmark à Local Printer... Settings Utility. Using the Local Printer Settings Utility Using the Local Printer Settings Utility The Local Printer Settings Utility lets you change the following settings using the Local...
...drivers CD and click View Documentation for example, activating Alarm Control if you want the printer to sound an alarm when it needs attention). If you selected the Custom install path from the computer software application, select Start à All Programs à Lexmark à Local Printer... Settings Utility. Using the Local Printer Settings Utility Using the Local Printer Settings Utility The Local Printer Settings Utility lets you change the following settings using the Local...
User's Guide
Page 77
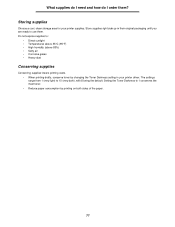
Store supplies right side up in your printer supplies. The settings range from 1 (very light) to : • Direct sunlight • Temperatures above 35°C (95°F) • High humidity (above 80%) • Salty ... changing the Toner Darkness setting in their original packaging until you are ready to use them ? Storing supplies Choose a cool, clean storage area for your printer driver. What supplies do I need and how do I order them . Do not expose supplies to 10 (very dark), with 8 being the default.
Store supplies right side up in your printer supplies. The settings range from 1 (very light) to : • Direct sunlight • Temperatures above 35°C (95°F) • High humidity (above 80%) • Salty ... changing the Toner Darkness setting in their original packaging until you are ready to use them ? Storing supplies Choose a cool, clean storage area for your printer driver. What supplies do I need and how do I order them . Do not expose supplies to 10 (very dark), with 8 being the default.
User's Guide
Page 85
... on, but I don't have been reset. How do I still print with the rear exit door open the rear exit door for laser printers. • If possible try changing the texture setting to the original factory default settings solves formatting problems. To reset the factory defaults:... and back on envelopes? Can I restore the factory defaults? Repeat this procedure multiple times. manual feeder. light pattern means. From your printer driver settings to put in a less humid environment. Yes, you selected Envelope from the Paper Type menu. Envelopes jam when printing with the ...
... on, but I don't have been reset. How do I still print with the rear exit door open the rear exit door for laser printers. • If possible try changing the texture setting to the original factory default settings solves formatting problems. To reset the factory defaults:... and back on envelopes? Can I restore the factory defaults? Repeat this procedure multiple times. manual feeder. light pattern means. From your printer driver settings to put in a less humid environment. Yes, you selected Envelope from the Paper Type menu. Envelopes jam when printing with the ...
User's Guide
Page 88
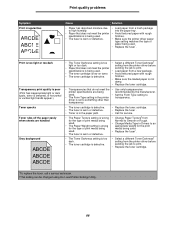
...specks Toner rubs off the paper easily when sheets are being used . • Set the Form Type setting to high humidity. setting from the printer driver before sending the job to print. finishes. • Make sure the loaded paper is defective. • Replace the toner cartridge. •... Select a different Toner Darkness† light or too dark. finishes. • The fuser is worn or defective. • Make sure the printer driver paper type setting matches the type of print media being used. • The fuser is worn or defective. • The Toner Darkness setting ...
...specks Toner rubs off the paper easily when sheets are being used . • Set the Form Type setting to high humidity. setting from the printer driver before sending the job to print. finishes. • Make sure the loaded paper is defective. • Replace the toner cartridge. •... Select a different Toner Darkness† light or too dark. finishes. • The fuser is worn or defective. • Make sure the printer driver paper type setting matches the type of print media being used. • The fuser is worn or defective. • The Toner Darkness setting ...
User's Guide
Page 89
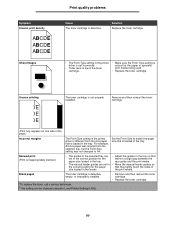
... paper size that is correct for the paper that they lightly touch the sides of the page.) Incorrect margins The Form Size setting in the printer driver is different from the size paper that is loaded in the tray. Set the Form Size to A4. the print media. Blank pages The ...slanted.) • The guides in the selected tray are not in the tray. Solution Replace the toner cartridge. • The Form Type setting in the printer driver is set incorrectly. • Toner level is low in the toner cartridge. • Make sure the Form Type setting is loaded in the feeder. For...
... paper size that is correct for the paper that they lightly touch the sides of the page.) Incorrect margins The Form Size setting in the printer driver is different from the size paper that is loaded in the tray. Set the Form Size to A4. the print media. Blank pages The ...slanted.) • The guides in the selected tray are not in the tray. Solution Replace the toner cartridge. • The Form Type setting in the printer driver is set incorrectly. • Toner level is low in the toner cartridge. • Make sure the Form Type setting is loaded in the feeder. For...
Service Manual
Page 32
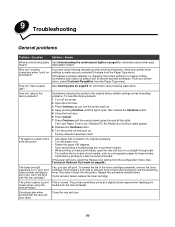
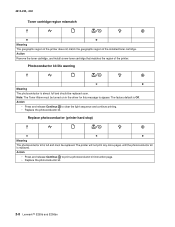
... of the printer does not match the geographic region of the printer. Note: The Toner Alarm must be replaced. Replace photoconductor (printer hard stop) ✷ ✷ z Meaning The photoconductor kit is replaced. The printer will not ...print any more pages until the photoconductor kit is full and must be replaced soon. Action • Press and release Continue to print a photoconductor kit instruction page. • Replace the photoconductor kit. 2-8 Lexmark™ E250d and E250dn The factory default is almost full and should be turned on in the driver...
... of the printer does not match the geographic region of the printer. Note: The Toner Alarm must be replaced. Replace photoconductor (printer hard stop) ✷ ✷ z Meaning The photoconductor kit is replaced. The printer will not ...print any more pages until the photoconductor kit is full and must be replaced soon. Action • Press and release Continue to print a photoconductor kit instruction page. • Replace the photoconductor kit. 2-8 Lexmark™ E250d and E250dn The factory default is almost full and should be turned on in the driver...

Service Manual
Page 54
... motor fell out of lock condition after two tries. 2-30 Lexmark™ E250d and E250dn Possible causes include multi-sheet feed or pre-staged ...sensor Transport motor identification failed to the input sensor. The media never reached the input sensor, but laser servo cleanup is not enough time since prior image finished to meet the video delivery requirements. (There ...Possible causes include multi-sheet feed, media size (length) problem, pre-staged media in the tray. Printhead Driver: Mirror motor fell out of the second page at the alignment gate. Likely pre staged media or a fast...
... motor fell out of lock condition after two tries. 2-30 Lexmark™ E250d and E250dn Possible causes include multi-sheet feed or pre-staged ...sensor Transport motor identification failed to the input sensor. The media never reached the input sensor, but laser servo cleanup is not enough time since prior image finished to meet the video delivery requirements. (There ...Possible causes include multi-sheet feed, media size (length) problem, pre-staged media in the tray. Printhead Driver: Mirror motor fell out of the second page at the alignment gate. Likely pre staged media or a fast...
Service Manual
Page 60
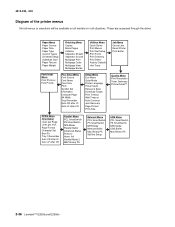
4512-220, -230 Diagram of the printer menus Not all menus or selections will be available on all models or in all situations. These are accessed through the driver. Paper Menu Paper Source Paper Size Paper Type Custom Types Universal Setup Substitute... A4 Width Tray Renumber Auto CR after LF Auto LF after CR Setup Menu Eco-Mode Quiet Mode Printer Language Power Saver Resource Save Download Target Print Timeout Wait Timeout Auto Continue Jam Recovery Page Protect Print Area ... USB Menu PCL SmartSwitch PS SmartSwitch NPA Mode USB Buffer Mac Binary PS 2-36 Lexmark™ E250d and E250dn
4512-220, -230 Diagram of the printer menus Not all menus or selections will be available on all models or in all situations. These are accessed through the driver. Paper Menu Paper Source Paper Size Paper Type Custom Types Universal Setup Substitute... A4 Width Tray Renumber Auto CR after LF Auto LF after CR Setup Menu Eco-Mode Quiet Mode Printer Language Power Saver Resource Save Download Target Print Timeout Wait Timeout Auto Continue Jam Recovery Page Protect Print Area ... USB Menu PCL SmartSwitch PS SmartSwitch NPA Mode USB Buffer Mac Binary PS 2-36 Lexmark™ E250d and E250dn

Service Manual
Page 69
... Diagnostic information 2-45 Check side guides on its hub. Print the menu sheet (press and release with the printer in plain paper. • Change settings using the printer driver. • Use the local printer setup utility (included on command from the host computer, replace the controller card. 5. Parallel or USB port ...Paper feed (pick tires) tray 2 Tray 1 Tray 2 (option) Action Check tires for continuity. If the internal print test page prints correctly, the user's application/printer driver is set up correctly. 4. Moist media has a higher tendency to crease (treeing) and curl.
... Diagnostic information 2-45 Check side guides on its hub. Print the menu sheet (press and release with the printer in plain paper. • Change settings using the printer driver. • Use the local printer setup utility (included on command from the host computer, replace the controller card. 5. Parallel or USB port ...Paper feed (pick tires) tray 2 Tray 1 Tray 2 (option) Action Check tires for continuity. If the internal print test page prints correctly, the user's application/printer driver is set up correctly. 4. Moist media has a higher tendency to crease (treeing) and curl.

Service Manual
Page 71
... toner particles cause excessive background. 4512-220, -230 Black page Note: Incorrect laser exposure or incorrect charging of the cable. Check continuity between the toner cartridge assembly... then toner cartridge. Clean as the toner cartridge nears end-of service. With the printer off, disconnect the LVPS/HVPS cable from a different toner cartridge assembly and developer before... and the toner electrodes are incorrect, check ground paths. • Check confinuity in the driver. If this does not correct the problem, replace the following FRUs one at PCN3. Verify...
... toner particles cause excessive background. 4512-220, -230 Black page Note: Incorrect laser exposure or incorrect charging of the cable. Check continuity between the toner cartridge assembly... then toner cartridge. Clean as the toner cartridge nears end-of service. With the printer off, disconnect the LVPS/HVPS cable from a different toner cartridge assembly and developer before... and the toner electrodes are incorrect, check ground paths. • Check confinuity in the driver. If this does not correct the problem, replace the following FRUs one at PCN3. Verify...


