Quick Reference
Page 3
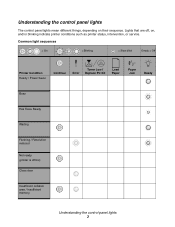
... / Power Saver Continue Toner Low / Error Replace PC Kit Load Paper Paper Jam Ready Busy Hex Trace Ready Waiting Flushing / Resolution reduced Not ready (printer is offline) Close door Insufficient collation area / Insufficient memory Understanding the control panel lights 3 Understanding the control panel lights The control panel lights mean different things, depending...
... / Power Saver Continue Toner Low / Error Replace PC Kit Load Paper Paper Jam Ready Busy Hex Trace Ready Waiting Flushing / Resolution reduced Not ready (printer is offline) Close door Insufficient collation area / Insufficient memory Understanding the control panel lights 3 Understanding the control panel lights The control panel lights mean different things, depending...

Quick Reference
Page 6
... default settings solves formatting problems. To reset the factory defaults: 1 Turn off the printer. 2 Open the front door. 3 Press Continue as you turn off and back on . 4 Keep pressing Continue until the lights cycle, then release the Continue button. 5 Close the front door. 6 Press Cancel. 7 Press Continue until the control panel cycles...
... default settings solves formatting problems. To reset the factory defaults: 1 Turn off the printer. 2 Open the front door. 3 Press Continue as you turn off and back on . 4 Keep pressing Continue until the lights cycle, then release the Continue button. 5 Close the front door. 6 Press Cancel. 7 Press Continue until the control panel cycles...
Quick Reference
Page 13
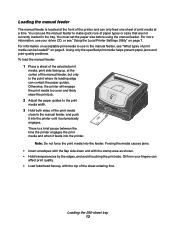
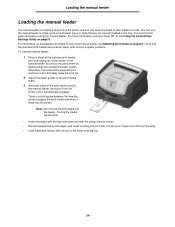
... sheet of print media at the center of paper types or sizes that are not currently loaded in the manual feeder, see "Using the Local Printer Settings Utility" on page 8. You can affect print quality. • Load letterhead faceup, with the stamp area as shown. • Hold transparencies by...quality problems. To load the manual feeder: 1 Place a sheet of the print media close to the print media width. 3 Hold both sides of the selected print media, print side facing up, at a time. Otherwise, the printer will engage the print media too soon and likely skew the print job. 2 Adjust ...
... sheet of print media at the center of paper types or sizes that are not currently loaded in the manual feeder, see "Using the Local Printer Settings Utility" on page 8. You can affect print quality. • Load letterhead faceup, with the stamp area as shown. • Hold transparencies by...quality problems. To load the manual feeder: 1 Place a sheet of the print media close to the print media width. 3 Hold both sides of the selected print media, print side facing up, at a time. Otherwise, the printer will engage the print media too soon and likely skew the print job. 2 Adjust ...

Quick Reference
Page 14
Note: If you print a multiple-page job with the rear exit door open the rear exit door. When closed, all media is open, all print media comes out the rear exit. Using the rear exit The single-sheet rear exit provides a straight-through paper ...path to help reduce curling and potential jams. This is being canceled. From a Windows computer 1 Click Start Æ Settings Æ Printers. 2 Double-click the printer you want to the output bin on the control panel while the job is especially useful for specialty media, such as transparencies, labels, card...
Note: If you print a multiple-page job with the rear exit door open the rear exit door. When closed, all media is open, all print media comes out the rear exit. Using the rear exit The single-sheet rear exit provides a straight-through paper ...path to help reduce curling and potential jams. This is being canceled. From a Windows computer 1 Click Start Æ Settings Æ Printers. 2 Double-click the printer you want to the output bin on the control panel while the job is especially useful for specialty media, such as transparencies, labels, card...
Quick Reference
Page 18
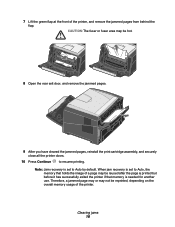
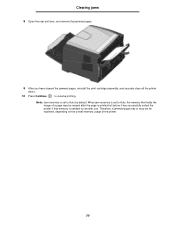
... that memory is set to Auto by default. 7 Lift the green flap at the front of the printer. Therefore, a jammed page may or may be reprinted, depending on the overall memory usage of the printer, and remove the jammed pages from behind the flap. CAUTION:The fuser or fuser area may not... hot. 8 Open the rear exit door, and remove the jammed pages. 9 After you have cleared the jammed pages, reinstall the print cartridge assembly, and securely close all the printer doors. 10 Press Continue to resume printing.
... that memory is set to Auto by default. 7 Lift the green flap at the front of the printer. Therefore, a jammed page may or may be reprinted, depending on the overall memory usage of the printer, and remove the jammed pages from behind the flap. CAUTION:The fuser or fuser area may not... hot. 8 Open the rear exit door, and remove the jammed pages. 9 After you have cleared the jammed pages, reinstall the print cartridge assembly, and securely close all the printer doors. 10 Press Continue to resume printing.
User's Guide
Page 8
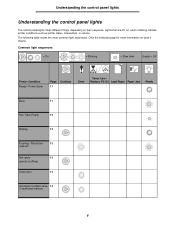
...control panel lights Understanding the control panel lights The control panel lights mean different things, depending on , and/or blinking indicate printer conditions such as printer status, intervention, or service. Lights that are off, on their sequence. Click the indicated page for more information on what ...it means. The following table shows the most common light sequences. Common light sequences = On = Blinking = Slow blink Empty = Off Printer Condition Ready / Power Saver Page Continue 11 Error Toner Low / Replace PC Kit Load Paper Paper Jam Ready Busy 11 Hex Trace ...
...control panel lights Understanding the control panel lights The control panel lights mean different things, depending on , and/or blinking indicate printer conditions such as printer status, intervention, or service. Lights that are off, on their sequence. Click the indicated page for more information on what ...it means. The following table shows the most common light sequences. Common light sequences = On = Blinking = Slow blink Empty = Off Printer Condition Ready / Power Saver Page Continue 11 Error Toner Low / Replace PC Kit Load Paper Paper Jam Ready Busy 11 Hex Trace ...
User's Guide
Page 14
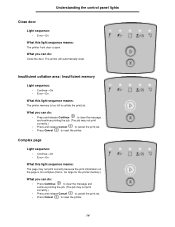
... / Insufficient memory Light sequence: • Continue-On • Error-On What this light sequence means: The printer memory is too full to reset the printer. What you can do : Close the door. Understanding the control panel lights Close door Light sequence: • Error-On What this light sequence means: The page may not print...
... / Insufficient memory Light sequence: • Continue-On • Error-On What this light sequence means: The printer memory is too full to reset the printer. What you can do : Close the door. Understanding the control panel lights Close door Light sequence: • Error-On What this light sequence means: The page may not print...

User's Guide
Page 21
... length is too short to cancel the print job. What you loaded is large enough. • Open the front door, clear the paper path, and close the door to resume printing (see Clearing jams on page56.) • Press Continue to clear the light sequence and continue printing. • Press Cancel to... media you can do: • Remove printed pages from the output bin. • Press Continue to clear the error code. 21 This occurs when the printer does not know the print media size loaded in the tray, or when there is full.
... length is too short to cancel the print job. What you loaded is large enough. • Open the front door, clear the paper path, and close the door to resume printing (see Clearing jams on page56.) • Press Continue to clear the light sequence and continue printing. • Press Cancel to... media you can do: • Remove printed pages from the output bin. • Press Continue to clear the error code. 21 This occurs when the printer does not know the print media size loaded in the tray, or when there is full.
User's Guide
Page 33
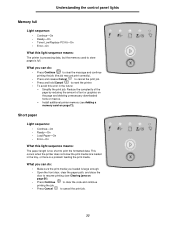
...large enough. • Open the front door, clear the paper path, and close the door to resume printing (see Adding a memory card on the page and deleting unnecessary downloaded fonts or macros. - This occurs when the printer does not know the print media size loaded in the future: - Understanding the...: • Continue-On • Ready-On • Toner Low/Replace PC Kit-On • Error-On What this light sequence means: The printer is processing data, but the memory used to store pages is too short to print the formatted data. Short paper Light sequence: • Continue-On...
...large enough. • Open the front door, clear the paper path, and close the door to resume printing (see Adding a memory card on the page and deleting unnecessary downloaded fonts or macros. - This occurs when the printer does not know the print media size loaded in the future: - Understanding the...: • Continue-On • Ready-On • Toner Low/Replace PC Kit-On • Error-On What this light sequence means: The printer is processing data, but the memory used to store pages is too short to print the formatted data. Short paper Light sequence: • Continue-On...
User's Guide
Page 37
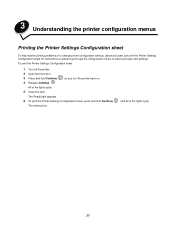
... of the lights cycle. 5 Close the door. 3 Understanding the printer configuration menus Printing the Printer Settings Configuration sheet To help resolve printing problems or to change printer configuration settings, advanced users can print the Printer Settings Configuration sheet for instructions on . 4 Release Continue . To print the Printer Settings Configuration sheet: 1 Turn off the printer. 2 Open the front...
... of the lights cycle. 5 Close the door. 3 Understanding the printer configuration menus Printing the Printer Settings Configuration sheet To help resolve printing problems or to change printer configuration settings, advanced users can print the Printer Settings Configuration sheet for instructions on . 4 Release Continue . To print the Printer Settings Configuration sheet: 1 Turn off the printer. 2 Open the front...
User's Guide
Page 54
... the printer will engage the print media too soon and likely skew the print job. 2 Adjust the paper guides to the print media width. 3 Hold both sides of the print media close to ...use the manual feeder to the point where its leading edge can only feed one sheet of paper types or sizes that are not currently loaded in the manual feeder, see Using the Local Printer...or see Selecting print media on acceptable print media to the manual feeder, and push it into the printer until it feeds into the feeder. For information on page43. For more information, see your fingers ...
... the printer will engage the print media too soon and likely skew the print job. 2 Adjust the paper guides to the print media width. 3 Hold both sides of the print media close to ...use the manual feeder to the point where its leading edge can only feed one sheet of paper types or sizes that are not currently loaded in the manual feeder, see Using the Local Printer...or see Selecting print media on acceptable print media to the manual feeder, and push it into the printer until it feeds into the feeder. For information on page43. For more information, see your fingers ...

User's Guide
Page 55
Using the rear exit Using the rear exit The single-sheet rear exit provides a straight-through paper path to help reduce curling and potential jams. This is sent to the output bin on top of the printer. Note: If you print a multiple-page job with the rear exit door open the rear exit door. To use the rear exit, open , the print speed may slow down. 55 When closed, all print media comes out the rear exit. When the rear exit door is open, all media is especially useful for specialty media, such as transparencies, labels, card stock, or index cards.
Using the rear exit Using the rear exit The single-sheet rear exit provides a straight-through paper path to help reduce curling and potential jams. This is sent to the output bin on top of the printer. Note: If you print a multiple-page job with the rear exit door open the rear exit door. To use the rear exit, open , the print speed may slow down. 55 When closed, all print media comes out the rear exit. When the rear exit door is open, all media is especially useful for specialty media, such as transparencies, labels, card stock, or index cards.
User's Guide
Page 59
...Open the rear exit door, and remove the jammed pages. 9 After you have cleared the jammed pages, reinstall the print cartridge assembly, and securely close all the printer doors. 10 Press Continue to Auto by default. Therefore, a jammed page may or may not be reprinted, depending on the overall memory usage of... a page may be reused after the page is printed but before it has successfully exited the printer if that holds the image of the printer. 59 Note: Jam recovery is set to Auto, the memory that memory is set to resume printing. When jam recovery ...
...Open the rear exit door, and remove the jammed pages. 9 After you have cleared the jammed pages, reinstall the print cartridge assembly, and securely close all the printer doors. 10 Press Continue to Auto by default. Therefore, a jammed page may or may not be reprinted, depending on the overall memory usage of... a page may be reused after the page is printed but before it has successfully exited the printer if that holds the image of the printer. 59 Note: Jam recovery is set to Auto, the memory that memory is set to resume printing. When jam recovery ...
User's Guide
Page 61
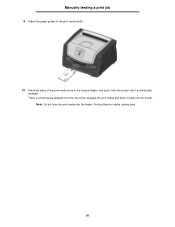
Forcing the print media causes jams. 61 Note: Do not force the print media into the printer until it automatically engages. Manually feeding a print job 9 Adjust the paper guides to the print media width. 10 Hold both sides of the print media close to the manual feeder, and push it into the feeder. There is a brief pause between the time the printer engages the print media and when it feeds into the printer.
Forcing the print media causes jams. 61 Note: Do not force the print media into the printer until it automatically engages. Manually feeding a print job 9 Adjust the paper guides to the print media width. 10 Hold both sides of the print media close to the manual feeder, and push it into the feeder. There is a brief pause between the time the printer engages the print media and when it feeds into the printer.

User's Guide
Page 72
..., and unplug the power cord from the wall outlet before continuing. CAUTION: If you touch a memory card. Memory options designed for other Lexmark printers may be required to 64MB of additional memory (for an optional memory card. Avoid touching the connection points along the edge of the card.... the latches on either end of the connector snap into the connector until the latches on both ends of the card. 7 Close the side door. 8 Close the rear exit. 9 Close the front door. 10 See Recognizing installed options on page73 . 72 Warning: Memory is easily damaged by static electricity. Touch ...
..., and unplug the power cord from the wall outlet before continuing. CAUTION: If you touch a memory card. Memory options designed for other Lexmark printers may be required to 64MB of additional memory (for an optional memory card. Avoid touching the connection points along the edge of the card.... the latches on either end of the connector snap into the connector until the latches on both ends of the card. 7 Close the side door. 8 Close the rear exit. 9 Close the front door. 10 See Recognizing installed options on page73 . 72 Warning: Memory is easily damaged by static electricity. Touch ...
User's Guide
Page 81
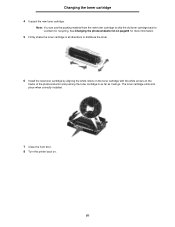
... the photoconductor kit on page82 for more information. 5 Firmly shake the toner cartridge in all directions to Lexmark for recycling. The toner cartridge clicks into place when correctly installed. 7 Close the front door. 8 Turn the printer back on the tracks of the photoconductor and pushing the toner cartridge in as far as it...
... the photoconductor kit on page82 for more information. 5 Firmly shake the toner cartridge in all directions to Lexmark for recycling. The toner cartridge clicks into place when correctly installed. 7 Close the front door. 8 Turn the printer back on the tracks of the photoconductor and pushing the toner cartridge in as far as it...

User's Guide
Page 84
... the instruction sheet that shipped with the green arrows on the tracks in the printer and pushing the print cartridge assembly in as far as it will go. 7 Close the front door. 8 Turn the printer back on page74. If Photoconductor is listed under Warnings, the photoconductor counter has ...not been properly reset. Recycling Lexmark products 6 Install the print cartridge assembly into the printer by aligning the green arrows on the guides...
... the instruction sheet that shipped with the green arrows on the tracks in the printer and pushing the print cartridge assembly in as far as it will go. 7 Close the front door. 8 Turn the printer back on page74. If Photoconductor is listed under Warnings, the photoconductor counter has ...not been properly reset. Recycling Lexmark products 6 Install the print cartridge assembly into the printer by aligning the green arrows on the guides...
User's Guide
Page 85
...Low / Replace PC Kit, Ready and Continue lights appear. 8 Release the Continue button. 9 Turn the printer off the printer. 2 Open the front door. 3 Press Continue as a xerographic paper for laser printers. • If possible try printing in yet. The toner low light sequence is sealed in its original ... cartridge to make sure you can still print. Can I don't have been reset. Close the rear exit door. 85 Why am I missing characters when I clear a paper jam? From your printer driver settings to put in a less humid environment. Factory defaults have another kind or brand...
...Low / Replace PC Kit, Ready and Continue lights appear. 8 Release the Continue button. 9 Turn the printer off the printer. 2 Open the front door. 3 Press Continue as a xerographic paper for laser printers. • If possible try printing in yet. The toner low light sequence is sealed in its original ... cartridge to make sure you can still print. Can I don't have been reset. Close the rear exit door. 85 Why am I missing characters when I clear a paper jam? From your printer driver settings to put in a less humid environment. Factory defaults have another kind or brand...
User's Guide
Page 86
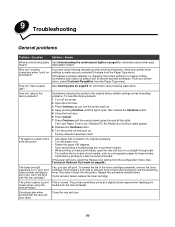
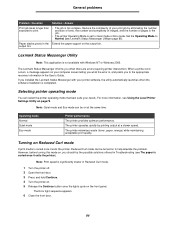
... panel. The Error light sequence appears. 6 Close the front door. 86 output bin. Lexmark Status Messenger Utility Note: This application is too complex. General problems Problem / Question Solution / Answer Print job takes longer than expected to print. • The job is not available with your printer software, the utility automatically launches when the...
... panel. The Error light sequence appears. 6 Close the front door. 86 output bin. Lexmark Status Messenger Utility Note: This application is too complex. General problems Problem / Question Solution / Answer Print job takes longer than expected to print. • The job is not available with your printer software, the utility automatically launches when the...

User's Guide
Page 92
Warning: Not using a clean, dry, lint-free cloth may result in as far as it will go. 7 Close the front door. 8 Turn the printer on. 92 Print quality problems 4 Locate the glass printhead lens within the recessed area in the top of the print cartridge assembly with the arrows on the tracks in the printer and pushing the print cartridge assembly in damage to the printhead lens. 6 Install the print cartridge assembly into the printer by aligning the arrows on the guides of the printer. 5 Gently wipe the printhead lens with a clean, dry, lint-free cloth.
Warning: Not using a clean, dry, lint-free cloth may result in as far as it will go. 7 Close the front door. 8 Turn the printer on. 92 Print quality problems 4 Locate the glass printhead lens within the recessed area in the top of the print cartridge assembly with the arrows on the tracks in the printer and pushing the print cartridge assembly in damage to the printhead lens. 6 Install the print cartridge assembly into the printer by aligning the arrows on the guides of the printer. 5 Gently wipe the printhead lens with a clean, dry, lint-free cloth.


