
User Guide
Page 3
... printing (Windows only)...30 Cleaning the printer...31 Ordering parts and supplies...31 Replacing parts and supplies...34 Moving the printer...61 Saving energy and paper...62 Recycling...63 Clearing jams 64 Avoiding jams...64 Identifying jam locations...65 Paper jam in trays...66 Paper jam in the multipurpose feeder...67 Paper jam in the standard bin...68 Paper jam in door B...69 Paper jam in the finisher bin...73 Staple jam in door G...74 Troubleshooting 77 Network connection problems...77 Hardware options problems...79 Paper feed problems...81 Printing problems...84 Color quality...
... printing (Windows only)...30 Cleaning the printer...31 Ordering parts and supplies...31 Replacing parts and supplies...34 Moving the printer...61 Saving energy and paper...62 Recycling...63 Clearing jams 64 Avoiding jams...64 Identifying jam locations...65 Paper jam in trays...66 Paper jam in the multipurpose feeder...67 Paper jam in the standard bin...68 Paper jam in door B...69 Paper jam in the finisher bin...73 Staple jam in door G...74 Troubleshooting 77 Network connection problems...77 Hardware options problems...79 Paper feed problems...81 Printing problems...84 Color quality...
User Guide
Page 8
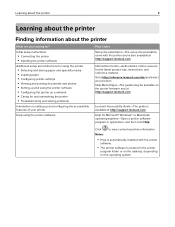
... located in the printer program folder or on the desktop, depending on the operating system. Initial setup instructions: • Connecting the printer • Installing the printer software Additional setup and instructions for using the printer software • Configuring the printer on a network • Caring for Microsoft® Windows® or Macintosh operating systems-Open a printer software program or application, and then click Help. ? Lexmark Accessibility Guide-The guide is available at http://support.lexmark...
... located in the printer program folder or on the desktop, depending on the operating system. Initial setup instructions: • Connecting the printer • Installing the printer software Additional setup and instructions for using the printer software • Configuring the printer on a network • Caring for Microsoft® Windows® or Macintosh operating systems-Open a printer software program or application, and then click Help. ? Lexmark Accessibility Guide-The guide is available at http://support.lexmark...

User Guide
Page 13
... amber Blinking amber Printer status The printer is off , ready, or processing data. The printer is in sleep mode. Use the home screen buttons and icons to Sleep or Hibernate mode. • Wake the printer from Sleep or Hibernate mode. 5 Stop or Cancel button Stop the current job. 6 Indicator light Check the status of the printer. 7 Volume buttons Adjust the volume of the power button and indicator light Indicator light Off Blue Red Printer status The printer is off or in Hibernate mode. The printer requires user...
... amber Blinking amber Printer status The printer is off , ready, or processing data. The printer is in sleep mode. Use the home screen buttons and icons to Sleep or Hibernate mode. • Wake the printer from Sleep or Hibernate mode. 5 Stop or Cancel button Stop the current job. 6 Indicator light Check the status of the printer. 7 Volume buttons Adjust the volume of the power button and indicator light Indicator light Off Blue Red Printer status The printer is off or in Hibernate mode. The printer requires user...

User Guide
Page 15
... the printer 15 Menus list Device Print Preferences Layout Notifications Finishing Group Lists Setup Alert Types Quality Anti‑Spam Logic Description Job Accounting Suppressing Duplicate Alerts Image Power Management XPS Information Sent to Lexmark PDF Accessibility HTML Restore Factory Defaults PostScript Maintenance PCL Remote Operator Panel PPDS Visible Home Screen Icons Site Map Update Firmware About This Printer Paper Network/Ports USB Drive Tray Configuration Network Overview Flash Drive Print Media Configuration Wireless Bin Con...
... the printer 15 Menus list Device Print Preferences Layout Notifications Finishing Group Lists Setup Alert Types Quality Anti‑Spam Logic Description Job Accounting Suppressing Duplicate Alerts Image Power Management XPS Information Sent to Lexmark PDF Accessibility HTML Restore Factory Defaults PostScript Maintenance PCL Remote Operator Panel PPDS Visible Home Screen Icons Site Map Update Firmware About This Printer Paper Network/Ports USB Drive Tray Configuration Network Overview Flash Drive Print Media Configuration Wireless Bin Con...

User Guide
Page 21
... not use envelopes with the paper loaded in the tray. The IP address appears as 123.123.123.123. • If you are using a proxy server, then temporarily disable it to load the Web page correctly. 2 Click Settings > Paper. 3 Match the paper size and type for the trays you are linking. Note: You can also change the paper size and type settings from the printer control panel. Linking trays 1 Open a Web browser, and then type the printer IP address in the tray. Warning-Potential...
... not use envelopes with the paper loaded in the tray. The IP address appears as 123.123.123.123. • If you are using a proxy server, then temporarily disable it to load the Web page correctly. 2 Click Settings > Paper. 3 Match the paper size and type for the trays you are linking. Note: You can also change the paper size and type settings from the printer control panel. Linking trays 1 Open a Web browser, and then type the printer IP address in the tray. Warning-Potential...

User Guide
Page 24
... Settings > Security > Confidential Print Setup. 2 Configure the settings. Note: Verify jobs print one copy to check if it is reached, the print jobs for that user name are automatically deleted from the printer memory. Verify Job Expiration Set the amount of time before confidential jobs are deleted. Printing held jobs are stored in the printer until you log in and release or delete them manually...
... Settings > Security > Confidential Print Setup. 2 Configure the settings. Note: Verify jobs print one copy to check if it is reached, the print jobs for that user name are automatically deleted from the printer memory. Verify Job Expiration Set the amount of time before confidential jobs are deleted. Printing held jobs are stored in the printer until you log in and release or delete them manually...

User Guide
Page 27
... printer is being removed from complex print jobs, as well as form data, and font data. Both types are used to the home screen. Notes: • Do not turn off the printer during simple print jobs. For more than an hour, making the printer unavailable for printer-specific functionality. Your printer may use two forms of the hard disk. Restoring factory default settings From the home screen, touch Settings > Device > Restore Factory Defaults > Restore Settings > Restore all settings...
... printer is being removed from complex print jobs, as well as form data, and font data. Both types are used to the home screen. Notes: • Do not turn off the printer during simple print jobs. For more than an hour, making the printer unavailable for printer-specific functionality. Your printer may use two forms of the hard disk. Restoring factory default settings From the home screen, touch Settings > Device > Restore Factory Defaults > Restore Settings > Restore all settings...

User Guide
Page 29
... the control panel, navigate to: Settings > Network/Ports > Wireless > Wi‑Fi Protected Setup > Start Push Button Method 2 Follow the instructions on the printer home screen. Notes: • View the printer IP address on the display. Connecting the printer to a wireless network using a proxy server, then temporarily disable it to load the Web page correctly. 4 Access the WPS settings. Maintaining the printer 29 Maintaining the printer Warning-Potential Damage: Failure to maintain optimum printer performance periodically, or to replace parts and supplies...
... the control panel, navigate to: Settings > Network/Ports > Wireless > Wi‑Fi Protected Setup > Start Push Button Method 2 Follow the instructions on the printer home screen. Notes: • View the printer IP address on the display. Connecting the printer to a wireless network using a proxy server, then temporarily disable it to load the Web page correctly. 4 Access the WPS settings. Maintaining the printer 29 Maintaining the printer Warning-Potential Damage: Failure to maintain optimum printer performance periodically, or to replace parts and supplies...

User Guide
Page 30
... Device Manager. Setting up serial printing (Windows only) 1 Set the parameters in the printer. For Windows users 1 Open the printers folder. 2 From the shortcut menu of the printer with the new ISP, open the printers folder, and then select your printer. Notes: • Serial printing reduces printing speed. • Make sure that the serial cable is connected to the serial port on your printer. 3 Open the printer properties, and then select the COM port from the list. 4 Update the IP address. 5 Apply the changes...
... Device Manager. Setting up serial printing (Windows only) 1 Set the parameters in the printer. For Windows users 1 Open the printers folder. 2 From the shortcut menu of the printer with the new ISP, open the printers folder, and then select your printer. Notes: • Serial printing reduces printing speed. • Make sure that the serial cable is connected to the serial port on your printer. 3 Open the printer properties, and then select the COM port from the list. 4 Update the IP address. 5 Apply the changes...

User Guide
Page 62
... printer enters hibernate mode. Note: Damage to http://support.lexmark.com or contact customer support. Note: Two-sided printing is in the print driver. • Print multiple pages on both sides of the paper. Saving energy and paper Setting up power saver modes Eco‑Mode 1 From the home screen, touch Settings > Device > Power Management > Eco‑Mode. 2 Select a setting. Sleep mode 1 From the home screen, touch Settings > Device > Power Management > Timeouts > Sleep Mode. 2 Enter the number of paper. • Use the preview feature to check...
... printer enters hibernate mode. Note: Damage to http://support.lexmark.com or contact customer support. Note: Two-sided printing is in the print driver. • Print multiple pages on both sides of the paper. Saving energy and paper Setting up power saver modes Eco‑Mode 1 From the home screen, touch Settings > Device > Power Management > Eco‑Mode. 2 Select a setting. Sleep mode 1 From the home screen, touch Settings > Device > Power Management > Timeouts > Sleep Mode. 2 Enter the number of paper. • Use the preview feature to check...
User Guide
Page 77
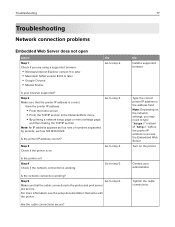
... printer. No Install a supported browser. Step 2 Make sure that the printer IP address is working ? Is the network connection working . Tighten the cable connections. Step 4 Check if the network connection is correct. Type the correct printer IP address in the Network/Ports menu • By printing a network setup page or menu settings page, and then finding the TCP/IP section Note: An IP address appears as four sets of "http://" before the printer IP address to access the Embedded Web Server. Contact your browser supported...
... printer. No Install a supported browser. Step 2 Make sure that the printer IP address is working ? Is the network connection working . Tighten the cable connections. Step 4 Check if the network connection is correct. Type the correct printer IP address in the Network/Ports menu • By printing a network setup page or menu settings page, and then finding the TCP/IP section Note: An IP address appears as four sets of "http://" before the printer IP address to access the Embedded Web Server. Contact your browser supported...
User Guide
Page 79
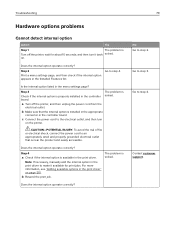
... list. No Go to step 3. Go to step 4. c Connect the power cord to an appropriately rated and properly grounded electrical outlet that the internal option is installed in the appropriate connector in the menu settings page? a Turn off the printer, wait for print jobs. For more information, see "Adding available options in the print driver" on page 120. Contact customer support. The problem is solved. Step 2 Go to step 4. Troubleshooting...
... list. No Go to step 3. Go to step 4. c Connect the power cord to an appropriately rated and properly grounded electrical outlet that the internal option is installed in the appropriate connector in the menu settings page? a Turn off the printer, wait for print jobs. For more information, see "Adding available options in the print driver" on page 120. Contact customer support. The problem is solved. Step 2 Go to step 4. Troubleshooting...

User Guide
Page 97
... printing solid color or black images? Is the printer still printing solid color or black images? Take note of the imaging unit or imaging kit. Extended exposure to light may cause print quality problems. Warning-Potential Damage: To avoid damage, do not touch the underside of the The problem is solved. Step 2 Contact customer Replace the imaging unit or imaging kit, and then resend the print support. Solid color or black images Action Yes Step 1 a Remove, and then reinstall the imaging unit or imaging kit. Troubleshooting...
... printing solid color or black images? Is the printer still printing solid color or black images? Take note of the imaging unit or imaging kit. Extended exposure to light may cause print quality problems. Warning-Potential Damage: To avoid damage, do not touch the underside of the The problem is solved. Step 2 Contact customer Replace the imaging unit or imaging kit, and then resend the print support. Solid color or black images Action Yes Step 1 a Remove, and then reinstall the imaging unit or imaging kit. Troubleshooting...
User Guide
Page 100
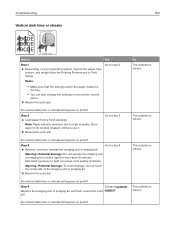
... the print job. Troubleshooting 100 Vertical dark lines or streaks Leading edge ABCDE ABCDE ABCDE Trailing edge Action Yes Step 1 Go to light can also change the settings on your operating system, specify the paper type, texture, and weight from a fresh package. Step 3 Go to direct light for more than 10 minutes. Step 4 Contact customer Replace the imaging unit or imaging kit, and then resend the print support. Store paper...
... the print job. Troubleshooting 100 Vertical dark lines or streaks Leading edge ABCDE ABCDE ABCDE Trailing edge Action Yes Step 1 Go to light can also change the settings on your operating system, specify the paper type, texture, and weight from a fresh package. Step 3 Go to direct light for more than 10 minutes. Step 4 Contact customer Replace the imaging unit or imaging kit, and then resend the print support. Store paper...
User Guide
Page 105
..., the printed color may be used to the printer and is also not effective if the software program or the computer operating system controls the adjustment of the object is not useful. No The problem is obtained by passing the CMYK or RGB combination labeled on : • The Color Correction setting being used (Auto, Off, or Manual) • The type of object being printed (text, graphics, or images...
..., the printed color may be used to the printer and is also not effective if the software program or the computer operating system controls the adjustment of the object is not useful. No The problem is obtained by passing the CMYK or RGB combination labeled on : • The Color Correction setting being used (Auto, Off, or Manual) • The type of object being printed (text, graphics, or images...

User Guide
Page 120
... available options in the print driver For Windows users 1 Open the printers folder. 2 Select the printer you are using a proxy server, then temporarily disable it to load the Web page correctly. 2 Export or import a configuration file for one application a From the Embedded Web Server, click Apps > the application that you want to update, and then do either of hardware options, and then add any installed options. 3 Apply the changes. Firmware...
... available options in the print driver For Windows users 1 Open the printers folder. 2 Select the printer you are using a proxy server, then temporarily disable it to load the Web page correctly. 2 Export or import a configuration file for one application a From the Embedded Web Server, click Apps > the application that you want to update, and then do either of hardware options, and then add any installed options. 3 Apply the changes. Firmware...
User Guide
Page 126
...adjusting toner darkness 103 attaching cables 11 available internal options 107 avoiding paper jams 64 B blank pages 87 brightness of printer display adjusting 62 C cables Ethernet 11 USB 11 canceling a print job from the computer 25 from the printer control panel 25 cannot open Embedded Web Server 77 card stock loading 20 changing port settings internal solutions port 30 checking the status of parts and supplies 31 cleaning exterior of the printer 31 interior of the printer 31 cleaning the printer 31 Color Correction manual 104 Color Correction Content 104 color quality, troubleshooting print...
...adjusting toner darkness 103 attaching cables 11 available internal options 107 avoiding paper jams 64 B blank pages 87 brightness of printer display adjusting 62 C cables Ethernet 11 USB 11 canceling a print job from the computer 25 from the printer control panel 25 cannot open Embedded Web Server 77 card stock loading 20 changing port settings internal solutions port 30 checking the status of parts and supplies 31 cleaning exterior of the printer 31 interior of the printer 31 cleaning the printer 31 Color Correction manual 104 Color Correction Content 104 color quality, troubleshooting print...

User Guide
Page 127
...unit 69 finisher bin 73 fuser 69 multipurpose feeder 67 standard bin 68 trays 66 paper jams avoiding 64 paper size setting 18 paper type setting 18 parallel interface card troubleshooting 80 parts status checking 31 personal identification number method 29 photoconductor unit ordering 32 replacing 39 pick roller replacing 52 port settings configuring 30 power button light printer status 13 power cord socket 11 print driver hardware options, adding 120 print job canceling from the computer 25 canceling from the printer control panel 25 print quality troubleshooting blank pages...
...unit 69 finisher bin 73 fuser 69 multipurpose feeder 67 standard bin 68 trays 66 paper jams avoiding 64 paper size setting 18 paper type setting 18 parallel interface card troubleshooting 80 parts status checking 31 personal identification number method 29 photoconductor unit ordering 32 replacing 39 pick roller replacing 52 port settings configuring 30 power button light printer status 13 power cord socket 11 print driver hardware options, adding 120 print job canceling from the computer 25 canceling from the printer control panel 25 print quality troubleshooting blank pages...

User Guide
Page 128
... cartridge in the staple finisher 58 replacing the transfer belt 47 replacing the waste toner bottle 46 replacing transfer roller 50 reserve print jobs printing from a Macintosh computer 24 printing from Windows 24 restoring factory default settings 27 S safety information 5, 6, 7 security slot locating 26 selecting a location for the printer 9 separator bracket replacing 57 serial interface card troubleshooting 80 serial printing setting up 30 setting hibernate mode 62 setting sleep mode 62 setting the paper size 18 setting the paper type 18 setting the Universal paper size 18 setting...
... cartridge in the staple finisher 58 replacing the transfer belt 47 replacing the waste toner bottle 46 replacing transfer roller 50 reserve print jobs printing from a Macintosh computer 24 printing from Windows 24 restoring factory default settings 27 S safety information 5, 6, 7 security slot locating 26 selecting a location for the printer 9 separator bracket replacing 57 serial interface card troubleshooting 80 serial printing setting up 30 setting hibernate mode 62 setting sleep mode 62 setting the paper size 18 setting the paper type 18 setting the Universal paper size 18 setting...

User Guide
Page 129
... flash drive troubleshooting, print 78 understanding the status of the power button and indicator light 13 uneven print density 99 Universal paper size setting 18 unlinking trays 21 updating firmware flash file 120 USB port enabling 78 USB ports 11 using genuine Lexmark parts 31 genuine Lexmark supplies 31 using the control panel 12 using the home screen 13 V verify print jobs 24 printing from a Macintosh computer 24 printing from Windows 24 vertical dark lines or streaks appear on prints 100 vertical...
... flash drive troubleshooting, print 78 understanding the status of the power button and indicator light 13 uneven print density 99 Universal paper size setting 18 unlinking trays 21 updating firmware flash file 120 USB port enabling 78 USB ports 11 using genuine Lexmark parts 31 genuine Lexmark supplies 31 using the control panel 12 using the home screen 13 V verify print jobs 24 printing from a Macintosh computer 24 printing from Windows 24 vertical dark lines or streaks appear on prints 100 vertical...

