Forms and Bar Code Card Technical Reference Guide
Page 133
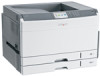
... printer, and when the accompanying bar code dictionaries have been installed in Optra Forms. 2 All one-dimensional bar code symbologies supported by the United States Postal Service (USPS) canceling machines to sort mail according to RM4SCC except for Customer Encoding Swiss Post 3 of 9 bar code Y...are not available in PCL 5 or PostScript. Lexmark Forms and Bar Code Card v3.0 Lexmark Forms and Bar Code Card v3.1 Lexmark Forms and Bar Code Card v3.2 LDSS Forms Composer v3.3.9 LDSS Document Producer Lexmark Optra Forms Bar code name Sample image Singapore 4-State Y Y Y Y Y Y2 ...
... printer, and when the accompanying bar code dictionaries have been installed in Optra Forms. 2 All one-dimensional bar code symbologies supported by the United States Postal Service (USPS) canceling machines to sort mail according to RM4SCC except for Customer Encoding Swiss Post 3 of 9 bar code Y...are not available in PCL 5 or PostScript. Lexmark Forms and Bar Code Card v3.0 Lexmark Forms and Bar Code Card v3.1 Lexmark Forms and Bar Code Card v3.2 LDSS Forms Composer v3.3.9 LDSS Document Producer Lexmark Optra Forms Bar code name Sample image Singapore 4-State Y Y Y Y Y Y2 ...

Maintenance Guide
Page 2
... the printer control panel 6 Checking the status of supplies from a network computer 7 Ordering supplies...7 Ordering toner cartridges...7 Ordering imaging units...8 Ordering a fuser or a transfer module...8 Ordering a waste toner bottle...8 Replacing Supplies...9 Replacing an imaging unit...9 Replacing a toner cartridge...11 Replacing the waste toner bottle...13 Moving the printer...15 Before moving the printer...15...
... the printer control panel 6 Checking the status of supplies from a network computer 7 Ordering supplies...7 Ordering toner cartridges...7 Ordering imaging units...8 Ordering a fuser or a transfer module...8 Ordering a waste toner bottle...8 Replacing Supplies...9 Replacing an imaging unit...9 Replacing a toner cartridge...11 Replacing the waste toner bottle...13 Moving the printer...15 Before moving the printer...15...

Maintenance Guide
Page 4
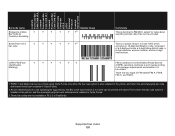
Make sure it is in the correct position. Maintaining the printer 4 b Push the imaging unit lock lever up and pull out the imaging unit. 4 Locate the LED wipe at the end of the imaging unit. 3 Remove the imaging unit: a Open the internal cover.
Make sure it is in the correct position. Maintaining the printer 4 b Push the imaging unit lock lever up and pull out the imaging unit. 4 Locate the LED wipe at the end of the imaging unit. 3 Remove the imaging unit: a Open the internal cover.
Maintenance Guide
Page 5
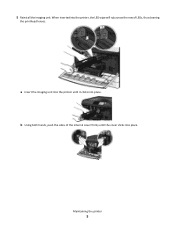
When inserted into the printer, the LED wipe will rub across the row of the internal cover firmly until it clicks into place. b Using both hands, push the sides of LEDs, thus cleaning the printhead lenses. Maintaining the printer 5 a Insert the imaging unit into the printer until the cover clicks into place. 5 Reinstall the imaging unit.
When inserted into the printer, the LED wipe will rub across the row of the internal cover firmly until it clicks into place. b Using both hands, push the sides of LEDs, thus cleaning the printhead lenses. Maintaining the printer 5 a Insert the imaging unit into the printer until the cover clicks into place. 5 Reinstall the imaging unit.
Maintenance Guide
Page 6
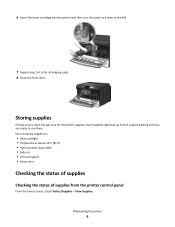
Maintaining the printer 6 Do not expose supplies to for the printer supplies. Storing supplies Choose a cool, clean storage area for all imaging units. 8 Close the front door. 6 Insert the toner cartridge into the printer and then turn the toner lock lever to the left. 7 Repeat step 2-6 to : • ...
Maintaining the printer 6 Do not expose supplies to for the printer supplies. Storing supplies Choose a cool, clean storage area for all imaging units. 8 Close the front door. 6 Insert the toner cartridge into the printer and then turn the toner lock lever to the left. 7 Repeat step 2-6 to : • ...
Maintenance Guide
Page 8
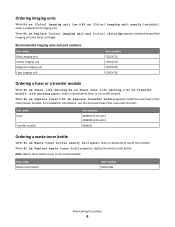
... the printer 8 Note: Waste toner bottle reuse is not recommended. When 84.xx Replace [color] imaging unit and [color] cartridge appears, replace the specified imaging unit and toner cartridge. Recommended imaging units and part numbers Part name Black imaging unit Yellow imaging unit Magenta imaging unit Cyan imaging unit Part number C925X72G C925X75G C925X74G C925X73G Ordering a fuser or a transfer module When 80.xx Fuser...
... the printer 8 Note: Waste toner bottle reuse is not recommended. When 84.xx Replace [color] imaging unit and [color] cartridge appears, replace the specified imaging unit and toner cartridge. Recommended imaging units and part numbers Part name Black imaging unit Yellow imaging unit Magenta imaging unit Cyan imaging unit Part number C925X72G C925X75G C925X74G C925X73G Ordering a fuser or a transfer module When 80.xx Fuser...
Maintenance Guide
Page 9
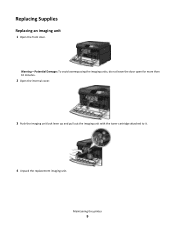
Replacing Supplies Replacing an imaging unit 1 Open the front door. Warning-Potential Damage: To avoid overexposing the imaging units, do not leave the door open for more than 10 minutes. 2 Open the internal cover. 3 Push the imaging unit lock lever up and pull out the imaging unit with the toner cartridge attached to it. 4 Unpack the replacement imaging unit. Maintaining the printer 9
Replacing Supplies Replacing an imaging unit 1 Open the front door. Warning-Potential Damage: To avoid overexposing the imaging units, do not leave the door open for more than 10 minutes. 2 Open the internal cover. 3 Push the imaging unit lock lever up and pull out the imaging unit with the toner cartridge attached to it. 4 Unpack the replacement imaging unit. Maintaining the printer 9
Maintenance Guide
Page 10
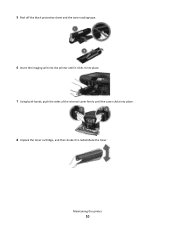
5 Peel off the black protective sheet and the toner sealing tape. 6 Insert the imaging unit into the printer until it clicks it into place. 7 Using both hands, push the sides of the internal cover firmly until the cover clicks into place. 8 Unpack the toner cartridge, and then shake it to redistribute the toner. Maintaining the printer 10
5 Peel off the black protective sheet and the toner sealing tape. 6 Insert the imaging unit into the printer until it clicks it into place. 7 Using both hands, push the sides of the internal cover firmly until the cover clicks into place. 8 Unpack the toner cartridge, and then shake it to redistribute the toner. Maintaining the printer 10
Maintenance Guide
Page 11
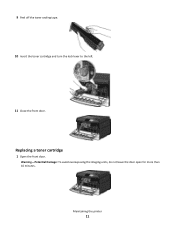
Warning-Potential Damage: To avoid overexposing the imaging units, do not leave the door open for more than 10 minutes. 9 Peel off the toner sealing tape. 10 Insert the toner cartridge and turn the lock lever to the left. 11 Close the front door. Maintaining the printer 11 Replacing a toner cartridge 1 Open the front door.
Warning-Potential Damage: To avoid overexposing the imaging units, do not leave the door open for more than 10 minutes. 9 Peel off the toner sealing tape. 10 Insert the toner cartridge and turn the lock lever to the left. 11 Close the front door. Maintaining the printer 11 Replacing a toner cartridge 1 Open the front door.
Menu Map
Page 1
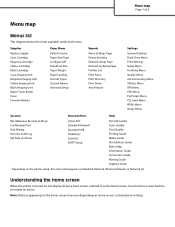
... screen, referred to initiate an action. Supplies Replace Supply Cyan Cartridge Magenta Cartridge Yellow Cartridge Black Cartridge Cyan Imaging Unit Magenta Imaging Unit Yellow Imaging Unit Black Imaging Unit Waste Toner Bottle Fuser Transfer Module Paper Menu Default Source Paper Size/Type Configure MP Substitute Size Paper Weight ... Menu Quality Menu Job Accounting Menu Utilities Menu XPS Menu PDF Menu PostScript Menu PCL Emul Menu HTML Menu Image Menu Security Network/Ports Help Miscellaneous Security Settings Confidential Print Disk Wiping Security Audit Log Set Date and Time Active...
... screen, referred to initiate an action. Supplies Replace Supply Cyan Cartridge Magenta Cartridge Yellow Cartridge Black Cartridge Cyan Imaging Unit Magenta Imaging Unit Yellow Imaging Unit Black Imaging Unit Waste Toner Bottle Fuser Transfer Module Paper Menu Default Source Paper Size/Type Configure MP Substitute Size Paper Weight ... Menu Quality Menu Job Accounting Menu Utilities Menu XPS Menu PDF Menu PostScript Menu PCL Emul Menu HTML Menu Image Menu Security Network/Ports Help Miscellaneous Security Settings Confidential Print Disk Wiping Security Audit Log Set Date and Time Active...

PRESCRIBE Emulation Technical Reference Guide
Page 9
Command Description SETF SET alternate Font SFA1 Set bitmap Font Attributes SFNT2 Select current FoNT by typeface SIMG1, 2 Set IMaGe model SLJN2 Set Line JoiN SLM Set Left Margin SLPI Set Lines Per Inch SLPP Set Lines Per Page SLS Set ... STAK3 select paper STAcKer STAT1 STATus STM Set Top Margin STR SeT dot Resolution STRK2 STRoKe current path SULP Set UnderLine Parameters TEXT print TEXT UNIT set UNIT of measure XPAT generate eXpanded fill PATtern WRED2, 3 WRite EnD (O&1, 4 enter Memorex Printer Compatibility Mode 1 Partial support or extended support (...
Command Description SETF SET alternate Font SFA1 Set bitmap Font Attributes SFNT2 Select current FoNT by typeface SIMG1, 2 Set IMaGe model SLJN2 Set Line JoiN SLM Set Left Margin SLPI Set Lines Per Inch SLPP Set Lines Per Page SLS Set ... STAK3 select paper STAcKer STAT1 STATus STM Set Top Margin STR SeT dot Resolution STRK2 STRoKe current path SULP Set UnderLine Parameters TEXT print TEXT UNIT set UNIT of measure XPAT generate eXpanded fill PATtern WRED2, 3 WRite EnD (O&1, 4 enter Memorex Printer Compatibility Mode 1 Partial support or extended support (...
Print Defects Guide
Page 1
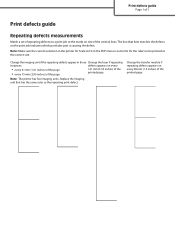
...the transfer module if repeating defects appears on every 38 mm (1.5 inches) of the printed page. Change the imaging unit if the repeating defects appear in the PDF menu is causing the defect. The line that has the same ...Make sure the current selection in the printer for the rulers to the marks on one of the vertical lines. Replace the imaging unit that best matches the defects on the print job indicates which particular part is set of repeating defects on a print job ... (2.95 inches) of the page 141 mm (5.55 inches) of the printed page. Note: The printer has four imaging units.
...the transfer module if repeating defects appears on every 38 mm (1.5 inches) of the printed page. Change the imaging unit if the repeating defects appear in the PDF menu is causing the defect. The line that has the same ...Make sure the current selection in the printer for the rulers to the marks on one of the vertical lines. Replace the imaging unit that best matches the defects on the print job indicates which particular part is set of repeating defects on a print job ... (2.95 inches) of the page 141 mm (5.55 inches) of the printed page. Note: The printer has four imaging units.

Print Drivers for UNIX and LINUX Systems
Page 26
...By default, multiple copies of a document are separated by all printers support the multiple-page feature. The printer must have an optional duplex unit installed in the Print dialog box of some programs. Program settings usually override the settings on the Setup tab. Check the documentation that came...with the printer to show how the printed page will look. 1 From the Properties dialog box, click Setup. 2 Choose the number of page images you select Long-edge, the pages of the document turn like the pages of a magazine. Printing a duplex job Duplex printing is printing on both...
...By default, multiple copies of a document are separated by all printers support the multiple-page feature. The printer must have an optional duplex unit installed in the Print dialog box of some programs. Program settings usually override the settings on the Setup tab. Check the documentation that came...with the printer to show how the printed page will look. 1 From the Properties dialog box, click Setup. 2 Choose the number of page images you select Long-edge, the pages of the document turn like the pages of a magazine. Printing a duplex job Duplex printing is printing on both...
Print Quality Guide
Page 4
... Damage: Be careful not to touch the photoconductor drum. If the problem continues, the printer may affect the print quality of 13 MAKE SURE THE IMAGING UNIT IS NOT DEFECTIVE Replace the...
... Damage: Be careful not to touch the photoconductor drum. If the problem continues, the printer may affect the print quality of 13 MAKE SURE THE IMAGING UNIT IS NOT DEFECTIVE Replace the...

Print Quality Guide
Page 5
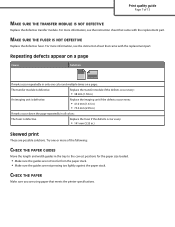
... of the following : MAKE SURE THERE IS NO DEFECTIVE TONER CARTRIDGE Replace the defective toner cartridge. MAKE SURE THE IMAGING UNIT IS NOT DEFECTIVE Replace the defective imaging unit. CHECK THE PAPER SIZE SETTING Make sure the paper size setting matches the paper loaded in the tray to print,... DEFECTIVE Replace the transfer module. CLEAN THE PRINTHEAD LENSES Remove and reinstall the imaging unit. Print quality guide Page 5 of LEDs, thus cleaning the printhead lenses. The LED wipe at the end of the imaging unit will rub across the row of 13 These are possible solutions. Try one...
... of the following : MAKE SURE THERE IS NO DEFECTIVE TONER CARTRIDGE Replace the defective toner cartridge. MAKE SURE THE IMAGING UNIT IS NOT DEFECTIVE Replace the defective imaging unit. CHECK THE PAPER SIZE SETTING Make sure the paper size setting matches the paper loaded in the tray to print,... DEFECTIVE Replace the transfer module. CLEAN THE PRINTHEAD LENSES Remove and reinstall the imaging unit. Print quality guide Page 5 of LEDs, thus cleaning the printhead lenses. The LED wipe at the end of the imaging unit will rub across the row of 13 These are possible solutions. Try one...
Print Quality Guide
Page 7
...; 38 mm (1.50 in .) Skewed print These are possible solutions. Replace the fuser if the defects occur every: • 141 mm (5.55 in .) An imaging unit is defective. Try one color and multiple times on a page Cause Solution ) ) ) ) ) If marks occur repeatedly in only one or more of 13... MAKE SURE THE FUSER IS NOT DEFECTIVE Replace the defective fuser. For more information, see the instruction sheet that meets the printer specifications. Replace the imaging unit if the defects occur every: • 41.0 mm (1.61 in.) • 75.0 mm (2.95 in.) If marks occur down the page ...
...; 38 mm (1.50 in .) Skewed print These are possible solutions. Replace the fuser if the defects occur every: • 141 mm (5.55 in .) An imaging unit is defective. Try one color and multiple times on a page Cause Solution ) ) ) ) ) If marks occur repeatedly in only one or more of 13... MAKE SURE THE FUSER IS NOT DEFECTIVE Replace the defective fuser. For more information, see the instruction sheet that meets the printer specifications. Replace the imaging unit if the defects occur every: • 41.0 mm (1.61 in.) • 75.0 mm (2.95 in.) If marks occur down the page ...

Print Quality Guide
Page 8
Warning-Potential Damage: Be careful not to be serviced. If the problem continues, the imaging unit may need to redistribute the toner. 3 Reinsert the toner cartridge. Streaked horizontal lines appear on prints ABCDE ABCDE ABCDE Try one or more of the .... Solid color pages Print quality guide Page 8 of 13 Try one or more of the following : MAKE SURE THE IMAGING UNIT IS INSTALLED CORRECTLY AND IS NOT DEFECTIVE Remove and then reinstall the imaging unit. Note: If print quality does not improve, replace the toner cartridge. • If the problem continues, the printer may...
Warning-Potential Damage: Be careful not to be serviced. If the problem continues, the imaging unit may need to redistribute the toner. 3 Reinsert the toner cartridge. Streaked horizontal lines appear on prints ABCDE ABCDE ABCDE Try one or more of the .... Solid color pages Print quality guide Page 8 of 13 Try one or more of the following : MAKE SURE THE IMAGING UNIT IS INSTALLED CORRECTLY AND IS NOT DEFECTIVE Remove and then reinstall the imaging unit. Note: If print quality does not improve, replace the toner cartridge. • If the problem continues, the printer may...
Print Quality Guide
Page 10
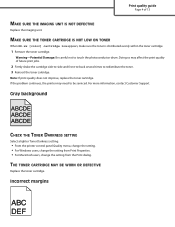
... Orientation pictures drop-down menu, choose Printer Features. 3 Choose a lower value for the Toner Darkness, Brightness, and Contrast settings. MAKE SURE THE IMAGING UNIT IS NOT DEFECTIVE Replace the defective imaging unit. Store paper in its original wrapper until you use it. Uneven print density Print quality guide Page 10 of 13 ABCDE ABCDE...
... Orientation pictures drop-down menu, choose Printer Features. 3 Choose a lower value for the Toner Darkness, Brightness, and Contrast settings. MAKE SURE THE IMAGING UNIT IS NOT DEFECTIVE Replace the defective imaging unit. Store paper in its original wrapper until you use it. Uneven print density Print quality guide Page 10 of 13 ABCDE ABCDE...

Print Quality Guide
Page 13
.... Transfer module may be worn or defective. Solution Reinstall or replace the toner cartridge. If necessary, of paper being used . Imaging unit may be worn or defective. The Paper Weight setting in envelope mode. Fuser is in the Paper Menu is being used . Replace... the fuser. Check the application. Toner fog or background shading appears on the left side of 13 Cause The imaging unit may be worn or defective. Toner may be defective or installed incorrectly. Fuser may not have recalibrated recently. Call for the...
.... Transfer module may be worn or defective. Solution Reinstall or replace the toner cartridge. If necessary, of paper being used . Imaging unit may be worn or defective. The Paper Weight setting in envelope mode. Fuser is in the Paper Menu is being used . Replace... the fuser. Check the application. Toner fog or background shading appears on the left side of 13 Cause The imaging unit may be worn or defective. Toner may be defective or installed incorrectly. Fuser may not have recalibrated recently. Call for the...

Supplies Guide
Page 1
...C925H2YG C925H2MG C925H2CG Ordering imaging units When 84.xx [Color] imaging unit low, or 84.xx [Color] imaging unit nearly low appears, order a replacement imaging unit. Recommended imaging units and part numbers Part name Black imaging unit Yellow imaging unit Magenta imaging unit Cyan imaging unit Part number C925X72G ...Replace [color] cartridge appears, replace the specified cartridge. When 84.xx Replace [color] imaging unit and [color] cartridge appears, replace the specified imaging unit and toner cartridge. Supplies guide Page 1 of toner. Extremely low print coverage (less ...
...C925H2YG C925H2MG C925H2CG Ordering imaging units When 84.xx [Color] imaging unit low, or 84.xx [Color] imaging unit nearly low appears, order a replacement imaging unit. Recommended imaging units and part numbers Part name Black imaging unit Yellow imaging unit Magenta imaging unit Cyan imaging unit Part number C925X72G ...Replace [color] cartridge appears, replace the specified cartridge. When 84.xx Replace [color] imaging unit and [color] cartridge appears, replace the specified imaging unit and toner cartridge. Supplies guide Page 1 of toner. Extremely low print coverage (less ...


