
User's Guide
Page 90
Cleaning the LEDs 90 Fingerprints can affect the performance of time can damage it . b Remove the photodeveloper completely, and then re-insert it . Warning: Exposing the photodevelopers to light for prolonged periods of the photodevelopers. a Open the waste toner arm. Maintaining the printer 2 Remove and re-insert each photodeveloper. Avoid touching the photodevelopers anywhere except the handles. Do not expose the photodevelopers to light for more than ten minutes.
Cleaning the LEDs 90 Fingerprints can affect the performance of time can damage it . b Remove the photodeveloper completely, and then re-insert it . Warning: Exposing the photodevelopers to light for prolonged periods of the photodevelopers. a Open the waste toner arm. Maintaining the printer 2 Remove and re-insert each photodeveloper. Avoid touching the photodevelopers anywhere except the handles. Do not expose the photodevelopers to light for more than ten minutes.

User's Guide
Page 91
Removing and re-inserting the photodevelopers sufficiently cleans the LEDs in most cases. Maintaining the printer c Close the waste toner arm. Cleaning the LEDs 91 If the problem persists, continue with step 3. d Repeat steps a through c for each photodeveloper.
Removing and re-inserting the photodevelopers sufficiently cleans the LEDs in most cases. Maintaining the printer c Close the waste toner arm. Cleaning the LEDs 91 If the problem persists, continue with step 3. d Repeat steps a through c for each photodeveloper.

Service Manual
Page 46
...a test print. • Transfer belt assembly • Transfer belt toner waste bottle • Transfer belt separation fingers • Fuser separation pawl Be... the output to plain paper. Reduce the number of 20 lb paper. Install a new staple cartridge. Toner scatter on which way the knobs are not connected properly. Does it . The printer and finisher have ...Be sure the MPF paper present sensor connector (CN16) is empty. Check the following: • Excessive toner buildup on page 2-11. Align the top of paper, the finisher ejects the stack without stapling it match...
...a test print. • Transfer belt assembly • Transfer belt toner waste bottle • Transfer belt separation fingers • Fuser separation pawl Be... the output to plain paper. Reduce the number of 20 lb paper. Install a new staple cartridge. Toner scatter on which way the knobs are not connected properly. Does it . The printer and finisher have ...Be sure the MPF paper present sensor connector (CN16) is empty. Check the following: • Excessive toner buildup on page 2-11. Align the top of paper, the finisher ejects the stack without stapling it match...

Service Manual
Page 97
...824.5 mm FRU / supply item Absorption/charge roller (transfer roller) Photodeveloper charge roller Supply roller (toner cartridge) Upper registration roller Lower registration roller Developer roller (toner cartridge) OCR (oil coating roller) Photodeveloper drum Fuser upper roller Fuser lower roller Transfer belt Fuser part... the symptom in Diagnostic Mode. The indicated assemblies are securely connected on the RIP board and operator panel. Toner will fall from the waste toner box onto the transfer sheets and roller(s) inside the belt. Ensure code is at prescribed intervals. 5056-XXX...
...824.5 mm FRU / supply item Absorption/charge roller (transfer roller) Photodeveloper charge roller Supply roller (toner cartridge) Upper registration roller Lower registration roller Developer roller (toner cartridge) OCR (oil coating roller) Photodeveloper drum Fuser upper roller Fuser lower roller Transfer belt Fuser part... the symptom in Diagnostic Mode. The indicated assemblies are securely connected on the RIP board and operator panel. Toner will fall from the waste toner box onto the transfer sheets and roller(s) inside the belt. Ensure code is at prescribed intervals. 5056-XXX...
Service Manual
Page 137
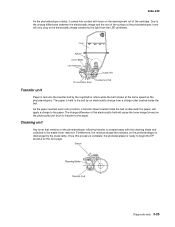
...held to the paper. 5056-XXX As the photodeveloper rotates, it comes into contact with toner on the photodeveloper following transfer is scraped away with the cleaning blade and collected in the waste toner reservoir. As the paper reaches each color position, a transfer sheet located inside the ...belt. Diagnostic aids 3-25 Cleaning unit Any toner that remains on the photoconductor drum to transfer to the paper. ...
...held to the paper. 5056-XXX As the photodeveloper rotates, it comes into contact with toner on the photodeveloper following transfer is scraped away with the cleaning blade and collected in the waste toner reservoir. As the paper reaches each color position, a transfer sheet located inside the ...belt. Diagnostic aids 3-25 Cleaning unit Any toner that remains on the photoconductor drum to transfer to the paper. ...

Service Manual
Page 222
5056-XXX Sensor board removal 1. Remove the screw from the left stopper, and remove the stopper. 5. Remove the screw from the right stopper, and remove the stopper. 4. Stay arm removal 1. Open the top unit, and remove the face down paper guide assembly. 2. Remove the 17 screws from the lock shaft. 6. Remove the transfer belt unit. 2. Remove the yellow and black sub frame. 3. Remove the clip from the stay arm, and remove the arm. 4-40 Service Manual Remove the four connectors. 3. Remove the three screws from the waste toner full sensor board.
5056-XXX Sensor board removal 1. Remove the screw from the left stopper, and remove the stopper. 5. Remove the screw from the right stopper, and remove the stopper. 4. Stay arm removal 1. Open the top unit, and remove the face down paper guide assembly. 2. Remove the 17 screws from the lock shaft. 6. Remove the transfer belt unit. 2. Remove the yellow and black sub frame. 3. Remove the clip from the stay arm, and remove the arm. 4-40 Service Manual Remove the four connectors. 3. Remove the three screws from the waste toner full sensor board.

Service Manual
Page 291
... 40X1128 40X1130 40X1516 40X1262 Units 1 1 1 1 1 1 1 1 1 1 1 1 1 1 1 Description Cover, top Cover assembly, right side Magnet, right side latch Operator panel Cover assembly, front Label, operator panel Cover, waste toner bottle Magnet, front cover latch Cover, left front Cover, left side Cover, paper feed Cover, solenoid Tray assembly, exit Cover, rear Cover, adjustment Label, MPT...
... 40X1128 40X1130 40X1516 40X1262 Units 1 1 1 1 1 1 1 1 1 1 1 1 1 1 1 Description Cover, top Cover assembly, right side Magnet, right side latch Operator panel Cover assembly, front Label, operator panel Cover, waste toner bottle Magnet, front cover latch Cover, left front Cover, left side Cover, paper feed Cover, solenoid Tray assembly, exit Cover, rear Cover, adjustment Label, MPT...

Service Manual
Page 363
... 40X1204 40X1205 40X1207 40X1208 40X1209 40X1227 40X1237 40X1238 40X1239 40X1240 40X1241 40X1242 40X1246 40X1247 40X1248 40X1254 40X1255 Cover, left front 7-3 Cover, adjustment 7-3 Cover, top 7-3 Cover, waste toner bottle 7-3 Feeder assembly, multipurpose 7-7 Photo interruptor 7-15 Photo interruptor 7-15 Magnet, right side latch 7-3 Magnet, front cover latch 7-3, 7-29 Holder, front hsp 7-9 Bracket, front upper...
... 40X1204 40X1205 40X1207 40X1208 40X1209 40X1227 40X1237 40X1238 40X1239 40X1240 40X1241 40X1242 40X1246 40X1247 40X1248 40X1254 40X1255 Cover, left front 7-3 Cover, adjustment 7-3 Cover, top 7-3 Cover, waste toner bottle 7-3 Feeder assembly, multipurpose 7-7 Photo interruptor 7-15 Photo interruptor 7-15 Magnet, right side latch 7-3 Magnet, front cover latch 7-3, 7-29 Holder, front hsp 7-9 Bracket, front upper...


