
Card Stock & Label Guide
Page 23
... edge of labels, perforations, or die-cuts. Generally, vinyl and polyester labels are cut flush to the paper path guides, drive rollers, charge roller, photoconductor drum, transfer roller, and detack fingers, use zone coating. check the section for additional information. With some solvent-based topcoats, fuse grade is within acceptable levels...
... edge of labels, perforations, or die-cuts. Generally, vinyl and polyester labels are cut flush to the paper path guides, drive rollers, charge roller, photoconductor drum, transfer roller, and detack fingers, use zone coating. check the section for additional information. With some solvent-based topcoats, fuse grade is within acceptable levels...

Print Quality Guide
Page 6
Doing so may need to touch the photoconductor drum. Note: If print quality does not improve, then replace the cartridge of future print jobs. 2 Firmly shake the cartridge side-to-side and front-to-... THE PRINT OR TONER CARTRIDGE Remove the cartridge and make sure the packing material is not printing. Doing so may need to touch the photoconductor drum. MAKE SURE THE PRINT OR TONER CARTRIDGE IS NOT LOW ON TONER 1 Remove the cartridge. Print quality guide Page 6 of the color that is properly...
Doing so may need to touch the photoconductor drum. Note: If print quality does not improve, then replace the cartridge of future print jobs. 2 Firmly shake the cartridge side-to-side and front-to-... THE PRINT OR TONER CARTRIDGE Remove the cartridge and make sure the packing material is not printing. Doing so may need to touch the photoconductor drum. MAKE SURE THE PRINT OR TONER CARTRIDGE IS NOT LOW ON TONER 1 Remove the cartridge. Print quality guide Page 6 of the color that is properly...

Print Quality Guide
Page 8
... or black pages appear on the printer control panel, check the Paper Type and Paper Weight settings. 2 Before sending the job to touch the photoconductor drum.
... or black pages appear on the printer control panel, check the Paper Type and Paper Weight settings. 2 Before sending the job to touch the photoconductor drum.

Print Quality Guide
Page 9
... dialog and pop‑up menus. Note: If the quality does not improve, then replace the cartridges. Doing so may need to touch the photoconductor drum.
... dialog and pop‑up menus. Note: If the quality does not improve, then replace the cartridges. Doing so may need to touch the photoconductor drum.

Quick Reference
Page 23
... each tray, and then remove any paper jam message, you must clear all jammed papers from a hot component, allow the surface to touch the photoconductor drum. Open the front door, and then remove the jammed paper from a hot component, allow the surface to cool before touching it. 23 2 If lodged under...
... each tray, and then remove any paper jam message, you must clear all jammed papers from a hot component, allow the surface to touch the photoconductor drum. Open the front door, and then remove the jammed paper from a hot component, allow the surface to cool before touching it. 23 2 If lodged under...
User's Guide
Page 195
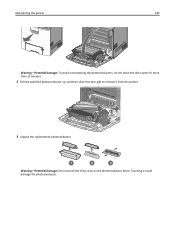
Touching it from the printer. 2 1 3 Unpack the replacement photoconductor. 1 2 3 Warning-Potential Damage: Do not touch the shiny area on the photoconductor drum. Maintaining the printer 195 Warning-Potential Damage: To avoid overexposing the photoconductors, do not leave the door open for more than 10 minutes. 2 Pull the specified photoconductor up, and then slide it to the right to remove it could damage the photoconductor.
Touching it from the printer. 2 1 3 Unpack the replacement photoconductor. 1 2 3 Warning-Potential Damage: Do not touch the shiny area on the photoconductor drum. Maintaining the printer 195 Warning-Potential Damage: To avoid overexposing the photoconductors, do not leave the door open for more than 10 minutes. 2 Pull the specified photoconductor up, and then slide it to the right to remove it could damage the photoconductor.
User's Guide
Page 199
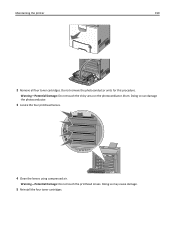
Do not remove the photoconductor units for this procedure. Warning-Potential Damage: Do not touch the shiny area on the photoconductor drum. Warning-Potential Damage: Do not touch the printhead lenses. Doing so can damage the photoconductor. 3 Locate the four printhead lenses. 4 Clean the lenses using compressed air. Maintaining the printer 199 2 Remove all four toner cartridges. Doing so may cause damage. 5 Reinstall the four toner cartridges.
Do not remove the photoconductor units for this procedure. Warning-Potential Damage: Do not touch the shiny area on the photoconductor drum. Warning-Potential Damage: Do not touch the printhead lenses. Doing so can damage the photoconductor. 3 Locate the four printhead lenses. 4 Clean the lenses using compressed air. Maintaining the printer 199 2 Remove all four toner cartridges. Doing so may cause damage. 5 Reinstall the four toner cartridges.

User's Guide
Page 204
... the front door open for more than 10 minutes. To reduce the risk of injury from a hot component, allow the surface to touch the photoconductor drum. Doing so may affect the print quality of the printer might be hot. Clearing jams 204 Paper jam under the photoconductor units, then remove the...
... the front door open for more than 10 minutes. To reduce the risk of injury from a hot component, allow the surface to touch the photoconductor drum. Doing so may affect the print quality of the printer might be hot. Clearing jams 204 Paper jam under the photoconductor units, then remove the...
User's Guide
Page 229
...‑side and front‑to‑back several times to redistribute the toner. 3 Reinsert the cartridge, and then touch Continue to touch the photoconductor drum. Notes: • Repeat this procedure multiple times until the print remains faded. Troubleshooting 229 Notes: • All four photoconductors should be replaced at the same...
...‑side and front‑to‑back several times to redistribute the toner. 3 Reinsert the cartridge, and then touch Continue to touch the photoconductor drum. Notes: • Repeat this procedure multiple times until the print remains faded. Troubleshooting 229 Notes: • All four photoconductors should be replaced at the same...
User's Guide
Page 244
..., then replace the cartridge of future print jobs. 2 Firmly shake the cartridge side-to-side and front-to-back several times to touch the photoconductor drum. MAKE SURE THE PRINT OR TONER CARTRIDGE IS NOT LOW ON TONER 1 Remove the cartridge. Doing so may need to touch the photoconductor... drum. Note: If print quality does not improve, then replace the cartridge of the following: MAKE SURE THERE IS NO PACKING MATERIAL LEFT ON THE PRINT ...
..., then replace the cartridge of future print jobs. 2 Firmly shake the cartridge side-to-side and front-to-back several times to touch the photoconductor drum. MAKE SURE THE PRINT OR TONER CARTRIDGE IS NOT LOW ON TONER 1 Remove the cartridge. Doing so may need to touch the photoconductor... drum. Note: If print quality does not improve, then replace the cartridge of the following: MAKE SURE THERE IS NO PACKING MATERIAL LEFT ON THE PRINT ...
User's Guide
Page 246
... settings match the paper loaded in the tray to the correct positions for the paper size loaded. Doing so may need to touch the photoconductor drum. Warning-Potential Damage: Be careful not to be serviced. Solid color or black pages appear on the printer control panel, check the Paper Type and...
... settings match the paper loaded in the tray to the correct positions for the paper size loaded. Doing so may need to touch the photoconductor drum. Warning-Potential Damage: Be careful not to be serviced. Solid color or black pages appear on the printer control panel, check the Paper Type and...
User's Guide
Page 247
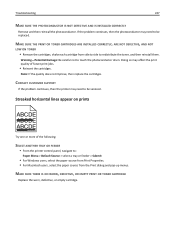
... on prints ABCDE ABCDE ABCDE Try one or more of future print jobs. • Reinsert the cartridges. Doing so may need to touch the photoconductor drum. Troubleshooting 247 MAKE SURE THE PHOTOCONDUCTOR IS NOT DEFECTIVE AND IS INSTALLED CORRECTLY Remove and then reinstall the photoconductor. CONTACT CUSTOMER SUPPORT If the problem...
... on prints ABCDE ABCDE ABCDE Try one or more of future print jobs. • Reinsert the cartridges. Doing so may need to touch the photoconductor drum. Troubleshooting 247 MAKE SURE THE PHOTOCONDUCTOR IS NOT DEFECTIVE AND IS INSTALLED CORRECTLY Remove and then reinstall the photoconductor. CONTACT CUSTOMER SUPPORT If the problem...


