
Wireless Setup Guide
Page 2
...information herein; UNITED STATES GOVERNMENT RIGHTS This software and any time. © 2008 Lexmark International, Inc. All rights reserved. therefore, this agreement are inconsistent with local law: LEXMARK INTERNATIONAL, INC., PROVIDES THIS PUBLICATION "AS IS" WITHOUT WARRANTY OF ANY KIND,...June 2008 The following paragraph does not apply to any country where such provisions are commercial computer software and documentation developed exclusively at any accompanying documentation provided under this statement may be incorporated in certain transactions; these changes will be...
...information herein; UNITED STATES GOVERNMENT RIGHTS This software and any time. © 2008 Lexmark International, Inc. All rights reserved. therefore, this agreement are inconsistent with local law: LEXMARK INTERNATIONAL, INC., PROVIDES THIS PUBLICATION "AS IS" WITHOUT WARRANTY OF ANY KIND,...June 2008 The following paragraph does not apply to any country where such provisions are commercial computer software and documentation developed exclusively at any accompanying documentation provided under this statement may be incorporated in certain transactions; these changes will be...
User's Guide
Page 97
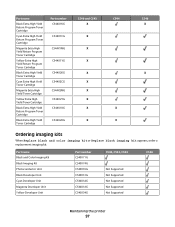
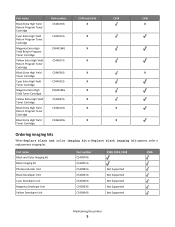
... Extra High Yield Return Program Toner Cartridge Black Extra High Yield Toner Cartridge Part number C544X1KG C544X1CG C544X1MG C544X1YG C544X2KG C544X2CG C544X2MG C544X2YG C546U1KG C546U2KG C540 and C543 X X X X X X X X X X C544 X X C546 X X Ordering imaging kits When Replace black and color... Black and Color Imaging Kit Black Imaging Kit Photoconductor Unit Black Developer Unit Cyan Developer Unit Magenta Developer Unit Yellow Developer Unit Part number C540X71G C540X74G C540X35G C540X31G C540X32G C540X33G C540X34G C540, C543, C544 Not Supported Not Supported Not Supported Not Supported ...
... Extra High Yield Return Program Toner Cartridge Black Extra High Yield Toner Cartridge Part number C544X1KG C544X1CG C544X1MG C544X1YG C544X2KG C544X2CG C544X2MG C544X2YG C546U1KG C546U2KG C540 and C543 X X X X X X X X X X C544 X X C546 X X Ordering imaging kits When Replace black and color... Black and Color Imaging Kit Black Imaging Kit Photoconductor Unit Black Developer Unit Cyan Developer Unit Magenta Developer Unit Yellow Developer Unit Part number C540X71G C540X74G C540X35G C540X31G C540X32G C540X33G C540X34G C540, C543, C544 Not Supported Not Supported Not Supported Not Supported ...

User's Guide
Page 104
... Lexmark products" on the developer units. 10 Gently shake the yellow, cyan, magenta, and black developer units side to side. 11 Remove the packaging from the developer units. 12 Insert the yellow, cyan, magenta, and black developer units. Maintaining the printer 104 8 Remove the yellow, cyan, magenta, and black developer ...units. 9 Unpack the replacement black and color imaging kit, and leave the packaging on page 37. Note: Make sure each developer unit is inserted into a matching color slot. 13 Place the used black...
... Lexmark products" on the developer units. 10 Gently shake the yellow, cyan, magenta, and black developer units side to side. 11 Remove the packaging from the developer units. 12 Insert the yellow, cyan, magenta, and black developer units. Maintaining the printer 104 8 Remove the yellow, cyan, magenta, and black developer ...units. 9 Unpack the replacement black and color imaging kit, and leave the packaging on page 37. Note: Make sure each developer unit is inserted into a matching color slot. 13 Place the used black...

User's Guide
Page 109
Note: When a developer unit is replaced, you . For more information, see "Color misregistration" on page 148. 1 Grasp the front door at the sides, and then pull it toward you must manually calibrate the color. To reduce the risk of the printer might be hot. Maintaining the printer 109 6 Close the top door. CAUTION-HOT SURFACE: The inside of injury from a hot component, allow the surface to cool before touching. 2 Open the top door by sliding the button forward. Replacing a developer unit Replace a developer unit when a print quality defect occurs.
Note: When a developer unit is replaced, you . For more information, see "Color misregistration" on page 148. 1 Grasp the front door at the sides, and then pull it toward you must manually calibrate the color. To reduce the risk of the printer might be hot. Maintaining the printer 109 6 Close the top door. CAUTION-HOT SURFACE: The inside of injury from a hot component, allow the surface to cool before touching. 2 Open the top door by sliding the button forward. Replacing a developer unit Replace a developer unit when a print quality defect occurs.

User's Guide
Page 111
This could damage the imaging kit. 8 Remove the used developer unit. 9 Place the used developer unit in the enclosed package. 6 Lift the blue levers on the imaging kit, and then pull it toward you. 7 Press down on the blue levers, grasp the handles on . 11 Gently shake the developer unit from side to side. For more information, see "Recycling Lexmark products" on page 37. 10 Unpack the replacement developer unit, and leave the packaging on the sides, and then pull the imaging kit out. Maintaining the printer 111 Warning-Potential Damage: Do not touch the underside of the imaging kit.
This could damage the imaging kit. 8 Remove the used developer unit. 9 Place the used developer unit in the enclosed package. 6 Lift the blue levers on the imaging kit, and then pull it toward you. 7 Press down on the blue levers, grasp the handles on . 11 Gently shake the developer unit from side to side. For more information, see "Recycling Lexmark products" on page 37. 10 Unpack the replacement developer unit, and leave the packaging on the sides, and then pull the imaging kit out. Maintaining the printer 111 Warning-Potential Damage: Do not touch the underside of the imaging kit.

User's Guide
Page 112
Maintaining the printer 112 12 Remove the red shipping cover from the developer unit. 13 Insert the developer unit. 14 Align and insert the imaging kit.
Maintaining the printer 112 12 Remove the red shipping cover from the developer unit. 13 Insert the developer unit. 14 Align and insert the imaging kit.

User's Guide
Page 145
... setting matches the paper loaded in .) Troubleshooting 145 Repeating defects REPEATING MARKS OCCUR REPEATEDLY ONLY IN ONE COLOR AND MULTIPLE TIMES ON A PAGE Replace the developer unit if the defects occur every 43.9 mm (1.7 in.) Replace the imaging kit if the defects occur every: • 34.6 mm (1.4 in.) • 94.2 mm...
... setting matches the paper loaded in .) Troubleshooting 145 Repeating defects REPEATING MARKS OCCUR REPEATEDLY ONLY IN ONE COLOR AND MULTIPLE TIMES ON A PAGE Replace the developer unit if the defects occur every 43.9 mm (1.7 in.) Replace the imaging kit if the defects occur every: • 34.6 mm (1.4 in.) • 94.2 mm...

User's Guide
Page 154
... for a Class B digital device, pursuant to radio communications. and other trademarks are commercial computer software and documentation developed exclusively at private expense. PCL is encouraged to try to correct the interference by using other countries. The FCC ...equipment into an outlet on , the user is Hewlett-Packard Company's designation of a set of FCC regulations. Notices 154 Trademarks Lexmark, Lexmark with the instructions, may result in a violation of printer commands (language) and functions included in a particular installation. Federal Communications...
... for a Class B digital device, pursuant to radio communications. and other trademarks are commercial computer software and documentation developed exclusively at private expense. PCL is encouraged to try to correct the interference by using other countries. The FCC ...equipment into an outlet on , the user is Hewlett-Packard Company's designation of a set of FCC regulations. Notices 154 Trademarks Lexmark, Lexmark with the instructions, may result in a violation of printer commands (language) and functions included in a particular installation. Federal Communications...
User's Guide
Page 165
...or assign the Software Program except to the extent provided in violation of inter-operability, error correction, and security testing. You and Lexmark agree to be an indirect transfer, such as otherwise described herein. You may not (a) acquire, ship, transfer, or reexport, ... upgrade eligibility. 8 LIMITATION ON REVERSE ENGINEERING. This Agreement is governed by Lexmark unless Lexmark provides other terms along with any of the terms of download. The Software Program has been developed entirely at the time of this License Agreement electronically. Rights of Goods shall...
...or assign the Software Program except to the extent provided in violation of inter-operability, error correction, and security testing. You and Lexmark agree to be an indirect transfer, such as otherwise described herein. You may not (a) acquire, ship, transfer, or reexport, ... upgrade eligibility. 8 LIMITATION ON REVERSE ENGINEERING. This Agreement is governed by Lexmark unless Lexmark provides other terms along with any of the terms of download. The Software Program has been developed entirely at the time of this License Agreement electronically. Rights of Goods shall...
User's Guide
Page 167
... Mode 36 conserving supplies 34 contacting Customer Support 152 control panel, printer factory defaults, restoring 116 Custom Types menu printer menus 72 D Defective Cartridge 127 developer unit replacing 109 Device Statistics menu 74 directory list printing 62 display troubleshooting display is blank 131 Index 167 display shows only diamonds 131 display...
... Mode 36 conserving supplies 34 contacting Customer Support 152 control panel, printer factory defaults, restoring 116 Custom Types menu printer menus 72 D Defective Cartridge 127 developer unit replacing 109 Device Statistics menu 74 directory list printing 62 display troubleshooting display is blank 131 Index 167 display shows only diamonds 131 display...

User's Guide
Page 169
... 74 Print Fonts menu 74 print job canceling from Macintosh 62 canceling from the printer control panel 62 canceling from Windows 62 print quality replacing developer unit 109 replacing imaging kit 101 replacing the waste toner box 98 print quality test pages, printing 62 print quality troubleshooting blank pages 138 characters...
... 74 Print Fonts menu 74 print job canceling from Macintosh 62 canceling from the printer control panel 62 canceling from Windows 62 print quality replacing developer unit 109 replacing imaging kit 101 replacing the waste toner box 98 print quality test pages, printing 62 print quality troubleshooting blank pages 138 characters...

User's Guide
Page 170
...page 23 photos 61 print quality test pages 62 publications, finding 7 Q Quiet Mode 36 R recycled paper using 33 recycling Lexmark packaging 37 Lexmark products 37 toner cartridges 37 WEEE statement 155 reducing noise 36 Reload printed pages in Tray 125 Remove packaging material 127 Remove ...paper from standard output bin 127 Replace Unsupported Cartridge 128 replacing developer unit 109 S safety information 5, 6 setting Active NIC 75 paper ...
...page 23 photos 61 print quality test pages 62 publications, finding 7 Q Quiet Mode 36 R recycled paper using 33 recycling Lexmark packaging 37 Lexmark products 37 toner cartridges 37 WEEE statement 155 reducing noise 36 Reload printed pages in Tray 125 Remove packaging material 127 Remove ...paper from standard output bin 127 Replace Unsupported Cartridge 128 replacing developer unit 109 S safety information 5, 6 setting Active NIC 75 paper ...
Maintenance Guide
Page 2
... toner bottle...6 Replacing supplies...6 Replacing the waste toner bottle...6 Replacing a black imaging kit...9 Replacing a black and color imaging kit...15 Replacing a toner cartridge...20 Replacing a developer unit...22 Cleaning the exterior of the printer...27 Moving the printer...28 Before moving the printer...28 Moving the printer to another location...28...
... toner bottle...6 Replacing supplies...6 Replacing the waste toner bottle...6 Replacing a black imaging kit...9 Replacing a black and color imaging kit...15 Replacing a toner cartridge...20 Replacing a developer unit...22 Cleaning the exterior of the printer...27 Moving the printer...28 Before moving the printer...28 Moving the printer to another location...28...
Maintenance Guide
Page 5
... Extra High Yield Return Program Toner Cartridge Black Extra High Yield Toner Cartridge Part number C544X1KG C544X1CG C544X1MG C544X1YG C544X2KG C544X2CG C544X2MG C544X2YG C546U1KG C546U2KG C540 and C543 X X X X X X X X X X C544 X X C546 X X Ordering imaging kits When Replace black and ... Black and Color Imaging Kit Black Imaging Kit Photoconductor Unit Black Developer Unit Cyan Developer Unit Magenta Developer Unit Yellow Developer Unit Part number C540X74G C540X71G C540X35G C540X31G C540X32G C540X33G C540X34G C540, C543, C544 Not Supported Not Supported Not Supported Not Supported Not...
... Extra High Yield Return Program Toner Cartridge Black Extra High Yield Toner Cartridge Part number C544X1KG C544X1CG C544X1MG C544X1YG C544X2KG C544X2CG C544X2MG C544X2YG C546U1KG C546U2KG C540 and C543 X X X X X X X X X X C544 X X C546 X X Ordering imaging kits When Replace black and ... Black and Color Imaging Kit Black Imaging Kit Photoconductor Unit Black Developer Unit Cyan Developer Unit Magenta Developer Unit Yellow Developer Unit Part number C540X74G C540X71G C540X35G C540X31G C540X32G C540X33G C540X34G C540, C543, C544 Not Supported Not Supported Not Supported Not Supported Not...
Maintenance Guide
Page 12
Note: Make sure each developer unit is inserted into a matching color slot. 8 Remove the yellow, cyan, and magenta developer units. 9 Unpack the replacement black imaging kit. Leave the packaging on the black developer unit. 10 Gently shake the black developer unit side to side. 11 Remove the packaging from the black developer unit. 12 Insert the black developer unit. 13 Replace the yellow, cyan, and magenta developer units. Maintaining the printer 12
Note: Make sure each developer unit is inserted into a matching color slot. 8 Remove the yellow, cyan, and magenta developer units. 9 Unpack the replacement black imaging kit. Leave the packaging on the black developer unit. 10 Gently shake the black developer unit side to side. 11 Remove the packaging from the black developer unit. 12 Insert the black developer unit. 13 Replace the yellow, cyan, and magenta developer units. Maintaining the printer 12

Maintenance Guide
Page 17
... side to side. 10 Remove the packaging from the yellow, cyan, magenta, and black developer units. 11 Insert the yellow, cyan, magenta, and black developer units. Warning-Potential Damage: Do not touch the underside of the imaging kit. Leave the packaging on the sides, and then pull the imaging kit ...
... side to side. 10 Remove the packaging from the yellow, cyan, magenta, and black developer units. 11 Insert the yellow, cyan, magenta, and black developer units. Warning-Potential Damage: Do not touch the underside of the imaging kit. Leave the packaging on the sides, and then pull the imaging kit ...

Maintenance Guide
Page 22
To reduce the risk of the printer might be hot. Replacing a developer unit Replace a developer unit when a print quality defect occurs or when damage occurs to open it. CAUTION-HOT SURFACE: The inside of injury from a hot component, allow the surface to cool before touching. 2 Open the top door. For more information, see colormisregistration-topic. 1 Grasp the front door at the side handholds, and then pull it toward you must manually calibrate the color. Note: When a developer unit is replaced, you to the printer. Maintaining the printer 22 6 Close the top door.
To reduce the risk of the printer might be hot. Replacing a developer unit Replace a developer unit when a print quality defect occurs or when damage occurs to open it. CAUTION-HOT SURFACE: The inside of injury from a hot component, allow the surface to cool before touching. 2 Open the top door. For more information, see colormisregistration-topic. 1 Grasp the front door at the side handholds, and then pull it toward you must manually calibrate the color. Note: When a developer unit is replaced, you to the printer. Maintaining the printer 22 6 Close the top door.

Maintenance Guide
Page 24
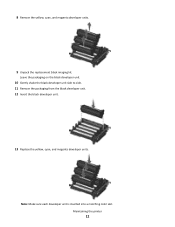
Maintaining the printer 24 This could damage the imaging kit. 8 Remove the used developer unit. 9 Place the used developer in the enclosed package. For more information, see recycling-lexmark- 6 Lift the blue levers on the imaging kit, and then pull it toward you. 7 Press down on the blue levers,... grasp the handles on the developer unit. 11 Gently shake the developer unit side to side. products-topic. 10 Unpack the replacement developer unit. Leave the...
Maintaining the printer 24 This could damage the imaging kit. 8 Remove the used developer unit. 9 Place the used developer in the enclosed package. For more information, see recycling-lexmark- 6 Lift the blue levers on the imaging kit, and then pull it toward you. 7 Press down on the blue levers,... grasp the handles on the developer unit. 11 Gently shake the developer unit side to side. products-topic. 10 Unpack the replacement developer unit. Leave the...

Maintenance Guide
Page 25
12 Remove the red shipping cover from the developer unit. 13 Insert the developer unit. 14 Align and insert the imaging kit. Maintaining the printer 25
12 Remove the red shipping cover from the developer unit. 13 Insert the developer unit. 14 Align and insert the imaging kit. Maintaining the printer 25

Technical Reference
Page 2
... is not intended to state or imply that only that product, program, or service may be used instead. Trademarks Lexmark and Lexmark with local law: LEXMARK INTERNATIONAL, INC., PROVIDES THIS PUBLICATION "AS IS" WITHOUT WARRANTY OF ANY KIND, EITHER EXPRESS OR IMPLIED, INCLUDING, ... all countries in which it operates. References in this agreement are commercial computer software and documentation developed exclusively at any time. For Lexmark technical support, visit support.lexmark.com. PCL is a trademark of printer commands (language) and functions included in conjunction with ...
... is not intended to state or imply that only that product, program, or service may be used instead. Trademarks Lexmark and Lexmark with local law: LEXMARK INTERNATIONAL, INC., PROVIDES THIS PUBLICATION "AS IS" WITHOUT WARRANTY OF ANY KIND, EITHER EXPRESS OR IMPLIED, INCLUDING, ... all countries in which it operates. References in this agreement are commercial computer software and documentation developed exclusively at any time. For Lexmark technical support, visit support.lexmark.com. PCL is a trademark of printer commands (language) and functions included in conjunction with ...

