Embedded Web Server Administrator's Guide
Page 27
... screen, browse to Settings ª Security ª SNMP. 2 Click Set SNMP Traps. 3 From the IP Address list, click one of device drivers and other printing applications, select the Enable PPM Mib (Printer Port Monitor MIB) check box. 6 Click Submit to finalize changes, or Reset Form to Settings ª Security ª SNMP. 2 Under... for the SNMP Community identifier (the default community name is used for SNMP versions 1 through the secure tunnel created between the authentication server and the printer. 5 Click Submit to save changes, or Reset Form to restore default values.
... screen, browse to Settings ª Security ª SNMP. 2 Click Set SNMP Traps. 3 From the IP Address list, click one of device drivers and other printing applications, select the Enable PPM Mib (Printer Port Monitor MIB) check box. 6 Click Submit to finalize changes, or Reset Form to Settings ª Security ª SNMP. 2 Under... for the SNMP Community identifier (the default community name is used for SNMP versions 1 through the secure tunnel created between the authentication server and the printer. 5 Click Submit to save changes, or Reset Form to restore default values.
Troubleshooting Guide
Page 1
... For information regarding tested and approved USB flash memory devices, visit the Lexmark Web site at www.lexmark.com. MAKE SURE THE CORRECT PRINTER SOFTWARE IS INSTALLED • Verify that came with the printer. 1 If the status is supported. CHECK THE NETWORK SETTINGS Depending on...available on the Lexmark Web site at www.lexmark.com. Check the printer power switch. • The printer cable is securely attached to the printer and the host computer, print server, option, or other network device. • All options are properly installed. • The printer driver settings are ...
... For information regarding tested and approved USB flash memory devices, visit the Lexmark Web site at www.lexmark.com. MAKE SURE THE CORRECT PRINTER SOFTWARE IS INSTALLED • Verify that came with the printer. 1 If the status is supported. CHECK THE NETWORK SETTINGS Depending on...available on the Lexmark Web site at www.lexmark.com. Check the printer power switch. • The printer cable is securely attached to the printer and the host computer, print server, option, or other network device. • All options are properly installed. • The printer driver settings are ...
User's Guide
Page 2
... Installing an optional duplex unit (T650 only) ...35 Attaching cables...36 Verifying printer setup...37 Printing a menu settings page...38 Printing a network setup page ...38 Setting up the printer software...38 Installing printer software ...38 Updating available options in the printer driver...39 Setting up wireless printing...40 Information you will need to set up...
... Installing an optional duplex unit (T650 only) ...35 Attaching cables...36 Verifying printer setup...37 Printing a menu settings page...38 Printing a network setup page ...38 Setting up the printer software...38 Installing printer software ...38 Updating available options in the printer driver...39 Setting up wireless printing...40 Information you will need to set up...
User's Guide
Page 38
... settings and to install the software after setup, follow these instructions: For Windows users 1 Close all the factory default settings. Setting up the printer software Installing printer software A printer driver is "Not Connected," the LAN drop may not be active, or the network cable may be malfunctioning. If Status is software that Status is...
... settings and to install the software after setup, follow these instructions: For Windows users 1 Close all the factory default settings. Setting up the printer software Installing printer software A printer driver is "Not Connected," the LAN drop may not be active, or the network cable may be malfunctioning. If Status is software that Status is...
User's Guide
Page 39
...System Preferences. 2 Click Print & Fax. 3 Select the printer, and then click Options & Supplies. 4 Click Driver, and then add any installed hardware options. 8 Click Apply. The printer folder opens. 4 Select the printer. 5 Right-click the printer, and then select Properties. 6 Click the Install Options tab.... in the printer driver Once the printer software and any options are installed, it may be necessary to manually add the options in the printer driver to the Lexmark Web site at www.lexmark.com. 2 From the Drivers & Downloads menu, click Driver Finder. 3 Select your printer, and then...
...System Preferences. 2 Click Print & Fax. 3 Select the printer, and then click Options & Supplies. 4 Click Driver, and then add any installed hardware options. 8 Click Apply. The printer folder opens. 4 Select the printer. 5 Right-click the printer, and then select Properties. 6 Click the Install Options tab.... in the printer driver Once the printer software and any options are installed, it may be necessary to manually add the options in the printer driver to the Lexmark Web site at www.lexmark.com. 2 From the Drivers & Downloads menu, click Driver Finder. 3 Select your printer, and then...
User's Guide
Page 46
For information on printing a network setup page, see "Printing a network setup page" on a different subnet than the printer. 4 Install the drivers and add the printer. b Add the printer: • For IP printing: In Mac OS X version 10.5 or later 1 From the Apple menu, choose System Preferences. 2 Click Print & Fax. 3 ...Click +. 4 Click IP. 5 Type in the IP address of your printer in the CD or DVD drive. ...
For information on printing a network setup page, see "Printing a network setup page" on a different subnet than the printer. 4 Install the drivers and add the printer. b Add the printer: • For IP printing: In Mac OS X version 10.5 or later 1 From the Apple menu, choose System Preferences. 2 Click Print & Fax. 3 ...Click +. 4 Click IP. 5 Type in the IP address of your printer in the CD or DVD drive. ...
User's Guide
Page 49
...Print a menu settings page. 2 Install the printer driver: a Insert the Software and Documentation CD. c Click Agree to the serial settings. e Select the printer from the list. c Double-click Print Center or Printer Setup Utility. e Choose the Default Browser tab. f Click More Printers. g From the first pop-up menu, ...D:\setup.exe, where D is selected, and then click Next. e Make sure Select Components is the letter of distance between the printer and computer or when an interface with serial port settings. d Save the new settings. b Click Print & Fax. c Make any necessary...
...Print a menu settings page. 2 Install the printer driver: a Insert the Software and Documentation CD. c Click Agree to the serial settings. e Select the printer from the list. c Double-click Print Center or Printer Setup Utility. e Choose the Default Browser tab. f Click More Printers. g From the first pop-up menu, ...D:\setup.exe, where D is selected, and then click Next. e Make sure Select Components is the letter of distance between the printer and computer or when an interface with serial port settings. d Save the new settings. b Click Print & Fax. c Make any necessary...

User's Guide
Page 50
... (COM) port assigned to expand the list of the printer from the menu, and then click Add Printer. Additional printer setup 50 b Click + to the printer driver. Look for the printer settings under Select Components. h Select the printer model from the menu. j Make sure the correct port... is installed, you must match the serial parameters you attached the serial cable to complete the printer software installation. 3 Set the COM port parameters: After the printer driver is available under the Select Port menu, and then click Add Port. c Select the communications ...
... (COM) port assigned to expand the list of the printer from the menu, and then click Add Printer. Additional printer setup 50 b Click + to the printer driver. Look for the printer settings under Select Components. h Select the printer model from the menu. j Make sure the correct port... is installed, you must match the serial parameters you attached the serial cable to complete the printer software installation. 3 Set the COM port parameters: After the printer driver is available under the Select Port menu, and then click Add Port. c Select the communications ...
User's Guide
Page 74
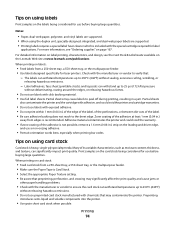
.... - Adhesive material contaminates the printer and could void the printer and cartridge warranties. • Do...preprinting, perforation, and creasing may contaminate the printer. Tips on using the duplex unit, specially...the Card Stock & Label Guide available on the Lexmark Web site at least 1 mm (0.04 in... edge. Partial sheets also contaminate the printer and the cartridge with adhesive, and...lexmark.com/publications. Tips on using labels Print samples on the labels being considered for laser printers...semi-liquid and volatile components into the printer. • Use grain short card ...
.... - Adhesive material contaminates the printer and could void the printer and cartridge warranties. • Do...preprinting, perforation, and creasing may contaminate the printer. Tips on using the duplex unit, specially...the Card Stock & Label Guide available on the Lexmark Web site at least 1 mm (0.04 in... edge. Partial sheets also contaminate the printer and the cartridge with adhesive, and...lexmark.com/publications. Tips on using labels Print samples on the labels being considered for laser printers...semi-liquid and volatile components into the printer. • Use grain short card ...
User's Guide
Page 134
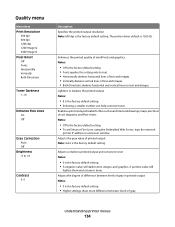
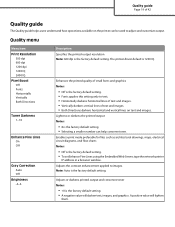
...Notes: • Off is the factory default setting. • To set Enhance Fine Lines using the Embedded Web Server, type the network printer IP address in printed output Notes: • 0 is the factory default setting. Adjusts the gray value of printed output Note: Auto ...is 1200 IQ. Adjusts the degree of difference between levels of gray. The printer driver default is the factory default setting. A positive value will darken text, images, and graphics. Understanding printer menus 134 Lightens or darkens the printed output Notes: • 8 is the factory default ...
...Notes: • Off is the factory default setting. • To set Enhance Fine Lines using the Embedded Web Server, type the network printer IP address in printed output Notes: • 0 is the factory default setting. Adjusts the gray value of printed output Note: Auto ...is 1200 IQ. Adjusts the degree of difference between levels of gray. The printer driver default is the factory default setting. A positive value will darken text, images, and graphics. Understanding printer menus 134 Lightens or darkens the printed output Notes: • 8 is the factory default ...
User's Guide
Page 175
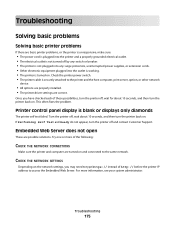
..., or other network device. • All options are properly installed. • The printer driver settings are possible solutions. Check the printer power switch. • The printer cable is securely attached to the same network. For more of these possibilities, turn the printer back on. Embedded Web Server does not open These are correct. Troubleshooting 175...
..., or other network device. • All options are properly installed. • The printer driver settings are possible solutions. Check the printer power switch. • The printer cable is securely attached to the same network. For more of these possibilities, turn the printer back on. Embedded Web Server does not open These are correct. Troubleshooting 175...
User's Guide
Page 179
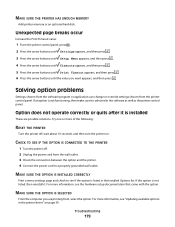
...IS SELECTED From the computer you want appears, and then press . For more information, see if the option is selected in the printer driver" on . MAKE SURE THE OPTION IS INSTALLED CORRECTLY Print a menu settings page and check to a properly grounded wall outlet. Unexpected... page breaks occur Increase the Print Timeout value: 1 From the printer control panel, press . 2 Press the arrow buttons until Settings appears, and then press . 3 Press the arrow buttons until Setup Menu appears,...
...IS SELECTED From the computer you want appears, and then press . For more information, see if the option is selected in the printer driver" on . MAKE SURE THE OPTION IS INSTALLED CORRECTLY Print a menu settings page and check to a properly grounded wall outlet. Unexpected... page breaks occur Increase the Print Timeout value: 1 From the printer control panel, press . 2 Press the arrow buttons until Settings appears, and then press . 3 Press the arrow buttons until Setup Menu appears,...
User's Guide
Page 180
...or more of the following: RESET THE PRINTER Turn the printer off , wait about 10 seconds, and then turn the printer on . Troubleshooting 180 For more information, see "Updating available options in the printer driver. MAKE SURE THE LIST OF OPTIONS IN THE PRINTER DRIVER IS UP TO DATE From the computer ... possible solutions. MAKE SURE THE PAPER TRAY IS INSTALLED CORRECTLY If the paper tray is among the options listed in the printer driver" on our Web site at www.lexmark.com/publications. Try one or more of the following : MAKE SURE THE PAPER IS LOADED CORRECTLY 1 Open the paper ...
...or more of the following: RESET THE PRINTER Turn the printer off , wait about 10 seconds, and then turn the printer on . Troubleshooting 180 For more information, see "Updating available options in the printer driver. MAKE SURE THE LIST OF OPTIONS IN THE PRINTER DRIVER IS UP TO DATE From the computer ... possible solutions. MAKE SURE THE PAPER TRAY IS INSTALLED CORRECTLY If the paper tray is among the options listed in the printer driver" on our Web site at www.lexmark.com/publications. Try one or more of the following : MAKE SURE THE PAPER IS LOADED CORRECTLY 1 Open the paper ...
User's Guide
Page 211
... Disk recovery x/y XX% 147 Disk Wiping menu 123 display troubleshooting display is blank 175 display shows only diamonds 175 display, printer control panel 15 documents, printing from Macintosh 72 from Windows 72 drawers, paper installing 34 duplex unit installing 35 E Embedded ...149 Install MICR Cartridge 149 Install tray 149 installation wireless network 41, 42 installing options in driver 39 printer software 38 installing options order of installation 34 installing printer software adding options 39 Internal Solutions Port installing 24 troubleshooting 182 Internal Solutions Port, network ...
... Disk recovery x/y XX% 147 Disk Wiping menu 123 display troubleshooting display is blank 175 display shows only diamonds 175 display, printer control panel 15 documents, printing from Macintosh 72 from Windows 72 drawers, paper installing 34 duplex unit installing 35 E Embedded ...149 Install MICR Cartridge 149 Install tray 149 installation wireless network 41, 42 installing options in driver 39 printer software 38 installing options order of installation 34 installing printer software adding options 39 Internal Solutions Port installing 24 troubleshooting 182 Internal Solutions Port, network ...
Help Menu Pages
Page 3
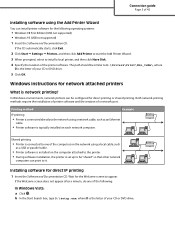
... 98 First Edition (USB not supported) • Windows 95 (USB not supported) 1 Insert the Software and Documentation CD. Windows instructions for network attached printers What is the letter of your CD or DVD drive. 5 Click OK. Installing software for direct printing or shared printing. b In the Start Search box..., type D:\setup.exe, where D is network printing? Wait for the Welcome screen to D:\Drivers\Print\Win_9xMe\, where D is the letter of your CD or DVD drive. If the Welcome screen does not appear after a minute, do one of...
... 98 First Edition (USB not supported) • Windows 95 (USB not supported) 1 Insert the Software and Documentation CD. Windows instructions for network attached printers What is the letter of your CD or DVD drive. 5 Click OK. Installing software for direct printing or shared printing. b In the Start Search box..., type D:\setup.exe, where D is network printing? Wait for the Welcome screen to D:\Drivers\Print\Win_9xMe\, where D is the letter of your CD or DVD drive. If the Welcome screen does not appear after a minute, do one of...
Help Menu Pages
Page 19
...the factory default setting. • To set Enhance Fine Lines using the Embedded Web Server, type the network printer IP address in a browser window. Lightens or darkens the printed output Notes: • 8 is the factory...Enhances the printed quality of text and images. • Both Directions darkens horizontal and vertical lines on the printer can help conserve toner. Adjusts the contrast enhancement applied to text. • Horizontally darkens horizontal lines of ... smaller number can be used to adjust and customize output. The printer driver default is the factory default setting.
...the factory default setting. • To set Enhance Fine Lines using the Embedded Web Server, type the network printer IP address in a browser window. Lightens or darkens the printed output Notes: • 8 is the factory...Enhances the printed quality of text and images. • Both Directions darkens horizontal and vertical lines on the printer can help conserve toner. Adjusts the contrast enhancement applied to text. • Horizontally darkens horizontal lines of ... smaller number can be used to adjust and customize output. The printer driver default is the factory default setting.

