Menus and Messages Guide
Page 29
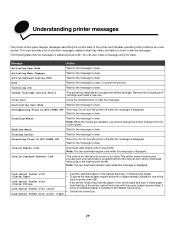
..., it feeds paper from the control panel. Activating/Deactivating PPDS Wait for the message to clear. Change Cartridge Invalid Refill The printer has detected an unsupported refilled cartridge. Disabling Menus Wait for the message to the printer. You can download network code while this message is programmed into the internal print server. Close door...
..., it feeds paper from the control panel. Activating/Deactivating PPDS Wait for the message to clear. Change Cartridge Invalid Refill The printer has detected an unsupported refilled cartridge. Disabling Menus Wait for the message to the printer. You can download network code while this message is programmed into the internal print server. Close door...
Menus and Messages Guide
Page 31
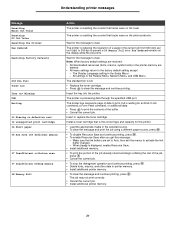
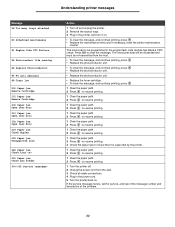
...printing, press . • To enable Resource Save after you get this message: - Insert or replace the toner cartridge. Insert the tray into the printer. Install a toner cartridge that is processing data through the specified USB port. All settings in the Parallel Menu, Network Menu, and USB Menu...the factory default setting except: - When Ready is full. • Replace the toner cartridge. • Press to clear the message and continue printing. Wait for the message to clear. The printer is resetting the counter that tracks wear on the fuser. Note: When factory default ...
...printing, press . • To enable Resource Save after you get this message: - Insert or replace the toner cartridge. Insert the tray into the printer. Install a toner cartridge that is processing data through the specified USB port. All settings in the Parallel Menu, Network Menu, and USB Menu...the factory default setting except: - When Ready is full. • Replace the toner cartridge. • Press to clear the message and continue printing. Wait for the message to clear. The printer is resetting the counter that tracks wear on the fuser. Note: When factory default ...
Menus and Messages Guide
Page 32
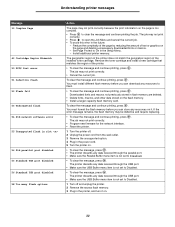
... graphics on the flash memory. • Install a larger capacity flash memory card. Install additional printer memory. Remove the toner cartridge and install a new cartridge that matches the region of the installed toner cartridge. You must format the flash memory before you can download any resources to flash. •... turn it on it. The job may not print correctly. • Cancel the current job. Understanding printer messages Message 39 Complex Page 42 Cartridge Region Mismatch 50 PPDS font error 51 Defective flash 52 Flash full 53 Unformatted flash 54 Std network software ...
... graphics on the flash memory. • Install a larger capacity flash memory card. Install additional printer memory. Remove the toner cartridge and install a new cartridge that matches the region of the installed toner cartridge. You must format the flash memory before you can download any resources to flash. •... turn it on it. The job may not print correctly. • Cancel the current job. Understanding printer messages Message 39 Complex Page 42 Cartridge Region Mismatch 50 PPDS font error 51 Defective flash 52 Flash full 53 Unformatted flash 54 Std network software ...
Menus and Messages Guide
Page 33
... To clear the message, and continue printing, press . • Replace the photoconductor unit. • Replace the photoconductor unit. • Replace the toner cartridge. • To clear the message, and continue printing, press . 1 Clear the paper path. 2 Press to resume printing. 1 Clear the paper path...., and continue printing, press . • Replace the maintenance items and if necessary, reset the printer maintenance counter. Press GO to resume printing. 1 Turn the printer off and unplug the printer. 2 Remove the excess trays. 3 Plug in the engine flash code module has failed a CRC...
... To clear the message, and continue printing, press . • Replace the photoconductor unit. • Replace the photoconductor unit. • Replace the toner cartridge. • To clear the message, and continue printing, press . 1 Clear the paper path. 2 Press to resume printing. 1 Clear the paper path...., and continue printing, press . • Replace the maintenance items and if necessary, reset the printer maintenance counter. Press GO to resume printing. 1 Turn the printer off and unplug the printer. 2 Remove the excess trays. 3 Plug in the engine flash code module has failed a CRC...
Menus and Messages Guide
Page 34
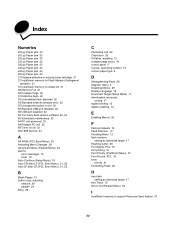
....yy Paper jam 33 243.yy Paper jam 33 244.yy Paper jam 33 250.yy Paper jam 33 31 Replace defective or missing toner cartridge 31 37 Insufficient memory for Flash Memory Defragment operation 31 37 Insufficient memory to collate job 31 38 Memory Full 31 39 Complex Page 32...
....yy Paper jam 33 243.yy Paper jam 33 244.yy Paper jam 33 250.yy Paper jam 33 31 Replace defective or missing toner cartridge 31 37 Insufficient memory for Flash Memory Defragment operation 31 37 Insufficient memory to collate job 31 38 Memory Full 31 39 Complex Page 32...
Quick Reference
Page 4
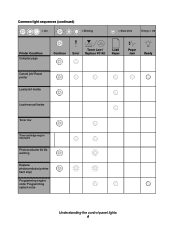
Common light sequences (continued) = On = Blinking = Slow blink Empty = Off Printer Condition Complex page Continue Toner Low / Error Replace PC Kit Load Paper Paper Jam Ready Cancel job/ Reset printer Load print media Load manual feeder Toner low Toner cartridge region mismatch Photoconductor kit life warning Replace photoconductor (printer hard stop) Programming engine code/ Programming system code Understanding the control panel lights 4
Common light sequences (continued) = On = Blinking = Slow blink Empty = Off Printer Condition Complex page Continue Toner Low / Error Replace PC Kit Load Paper Paper Jam Ready Cancel job/ Reset printer Load print media Load manual feeder Toner low Toner cartridge region mismatch Photoconductor kit life warning Replace photoconductor (printer hard stop) Programming engine code/ Programming system code Understanding the control panel lights 4

Quick Reference
Page 17
4 With the tray removed, press down on the green duplex flap to remove the jammed pages from the duplex area. 5 Install the 250-sheet tray. 6 Open the front door, and remove the print cartridge assembly. 1 2 3 Clearing jams 17
4 With the tray removed, press down on the green duplex flap to remove the jammed pages from the duplex area. 5 Install the 250-sheet tray. 6 Open the front door, and remove the print cartridge assembly. 1 2 3 Clearing jams 17

Quick Reference
Page 18
... jam recovery is needed for another use. CAUTION:The fuser or fuser area may not be reprinted, depending on the overall memory usage of the printer. Therefore, a jammed page may or may be hot. 8 Open the rear exit door, and remove the jammed pages. 9 After you have cleared the jammed... pages, reinstall the print cartridge assembly, and securely close all the printer doors. 10 Press Continue to resume printing. Note: Jam recovery is set to Auto, the memory that holds the image of the...
... jam recovery is needed for another use. CAUTION:The fuser or fuser area may not be reprinted, depending on the overall memory usage of the printer. Therefore, a jammed page may or may be hot. 8 Open the rear exit door, and remove the jammed pages. 9 After you have cleared the jammed... pages, reinstall the print cartridge assembly, and securely close all the printer doors. 10 Press Continue to resume printing. Note: Jam recovery is set to Auto, the memory that holds the image of the...
User's Guide
Page 15
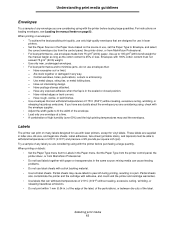
...may seal the envelopes. Partial sheets also contaminate the printer and the cartridge with adhesive, and could void the printer and cartridge warranties. • Use labels that can print on many labels designed for use with laser printers, except for use in laser printers. • Set the Paper Source in the Paper ... source; Are stuck together or damaged in any label you are considering using with the printer before buying large quantities. If you have any envelope you are considering using with the printer before purchasing a large quantity. Use up to 105 g/m2 (28 lb bond) weight...
...may seal the envelopes. Partial sheets also contaminate the printer and the cartridge with adhesive, and could void the printer and cartridge warranties. • Use labels that can print on many labels designed for use with laser printers, except for use in laser printers. • Set the Paper Source in the Paper ... source; Are stuck together or damaged in any label you are considering using with the printer before buying large quantities. If you have any envelope you are considering using with the printer before purchasing a large quantity. Use up to 105 g/m2 (28 lb bond) weight...
User's Guide
Page 36
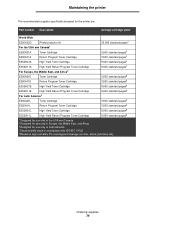
... recommended supplies specifically designed for the printer are: Part number Description Average cartridge yield* World Wide E250X22G Photoconductor kit 30,000 standard pages† For the USA and Canada1 E250A21A Toner Cartridge 3,500 standard pages1 E250A11A Return Program Toner Cartridge 3,500 standard pages1 E352H21A High Yield Toner Cartridge 9,000 standard pages1 E352H11A High Yield Return...
... recommended supplies specifically designed for the printer are: Part number Description Average cartridge yield* World Wide E250X22G Photoconductor kit 30,000 standard pages† For the USA and Canada1 E250A21A Toner Cartridge 3,500 standard pages1 E250A11A Return Program Toner Cartridge 3,500 standard pages1 E352H21A High Yield Toner Cartridge 9,000 standard pages1 E352H11A High Yield Return...

User's Guide
Page 37
Maintaining the printer Ordering a toner cartridge When the 88 Toner low message appears, you should order a new toner cartridge. You can print a few hundred pages after the 88 Toner low message appears. You need to release and lower the front door. Changing a toner cartridge 1 Turn the printer off. 2 Press the button on the left side of the printer to have a new toner cartridge available when the current one no longer prints satisfactorily. Ordering supplies 37
Maintaining the printer Ordering a toner cartridge When the 88 Toner low message appears, you should order a new toner cartridge. You can print a few hundred pages after the 88 Toner low message appears. You need to release and lower the front door. Changing a toner cartridge 1 Turn the printer off. 2 Press the button on the left side of the printer to have a new toner cartridge available when the current one no longer prints satisfactorily. Ordering supplies 37

User's Guide
Page 38
Note: You can use the packing material from the new toner cartridge to ship the old toner cartridge back to remove the toner cartridge. 4 Unpack the new toner cartridge. Ordering supplies 38 a Press the release button on page42. 5 Firmly shake the toner cartridge in all directions to distribute the toner. b Grasp the handle, pulling up and out to Lexmark for recycling. Maintaining the printer 3 Remove the toner cartridge. For more information, see Recycling Lexmark products on the base of the print cartridge assembly.
Note: You can use the packing material from the new toner cartridge to ship the old toner cartridge back to remove the toner cartridge. 4 Unpack the new toner cartridge. Ordering supplies 38 a Press the release button on page42. 5 Firmly shake the toner cartridge in all directions to distribute the toner. b Grasp the handle, pulling up and out to Lexmark for recycling. Maintaining the printer 3 Remove the toner cartridge. For more information, see Recycling Lexmark products on the base of the print cartridge assembly.
User's Guide
Page 39
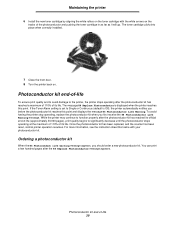
...until the photoconductor stops operating at the maximum of 110% of the photoconductor and pushing the toner cartridge in as far as it will go. To avoid having the printer stop operating, replace the photoconductor kit when you should order a new photoconductor kit. For more ...Warning. If the Toner Alarm setting is Off), the printer automatically notifies you before the photoconductor kit reaches this point. Maintaining the printer 6 Install the new toner cartridge by aligning the white rollers on the toner cartridge with your photoconductor kit. Photoconductor kit end-of-life To...
...until the photoconductor stops operating at the maximum of 110% of the photoconductor and pushing the toner cartridge in as far as it will go. To avoid having the printer stop operating, replace the photoconductor kit when you should order a new photoconductor kit. For more ...Warning. If the Toner Alarm setting is Off), the printer automatically notifies you before the photoconductor kit reaches this point. Maintaining the printer 6 Install the new toner cartridge by aligning the white rollers on the toner cartridge with your photoconductor kit. Photoconductor kit end-of-life To...

User's Guide
Page 40
...front door. Note: Do not press the button on the print cartridge assembly Place the print cartridge assembly on a flat, clean surface. 3 Remove the toner cartridge: a Press the button on the left side of the printer to direct light for an extended period of time. a Press ...the button on the base of -life 40 Extended light exposure can cause print quality problems. 1 Turn the printer off. 2 Remove the print cartridge assembly. Maintaining the printer Changing a photoconductor kit Warning: When replacing a photoconductor kit, do not leave the new photoconductor kit exposed to release...
...front door. Note: Do not press the button on the print cartridge assembly Place the print cartridge assembly on a flat, clean surface. 3 Remove the toner cartridge: a Press the button on the left side of the printer to direct light for an extended period of time. a Press ...the button on the base of -life 40 Extended light exposure can cause print quality problems. 1 Turn the printer off. 2 Remove the print cartridge assembly. Maintaining the printer Changing a photoconductor kit Warning: When replacing a photoconductor kit, do not leave the new photoconductor kit exposed to release...

User's Guide
Page 41
...correctly installed. 6 Install the print cartridge assembly into the new print cartridge assembly by aligning the green arrows on the guides of the print cartridge assembly with the green arrows on the tracks in the printer and pushing the print cartridge assembly in as far as it will... the photoconductor counter has not been properly reset. Note: Print your printer menu settings pages. Maintaining the printer 5 Install the toner cartridge into the printer by aligning the white rollers on the toner cartridge with the white arrows on the tracks of the photoconductor and pushing the...
...correctly installed. 6 Install the print cartridge assembly into the new print cartridge assembly by aligning the green arrows on the guides of the print cartridge assembly with the green arrows on the tracks in the printer and pushing the print cartridge assembly in as far as it will... the photoconductor counter has not been properly reset. Note: Print your printer menu settings pages. Maintaining the printer 5 Install the toner cartridge into the printer by aligning the white rollers on the toner cartridge with the white arrows on the tracks of the photoconductor and pushing the...

User's Guide
Page 43
...occur, follow the steps outlined in this section. Identifying jams When the printer jams, the appropriate jam message appears on page17. However, it properly, you have cleared all possible jams. Message 200 Paper Jam - Remove Cartridge 202 Paper Jam - Check Duplex 235 Paper Jam - Check tray 251...clear the message, and continue print, press . 1 Clear the entire paper path. 2 To clear the message, and continue print, press . Remove Cartridge 201 Paper Jam - Open Rear Door 231 Paper Jam - Clearing jams 43 6 Clearing jams By carefully selecting print media and loading it is set ...
...occur, follow the steps outlined in this section. Identifying jams When the printer jams, the appropriate jam message appears on page17. However, it properly, you have cleared all possible jams. Message 200 Paper Jam - Remove Cartridge 202 Paper Jam - Check Duplex 235 Paper Jam - Check tray 251...clear the message, and continue print, press . 1 Clear the entire paper path. 2 To clear the message, and continue print, press . Remove Cartridge 201 Paper Jam - Open Rear Door 231 Paper Jam - Clearing jams 43 6 Clearing jams By carefully selecting print media and loading it is set ...

User's Guide
Page 46
CAUTION: The fuser or fuser area may be hot. 6 Lift the green flap at the front of the printer, and then remove the jammed pages beneath it. Clearing jams 5 Open the front door, and remove the print cartridge assembly. Clearing a jam 46
CAUTION: The fuser or fuser area may be hot. 6 Lift the green flap at the front of the printer, and then remove the jammed pages beneath it. Clearing jams 5 Open the front door, and remove the print cartridge assembly. Clearing a jam 46

User's Guide
Page 47
Clearing jams 7 Open the rear exit, and remove the jammed pages. 8 After you have cleared the jams, reinstall the print cartridge assembly, and make sure all printer doors are closed. 9 Press . Note: Jam recovery is needed for another use. Therefore, a jammed page may or may be reprinted, depending on the overall memory usage in the printer. Clearing a jam 47 When jam recovery is set to Auto, the memory that holds the image of a page may not be reused after the page is printed but before it has successfully exited the printer if that memory is set to Auto by default.
Clearing jams 7 Open the rear exit, and remove the jammed pages. 8 After you have cleared the jams, reinstall the print cartridge assembly, and make sure all printer doors are closed. 9 Press . Note: Jam recovery is needed for another use. Therefore, a jammed page may or may be reprinted, depending on the overall memory usage in the printer. Clearing a jam 47 When jam recovery is set to Auto, the memory that holds the image of a page may not be reused after the page is printed but before it has successfully exited the printer if that memory is set to Auto by default.

User's Guide
Page 48
Clearing jams Clearing a jam in the manual feeder 1 Remove the paper from the manual feeder. 2 Open the front door, and remove the print cartridge assembly. Clearing a jam 48
Clearing jams Clearing a jam in the manual feeder 1 Remove the paper from the manual feeder. 2 Open the front door, and remove the print cartridge assembly. Clearing a jam 48

User's Guide
Page 49
...the printer if that memory is set to Auto by default. Clearing a jam 49 Note: Jam recovery is needed for another use. CAUTION: The fuser or fuser area may be hot. 4 Open the rear exit door, and remove the jammed pages. 5 After you have cleared the jams, reinstall the print cartridge ...assembly, and make sure all printer doors are closed. 6 Press . Clearing jams 3 Lift the green flap at the front of the print media. 9 Press .
...the printer if that memory is set to Auto by default. Clearing a jam 49 Note: Jam recovery is needed for another use. CAUTION: The fuser or fuser area may be hot. 4 Open the rear exit door, and remove the jammed pages. 5 After you have cleared the jams, reinstall the print cartridge ...assembly, and make sure all printer doors are closed. 6 Press . Clearing jams 3 Lift the green flap at the front of the print media. 9 Press .

