Menus and Messages Guide
Page 12
... source Paper Loading This menu selection is used to set the loading orientation for all print Off* jobs Note: Select Duplex from the printer On driver to indicate simplex printing. Menu selection Duplex Duplex Bind Purpose Values Sets duplexing as the default for each paper type. Note: Paper Loading...Normal* Heavy Shown if the custom type is supported in the specified input source Finishing Menu Use this menu selection to define how the printer delivers the printed output. Defines the way duplexed pages would be bound, and how the printing on both sides of the paper Assumes ...
... source Paper Loading This menu selection is used to set the loading orientation for all print Off* jobs Note: Select Duplex from the printer On driver to indicate simplex printing. Menu selection Duplex Duplex Bind Purpose Values Sets duplexing as the default for each paper type. Note: Paper Loading...Normal* Heavy Shown if the custom type is supported in the specified input source Finishing Menu Use this menu selection to define how the printer delivers the printed output. Defines the way duplexed pages would be bound, and how the printing on both sides of the paper Assumes ...
Menus and Messages Guide
Page 13
... of paper, also called n-up or Paper Saver 2 Up 3 Up 4 Up 6 Up 9 Up 12 Up 16 Up Values selected from the printer driver always override values selected from the control panel. Inserts a blank sheet between jobs Inserts a blank sheet between each copy of a job. If Collation is...Blank Pages Collation Purpose Values Sets the number of copies you want to insert blank pages in a document for a specific job from the printer driver. 1...999 (1*) Specifies whether to include programgenerated blank pages as part of your printed output Do Not Print* Print Keeps the pages of ...
... of paper, also called n-up or Paper Saver 2 Up 3 Up 4 Up 6 Up 9 Up 12 Up 16 Up Values selected from the printer driver always override values selected from the control panel. Inserts a blank sheet between jobs Inserts a blank sheet between each copy of a job. If Collation is...Blank Pages Collation Purpose Values Sets the number of copies you want to insert blank pages in a document for a specific job from the printer driver. 1...999 (1*) Specifies whether to include programgenerated blank pages as part of your printed output Do Not Print* Print Keeps the pages of ...
Menus and Messages Guide
Page 21
... Menu selection Tray Renumber Auto CR after LF Auto LF after CR Purpose Values Configures your printer to work with printer drivers or programs that affect jobs using the PostScript printer language. Menu selection Print PS Error Font Priority Purpose Prints a page defining the PostScript emulation error when an error occurs Values Off* On...
... Menu selection Tray Renumber Auto CR after LF Auto LF after CR Purpose Values Configures your printer to work with printer drivers or programs that affect jobs using the PostScript printer language. Menu selection Print PS Error Font Priority Purpose Prints a page defining the PostScript emulation error when an error occurs Values Off* On...
Menus and Messages Guide
Page 22
... best fit search if the requested font cannot be found On* Tray 1 Renumber Configures your printer to work with printer drivers or applications that use different source assignments for the paper trays. The addresses from the requested source. Printer stops printing when a requested font cannot be found . Print job requests for Tray 2 are equal...
... best fit search if the requested font cannot be found On* Tray 1 Renumber Configures your printer to work with printer drivers or applications that use different source assignments for the paper trays. The addresses from the requested source. Printer stops printing when a requested font cannot be found . Print job requests for Tray 2 are equal...
Quick Reference
Page 7
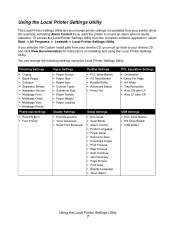
... application, select Start Æ All Programs Æ Lexmark Æ Local Printer Settings Utility. You can change printer settings not available from your printer driver (for example, activating Alarm Control if you want the printer to your drivers CD, you must go back to sound an alarm ...when it needs attention). To access the Local Printer Settings Utility from your drivers CD and click View Documentation for instructions on installing and using the Local Printer Settings Utility: Finishing Settings • Copies • Blank Pages • Collation...
... application, select Start Æ All Programs Æ Lexmark Æ Local Printer Settings Utility. You can change printer settings not available from your printer driver (for example, activating Alarm Control if you want the printer to your drivers CD, you must go back to sound an alarm ...when it needs attention). To access the Local Printer Settings Utility from your drivers CD and click View Documentation for instructions on installing and using the Local Printer Settings Utility: Finishing Settings • Copies • Blank Pages • Collation...
Quick Reference
Page 13
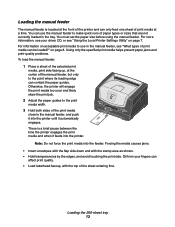
..., see "Using the Local Printer Settings Utility" on acceptable print media to use the manual...the manual feeder, and push it into the printer until it feeds into the printer. Using only the specified print media helps ...feeder The manual feeder is a brief pause between the time the printer engages the print media and when it automatically engages. Loading the 250... by the edges, and avoid touching the print side. Otherwise, the printer will engage the print media too soon and likely skew the print job...located at the front of the printer and can only feed one sheet of print media at...
..., see "Using the Local Printer Settings Utility" on acceptable print media to use the manual...the manual feeder, and push it into the printer until it feeds into the printer. Using only the specified print media helps ...feeder The manual feeder is a brief pause between the time the printer engages the print media and when it automatically engages. Loading the 250... by the edges, and avoid touching the print side. Otherwise, the printer will engage the print media too soon and likely skew the print job...located at the front of the printer and can only feed one sheet of print media at...
User's Guide
Page 15
... Have nicked edges or bent corners. - Have rough, cockle, or laid finishes. • Use envelopes that are designed for use in laser printers. • Set the Paper Source in the Paper menu based on many labels designed for use label sheets with a slick backing material. ...• A combination of the label. Contain windows, holes, perforations, cutouts or embossing. - Set the Paper Type from the printer control panel, the printer driver, or from MarkVision Professional. • Do not load labels together with paper or transparencies in any envelope you are considering using ...
... Have nicked edges or bent corners. - Have rough, cockle, or laid finishes. • Use envelopes that are designed for use in laser printers. • Set the Paper Source in the Paper menu based on many labels designed for use label sheets with a slick backing material. ...• A combination of the label. Contain windows, holes, perforations, cutouts or embossing. - Set the Paper Type from the printer control panel, the printer driver, or from MarkVision Professional. • Do not load labels together with paper or transparencies in any envelope you are considering using ...
User's Guide
Page 16
...the following guidelines to avoid paper feeding problems and uneven print quality: • For best results, store media in .) strip on the Lexmark Web site at least 1 mm (0.04 in the Paper Menu to CardStock Weight, and select the CardStock Weight as the moisture content, thickness...and texture, that have exposed adhesive. • Do not use preprinted card stock manufactured with chemicals that may contaminate the printer. Set this from the control panel, the printer driver, or from the Manual Feeder. • Set the Paper Type menu item in .) away from edges is recommended. ...
...the following guidelines to avoid paper feeding problems and uneven print quality: • For best results, store media in .) strip on the Lexmark Web site at least 1 mm (0.04 in the Paper Menu to CardStock Weight, and select the CardStock Weight as the moisture content, thickness...and texture, that have exposed adhesive. • Do not use preprinted card stock manufactured with chemicals that may contaminate the printer. Set this from the control panel, the printer driver, or from the Manual Feeder. • Set the Paper Type menu item in .) away from edges is recommended. ...
User's Guide
Page 24
... of the trays. For example, if you have the same type of print media in the dialog. Modify the printer settings as appropriate (such as a complete description of the driver packages and Lexmark driver support, are linked, you load the same size and type of print media when they are available from the next...
... of the trays. For example, if you have the same type of print media in the dialog. Modify the printer settings as appropriate (such as a complete description of the driver packages and Lexmark driver support, are linked, you load the same size and type of print media when they are available from the next...
User's Guide
Page 34
...: If you can add the appropriate option manually. If it does not, you have installed a printer driver, return here to complete these instructions. 1 Click Start à Settings à Printers. 2 Select the printer icon. 3 Click File à Properties. 4 Click the Install Options tab. 5 Add the ... of 160 MB). Installing options Recognizing installed options The printer driver should automatically recognize the newly-installed option when the printer is turned on the Setup sheet supplied with your printer. Flash Memory Card-Increase the printer flash memory to 550 sheets. 6 Click OK.
...: If you can add the appropriate option manually. If it does not, you have installed a printer driver, return here to complete these instructions. 1 Click Start à Settings à Printers. 2 Select the printer icon. 3 Click File à Properties. 4 Click the Install Options tab. 5 Add the ... of 160 MB). Installing options Recognizing installed options The printer driver should automatically recognize the newly-installed option when the printer is turned on the Setup sheet supplied with your printer. Flash Memory Card-Increase the printer flash memory to 550 sheets. 6 Click OK.
User's Guide
Page 51
... cable is not Make sure the connection is blank or failed. complex. For more information, see the drivers CD or the Lexmark Web site. Make sure the Paper Size and Paper Type specified in the printer driver match the paper size and type in the job. Troubleshooting Printing multiple-language PDFs Symptom Some documents...
... cable is not Make sure the connection is blank or failed. complex. For more information, see the drivers CD or the Lexmark Web site. Make sure the Paper Size and Paper Type specified in the printer driver match the paper size and type in the job. Troubleshooting Printing multiple-language PDFs Symptom Some documents...
User's Guide
Page 52
... to exit Hex Trace mode. Off* is too complex. We recommend Lexmark part cable. number 1021231 for simplex printing. Turn the printer off . Set Collation to help reduce the problem. The printer does not Add printer memory. The job has timed out. However, before you can be turned...; Try another kind or brand of print media, such as a xerographic paper for laser printers. • If possible, try printing in Troubleshooting. The paper has absorbed moisture due to Off in the driver overrides the setting in its power-on sequence, and then Config Menu appears on Reduced...
... to exit Hex Trace mode. Off* is too complex. We recommend Lexmark part cable. number 1021231 for simplex printing. Turn the printer off . Set Collation to help reduce the problem. The printer does not Add printer memory. The job has timed out. However, before you can be turned...; Try another kind or brand of print media, such as a xerographic paper for laser printers. • If possible, try printing in Troubleshooting. The paper has absorbed moisture due to Off in the driver overrides the setting in its power-on sequence, and then Config Menu appears on Reduced...
User's Guide
Page 58
...asterisk (*) are available on the driver and on the printer Embedded Web Server (EWS) interface. In the driver, select the check box. In the driver, clear the check box. For more information about these options, see the driver Help. Adjust the contrast of ...the default setting. 0-5 0* is the default setting. Menu selection Print Resolution Toner Darkness Brightness Contrast Purpose Select printed output resolution. Driver option Purpose Values† Enhance Fine Lines Enable a print mode preferable for On certain files containing fine line detail, such as...
...asterisk (*) are available on the driver and on the printer Embedded Web Server (EWS) interface. In the driver, select the check box. In the driver, clear the check box. For more information about these options, see the driver Help. Adjust the contrast of ...the default setting. 0-5 0* is the default setting. Menu selection Print Resolution Toner Darkness Brightness Contrast Purpose Select printed output resolution. Driver option Purpose Values† Enhance Fine Lines Enable a print mode preferable for On certain files containing fine line detail, such as...

