

Quick Reference
Page 7
...select Start Æ All Programs Æ Lexmark Æ Local Printer Settings Utility. You can change printer settings not available from your drivers CD and click View Documentation for example, activating Alarm Control if you want the printer to sound an alarm when it needs ... lets you change the following settings using the Local Printer Settings Utility. To access the Local Printer Settings Utility from your drivers CD, you must go back to your printer driver (for instructions on installing and using the Local Printer Settings Utility: Finishing Settings • Copies •...
...select Start Æ All Programs Æ Lexmark Æ Local Printer Settings Utility. You can change printer settings not available from your drivers CD and click View Documentation for example, activating Alarm Control if you want the printer to sound an alarm when it needs ... lets you change the following settings using the Local Printer Settings Utility. To access the Local Printer Settings Utility from your drivers CD, you must go back to your printer driver (for instructions on installing and using the Local Printer Settings Utility: Finishing Settings • Copies •...
Quick Reference
Page 13
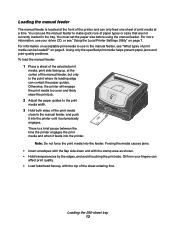
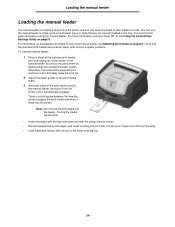
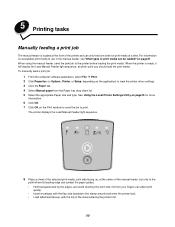
... manual feeder: 1 Place a sheet of the manual feeder, but only to the manual feeder, and push it into the printer until it feeds into the feeder. Oil from your driver CD, or see your fingers can affect print quality. • Load letterhead faceup, with the stamp area as shown. &#...8226; Hold transparencies by the edges, and avoid touching the print side. Loading the manual feeder The manual feeder is a brief pause between the time the printer engages ...
... manual feeder: 1 Place a sheet of the manual feeder, but only to the manual feeder, and push it into the printer until it feeds into the feeder. Oil from your driver CD, or see your fingers can affect print quality. • Load letterhead faceup, with the stamp area as shown. &#...8226; Hold transparencies by the edges, and avoid touching the print side. Loading the manual feeder The manual feeder is a brief pause between the time the printer engages ...
User's Guide
Page 54
...with the flap side down and with the top of the sheet entering first. 54 Oil from your driver CD, or see Selecting print media on page43. You can contact the paper guides. Using only the ...selected print media, print side facing up, at the center of print media at the front of the printer and can only feed one sheet of the manual feeder, but only to the point where its leading ... paper types or sizes that are not currently loaded in the manual feeder, see Using the Local Printer Settings Utility on acceptable print media to use the manual feeder to make quick runs of the print...
...with the flap side down and with the top of the sheet entering first. 54 Oil from your driver CD, or see Selecting print media on page43. You can contact the paper guides. Using only the ...selected print media, print side facing up, at the center of print media at the front of the printer and can only feed one sheet of the manual feeder, but only to the point where its leading ... paper types or sizes that are not currently loaded in the manual feeder, see Using the Local Printer Settings Utility on acceptable print media to use the manual feeder to make quick runs of the print...
User's Guide
Page 60
...manual feeder, see What types of print media can be loaded? See Using the Local Printer Settings Utility on page75 for more information. 6 Click OK. 7 Click OK on the application) to view the printer driver settings. 3 Click the Paper tab. 4 Select Manual paper from your fingers can affect... print quality. • Insert envelopes with the top of the sheet entering the printer first. 60 For information on page41. on acceptable print media...
...manual feeder, see What types of print media can be loaded? See Using the Local Printer Settings Utility on page75 for more information. 6 Click OK. 7 Click OK on the application) to view the printer driver settings. 3 Click the Paper tab. 4 Select Manual paper from your fingers can affect... print quality. • Insert envelopes with the top of the sheet entering the printer first. 60 For information on page41. on acceptable print media...
User's Guide
Page 63
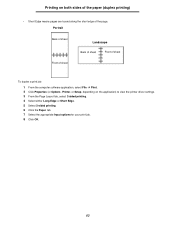
... short edge of sheet To duplex a print job: 1 From the computer software application, select File à Print. 2 Click Properties (or Options, Printer, or Setup, depending on the application) to view the printer driver settings. 3 From the Page Layout tab, select 2-sided printing. 4 Select either Long Edge or Short Edge. 5 Select 2-sided printing. 6 Click...
... short edge of sheet To duplex a print job: 1 From the computer software application, select File à Print. 2 Click Properties (or Options, Printer, or Setup, depending on the application) to view the printer driver settings. 3 From the Page Layout tab, select 2-sided printing. 4 Select either Long Edge or Short Edge. 5 Select 2-sided printing. 6 Click...
User's Guide
Page 64
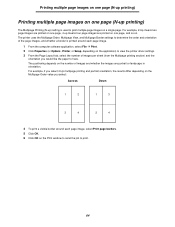
The positioning depends on the number of images and whether the images are printed on one page, and so on. The printer uses the Multipage Order, Multipage View, and Multipage Border settings to determine the order and orientation of images per sheet (from the ...is printed around each page image. 1 From the computer software application, select File à Print. 2 Click Properties (or Options, Printer, or Setup, depending on the application) to view the printer driver settings. 3 From the Page Layout tab, select the number of the page images, and whether a border is used to have. ...
The positioning depends on the number of images and whether the images are printed on one page, and so on. The printer uses the Multipage Order, Multipage View, and Multipage Border settings to determine the order and orientation of images per sheet (from the ...is printed around each page image. 1 From the computer software application, select File à Print. 2 Click Properties (or Options, Printer, or Setup, depending on the application) to view the printer driver settings. 3 From the Page Layout tab, select the number of the page images, and whether a border is used to have. ...
User's Guide
Page 65
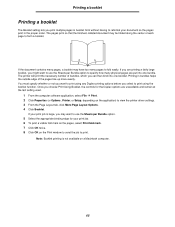
...pages, select Print fold mark. 7 Click OK twice. 8 Click OK on the Print window to send the job to print. The printer will print the necessary number of bundles, which you select to print using any Duplex printing options before you can then bind into one ...remain at the last setting used. 1 From the computer software application, select File à Print. 2 Click Properties (or Options, Printer, or Setup, depending on the application) to view the printer driver settings. 3 From the Page Layout tab, click More Page Layout Options. 4 Click Booklet. Printing a booklet Printing a booklet The...
...pages, select Print fold mark. 7 Click OK twice. 8 Click OK on the Print window to send the job to print. The printer will print the necessary number of bundles, which you select to print using any Duplex printing options before you can then bind into one ...remain at the last setting used. 1 From the computer software application, select File à Print. 2 Click Properties (or Options, Printer, or Setup, depending on the application) to view the printer driver settings. 3 From the Page Layout tab, click More Page Layout Options. 4 Click Booklet. Printing a booklet Printing a booklet The...
User's Guide
Page 66
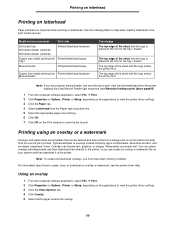
... memory installed. Watermarks are templates that can create an overlay or watermark file on your system and then download it to view the printer driver settings. 3 Click the Other Options tab. 4 Click Overlay. 5 Select which pages receive the overlay. 66 Printing on letterhead Printing.... Using an overlay 1 From the computer software application, select File à Print. 2 Click Properties (or Options, Printer, or Setup, depending on the application) to view the printer driver settings. 3 Click the Paper tab. 4 Select Letterhead from the current job is placed at the front of the tray...
... memory installed. Watermarks are templates that can create an overlay or watermark file on your system and then download it to view the printer driver settings. 3 Click the Other Options tab. 4 Click Overlay. 5 Select which pages receive the overlay. 66 Printing on letterhead Printing.... Using an overlay 1 From the computer software application, select File à Print. 2 Click Properties (or Options, Printer, or Setup, depending on the application) to view the printer driver settings. 3 Click the Paper tab. 4 Select Letterhead from the current job is placed at the front of the tray...
User's Guide
Page 67
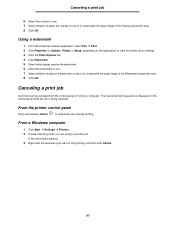
... of or underneath the page image in the Overlay placement area. 8 Click OK. From the printer control panel Press and release Cancel to place the watermark on the application) to view the printer driver settings. 3 Click the Other Options tab. 4 Click Watermark. 5 Select which pages receive the...document you are using to stop printing, and then click Cancel. 67 From a Windows computer 1 Click Start à Settings à Printers. 2 Double-click the printer you want to print the job. Canceling a print job A print job can be canceled from the control panel or from your computer....
... of or underneath the page image in the Overlay placement area. 8 Click OK. From the printer control panel Press and release Cancel to place the watermark on the application) to view the printer driver settings. 3 Click the Other Options tab. 4 Click Watermark. 5 Select which pages receive the...document you are using to stop printing, and then click Cancel. 67 From a Windows computer 1 Click Start à Settings à Printers. 2 Double-click the printer you want to print the job. Canceling a print job A print job can be canceled from the control panel or from your computer....
User's Guide
Page 73
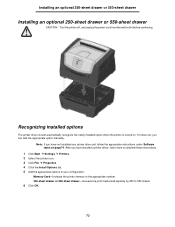
... automatically recognize the newly installed option when the printer is turned on page74. Note: If you have installed a printer driver, return here to complete these instructions. 1 Click Start à Settings à Printers. 2 Select the printer icon. 3 Click File à Properties. 4 Click the Install Options tab. 5 Add the appropriate ... appropriate number. 250-sheet drawer or 550-sheet drawer-Increase the print media load capacity by 250 to your printer driver yet, follow the appropriate instructions under Software tasks on . Installing an optional 250-sheet drawer or 550-sheet drawer...
... automatically recognize the newly installed option when the printer is turned on page74. Note: If you have installed a printer driver, return here to complete these instructions. 1 Click Start à Settings à Printers. 2 Select the printer icon. 3 Click File à Properties. 4 Click the Install Options tab. 5 Add the appropriate ... appropriate number. 250-sheet drawer or 550-sheet drawer-Increase the print media load capacity by 250 to your printer driver yet, follow the appropriate instructions under Software tasks on . Installing an optional 250-sheet drawer or 550-sheet drawer...

User's Guide
Page 75
...drivers CD and click View Documentation for example, activating Alarm Control if you want the printer to your drivers CD, you change the following settings using the Local Printer Settings Utility. To access the Local Printer Settings Utility from your printer driver... (for instructions on installing and using the Local Printer... Mode • Alarm Control • Printer Language • Power Saver • ...
...drivers CD and click View Documentation for example, activating Alarm Control if you want the printer to your drivers CD, you change the following settings using the Local Printer Settings Utility. To access the Local Printer Settings Utility from your printer driver... (for instructions on installing and using the Local Printer... Mode • Alarm Control • Printer Language • Power Saver • ...
User's Guide
Page 77
... paper. 77 What supplies do I need and how do I order them . Do not expose supplies to use them ? Store supplies right side up in your printer supplies. Setting the Toner Darkness to 10 (very dark), with 8 being the default. Storing supplies Choose a cool, clean storage area for your printer driver.
... paper. 77 What supplies do I need and how do I order them . Do not expose supplies to use them ? Store supplies right side up in your printer supplies. Setting the Toner Darkness to 10 (very dark), with 8 being the default. Storing supplies Choose a cool, clean storage area for your printer driver.
User's Guide
Page 85
If you see voids (missing characters) when printing envelopes, check your printer driver, select Custom6-RoughEnv from the Paper Type menu. Yes, you turn the printer back on. 4 Keep pressing Continue until the lights cycle, then release the Continue button. 5 Close the front door. 6 ... missing characters when I clear a paper jam? From your printer driver settings to make sure you selected Envelope from the Paper Type menu. Can I still print with the rear exit door open the rear exit door for laser printers. • If possible try changing the texture setting to ...
If you see voids (missing characters) when printing envelopes, check your printer driver, select Custom6-RoughEnv from the Paper Type menu. Yes, you turn the printer back on. 4 Keep pressing Continue until the lights cycle, then release the Continue button. 5 Close the front door. 6 ... missing characters when I clear a paper jam? From your printer driver settings to make sure you selected Envelope from the Paper Type menu. Can I still print with the rear exit door open the rear exit door for laser printers. • If possible try changing the texture setting to ...
User's Guide
Page 88
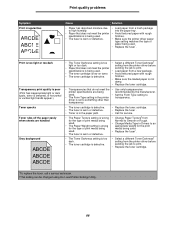
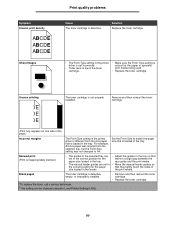
...vertical light bands appear.) Toner specks Toner rubs off the paper easily when sheets are being recommended by the manufacturer. setting from the printer driver before sending the job to print. • Replace the toner cartridge. *To replace the fuser, call a service technician. &#...ABCDE ABCDE Cause Solution • Paper has absorbed moisture due • Load paper from the printer driver before • Paper that do not meet the • Use only transparencies printer specifications are handled Gray background ABCDE ABCDE ABCDE • The Toner Darkness setting is too •...
...vertical light bands appear.) Toner specks Toner rubs off the paper easily when sheets are being recommended by the manufacturer. setting from the printer driver before sending the job to print. • Replace the toner cartridge. *To replace the fuser, call a service technician. &#...ABCDE ABCDE Cause Solution • Paper has absorbed moisture due • Load paper from the printer driver before • Paper that do not meet the • Use only transparencies printer specifications are handled Gray background ABCDE ABCDE ABCDE • The Toner Darkness setting is too •...
User's Guide
Page 89
...that is different from the size paper that they lightly touch the sides of the page.) Incorrect margins The Form Size setting in the printer driver is loaded in the tray. Set the Form Size to A4. Solution Replace the toner cartridge. • The Form Type setting in the... printer driver is set incorrectly. • Toner level is loaded in the tray. Blank pages The toner cartridge is not properly installed. the print media. ...
...that is different from the size paper that they lightly touch the sides of the page.) Incorrect margins The Form Size setting in the printer driver is loaded in the tray. Set the Form Size to A4. Solution Replace the toner cartridge. • The Form Type setting in the... printer driver is set incorrectly. • Toner level is loaded in the tray. Blank pages The toner cartridge is not properly installed. the print media. ...

Technical Reference
Page 23
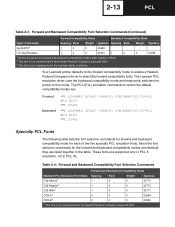
With the appropriate printer driver installed and selected, your software program selects these fonts. Table ... each font. All Type 1 fonts are supported by both the Hewlett-Packard Company's LaserJet 4050 and the Lexmark family of the fonts work only in the forward compatibility mode. Typeface 4362 4362 4140 4297 4116 0 0...of the Type 1 fonts have different font selection parameters in the forward and backward compatibility modes and nine of printers unless otherwise noted. The following table shows the font selection commands for forward and backward compatibility modes and indicates...
With the appropriate printer driver installed and selected, your software program selects these fonts. Table ... each font. All Type 1 fonts are supported by both the Hewlett-Packard Company's LaserJet 4050 and the Lexmark family of the fonts work only in the forward compatibility mode. Typeface 4362 4362 4140 4297 4116 0 0...of the Type 1 fonts have different font selection parameters in the forward and backward compatibility modes and nine of printers unless otherwise noted. The following table shows the font selection commands for forward and backward compatibility modes and indicates...
Technical Reference
Page 25
... Regular1 1 0 0 C39 Wide1 1 0 0 OCR-A1 0 0 0 OCR-B1 0 0 0 1 This font is not implemented in the Lexmark family of the five specialty PCL emulation fonts. Since the font selection commands for the forward and backward compatibility modes are identical, they are : Forward... listed together in the table. Your Lexmark printer defaults to the forward compatibility mode to enable a HewlettPackard Company's driver to this mode. The Lexmark PCL emulation driver uses the backward compatibility mode and temporarily switches the printer to select the forward compatibility fonts. ...
... Regular1 1 0 0 C39 Wide1 1 0 0 OCR-A1 0 0 0 OCR-B1 0 0 0 1 This font is not implemented in the Lexmark family of the five specialty PCL emulation fonts. Since the font selection commands for the forward and backward compatibility modes are identical, they are : Forward... listed together in the table. Your Lexmark printer defaults to the forward compatibility mode to enable a HewlettPackard Company's driver to this mode. The Lexmark PCL emulation driver uses the backward compatibility mode and temporarily switches the printer to select the forward compatibility fonts. ...

Technical Reference
Page 86
...for the page. It can only be entered from within PCL emulation and cannot be used with software without a unique printer driver written explicitly for GL/2. Command Name Comment Default Values Initialize Input P1 and P2 resumes normal command processing. GL/2 ...commands by group. Table 2-31: Configuration Group Command / Parameter CO "text" DF; IP (XP1, YP1(, XP2, YP2)); To determine which GL/2 commands your printer supports, see "Table A-2: GL/2 Commands" on page A-7. 2-74 PCL Table 2-30: Miscellaneous Commands (Continued) Command / Parameters ESCZ ESCz ESC*o#M(b) -1 Ink ...
...for the page. It can only be entered from within PCL emulation and cannot be used with software without a unique printer driver written explicitly for GL/2. Command Name Comment Default Values Initialize Input P1 and P2 resumes normal command processing. GL/2 ...commands by group. Table 2-31: Configuration Group Command / Parameter CO "text" DF; IP (XP1, YP1(, XP2, YP2)); To determine which GL/2 commands your printer supports, see "Table A-2: GL/2 Commands" on page A-7. 2-74 PCL Table 2-30: Miscellaneous Commands (Continued) Command / Parameters ESCZ ESCz ESC*o#M(b) -1 Ink ...
Technical Reference
Page 245
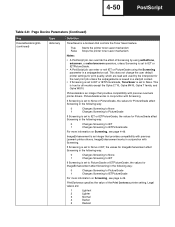
... setpagedevice call. True False Starts the printer toner saver mechanism Stops the printer toner saver mechanism Notes: • A PostScript job can override the effect of the Print Darkness printer setting. This is an integer that provides compatibility with previous Lexmark printer drivers. Legal values are read and used by... Page Device Parameters (Continued) Key DeviceRenderingInfo (continued) Type dictionary Definition TonerSaver is an integer that provides compatibility with previous Lexmark printer drivers. ImageEnhancement works in conjunction with Screening.
... setpagedevice call. True False Starts the printer toner saver mechanism Stops the printer toner saver mechanism Notes: • A PostScript job can override the effect of the Print Darkness printer setting. This is an integer that provides compatibility with previous Lexmark printer drivers. Legal values are read and used by... Page Device Parameters (Continued) Key DeviceRenderingInfo (continued) Type dictionary Definition TonerSaver is an integer that provides compatibility with previous Lexmark printer drivers. ImageEnhancement works in conjunction with Screening.
Technical Reference
Page 328
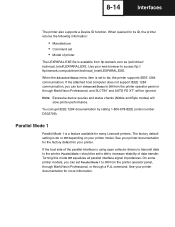
... for the factory default for many Lexmark printers. Parallel Mode 1 Parallel Mode 1 is On or Off depending on your printer documentation for its ID, the printer returns the following information: • Manufacturer • Command set to Off from ftp.lexmark.com as /pub/driver/ technical_brief/LEXPARAL.EXE. 8-14 Interfaces The printer also supports a Device ID function. When...
... for the factory default for many Lexmark printers. Parallel Mode 1 Parallel Mode 1 is On or Off depending on your printer documentation for its ID, the printer returns the following information: • Manufacturer • Command set to Off from ftp.lexmark.com as /pub/driver/ technical_brief/LEXPARAL.EXE. 8-14 Interfaces The printer also supports a Device ID function. When...

