User's Guide
Page 3
... printer 7 Understanding the printer 9 Printer parts...9 Using the control panel 11 Navigating the display menus 13 Loading paper into the printer 15 Loading paper 15 Selecting the paper size 16 Selecting the paper type 16 Getting started printing photos 17 Previewing photos 17 Selecting and printing photos 17 Printing an index page 17 Printing all photos from a photo storage device 19 Printing multiple copies of a photo 19 Changing the print quality 19 Selecting and editing photos 21 Adjusting the print area 21 Adjusting the appearance of photos 22 Using Color...
... printer 7 Understanding the printer 9 Printer parts...9 Using the control panel 11 Navigating the display menus 13 Loading paper into the printer 15 Loading paper 15 Selecting the paper size 16 Selecting the paper type 16 Getting started printing photos 17 Previewing photos 17 Selecting and printing photos 17 Printing an index page 17 Printing all photos from a photo storage device 19 Printing multiple copies of a photo 19 Changing the print quality 19 Selecting and editing photos 21 Adjusting the print area 21 Adjusting the appearance of photos 22 Using Color...
User's Guide
Page 5
... and easily accessible. • Refer service or repairs, other than those described in the United States and/or other countries. Other trademarks are not sure whether you are the property of Lexmark International, Inc., registered in the user documentation, to a professional service person. Trademarks Lexmark and Lexmark with this product or make any electrical or cabling connections, such as the power cord or telephone...
... and easily accessible. • Refer service or repairs, other than those described in the United States and/or other countries. Other trademarks are not sure whether you are the property of Lexmark International, Inc., registered in the user documentation, to a professional service person. Trademarks Lexmark and Lexmark with this product or make any electrical or cabling connections, such as the power cord or telephone...
User's Guide
Page 6
... to print a photo while using the control panel, a photo storage device must be inserted in the area shown while the light is an arrow on the card, make sure it points toward the printer. • Insert only one CD into the drive at a time. • Consult the Lexmark Web site at www.lexmark.com for late-breaking information about supported Bluetooth adapters. • Follow the instructions provided...
... to print a photo while using the control panel, a photo storage device must be inserted in the area shown while the light is an arrow on the card, make sure it points toward the printer. • Insert only one CD into the drive at a time. • Consult the Lexmark Web site at www.lexmark.com for late-breaking information about supported Bluetooth adapters. • Follow the instructions provided...
User's Guide
Page 7
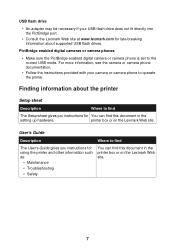
... or camera phone documentation. • Follow the instructions provided with your USB flash drive does not fit directly into the PictBridge port. • Consult the Lexmark Web site at www.lexmark.com for late-breaking information about the printer Setup sheet Description Where to find The Setup sheet gives you instructions for You can find this document in the setting up hardware. User's Guide Description Where to the correct USB mode.
... or camera phone documentation. • Follow the instructions provided with your USB flash drive does not fit directly into the PictBridge port. • Consult the Lexmark Web site at www.lexmark.com for late-breaking information about the printer Setup sheet Description Where to find The Setup sheet gives you instructions for You can find this document in the setting up hardware. User's Guide Description Where to the correct USB mode.
User's Guide
Page 9
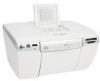
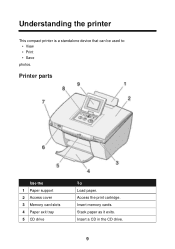
Insert memory cards. Access the print cartridge. Stack paper as it exits. Printer parts Use the 1 Paper support 2 Access cover 3 Memory card slots 4 Paper exit tray 5 CD drive To Load paper. Understanding the printer This compact printer is a standalone device that can be used to: • View • Print • Save photos. Insert a CD in the CD drive. 9
Insert memory cards. Access the print cartridge. Stack paper as it exits. Printer parts Use the 1 Paper support 2 Access cover 3 Memory card slots 4 Paper exit tray 5 CD drive To Load paper. Understanding the printer This compact printer is a standalone device that can be used to: • View • Print • Save photos. Insert a CD in the CD drive. 9
User's Guide
Page 10
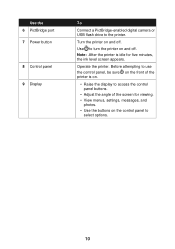
... access the control panel buttons. • Adjust the angle of the printer is idle for viewing. • View menus, settings, messages, and photos. • Use the buttons on and off . Operate the printer. Use the 6 PictBridge port 7 Power button 8 Control panel 9 Display To Connect a PictBridge-enabled digital camera or USB flash drive to turn the printer on and off . Turn the printer on the control panel to use the control panel, be sure on the front of the screen for five minutes, the ink level screen...
... access the control panel buttons. • Adjust the angle of the printer is idle for viewing. • View menus, settings, messages, and photos. • Use the buttons on and off . Operate the printer. Use the 6 PictBridge port 7 Power button 8 Control panel 9 Display To Connect a PictBridge-enabled digital camera or USB flash drive to turn the printer on and off . Turn the printer on the control panel to use the control panel, be sure on the front of the screen for five minutes, the ink level screen...

User's Guide
Page 12
...; Change settings on the opening screen of a menu. • Edit photos, such as cropping, enhancing the image, and removing red-eye. • Change the number of a menu. 12 Return to be printed. • Apply a photo-editing feature. Note: This button is only lit when available. Note: This button has no effect when you are on the opening screen of a menu. • Start printing. • Start a slideshow. • Start copying to a CD or USB flash drive. Note...
...; Change settings on the opening screen of a menu. • Edit photos, such as cropping, enhancing the image, and removing red-eye. • Change the number of a menu. 12 Return to be printed. • Apply a photo-editing feature. Note: This button is only lit when available. Note: This button has no effect when you are on the opening screen of a menu. • Start printing. • Start a slideshow. • Start copying to a CD or USB flash drive. Note...
User's Guide
Page 13
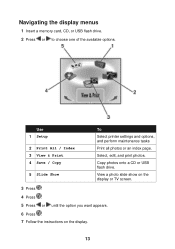
View a photo slide show on the display or TV screen. 3 Press . 4 Press . 5 Press or until the option you want appears. 6 Press . 7 Follow the instructions on the display. 13 Navigating the display menus 1 Insert a memory card, CD, or USB flash drive. 2 Press or to choose one of the available options. Select, edit, and print photos. Copy photos onto a CD or USB flash drive. Use 1 Setup 2 Print All / Index 3 View & Print 4 Save / Copy 5 Slide Show To Select printer settings and options, and perform maintenance tasks Print all photos or an index page.
View a photo slide show on the display or TV screen. 3 Press . 4 Press . 5 Press or until the option you want appears. 6 Press . 7 Follow the instructions on the display. 13 Navigating the display menus 1 Insert a memory card, CD, or USB flash drive. 2 Press or to choose one of the available options. Select, edit, and print photos. Copy photos onto a CD or USB flash drive. Use 1 Setup 2 Print All / Index 3 View & Print 4 Save / Copy 5 Slide Show To Select printer settings and options, and perform maintenance tasks Print all photos or an index page.
User's Guide
Page 17
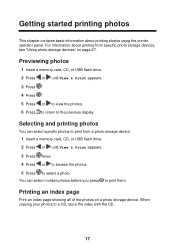
... to the previous display. Previewing photos 1 Insert a memory card, CD, or USB flash drive. 2 Press or until View & Print appears. 3 Press twice. 4 Press or to browse the photos. 5 Press to print from specific photo storage devices, see "Using photo storage devices" on a photo storage device. Printing an index page Print an index page showing all of the photos on page 27. When copying your photos to print them. Selecting and printing photos You can select...
... to the previous display. Previewing photos 1 Insert a memory card, CD, or USB flash drive. 2 Press or until View & Print appears. 3 Press twice. 4 Press or to browse the photos. 5 Press to print from specific photo storage devices, see "Using photo storage devices" on a photo storage device. Printing an index page Print an index page showing all of the photos on page 27. When copying your photos to print them. Selecting and printing photos You can select...
User's Guide
Page 21
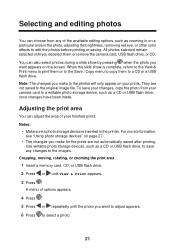
... card to a writable photo storage device, such as a CD or USB flash drive, to save your changes, copy the photo from any changes to edit the photos before printing or saving. Use writable photo storage devices, such as a CD or USB flash drive, once changes have been made. They are not automatically saved after printing. All photos selected remain selected until you want to adjust appears. 6 Press to the original image file. A menu...
... card to a writable photo storage device, such as a CD or USB flash drive, to save your changes, copy the photo from any changes to edit the photos before printing or saving. Use writable photo storage devices, such as a CD or USB flash drive, once changes have been made. They are not automatically saved after printing. All photos selected remain selected until you want to adjust appears. 6 Press to the original image file. A menu...
User's Guide
Page 22
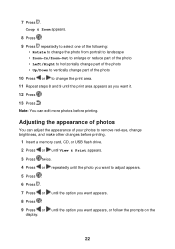
Note: You can adjust the appearance of your photos to remove red-eye, change brightness, and make other changes before printing. 7 Press . Adjusting the appearance of photos You can edit more photos before printing. 1 Insert a memory card, CD, or USB flash drive. 2 Press or until View & Print appears. 3 Press twice. 4 Press or repeatedly until the photo you want to change part of the photo • Up/Down to vertically change the print area. 11 Repeat...
Note: You can adjust the appearance of your photos to remove red-eye, change brightness, and make other changes before printing. 7 Press . Adjusting the appearance of photos You can edit more photos before printing. 1 Insert a memory card, CD, or USB flash drive. 2 Press or until View & Print appears. 3 Press twice. 4 Press or repeatedly until the photo you want to change part of the photo • Up/Down to vertically change the print area. 11 Repeat...

User's Guide
Page 34
... coated side facing you specified in the camera documentation to the correct USB mode. Note: Be sure the size of the printer. For more information, see "Loading paper" on page 15. 34 For more information, see the camera documentation. 3 Follow the instructions in the DPOF selection. 1 Make sure the printer is turned on the front of the paper loaded is set to select and print photos. For best results, use the buttons...
... coated side facing you specified in the camera documentation to the correct USB mode. Note: Be sure the size of the printer. For more information, see "Loading paper" on page 15. 34 For more information, see the camera documentation. 3 Follow the instructions in the DPOF selection. 1 Make sure the printer is turned on the front of the paper loaded is set to select and print photos. For best results, use the buttons...
User's Guide
Page 36
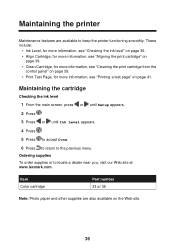
Item Color cartridge Part number 33 or 35 Note: Photo paper and other supplies are available to the previous menu. Maintaining the printer Maintenance features are also available on page 41. Maintaining the cartridge Checking the ink level 1 From the main screen, press or until Setup appears. 2 Press . 3 Press or until Ink Level appears. 4 Press . 5 Press to accept Done. 6 Press to return to keep the printer functioning smoothly. Ordering supplies To order supplies or...
Item Color cartridge Part number 33 or 35 Note: Photo paper and other supplies are available to the previous menu. Maintaining the printer Maintenance features are also available on page 41. Maintaining the cartridge Checking the ink level 1 From the main screen, press or until Setup appears. 2 Press . 3 Press or until Ink Level appears. 4 Press . 5 Press to accept Done. 6 Press to return to keep the printer functioning smoothly. Ordering supplies To order supplies or...
User's Guide
Page 41
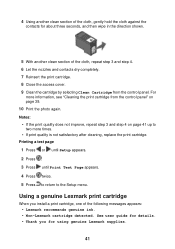
... user guide for using genuine Lexmark supplies. 41 Printing a test page 1 Press or until Setup appears. 2 Press . 3 Press until Print Test Page appears. 4 Press twice. 5 Press to return to two more information, see "Cleaning the print cartridge from the control panel. Using a genuine Lexmark print cartridge When you for details. • Thank you install a print cartridge, one of the cloth, repeat step 3 and step 4. 6 Let the nozzles and contacts dry completely. 7 Reinsert the print cartridge. 8 Close the access cover. 9 Clean...
... user guide for using genuine Lexmark supplies. 41 Printing a test page 1 Press or until Setup appears. 2 Press . 3 Press until Print Test Page appears. 4 Press twice. 5 Press to return to two more information, see "Cleaning the print cartridge from the control panel. Using a genuine Lexmark print cartridge When you for details. • Thank you install a print cartridge, one of the cloth, repeat step 3 and step 4. 6 Let the nozzles and contacts dry completely. 7 Reinsert the print cartridge. 8 Close the access cover. 9 Clean...
User's Guide
Page 45
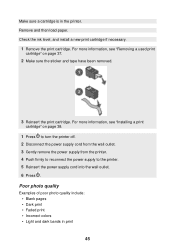
... printer. 5 Reinsert the power supply cord into the wall outlet. 6 Press . For more information, see "Installing a print cartridge" on page 37. 2 Make sure the sticker and tape have been removed. 3 Reinsert the print cartridge. Poor photo quality Examples of poor photo quality include: • Blank pages • Dark print • Faded print • Incorrect colors • Light and dark bands in the printer. Check the ink level, and install a new print cartridge if necessary. 1 Remove the print cartridge. Make sure a cartridge is in print 45 Remove and then load paper...
... printer. 5 Reinsert the power supply cord into the wall outlet. 6 Press . For more information, see "Installing a print cartridge" on page 37. 2 Make sure the sticker and tape have been removed. 3 Reinsert the print cartridge. Poor photo quality Examples of poor photo quality include: • Blank pages • Dark print • Faded print • Incorrect colors • Light and dark bands in the printer. Check the ink level, and install a new print cartridge if necessary. 1 Remove the print cartridge. Make sure a cartridge is in print 45 Remove and then load paper...
User's Guide
Page 46
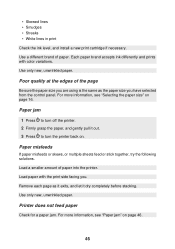
... of paper into the printer. For more information, see "Paper jam" on . For more information, see "Selecting the paper size" on page 16. Load a smaller amount of paper. Remove each page as the paper size you . • Skewed lines • Smudges • Streaks • White lines in print Check the ink level, and install a new print cartridge if necessary. Each paper brand accepts ink differently and prints with the print side facing you have selected from the control panel. Use only new, unwrinkled paper.
... of paper into the printer. For more information, see "Paper jam" on . For more information, see "Selecting the paper size" on page 16. Load a smaller amount of paper. Remove each page as the paper size you . • Skewed lines • Smudges • Streaks • White lines in print Check the ink level, and install a new print cartridge if necessary. Each paper brand accepts ink differently and prints with the print side facing you have selected from the control panel. Use only new, unwrinkled paper.
User's Guide
Page 47
... printer. Error messages on page 48. For more information, see "Error messages" on display If an error message is PictBridge-enabled. 47 Check that the type of memory card you are using can be used in the printer. Make sure that came with your memory card and to the PictBridge port. Try loading one memory device at a time. Disconnect the PictBridge-enabled digital camera from PictBridge-enabled devices" on page 27. Photo storage device troubleshooting • "Memory card...
... printer. Error messages on page 48. For more information, see "Error messages" on display If an error message is PictBridge-enabled. 47 Check that the type of memory card you are using can be used in the printer. Make sure that came with your memory card and to the PictBridge port. Try loading one memory device at a time. Disconnect the PictBridge-enabled digital camera from PictBridge-enabled devices" on page 27. Photo storage device troubleshooting • "Memory card...

User's Guide
Page 54
... digital camera (PictBridge-enabled) 34 display, control panel 9 DPOF settings 34 E emission notices 50 enhancing an image 23 error message 1102 48 error messages troubleshooting 48 F FCC notices 50 finding information 7 publications 7 Web site 8 flash drives see USB flash drives G general troubleshooting 43 I Image Enhance feature 23 incorrect language appears on display 44 index page 17 information finding 7 Ink Level feature 36 ink level, checking 36 inserting USB flash drives 29 installing print cartridge 38 J jam, paper 46 L language incorrect 44 54
... digital camera (PictBridge-enabled) 34 display, control panel 9 DPOF settings 34 E emission notices 50 enhancing an image 23 error message 1102 48 error messages troubleshooting 48 F FCC notices 50 finding information 7 publications 7 Web site 8 flash drives see USB flash drives G general troubleshooting 43 I Image Enhance feature 23 incorrect language appears on display 44 index page 17 information finding 7 Ink Level feature 36 ink level, checking 36 inserting USB flash drives 29 installing print cartridge 38 J jam, paper 46 L language incorrect 44 54

User's Guide
Page 55
... View & Print 13 menus, display navigating 13 misfeeds, paper 46 moving print area 21 multiple copies, printing 19 N nothing happens when memory card is inserted 47 notices 50, 52 O ordering supplies 36 P page does not print 44 paper loading 15 sizes 15 paper exit tray 9 paper jam 46 paper misfeeds 46 paper size selecting 16 Paper Size setting 16 paper support 9 Paper Type setting 16 part number cartridge 36 personal digital assistant 32 phone camera 32 photo storage device troubleshooting 47 photos adjusting print area 21...
... View & Print 13 menus, display navigating 13 misfeeds, paper 46 moving print area 21 multiple copies, printing 19 N nothing happens when memory card is inserted 47 notices 50, 52 O ordering supplies 36 P page does not print 44 paper loading 15 sizes 15 paper exit tray 9 paper jam 46 paper misfeeds 46 paper size selecting 16 Paper Size setting 16 paper support 9 Paper Type setting 16 part number cartridge 36 personal digital assistant 32 phone camera 32 photo storage device troubleshooting 47 photos adjusting print area 21...
User's Guide
Page 56
... removing print cartridge 37 rotating photos 21 U USB flash drives inserting 29 USB port 11 using CD drive 30 V video output 26 video output port 26 View & Print 13 W Web site finding 8 Z zooming photos 21 S safety information 5 selecting paper size 16 photos 17 print quality 19 selecting paper types 16 Sepia Tone Print 24 Setup 13 Slide Show 13 slide show, viewing 26 supplies, ordering 36 T Test Page feature 41 test page, printing 41 troubleshooting general 43 photo storage device 47 troubleshooting error messages...
... removing print cartridge 37 rotating photos 21 U USB flash drives inserting 29 USB port 11 using CD drive 30 V video output 26 video output port 26 View & Print 13 W Web site finding 8 Z zooming photos 21 S safety information 5 selecting paper size 16 photos 17 print quality 19 selecting paper types 16 Sepia Tone Print 24 Setup 13 Slide Show 13 slide show, viewing 26 supplies, ordering 36 T Test Page feature 41 test page, printing 41 troubleshooting general 43 photo storage device 47 troubleshooting error messages...


