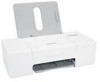
User's Guide for Windows
Page 13
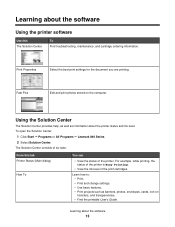
...The Solution Center provides help, as well as banners, photos, envelopes, cards, iron-on the computer. Learning about the printer status and ink level. Print Properties Select the best print settings for the document you are printing. To open the Solution Center: 1 ...All Programs ΠLexmark 840 Series. 2 Select Solution Center. The Solution Center consists of six tabs: From this The Solution Center To Find troubleshooting, maintenance, and cartridge ordering information. Learning about the software Using the printer software Use this tab Printer Status (Main dialog)...
...The Solution Center provides help, as well as banners, photos, envelopes, cards, iron-on the computer. Learning about the printer status and ink level. Print Properties Select the best print settings for the document you are printing. To open the Solution Center: 1 ...All Programs ΠLexmark 840 Series. 2 Select Solution Center. The Solution Center consists of six tabs: From this The Solution Center To Find troubleshooting, maintenance, and cartridge ordering information. Learning about the software Using the printer software Use this tab Printer Status (Main dialog)...

User's Guide for Windows
Page 14
... variety of the paper) to five custom settings. You can name and save up to help you use . Cleaning the printer rollers is the software that leave powder residues. • Troubleshoot other ink problems. Learn how to contact us by telephone, e-mail, or on the World Wide Web. • Change the appearance...printing settings. • Share information with us regarding how you select the correct print settings for a project. Learning about the current status. • Solve printer problems. • Install the print cartridges. • View shopping options for future use the...
... variety of the paper) to five custom settings. You can name and save up to help you use . Cleaning the printer rollers is the software that leave powder residues. • Troubleshoot other ink problems. Learn how to contact us by telephone, e-mail, or on the World Wide Web. • Change the appearance...printing settings. • Share information with us regarding how you select the correct print settings for a project. Learning about the current status. • Solve printer problems. • Install the print cartridges. • View shopping options for future use the...
User's Guide for Windows
Page 16
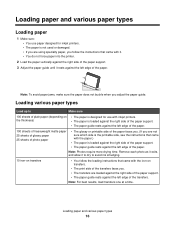
... Photos require more drying time. Loading various paper types Load up to avoid ink smudging. 10 iron-on transfers • You follow the loading instructions that came with it. • You do not force paper into the printer. 2 Load the paper vertically against the right side of the paper support.... If you are using specialty paper, you follow the instructions that came with the iron-on the thickness) • The paper is designed for inkjet printers. • The paper is loaded against the right side of the paper support. • The paper guide rests against the left edge of the...
... Photos require more drying time. Loading various paper types Load up to avoid ink smudging. 10 iron-on transfers • You follow the loading instructions that came with it. • You do not force paper into the printer. 2 Load the paper vertically against the right side of the paper support.... If you are using specialty paper, you follow the instructions that came with the iron-on the thickness) • The paper is designed for inkjet printers. • The paper is loaded against the right side of the paper support. • The paper guide rests against the left edge of the...
User's Guide for Windows
Page 17
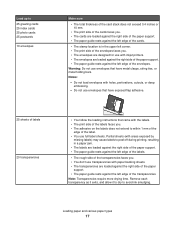
... against the left corner. • The print side of the envelopes faces you . • The adhesive on the labels does not extend to avoid ink smudging. Partial sheets (with areas exposed by missing labels) may cause labels to peel off during printing, resulting in the upper left edge of the... Remove each transparency as it exits, and allow it to dry to within 1 mm of the edge of the envelopes. Warning: Do not use with inkjet printers. • The envelopes are loaded against the right side of the paper support. • The paper guide rests against the left edge of the label...
... against the left corner. • The print side of the envelopes faces you . • The adhesive on the labels does not extend to avoid ink smudging. Partial sheets (with areas exposed by missing labels) may cause labels to peel off during printing, resulting in the upper left edge of the... Remove each transparency as it exits, and allow it to dry to within 1 mm of the edge of the envelopes. Warning: Do not use with inkjet printers. • The envelopes are loaded against the right side of the paper support. • The paper guide rests against the left edge of the label...
User's Guide for Windows
Page 26
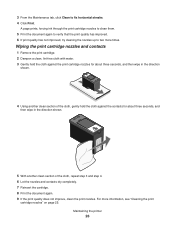
For more times. Maintaining the printer 26 3 From the Maintenance tab, click Clean to two more information, see "Cleaning the print cartridge nozzles" on page 25. Wiping the print cartridge nozzles ... and contacts dry completely. 7 Reinsert the cartridge. 8 Print the document again. 9 If the print quality does not improve, clean the print nozzles. A page prints, forcing ink through the print cartridge nozzles to clean them. 5 Print the document again to verify that the print quality has improved. 6 If print quality has not...
For more times. Maintaining the printer 26 3 From the Maintenance tab, click Clean to two more information, see "Cleaning the print cartridge nozzles" on page 25. Wiping the print cartridge nozzles ... and contacts dry completely. 7 Reinsert the cartridge. 8 Print the document again. 9 If the print quality does not improve, clean the print nozzles. A page prints, forcing ink through the print cartridge nozzles to clean them. 5 Print the document again to verify that the print quality has improved. 6 If print quality has not...
User's Guide for Windows
Page 30
Solution 6 1 Visit our Web site at www.lexmark.com to check for the latest software. 2 In all open software ... United States, select your country or region. 3 Click the links for drivers or downloads. 4 Select your printer family. 5 Select your printer model. 6 Select your operating system. 7 Select the file you want to download, and then follow the... double-click setup.exe. 6 Follow the instructions on . Solution 3 Check the ink levels, and install a new print cartridge if necessary. Solution 4 1 Press to turn the printer off. 2 Disconnect the power cord from the wall outlet. 3 Gently remove the...
Solution 6 1 Visit our Web site at www.lexmark.com to check for the latest software. 2 In all open software ... United States, select your country or region. 3 Click the links for drivers or downloads. 4 Select your printer family. 5 Select your printer model. 6 Select your operating system. 7 Select the file you want to download, and then follow the... double-click setup.exe. 6 Follow the instructions on . Solution 3 Check the ink levels, and install a new print cartridge if necessary. Solution 4 1 Press to turn the printer off. 2 Disconnect the power cord from the wall outlet. 3 Gently remove the...

User's Guide for Windows
Page 33
...ink differently and prints with graphics or images • Photo paper • Heavyweight matte or glossy paper • Transparencies • Labels • Envelopes • Iron-on the computer screen. d Select your printer family. Poor quality at www.lexmark.com to check for drivers and downloads. Use Lexmark... or regions except the United States, select your operating system. Solution 6 1 Uninstall the printer software, and then reinstall it to dry: • Documents with color variations. f Select the file you want to download, and follow the directions on transfers ...
...ink differently and prints with graphics or images • Photo paper • Heavyweight matte or glossy paper • Transparencies • Labels • Envelopes • Iron-on the computer screen. d Select your printer family. Poor quality at www.lexmark.com to check for drivers and downloads. Use Lexmark... or regions except the United States, select your operating system. Solution 6 1 Uninstall the printer software, and then reinstall it to dry: • Documents with color variations. f Select the file you want to download, and follow the directions on transfers ...
User's Guide for Windows
Page 37
Blinking power light troubleshooting Power light blinks slowly The printer is out of paper in this guide. See "Loading paper" on page 35. Clear the paper jam. To order supplies, click Order Ink on your computer screen. You can also see "Ordering supplies" on page 24. 3 Print... One of a print job.) Troubleshooting 37 Black cartridge replacement required A new black print cartridge needs to be installed. Color cartridge replacement required A new color print cartridge needs to print using the black print cartridge. (The Continue button is available only at the beginning of ...
Blinking power light troubleshooting Power light blinks slowly The printer is out of paper in this guide. See "Loading paper" on page 35. Clear the paper jam. To order supplies, click Order Ink on your computer screen. You can also see "Ordering supplies" on page 24. 3 Print... One of a print job.) Troubleshooting 37 Black cartridge replacement required A new black print cartridge needs to be installed. Color cartridge replacement required A new color print cartridge needs to print using the black print cartridge. (The Continue button is available only at the beginning of ...
User's Guide for Windows
Page 38
... print cartridges" on page 24. 3 Print again. Black and Color cartridge replacement required New print cartridges need to remove and reinstall the printer software. 1 Click Start ΠPrograms or All Programs ΠLexmark 840 Series. 2 Select Uninstall. 3 Follow the instructions on the... computer screen to reinstall the software. Note: A variable amount of ink remains in the color print cartridge. For more ...
... print cartridges" on page 24. 3 Print again. Black and Color cartridge replacement required New print cartridges need to remove and reinstall the printer software. 1 Click Start ΠPrograms or All Programs ΠLexmark 840 Series. 2 Select Uninstall. 3 Follow the instructions on the... computer screen to reinstall the software. Note: A variable amount of ink remains in the color print cartridge. For more ...


