From Setup to Printing
Page 2
... and Technical Support, Lexmark International, S.A., Boigny, France. References in this program introduce personal computers, printers, monitors, or fax machines that product, program, or service may result in applicable FAR provisions: Lexmark International, Inc., Lexington, KY 40550. Lexmark and Lexmark with RESTRICTED... used . Federal Communications Commission (FCC) Compliance information statement The Lexmark Z45 Color Jetprinter, Type 4111-001 has been tested and found to comply with the requirements of Lexmark International, Inc. Operation is encouraged to try to correct the ...
... and Technical Support, Lexmark International, S.A., Boigny, France. References in this program introduce personal computers, printers, monitors, or fax machines that product, program, or service may result in applicable FAR provisions: Lexmark International, Inc., Lexington, KY 40550. Lexmark and Lexmark with RESTRICTED... used . Federal Communications Commission (FCC) Compliance information statement The Lexmark Z45 Color Jetprinter, Type 4111-001 has been tested and found to comply with the requirements of Lexmark International, Inc. Operation is encouraged to try to correct the ...
From Setup to Printing
Page 10
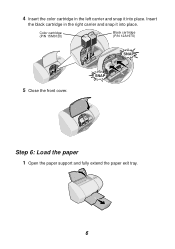
4 Insert the color cartridge in the right carrier and snap it into place. Insert the black cartridge in the left carrier and snap it into place. SNAP Step 6: Load the paper 1 Open the paper support and fully extend the paper exit tray. 6 Color cartridge (P/N 15M0120) Black cartridge (P/N 12A1970) SNAP 5 Close the front cover.
4 Insert the color cartridge in the right carrier and snap it into place. Insert the black cartridge in the left carrier and snap it into place. SNAP Step 6: Load the paper 1 Open the paper support and fully extend the paper exit tray. 6 Color cartridge (P/N 15M0120) Black cartridge (P/N 12A1970) SNAP 5 Close the front cover.
From Setup to Printing
Page 15
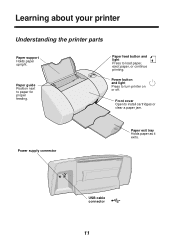
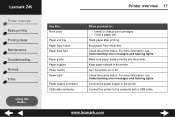
Front cover Open to load paper, eject paper, or continue printing. Paper feed button and light Press to install cartridges or clear a paper jam. Paper guide Position next to turn printer on or off. Power button and light Press to paper for proper feeding. USB cable connector 11 Learning about your printer Understanding the printer parts Paper support Holds paper upright. Power supply connector Paper exit tray Holds paper as it exits.
Front cover Open to load paper, eject paper, or continue printing. Paper feed button and light Press to install cartridges or clear a paper jam. Paper guide Position next to turn printer on or off. Power button and light Press to paper for proper feeding. USB cable connector 11 Learning about your printer Understanding the printer parts Paper support Holds paper upright. Power supply connector Paper exit tray Holds paper as it exits.
From Setup to Printing
Page 21
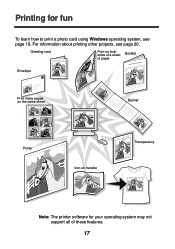
Greeting card Print on both sides of a sheet Booklet of these features. 17 For information about printing other projects, see page 18. Printing for your operating system may not support all of paper Envelope Print many pages on the same sheet Banner Poster Iron-on transfer Transparency Note: The printer software for fun To learn how to print a photo card using Windows operating system, see page 20.
Greeting card Print on both sides of a sheet Booklet of these features. 17 For information about printing other projects, see page 18. Printing for your operating system may not support all of paper Envelope Print many pages on the same sheet Banner Poster Iron-on transfer Transparency Note: The printer software for fun To learn how to print a photo card using Windows operating system, see page 20.

From Setup to Printing
Page 22
You do not push the cards too far into the printer. - All the cards have the same dimensions. 2 Squeeze and slide the paper guide to 10 photo cards vertically against the right side of the cards. 18 You carefully read the instructions that came with your cards. - The print side is facing you load photo cards, make sure: - Printing a digital photo on a photo card (Windows) 1 Load up to the left edge of the paper support. When you . -
You do not push the cards too far into the printer. - All the cards have the same dimensions. 2 Squeeze and slide the paper guide to 10 photo cards vertically against the right side of the cards. 18 You carefully read the instructions that came with your cards. - The print side is facing you load photo cards, make sure: - Printing a digital photo on a photo card (Windows) 1 Load up to the left edge of the paper support. When you . -

From Setup to Printing
Page 32
... Contact Information Customer Support. • Insert the printer software CD, and then click Contact Lexmark Technical Support. • From your printer. • Check for free offers. Contacting Lexmark Visit our Web site at www.lexmark.com to: • Receive technical support. • Register your printer. • Access publications for your printer folder, double-click Technical Support. • Insert the printer software CD...
... Contact Information Customer Support. • Insert the printer software CD, and then click Contact Lexmark Technical Support. • From your printer. • Check for free offers. Contacting Lexmark Visit our Web site at www.lexmark.com to: • Receive technical support. • Register your printer. • Access publications for your printer folder, double-click Technical Support. • Insert the printer software CD...

From Setup to Printing
Page 33
... 15 I I Want To menu (Windows 12 installing cartridges 4 printer software 7 Mac OS 10.0.3 to 10.1 . . . . . 10 Mac OS 8.6 to 9.2 9 Windows 8 L Lexmark Solution Center (Windows) 14 Lexmark Z45 Utility (Mac OS X 10.0.3 to 9.2) . 15 N... cartridge part numbers 4 cartridges, installing 4 checklist, troubleshooting 21 connecting the power supply 3 the USB cable 4 contacting Lexmark 28 Control Panel (Mac OS 8.6 to 10.1 15 loading paper 6 photo cards 18 P Page Setup dialog box ...selecting . . . . 13 printer parts front cover 11 paper exit tray 11 feed button and light 11 guide 7, 11...
... 15 I I Want To menu (Windows 12 installing cartridges 4 printer software 7 Mac OS 10.0.3 to 10.1 . . . . . 10 Mac OS 8.6 to 9.2 9 Windows 8 L Lexmark Solution Center (Windows) 14 Lexmark Z45 Utility (Mac OS X 10.0.3 to 9.2) . 15 N... cartridge part numbers 4 cartridges, installing 4 checklist, troubleshooting 21 connecting the power supply 3 the USB cable 4 contacting Lexmark 28 Control Panel (Mac OS 8.6 to 10.1 15 loading paper 6 photo cards 18 P Page Setup dialog box ...selecting . . . . 13 printer parts front cover 11 paper exit tray 11 feed button and light 11 guide 7, 11...

From Setup to Printing
Page 35
...may recover actual damages up to in transit to the United States. For products no longer covered by a Lexmark warranty, technical support may be required to the Remarketer or Lexmark, or ship it was originally purchased for any claim concerning performance or nonperformance of , or damage to, ... the World Wide Web at (407) 563-4600, or on the purchase receipt. Remote technical support is available to this product for the remainder of Limited Warranty Lexmark International, Inc. ANY WARRANTIES THAT MAY NOT BE DISCLAIMED UNDER APPLICABLE LAW ARE LIMITED IN DURATION ...
...may recover actual damages up to in transit to the United States. For products no longer covered by a Lexmark warranty, technical support may be required to the Remarketer or Lexmark, or ship it was originally purchased for any claim concerning performance or nonperformance of , or damage to, ... the World Wide Web at (407) 563-4600, or on the purchase receipt. Remote technical support is available to this product for the remainder of Limited Warranty Lexmark International, Inc. ANY WARRANTIES THAT MAY NOT BE DISCLAIMED UNDER APPLICABLE LAW ARE LIMITED IN DURATION ...
Online User's Guide for Mac OS 8.6 to 9.2
Page 16
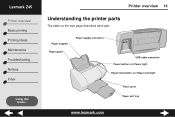
Lexmark Z45 Printer overview Basic printing Printing ideas Maintenance Troubleshooting Notices Index Using this Guide... Paper support Paper guide Power supply connector USB cable connector Power button and Power light Paper feed button and Paper feed light Front cover Paper exit tray www.lexmark.com Printer overview 16 Understanding the printer parts The table on the next page describes each part.
Lexmark Z45 Printer overview Basic printing Printing ideas Maintenance Troubleshooting Notices Index Using this Guide... Paper support Paper guide Power supply connector USB cable connector Power button and Power light Paper feed button and Paper feed light Front cover Paper exit tray www.lexmark.com Printer overview 16 Understanding the printer parts The table on the next page describes each part.
Online User's Guide for Mac OS 8.6 to 9.2
Page 17
Stack paper after printing. Check the printer status. Turn the printer on or off. Lexmark Z45 Printer overview Basic printing Printing ideas Maintenance Troubleshooting Notices Index Using this : Front cover Paper exit tray Paper feed button Paper feed light Paper guide Paper support Power button Power light Power supply connector USB cable connector When you want...
Stack paper after printing. Check the printer status. Turn the printer on or off. Lexmark Z45 Printer overview Basic printing Printing ideas Maintenance Troubleshooting Notices Index Using this : Front cover Paper exit tray Paper feed button Paper feed light Paper guide Paper support Power button Power light Power supply connector USB cable connector When you want...
Online User's Guide for Mac OS 8.6 to 9.2
Page 19
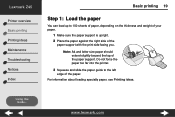
... loading specialty paper, see Printing ideas. Using this Guide... www.lexmark.com Lexmark Z45 Printer overview Basic printing Printing ideas Maintenance Troubleshooting Notices Index Basic printing 19 Step 1: Load the paper You can load up to the left edge of the paper support with the print side facing you. Do not force the paper...
... loading specialty paper, see Printing ideas. Using this Guide... www.lexmark.com Lexmark Z45 Printer overview Basic printing Printing ideas Maintenance Troubleshooting Notices Index Basic printing 19 Step 1: Load the paper You can load up to the left edge of the paper support with the print side facing you. Do not force the paper...

Online User's Guide for Mac OS 8.6 to 9.2
Page 23
... side is facing you would like to 25 sheets of coated, photo, or glossy paper, depending on the thickness of the paper. www.lexmark.com This ensures that you do not waste photo paper perfecting the image you . • Load the paper against the right side of ...the paper support. Step 1: Load the photo paper • If your photo paper came with instructions, read them carefully. • Make sure your settings. Printing ideas 23 Printing photos You can load up to print. Lexmark Z45 Printer overview Basic printing Printing ideas Maintenance Troubleshooting...
... side is facing you would like to 25 sheets of coated, photo, or glossy paper, depending on the thickness of the paper. www.lexmark.com This ensures that you do not waste photo paper perfecting the image you . • Load the paper against the right side of ...the paper support. Step 1: Load the photo paper • If your photo paper came with instructions, read them carefully. • Make sure your settings. Printing ideas 23 Printing photos You can load up to print. Lexmark Z45 Printer overview Basic printing Printing ideas Maintenance Troubleshooting...
Online User's Guide for Mac OS 8.6 to 9.2
Page 26
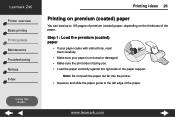
... on premium (coated) paper You can load up to the left edge of the paper. Note: Do not push the paper too far into the printer. • Squeeze and slide the paper guide to 100 pages of premium (coated) paper, depending on the thickness of the paper. Step 1: Load the premium... not used or damaged. • Make sure the print side is facing you. • Load the paper vertically against the right side of the paper support. Lexmark Z45 Printer overview Basic printing Printing ideas Maintenance Troubleshooting Notices Index Using this Guide... www...
... on premium (coated) paper You can load up to the left edge of the paper. Note: Do not push the paper too far into the printer. • Squeeze and slide the paper guide to 100 pages of premium (coated) paper, depending on the thickness of the paper. Step 1: Load the premium... not used or damaged. • Make sure the print side is facing you. • Load the paper vertically against the right side of the paper support. Lexmark Z45 Printer overview Basic printing Printing ideas Maintenance Troubleshooting Notices Index Using this Guide... www...
Online User's Guide for Mac OS 8.6 to 9.2
Page 29
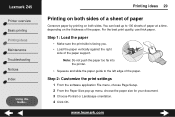
...by printing on the thickness of the paper. For the best print quality, use thick paper. www.lexmark.com Lexmark Z45 Printer overview Basic printing Printing ideas Maintenance Troubleshooting Notices Index Using this Guide... Printing ideas 29 Printing on both... sides. Step 2: Customize the print settings 1 From the software application File menu, choose Page Setup. 2 From the Paper Size pop-up to the left edge of the paper support...
...by printing on the thickness of the paper. For the best print quality, use thick paper. www.lexmark.com Lexmark Z45 Printer overview Basic printing Printing ideas Maintenance Troubleshooting Notices Index Using this Guide... Printing ideas 29 Printing on both... sides. Step 2: Customize the print settings 1 From the software application File menu, choose Page Setup. 2 From the Paper Size pop-up to the left edge of the paper support...

Online User's Guide for Mac OS 8.6 to 9.2
Page 31
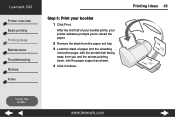
Printing ideas 31 Using this Guide... www.lexmark.com Lexmark Z45 Printer overview Basic printing Printing ideas Maintenance Troubleshooting Notices Index Step 3: Print your printer software prompts you to reload the paper. 2 Remove the stack of paper from the paper exit tray. 3 Load the stack of paper and reloading instruction page, with the printed side facing away from you and the arrows pointing down, into the paper support as shown. 4 Click Continue. The odd-numbered pages print, and then your document 1 Click Print. The even-numbered pages print.
Printing ideas 31 Using this Guide... www.lexmark.com Lexmark Z45 Printer overview Basic printing Printing ideas Maintenance Troubleshooting Notices Index Step 3: Print your printer software prompts you to reload the paper. 2 Remove the stack of paper from the paper exit tray. 3 Load the stack of paper and reloading instruction page, with the printed side facing away from you and the arrows pointing down, into the paper support as shown. 4 Click Continue. The odd-numbered pages print, and then your document 1 Click Print. The even-numbered pages print.
Online User's Guide for Mac OS 8.6 to 9.2
Page 32
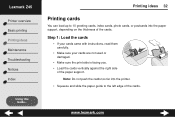
...Note: Do not push the cards too far into the paper support, depending on the thickness of the cards. www.lexmark.com Printing ideas 32 Printing cards You can load up to 10 greeting cards, index cards, photo cards, or postcards into the printer. • Squeeze and slide the paper guide to the ...left edge of the paper support. Step 1: Load the cards • ...
...Note: Do not push the cards too far into the paper support, depending on the thickness of the cards. www.lexmark.com Printing ideas 32 Printing cards You can load up to 10 greeting cards, index cards, photo cards, or postcards into the printer. • Squeeze and slide the paper guide to the ...left edge of the paper support. Step 1: Load the cards • ...
Online User's Guide for Mac OS 8.6 to 9.2
Page 35
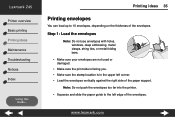
... too far into the printer. • Squeeze and slide the paper guide to 10 envelopes, depending on the thickness of the envelopes. Printing ideas 35 Printing envelopes You can load up to the left corner. • Load the envelopes vertically against the right side of the paper support. Step 1: Load the envelopes... damaged. • Make sure the print side is facing you. • Make sure the stamp location is in the upper left edge of the envelopes. Lexmark Z45 Printer overview Basic printing Printing ideas Maintenance Troubleshooting Notices Index Using this Guide...
... too far into the printer. • Squeeze and slide the paper guide to 10 envelopes, depending on the thickness of the envelopes. Printing ideas 35 Printing envelopes You can load up to the left corner. • Load the envelopes vertically against the right side of the paper support. Step 1: Load the envelopes... damaged. • Make sure the print side is facing you. • Make sure the stamp location is in the upper left edge of the envelopes. Lexmark Z45 Printer overview Basic printing Printing ideas Maintenance Troubleshooting Notices Index Using this Guide...
Online User's Guide for Mac OS 8.6 to 9.2
Page 38
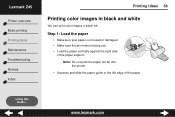
Lexmark Z45 Printer overview Basic printing Printing ideas Maintenance Troubleshooting Notices Index Printing ideas 38 Printing color images in black and white You can print color images in black ink. Step 1: Load the paper • Make sure your paper is not used or damaged. • Make sure the print side is facing you. • Load the paper vertically against the right side of the paper. www.lexmark.com Using this Guide... Note: Do not push the paper too far into the printer. • Squeeze and slide the paper guide to the left edge of the paper support.
Lexmark Z45 Printer overview Basic printing Printing ideas Maintenance Troubleshooting Notices Index Printing ideas 38 Printing color images in black and white You can print color images in black ink. Step 1: Load the paper • Make sure your paper is not used or damaged. • Make sure the print side is facing you. • Load the paper vertically against the right side of the paper. www.lexmark.com Using this Guide... Note: Do not push the paper too far into the printer. • Squeeze and slide the paper guide to the left edge of the paper support.

Online User's Guide for Mac OS 8.6 to 9.2
Page 40
... up to 100 sheets of paper in the paper support, depending on the thickness of the paper. You can print and bundle your document to the left edge of the paper support. www.lexmark.com Note: Do not push the paper too far into the printer. • Squeeze and slide the paper guide to...
... up to 100 sheets of paper in the paper support, depending on the thickness of the paper. You can print and bundle your document to the left edge of the paper support. www.lexmark.com Note: Do not push the paper too far into the printer. • Squeeze and slide the paper guide to...
Online User's Guide for Mac OS 8.6 to 9.2
Page 43
Using this Guide... www.lexmark.com Printing ideas 43 After the first half of paper and the reloading instruction page, with the printed side facing away from you and the arrows pointing down, into the paper support as shown. 4 Click Continue. Lexmark Z45 Printer overview Basic printing Printing ideas Maintenance Troubleshooting Notices Index Step 3: Print your printer software prompts you to reload the paper. 2 Remove the stack from the paper exit tray. 3 Load the stack of your booklet prints, your booklet 1 Click Print.
Using this Guide... www.lexmark.com Printing ideas 43 After the first half of paper and the reloading instruction page, with the printed side facing away from you and the arrows pointing down, into the paper support as shown. 4 Click Continue. Lexmark Z45 Printer overview Basic printing Printing ideas Maintenance Troubleshooting Notices Index Step 3: Print your printer software prompts you to reload the paper. 2 Remove the stack from the paper exit tray. 3 Load the stack of your booklet prints, your booklet 1 Click Print.
