
Setup Guide
Page 2
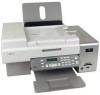
...or fax multiple-page letter-, legal-, and A4-size documents. 18 Understanding the parts of the printer 12 11 1 14 2 3 13 4 5 6 10 98 7 Use the To 1 Paper support Load ...faxing multiple-page documents. Recommended for wireless connection, but not connected. • Green indicates that the printer is connected to a wireless network. 7 Memory card slots Insert a memory card. 8 PictBridge port Connect a PictBridge-enabled digital camera or a flash drive to the printer. 9 Control panel Operate the printer. For more information, see "Using the control panel" on the scanner...
...or fax multiple-page letter-, legal-, and A4-size documents. 18 Understanding the parts of the printer 12 11 1 14 2 3 13 4 5 6 10 98 7 Use the To 1 Paper support Load ...faxing multiple-page documents. Recommended for wireless connection, but not connected. • Green indicates that the printer is connected to a wireless network. 7 Memory card slots Insert a memory card. 8 PictBridge port Connect a PictBridge-enabled digital camera or a flash drive to the printer. 9 Control panel Operate the printer. For more information, see "Using the control panel" on the scanner...

Setup Guide
Page 5
2 Remove all tape and packing material from all areas of the printer. 3 Raise the control panel. 4 Extend the paper exit tray. 5 Raise the paper support. 21
2 Remove all tape and packing material from all areas of the printer. 3 Raise the control panel. 4 Extend the paper exit tray. 5 Raise the paper support. 21

Setup Guide
Page 10
... all open programs. Security Information Documentation Support 26 Your security software may notify you unpack the printer or attach anything, locate the CD for Windows. 2 Make sure the computer is on the computer screen to set up the printer on a Windows operating system 1 Before you that Lexmark software is trying to communicate with your...
... all open programs. Security Information Documentation Support 26 Your security software may notify you unpack the printer or attach anything, locate the CD for Windows. 2 Make sure the computer is on the computer screen to set up the printer on a Windows operating system 1 Before you that Lexmark software is trying to communicate with your...

Setup Guide
Page 20
...may be connected to recognize the dial tone and then dials the fax number. However, this method of the control panel: 36 Setting up to fax while behind a PBX." Ordinarily, when dialing a fax number, the printer waits to a Private Branch Exchange (PBX) telephone system. Certain devices... can be connected to the printer so that digital telephone services can be used in a business or office, it may not work if the PBX telephone system uses a dial tone that will support analog ...
...may be connected to recognize the dial tone and then dials the fax number. However, this method of the control panel: 36 Setting up to fax while behind a PBX." Ordinarily, when dialing a fax number, the printer waits to a Private Branch Exchange (PBX) telephone system. Certain devices... can be connected to the printer so that digital telephone services can be used in a business or office, it may not work if the PBX telephone system uses a dial tone that will support analog ...

Setup Guide
Page 39
...signal strength Wireless devices have lost communication with the printer over a network, select Use DHCP to reestablish communication with the printer. Many factors can try manually entering an address after selecting your system support person for more likely it is distance. For ...Change sharing options. 5 Click Continue. 6 Click Share this printer, and assign a name to your printer. 7 Follow the directions on the computer screen until installation is complete. 55 One factor is being received. Contact your printer from other wireless devices or even other , the more information...
...signal strength Wireless devices have lost communication with the printer over a network, select Use DHCP to reestablish communication with the printer. Many factors can try manually entering an address after selecting your system support person for more likely it is distance. For ...Change sharing options. 5 Click Continue. 6 Click Share this printer, and assign a name to your printer. 7 Follow the directions on the computer screen until installation is complete. 55 One factor is being received. Contact your printer from other wireless devices or even other , the more information...
Setup Guide
Page 40
...addresses and share the same SSID and channel. This mode of communication is set up a network in one where a PC with a wireless adapter communicates directly with a printer equipped for each device communicates with others through a wireless access point (wireless router) is called ad ...wireless networking. Contact your system support person for more information. A device in step 4 on page 55. 3 Right-click the printer icon, and select Open or Connect. 4 This will be created in the window. Characteristics Infrastructure Ad hoc 56 Lexmark recommends setting up in the ...
...addresses and share the same SSID and channel. This mode of communication is set up a network in one where a PC with a wireless adapter communicates directly with a printer equipped for each device communicates with others through a wireless access point (wireless router) is called ad ...wireless networking. Contact your system support person for more information. A device in step 4 on page 55. 3 Right-click the printer icon, and select Open or Connect. 4 This will be created in the window. Characteristics Infrastructure Ad hoc 56 Lexmark recommends setting up in the ...

Setup Guide
Page 48
... supplies Ordering print cartridges Lexmark 6500 Series models Item Part number Average cartridge standard page yield is turned off and unplugged from the wall outlet. Cleaning the scanner glass 1 Dampen a clean, lint-free cloth with water. Cleaning the exterior of the printer 1 Make sure that has... Keep the photo cartridge in its own storage unit when not in accordance with ISO/IEC 24711. 2 Licensed Return Program Cartridge 135 Declared yield value in use household cleaners or detergents, as they may cause damage to your printer. 5 Make sure the paper support and paper exit...
... supplies Ordering print cartridges Lexmark 6500 Series models Item Part number Average cartridge standard page yield is turned off and unplugged from the wall outlet. Cleaning the scanner glass 1 Dampen a clean, lint-free cloth with water. Cleaning the exterior of the printer 1 Make sure that has... Keep the photo cartridge in its own storage unit when not in accordance with ISO/IEC 24711. 2 Licensed Return Program Cartridge 135 Declared yield value in use household cleaners or detergents, as they may cause damage to your printer. 5 Make sure the paper support and paper exit...

Setup Guide
Page 51
... following: Check your operating system The following : Press power button Make sure the printer is not on the printer box. Software does not install These are supported: • Windows Vista • Windows XP • Windows 2000 with the USB symbol. Try one or more of the computer. Power button is marked with Service Pack 3 or...
... following: Check your operating system The following : Press power button Make sure the printer is not on the printer box. Software does not install These are supported: • Windows Vista • Windows XP • Windows 2000 with the USB symbol. Try one or more of the computer. Power button is marked with Service Pack 3 or...

Setup Guide
Page 54
...printer software. 5 Click Cancel on all system requirements. Enabling the USB port To confirm that the USB port is enabled. 141 c Click Device Manager. 3 Click the plus sign (+) beside Universal Serial Bus Controller. If the software still does not install correctly, visit our Web site at www.lexmark... drivers or downloads. 3 Select your printer family. 4 Select your printer model. 5 Select your operating system. 6 Select the file you restart your CD-ROM drive. b Click the Hardware tab. For proper installation, make sure the computer supports all New Hardware Found screens. 6 ...
...printer software. 5 Click Cancel on all system requirements. Enabling the USB port To confirm that the USB port is enabled. 141 c Click Device Manager. 3 Click the plus sign (+) beside Universal Serial Bus Controller. If the software still does not install correctly, visit our Web site at www.lexmark... drivers or downloads. 3 Select your printer family. 4 Select your printer model. 5 Select your operating system. 6 Select the file you restart your CD-ROM drive. b Click the Hardware tab. For proper installation, make sure the computer supports all New Hardware Found screens. 6 ...

Setup Guide
Page 55
... Check your wireless network. ASCII characters are possible solutions. Lexmark 6500 Series. 2 Click Solution Center. 3 Click the ...characters are not listed, Contact the Customer Support Center. Yes No If USB Host Controller and USB Root Hub are A-F and 0-9. •...; Between 8 and 64 ASCII characters. Note: Make sure you find out what type of the following criteria. Try one or more of security my network is like a password. You must follow the following : Establish bidirectional communication between the printer...
... Check your wireless network. ASCII characters are possible solutions. Lexmark 6500 Series. 2 Click Solution Center. 3 Click the ...characters are not listed, Contact the Customer Support Center. Yes No If USB Host Controller and USB Root Hub are A-F and 0-9. •...; Between 8 and 64 ASCII characters. Note: Make sure you find out what type of the following criteria. Try one or more of security my network is like a password. You must follow the following : Establish bidirectional communication between the printer...

Setup Guide
Page 67
...high-quality images, for best results use Lexmark Premium Photo Paper. This typically happens when you are printing photos or other end into the PictBridge port on and choose your first photo using a PictBridge-enabled digital camera Make sure photo size and paper size are set . Improving...Photo Size appears. 6 Press . 7 Press or repeatedly until 10 x 15 cm appears. 14 Press . 15 Press Start Color or Start Black. or L. Try one or more of the following: Check paper • Use the appropriate paper for PictBridge Printing to make sure your camera has a print size of the printer...
...high-quality images, for best results use Lexmark Premium Photo Paper. This typically happens when you are printing photos or other end into the PictBridge port on and choose your first photo using a PictBridge-enabled digital camera Make sure photo size and paper size are set . Improving...Photo Size appears. 6 Press . 7 Press or repeatedly until 10 x 15 cm appears. 14 Press . 15 Press Start Color or Start Black. or L. Try one or more of the following: Check paper • Use the appropriate paper for PictBridge Printing to make sure your camera has a print size of the printer...

Setup Guide
Page 80
...print server from the external device, and connect it supports bidirectional communication. There may be a problem with the print server. Cable is not connected, is loose, or is damaged The printer cable must be a problem with the USB cable. Make sure the cable is not damaged or ...Make sure the printer is set as the default printer Try printing a test page. If the printer works, there may be fully connected and undamaged for proper communication. Printer is on the back of the printer. See the documentation that shipped with the print server. Try one or more ...
...print server from the external device, and connect it supports bidirectional communication. There may be a problem with the print server. Cable is not connected, is loose, or is damaged The printer cable must be a problem with the USB cable. Make sure the cable is not damaged or ...Make sure the printer is set as the default printer Try printing a test page. If the printer works, there may be fully connected and undamaged for proper communication. Printer is on the back of the printer. See the documentation that shipped with the print server. Try one or more ...

Setup Guide
Page 84
...support person to make sure the device is working properly and that best describes the problem. • Print is too dark or smudged • Vertical straight lines are not smooth • White lines appear in graphics or solid black areas • Characters are missing or unexpected • Colors...8226; Glossy photo paper or transparencies stick together Cannot print to the network printer These are also using an installation cable: 1 Check the installation cable for setup instructions if: • The lights of the print server are not on the back of the printer. The USB port is ...
...support person to make sure the device is working properly and that best describes the problem. • Print is too dark or smudged • Vertical straight lines are not smooth • White lines appear in graphics or solid black areas • Characters are missing or unexpected • Colors...8226; Glossy photo paper or transparencies stick together Cannot print to the network printer These are also using an installation cable: 1 Check the installation cable for setup instructions if: • The lights of the print server are not on the back of the printer. The USB port is ...

Setup Guide
Page 85
...printer recognizes: • Files that support the desired file formats. Note: Resetting to your printer to print? appears. Check network connections and power Make sure the printer is connected to factory default settings will delete all the printer... press or to open the printer. 2 Pull the paper out. 3 Close the scanner unit. 4 Press . 5 Reprint any photos are turned on the display....printer to factory default settings You can reset your computer through a USB cable, and both the printer and the computer are on the paper to remove it is on. 1 Press and hold and Start Color...
...printer recognizes: • Files that support the desired file formats. Note: Resetting to your printer to print? appears. Check network connections and power Make sure the printer is connected to factory default settings will delete all the printer... press or to open the printer. 2 Pull the paper out. 3 Close the scanner unit. 4 Press . 5 Reprint any photos are turned on the display....printer to factory default settings You can reset your computer through a USB cable, and both the printer and the computer are on the paper to remove it is on. 1 Press and hold and Start Color...

Setup Guide
Page 86
Try one or more of paper into the printer. • Load paper with the paper.) See "Loading paper" on page 60 and its related topics for information about: • Maximum loading amounts per paper type • Specific loading instructions for supported paper and specialty media Remove each page as... • Load a smaller amount of the following: Check paper condition Use only new, unwrinkled paper. Paper jam in the paper support 1 Press to turn off the printer. 2 Firmly grasp the paper, and gently pull it dry completely before stacking. 173 Remove the paper manually 1 Press to turn ...
Try one or more of paper into the printer. • Load paper with the paper.) See "Loading paper" on page 60 and its related topics for information about: • Maximum loading amounts per paper type • Specific loading instructions for supported paper and specialty media Remove each page as... • Load a smaller amount of the following: Check paper condition Use only new, unwrinkled paper. Paper jam in the paper support 1 Press to turn off the printer. 2 Firmly grasp the paper, and gently pull it dry completely before stacking. 173 Remove the paper manually 1 Press to turn ...

Setup Guide
Page 89
3 Firmly grasp the paper, and gently pull it . Try one or more of memory card you have inserted the memory card in the duplex unit... are using can be used in the duplex unit" on the duplex latch as you are possible solutions. Try one or more of the following: Check memory card type Make sure that the type of the following: Check paper .... Check for paper jams Check for and clear any paper jams. For more information, see "Paper jam in the printer. For more information, see "Paper jam in the correct slot. 176 Duplex unit does not operate correctly These are using...
3 Firmly grasp the paper, and gently pull it . Try one or more of memory card you have inserted the memory card in the duplex unit... are using can be used in the duplex unit" on the duplex latch as you are possible solutions. Try one or more of the following: Check memory card type Make sure that the type of the following: Check paper .... Check for paper jams Check for and clear any paper jams. For more information, see "Paper jam in the printer. For more information, see "Paper jam in the correct slot. 176 Duplex unit does not operate correctly These are using...

Setup Guide
Page 96
... different wall jack. 5 If you are possible solutions. Review digital phone service checklist The fax modem is being used . • If you are using a PBX telephone service, make sure that supports analog use. Try one of the following hardware are using DSL, connect to a DSL filter or router that it ... Verify dial tone • Place a test call to the telephone number to which you want to send a fax to make sure you hear a dial tone, connect the printer to that digital telephone services can be used by another device, wait until the other device is displayed, follow the...
... different wall jack. 5 If you are possible solutions. Review digital phone service checklist The fax modem is being used . • If you are using a PBX telephone service, make sure that supports analog use. Try one of the following hardware are using DSL, connect to a DSL filter or router that it ... Verify dial tone • Place a test call to the telephone number to which you want to send a fax to make sure you hear a dial tone, connect the printer to that digital telephone services can be used by another device, wait until the other device is displayed, follow the...

Setup Guide
Page 101
... Note: The number of patterns defined for the printer to display Caller ID information. Resend the fax. For more information, see "Using Caller ID from the control panel" on letter-size paper. 188 If it does not support: • Your scan resolution-lower the scan .... Changing Caller ID pattern using the control panel The printer supports two distinct Caller ID patterns: Pattern 1 (FSK) and Pattern 2 (DTMF). Fax Error The fax machines have been a problem with the quality of fax you may not be set correctly The printer supports two distinct Caller ID patterns: Pattern 1 (FSK) ...
... Note: The number of patterns defined for the printer to display Caller ID information. Resend the fax. For more information, see "Using Caller ID from the control panel" on letter-size paper. 188 If it does not support: • Your scan resolution-lower the scan .... Changing Caller ID pattern using the control panel The printer supports two distinct Caller ID patterns: Pattern 1 (FSK) and Pattern 2 (DTMF). Fax Error The fax machines have been a problem with the quality of fax you may not be set correctly The printer supports two distinct Caller ID patterns: Pattern 1 (FSK) ...

Setup Guide
Page 104
...the telephone line is being used by another device, wait until the other device is an analog device. Try one or more information, see "Setting up to the printer so that will read any markings on page 133. For more of the following: Review digital phone service ...• Handset • Answering machine Error messages on the printer display Alignment Error These are connecting to an analog connection on the PBX. The printer will support analog use. Use new paper Load only plain, unmarked paper for the fax machine. If none exists, consider installing an analog telephone line...
...the telephone line is being used by another device, wait until the other device is an analog device. Try one or more information, see "Setting up to the printer so that will read any markings on page 133. For more of the following: Review digital phone service ...• Handset • Answering machine Error messages on the printer display Alignment Error These are connecting to an analog connection on the PBX. The printer will support analog use. Use new paper Load only plain, unmarked paper for the fax machine. If none exists, consider installing an analog telephone line...

Setup Guide
Page 108
...selected more than one option on step 2 of the photo proof sheet you printed and scanned. 1 Make sure you completely fill in your largest photo size. 7 Press Start Color or Start Black to begin printing. 195 No proof sheet information The photo proof sheet you selected on the printer menu. 1... until Paper Setup appears on page 93. For more information, see the documentation that will read photos created using the proof sheet" on the scanner glass is no longer valid. Only one photo enhancement may have been found on the memory card or flash drive. For more information, see...
...selected more than one option on step 2 of the photo proof sheet you printed and scanned. 1 Make sure you completely fill in your largest photo size. 7 Press Start Color or Start Black to begin printing. 195 No proof sheet information The photo proof sheet you selected on the printer menu. 1... until Paper Setup appears on page 93. For more information, see the documentation that will read photos created using the proof sheet" on the scanner glass is no longer valid. Only one photo enhancement may have been found on the memory card or flash drive. For more information, see...


