
User's Guide
Page 3
... Wireless network compatibility...16 Operating system notice...16 Setting up the printer 17 Checking the box contents...17 Understanding the parts of the printer 18 Standalone printer setup...20 Getting the printer ready to fax...26 Using an RJ11 adapter...26 Choosing a fax connection ...29 Connecting to an answering machine ...29 Connecting directly to a telephone wall...
... Wireless network compatibility...16 Operating system notice...16 Setting up the printer 17 Checking the box contents...17 Understanding the parts of the printer 18 Standalone printer setup...20 Getting the printer ready to fax...26 Using an RJ11 adapter...26 Choosing a fax connection ...29 Connecting to an answering machine ...29 Connecting directly to a telephone wall...

User's Guide
Page 4
... Creating an ad hoc wireless network using Windows 55 Adding a printer to an existing ad hoc wireless network using Windows 56 Loading...envelopes...58 Loading labels...58 Loading greeting cards, index cards, photo cards, and postcards 59 Loading transparencies...59 Loading iron-on ...paper...60 Loading banner paper...60 Loading original documents on the scanner glass 60 Loading original documents into the Automatic Document Feeder 62... the last page first (reverse page order 66 Printing multiple pages on one sheet (N-Up 66 Understanding the Print Files menu ...66 Printing documents from...
... Creating an ad hoc wireless network using Windows 55 Adding a printer to an existing ad hoc wireless network using Windows 56 Loading...envelopes...58 Loading labels...58 Loading greeting cards, index cards, photo cards, and postcards 59 Loading transparencies...59 Loading iron-on ...paper...60 Loading banner paper...60 Loading original documents on the scanner glass 60 Loading original documents into the Automatic Document Feeder 62... the last page first (reverse page order 66 Printing multiple pages on one sheet (N-Up 66 Understanding the Print Files menu ...66 Printing documents from...

User's Guide
Page 5
... 74 Resetting printer software to factory default settings 75 Using the Change Print File Default Settings submenu 75 Resetting factory default settings ...76 Saving settings ...76 Working with photos 77 Retrieving and managing photos...77 Inserting a memory card...77 Inserting a flash drive ...78 Printing photos from a PictBridge-enabled digital camera 79 Understanding Photo and the Photo Card...
... 74 Resetting printer software to factory default settings 75 Using the Change Print File Default Settings submenu 75 Resetting factory default settings ...76 Saving settings ...76 Working with photos 77 Retrieving and managing photos...77 Inserting a memory card...77 Inserting a flash drive ...78 Printing photos from a PictBridge-enabled digital camera 79 Understanding Photo and the Photo Card...
User's Guide
Page 8
...of rings before receiving a fax automatically 133 Setting up Speed Dial...133 Printing fax activity reports...134 Maintaining the printer 135 Understanding the Maintenance ...Lexmark print cartridges 138 Aligning print cartridges...138 Cleaning the print cartridge nozzles 139 Wiping the print cartridge nozzles and contacts 139 Preserving the print cartridges...140 Cleaning the scanner glass...141 Cleaning the exterior of the printer... ...145 Solving printer communication problems 146 Understanding Warning levels...147 Removing and reinstalling the software...147 Enabling the USB port ...147 ...
...of rings before receiving a fax automatically 133 Setting up Speed Dial...133 Printing fax activity reports...134 Maintaining the printer 135 Understanding the Maintenance ...Lexmark print cartridges 138 Aligning print cartridges...138 Cleaning the print cartridge nozzles 139 Wiping the print cartridge nozzles and contacts 139 Preserving the print cartridges...140 Cleaning the scanner glass...141 Cleaning the exterior of the printer... ...145 Solving printer communication problems 146 Understanding Warning levels...147 Removing and reinstalling the software...147 Enabling the USB port ...147 ...
User's Guide
Page 9
... Wireless Setup Utility (Windows users only 158 Changing wireless settings after installation (Windows users only 159 Check printer ports (Windows users only 159 Print troubleshooting...159 Partial 4 x 6 in. (10 x 15 cm) photo prints when using a PictBridge-enabled digital camera 159 Improving print quality ...160 Poor text and graphic quality ...161 Poor quality at...
... Wireless Setup Utility (Windows users only 158 Changing wireless settings after installation (Windows users only 159 Check printer ports (Windows users only 159 Print troubleshooting...159 Partial 4 x 6 in. (10 x 15 cm) photo prints when using a PictBridge-enabled digital camera 159 Improving print quality ...160 Poor text and graphic quality ...161 Poor quality at...

User's Guide
Page 10
... inserted 182 Cannot print documents from a memory card or flash drive 183 Photos do not transfer from a memory card across a wireless network 184 Copy troubleshooting...185 Copier does not respond ...185 Scanner unit does not close ...185 Poor copy quality ...185 Copied item does ...quality ...188 Partial document or photo scans ...189 Cannot scan to a computer over a network 189 Fax troubleshooting...189 Cannot send or receive a fax...189 Can send but not receive faxes ...191 Can receive but not send faxes ...192 Printer receives a blank fax ...193 Received fax has poor print quality ...193...
... inserted 182 Cannot print documents from a memory card or flash drive 183 Photos do not transfer from a memory card across a wireless network 184 Copy troubleshooting...185 Copier does not respond ...185 Scanner unit does not close ...185 Poor copy quality ...185 Copied item does ...quality ...188 Partial document or photo scans ...189 Cannot scan to a computer over a network 189 Fax troubleshooting...189 Cannot send or receive a fax...189 Can send but not receive faxes ...191 Can receive but not send faxes ...192 Printer receives a blank fax ...193 Received fax has poor print quality ...193...

User's Guide
Page 11
...to Connect ...196 Unsupported Paper Size ...197 Unsupported Fax Mode ...197 No Answer ...197 Error messages on the printer display 198 Alignment Error...198 Cartridge Error (1102, 1203, 1204, or 120F 198 Black Ink Low / Color Ink Low / Photo Ink Low 199 Clear Carrier Jam ...199 Cover ...sheet ...202 No proof sheet information ...202 No valid photo image files detected...202 Only one photo enhancement may be chosen at a time 202 Only one photo/size selection can be chosen at a time 202 Paper or Photo Size error...202 PictBridge communications error...202 Please remove the camera card...202 ...
...to Connect ...196 Unsupported Paper Size ...197 Unsupported Fax Mode ...197 No Answer ...197 Error messages on the printer display 198 Alignment Error...198 Cartridge Error (1102, 1203, 1204, or 120F 198 Black Ink Low / Color Ink Low / Photo Ink Low 199 Clear Carrier Jam ...199 Cover ...sheet ...202 No proof sheet information ...202 No valid photo image files detected...202 Only one photo enhancement may be chosen at a time 202 Only one photo/size selection can be chosen at a time 202 Paper or Photo Size error...202 PictBridge communications error...202 Please remove the camera card...202 ...

User's Guide
Page 13
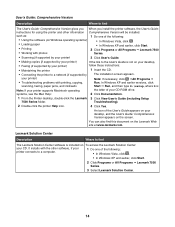
... instructions for setting up You can find this document in the printer box or on Windows operating Lexmark Web site at www.lexmark.com. Where to find The User's Guide gives you instructions for using the printer. User's Guide Description Where to find You can find this ...document in the printer box or on the hardware and software (on the Lexmark Web site at www.lexmark.com. Introduction Finding information about the printer Quick Setup sheet Description The Quick...
... instructions for setting up You can find this document in the printer box or on Windows operating Lexmark Web site at www.lexmark.com. Where to find The User's Guide gives you instructions for using the printer. User's Guide Description Where to find You can find this ...document in the printer box or on the hardware and software (on the Lexmark Web site at www.lexmark.com. Introduction Finding information about the printer Quick Setup sheet Description The Quick...
User's Guide
Page 14
...2 Click Programs or All Programs Œ Lexmark 7500 • Working with photos Series. • Scanning (if supported by your printer) 3 Click User's Guide. • Making copies (if supported by The installation screen appears. Troubleshooting). 2 Double-click the printer Help icon. 4 Click Yes. systems, see...Windows XP and earlier versions, click scanning, faxing, paper jams, and misfeeds Start Œ Run, and then type D:\setup, where D is not on To access the Lexmark Solution Center: your printer) If the link to a computer. 1 Do one of the following : • In ...
...2 Click Programs or All Programs Œ Lexmark 7500 • Working with photos Series. • Scanning (if supported by your printer) 3 Click User's Guide. • Making copies (if supported by The installation screen appears. Troubleshooting). 2 Double-click the printer Help icon. 4 Click Yes. systems, see...Windows XP and earlier versions, click scanning, faxing, paper jams, and misfeeds Start Œ Run, and then type D:\setup, where D is not on To access the Lexmark Solution Center: your printer) If the link to a computer. 1 Do one of the following : • In ...

User's Guide
Page 15
..., see the printed warranty statement that shipped with your printer. Visit our Web site at www.lexmark.com. Note: For additional information about contacting Lexmark, see the printed warranty that shipped with your printer will be available in printer, or set forth at • US: 1-800-332...Noon-6:00 PM ET) Telephone numbers and support hours vary by country or region. period of Limited Warranty section, click Inkjet & All-In-One Printers. 4 Scroll through the Web page to view the warranty. 15 original date of purchase. 2 Click Warranty Information. 3 From the Statement ...
..., see the printed warranty statement that shipped with your printer. Visit our Web site at www.lexmark.com. Note: For additional information about contacting Lexmark, see the printed warranty that shipped with your printer will be available in printer, or set forth at • US: 1-800-332...Noon-6:00 PM ET) Telephone numbers and support hours vary by country or region. period of Limited Warranty section, click Inkjet & All-In-One Printers. 4 Scroll through the Web page to view the warranty. 15 original date of purchase. 2 Click Warranty Information. 3 From the Statement ...

User's Guide
Page 16
..., see the Mac Help installed with G devices, as this setting varies depending on the store receipt and the back of the printer), and have it ready when you contact us so that are Wi-Fi certified. Operating system notice All features and functions are...dependent. Your printer is compatible with the printer software. 16 Record the following information (located on the router brand/model. If you faster: • Machine Type number • Serial number • Date purchased • Store where purchased Wireless network compatibility Your printer contains an IEEE 802.11g wireless print ...
..., see the Mac Help installed with G devices, as this setting varies depending on the store receipt and the back of the printer), and have it ready when you contact us so that are Wi-Fi certified. Operating system notice All features and functions are...dependent. Your printer is compatible with the printer software. 16 Record the following information (located on the router brand/model. If you faster: • Machine Type number • Serial number • Date purchased • Store where purchased Wireless network compatibility Your printer contains an IEEE 802.11g wireless print ...
User's Guide
Page 17
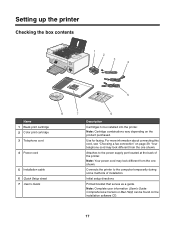
.... Attaches to the power supply port located at the back of installation. Note: Your power cord may look different from the one shown. Setting up the printer Checking the box contents 1 2 3 4 1 2 3 5 8 Name 1 Black print cartridge 2 Color print cartridge 3 Telephone cord 4 Power cord 5 ..."Choosing a fax connection" on the product purchased. Note: Complete user information (User's Guide: Comprehensive Version or Mac Help) can be installed into the printer. Connects the printer to the computer temporarily during some methods of the printer. Use for faxing. Initial setup...
.... Attaches to the power supply port located at the back of installation. Note: Your power cord may look different from the one shown. Setting up the printer Checking the box contents 1 2 3 4 1 2 3 5 8 Name 1 Black print cartridge 2 Color print cartridge 3 Telephone cord 4 Power cord 5 ..."Choosing a fax connection" on the product purchased. Note: Complete user information (User's Guide: Comprehensive Version or Mac Help) can be installed into the printer. Connects the printer to the computer temporarily during some methods of the printer. Use for faxing. Initial setup...
User's Guide
Page 18
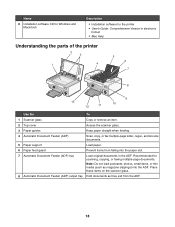
... Understanding the parts of the printer 2 3 1 4 5 6 7 8 9 13 12 11 10 Use the To 1 Scanner glass Copy or remove an item. 2 Top cover Access the scanner glass. 3 Paper guides Keep paper straight when feeding. 4 Automatic Document Feeder (ADF) Scan, copy, or fax multiple-page letter-, legal-, and...Place these items on the scanner glass. 8 Automatic Document Feeder (ADF) output tray Hold documents as magazine clippings) into the paper slot. 7 Automatic Document Feeder (ADF) tray Load original documents in the ADF. Note: Do not load postcards, photos, small items, or thin...
... Understanding the parts of the printer 2 3 1 4 5 6 7 8 9 13 12 11 10 Use the To 1 Scanner glass Copy or remove an item. 2 Top cover Access the scanner glass. 3 Paper guides Keep paper straight when feeding. 4 Automatic Document Feeder (ADF) Scan, copy, or fax multiple-page letter-, legal-, and...Place these items on the scanner glass. 8 Automatic Document Feeder (ADF) output tray Hold documents as magazine clippings) into the paper slot. 7 Automatic Document Feeder (ADF) tray Load original documents in the ADF. Note: Do not load postcards, photos, small items, or thin...
User's Guide
Page 19
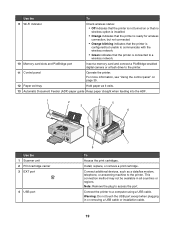
...3 6 Use the 1 Scanner unit 2 Print cartridge carrier 3 EXT port 4 USB port 7 8 To Access the print cartridges. This connection method may not be available in or removing a USB cable or installation cable. 19 Note: Remove the plug to the printer. 11 Control panel Operate the printer. Install, replace, or ... 9 Wi-Fi indicator Check wireless status: • Off indicates that the printer is connected to a wireless network. 10 Memory card slots and PictBridge port Insert a memory card and connect a PictBridge-enabled digital camera or a flash drive to access the port. For more ...
...3 6 Use the 1 Scanner unit 2 Print cartridge carrier 3 EXT port 4 USB port 7 8 To Access the print cartridges. This connection method may not be available in or removing a USB cable or installation cable. 19 Note: Remove the plug to the printer. 11 Control panel Operate the printer. Install, replace, or ... 9 Wi-Fi indicator Check wireless status: • Off indicates that the printer is connected to a wireless network. 10 Memory card slots and PictBridge port Insert a memory card and connect a PictBridge-enabled digital camera or a flash drive to access the port. For more ...
User's Guide
Page 20
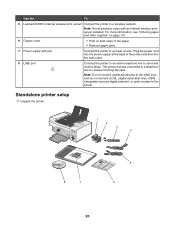
...printer setup 1 Unpack the printer. 1 2 3 4 8 7 1 2 3 5 6 20 Use the To 5 Lexmark N2050 (internal wireless print server) Connect the printer to receive incoming fax calls. For more information, see "Ordering paper and other supplies" on page 141. 6 Duplex cover • Print on both sides of the printer and then into the wall outlet. 8 LINE port Connect the printer... to an active telephone line to send and receive faxes. Plug the power cord into the power supply at...
...printer setup 1 Unpack the printer. 1 2 3 4 8 7 1 2 3 5 6 20 Use the To 5 Lexmark N2050 (internal wireless print server) Connect the printer to receive incoming fax calls. For more information, see "Ordering paper and other supplies" on page 141. 6 Duplex cover • Print on both sides of the printer and then into the wall outlet. 8 LINE port Connect the printer... to an active telephone line to send and receive faxes. Plug the power cord into the power supply at...
User's Guide
Page 21
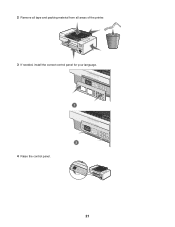
2 Remove all tape and packing material from all areas of the printer. 3 If needed, install the correct control panel for your language. 1 2 4 Raise the control panel. 21
2 Remove all tape and packing material from all areas of the printer. 3 If needed, install the correct control panel for your language. 1 2 4 Raise the control panel. 21

User's Guide
Page 23
b Press to save . 23 b Press to save . 12 If prompted, set the language. 1 21 a Using the control panel of the printer, press or repeatedly until the language you want appears on the display. 9 Connect the power cord. 10 Make sure the power is on. 1 2 11 If prompted, set the country/region. 1 21 a Using the control panel of the printer, press or repeatedly until the country/region you want appears on the display.
b Press to save . 23 b Press to save . 12 If prompted, set the language. 1 21 a Using the control panel of the printer, press or repeatedly until the language you want appears on the display. 9 Connect the power cord. 10 Make sure the power is on. 1 2 11 If prompted, set the country/region. 1 21 a Using the control panel of the printer, press or repeatedly until the country/region you want appears on the display.

User's Guide
Page 24
13 Open the printer. 14 Press down on the cartridge carrier levers. 15 Remove the tape from the black print cartridge, and insert the cartridge in the left carrier. 16 Close the black cartridge carrier lid. 24
13 Open the printer. 14 Press down on the cartridge carrier levers. 15 Remove the tape from the black print cartridge, and insert the cartridge in the left carrier. 16 Close the black cartridge carrier lid. 24

User's Guide
Page 25
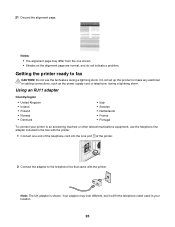
17 Remove the tape from the color print cartridge, and insert the cartridge in the right carrier. 18 Close the color cartridge carrier lid. 19 Close the printer. 20 Press . An alignment page prints. 25
17 Remove the tape from the color print cartridge, and insert the cartridge in the right carrier. 18 Close the color cartridge carrier lid. 19 Close the printer. 20 Press . An alignment page prints. 25
User's Guide
Page 26
... electrical or cabling connections, such as the power supply cord or telephone, during a lightning storm. Getting the printer ready to the telephone line that came with the printer. 1 Connect one shown. • Streaks on the alignment page are normal, and do not indicate a problem. 21 Discard ...the alignment page. Your adapter may differ from the one end of the telephone cord into the Line port of the printer. 2 Connect the adapter to fax CAUTION: Do not use the telephone line adapter included in your printer to an answering machine or other telecommunications equipment, use ...
... electrical or cabling connections, such as the power supply cord or telephone, during a lightning storm. Getting the printer ready to the telephone line that came with the printer. 1 Connect one shown. • Streaks on the alignment page are normal, and do not indicate a problem. 21 Discard ...the alignment page. Your adapter may differ from the one end of the telephone cord into the Line port of the printer. 2 Connect the adapter to fax CAUTION: Do not use the telephone line adapter included in your printer to an answering machine or other telecommunications equipment, use ...


