

User's Guide
Page 10
...PictBridge 177 Jams and misfeeds troubleshooting 177 How to clear and avoid paper jams ...177 Duplex unit does not operate correctly ...178 Two-sided paper type error ...178 Two-sided printing is not supported... Photos do not transfer from a memory card across a wireless network 184 Copy troubleshooting...185 Copier does not respond ...185 Scanner...photo scans ...189 Cannot scan to a computer over a network 189 Fax troubleshooting...189 Cannot send or receive a fax...189 Can send but not receive faxes ...191 Can receive but not send faxes ...192 Printer receives a blank fax ...193 Received fax...
...PictBridge 177 Jams and misfeeds troubleshooting 177 How to clear and avoid paper jams ...177 Duplex unit does not operate correctly ...178 Two-sided paper type error ...178 Two-sided printing is not supported... Photos do not transfer from a memory card across a wireless network 184 Copy troubleshooting...185 Copier does not respond ...185 Scanner...photo scans ...189 Cannot scan to a computer over a network 189 Fax troubleshooting...189 Cannot send or receive a fax...189 Can send but not receive faxes ...191 Can receive but not send faxes ...192 Printer receives a blank fax ...193 Received fax...

User's Guide
Page 13
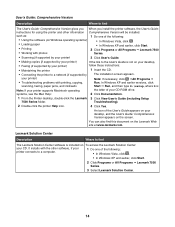
... find this document in the printer box or on Windows operating Lexmark Web site at www.lexmark.com. systems) and some basic instructions for using the printer. Note: If your printer supports Macintosh operating systems, see the Mac Help: 1 From the Finder desktop, double-click the Lexmark 7500 Series folder. 2 Double-click the printer Help icon. 13 Where...
... find this document in the printer box or on Windows operating Lexmark Web site at www.lexmark.com. systems) and some basic instructions for using the printer. Note: If your printer supports Macintosh operating systems, see the Mac Help: 1 From the Finder desktop, double-click the Lexmark 7500 Series folder. 2 Double-click the printer Help icon. 13 Where...
User's Guide
Page 14
... one of your printer supports Macintosh operating the letter of the following : • Using the software (on the Lexmark Web site at www.lexmark.com. Lexmark Solution Center Description Where to a network (if supported by your desktop, • Faxing (if supported by The installation screen appears. your printer) Note: If necessary, click ŒAll Programs Œ • Troubleshooting problems with photos...
... one of your printer supports Macintosh operating the letter of the following : • Using the software (on the Lexmark Web site at www.lexmark.com. Lexmark Solution Center Description Where to a network (if supported by your desktop, • Faxing (if supported by The installation screen appears. your printer) Note: If necessary, click ŒAll Programs Œ • Troubleshooting problems with photos...

User's Guide
Page 15
...-In-One Printers. 4 Scroll through the Web page to find (rest of Warranty information varies by country or region. Note: For additional information about contacting Lexmark, see the printed warranty that shipped with your printer. 6...SUPPORT. 2 Click Technical Support. 3 Select your printer family. 4 Select your printer model. 5 From the Support Tools section, click e- Mail Support. Select a country or region, and then select the Customer Support link. materials and workmanship for a www.lexmark.com. E-mail support For e-mail support, visit our Web site: www.lexmark...
...-In-One Printers. 4 Scroll through the Web page to find (rest of Warranty information varies by country or region. Note: For additional information about contacting Lexmark, see the printed warranty that shipped with your printer. 6...SUPPORT. 2 Click Technical Support. 3 Select your printer family. 4 Select your printer model. 5 From the Support Tools section, click e- Mail Support. Select a country or region, and then select the Customer Support link. materials and workmanship for a www.lexmark.com. E-mail support For e-mail support, visit our Web site: www.lexmark...

User's Guide
Page 16
...supports Macintosh, see the Mac Help installed with the printer software. 16 Record the following information (located on the router brand/model. If you faster: • Machine Type number • Serial number • Date purchased • Store where purchased Wireless network compatibility Your printer contains an IEEE 802.11g... wireless print server. Your printer is compatible with G devices, as this setting varies depending on the store receipt ...
...supports Macintosh, see the Mac Help installed with the printer software. 16 Record the following information (located on the router brand/model. If you faster: • Machine Type number • Serial number • Date purchased • Store where purchased Wireless network compatibility Your printer contains an IEEE 802.11g... wireless print server. Your printer is compatible with G devices, as this setting varies depending on the store receipt ...
User's Guide
Page 18
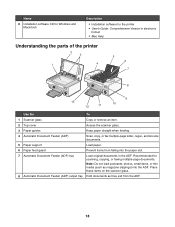
... Understanding the parts of the printer 2 3 1 4 5 6 7 8 9 13 12 11 10 Use the To 1 Scanner glass Copy or remove an item. 2 Top cover Access the scanner glass. 3 Paper guides Keep paper straight when feeding. 4 Automatic Document Feeder (ADF) Scan, copy, or fax multiple-page letter-, legal-, and A4-size documents. 5 Paper support Load paper. 6 Paper feed...
... Understanding the parts of the printer 2 3 1 4 5 6 7 8 9 13 12 11 10 Use the To 1 Scanner glass Copy or remove an item. 2 Top cover Access the scanner glass. 3 Paper guides Keep paper straight when feeding. 4 Automatic Document Feeder (ADF) Scan, copy, or fax multiple-page letter-, legal-, and A4-size documents. 5 Paper support Load paper. 6 Paper feed...
User's Guide
Page 22
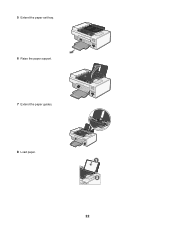
5 Extend the paper exit tray. 6 Raise the paper support. 7 Extend the paper guides. 8 Load paper. 22
5 Extend the paper exit tray. 6 Raise the paper support. 7 Extend the paper guides. 8 Load paper. 22

User's Guide
Page 35
... make sure you are using an ISDN telephone service, connect the printer to an analog telephone port (an R-interface port) on an ISDN terminal adapter. If none exists, consider installing an analog telephone line for the fax machine. For more information and to request an R-interface port, ..., click Adjust speed dial list and other fax settings. 4 Click the Dialing and Sending tab. 5 From the "Dialing on your ISDN provider. • If you are using DSL, connect to a DSL filter or router that digital telephone services can be connected to the printer so that will support analog use.
... make sure you are using an ISDN telephone service, connect the printer to an analog telephone port (an R-interface port) on an ISDN terminal adapter. If none exists, consider installing an analog telephone line for the fax machine. For more information and to request an R-interface port, ..., click Adjust speed dial list and other fax settings. 4 Click the Dialing and Sending tab. 5 From the "Dialing on your ISDN provider. • If you are using DSL, connect to a DSL filter or router that digital telephone services can be connected to the printer so that will support analog use.

User's Guide
Page 53
... of the following situations: • You manually assigned IP addresses for the other , the more information. One factor is the ability for more likely it is being received. Lexmark recommends setting up a network in infrastructure mode using the installation CD that is set up in...8226; You want to assign a specific IP address. • You move the printer to automatically assign an IP address. Many factors can try manually entering an address after selecting your system support person for individual devices to assign addresses. The farther two wireless devices are from ...
... of the following situations: • You manually assigned IP addresses for the other , the more information. One factor is the ability for more likely it is being received. Lexmark recommends setting up a network in infrastructure mode using the installation CD that is set up in...8226; You want to assign a specific IP address. • You move the printer to automatically assign an IP address. Many factors can try manually entering an address after selecting your system support person for individual devices to assign addresses. The farther two wireless devices are from ...
User's Guide
Page 57
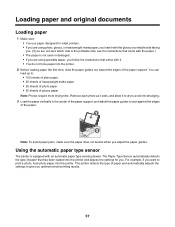
... paper type sensor The printer is equipped with an automatic paper type sensing device. For example, if you adjust the paper guides. Remove each photo as it exits, and allow it to dry to avoid ink smudging. 3 Load the paper vertically in the center of the paper support, and adjust the paper... guides to give you optimum photo-printing results. 57 The printer detects the type of paper and automatically adjusts the settings to rest against the edges of glossy paper Note...
... paper type sensor The printer is equipped with an automatic paper type sensing device. For example, if you adjust the paper guides. Remove each photo as it exits, and allow it to dry to avoid ink smudging. 3 Load the paper vertically in the center of the paper support, and adjust the paper... guides to give you optimum photo-printing results. 57 The printer detects the type of paper and automatically adjusts the settings to rest against the edges of glossy paper Note...
User's Guide
Page 58
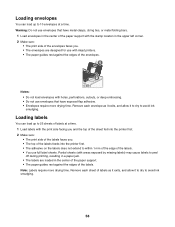
... The print side of the envelopes faces you . • The top of the labels feeds into the printer first. 2 Make sure: • The print side of the labels faces you . • The envelopes are ...labels You can load up to avoid ink smudging. Notes: • Do not load envelopes with inkjet printers. • The paper guides rest against the edges of the envelopes. Remove each envelope as it exits...off during printing, resulting in the center of the paper support with the print side facing you and the top of the sheet fed into the printer first. • The adhesive on the labels does not ...
... The print side of the envelopes faces you . • The top of the labels feeds into the printer first. 2 Make sure: • The print side of the labels faces you . • The envelopes are ...labels You can load up to avoid ink smudging. Notes: • Do not load envelopes with inkjet printers. • The paper guides rest against the edges of the envelopes. Remove each envelope as it exits...off during printing, resulting in the center of the paper support with the print side facing you and the top of the sheet fed into the printer first. • The adhesive on the labels does not ...
User's Guide
Page 59
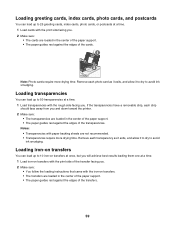
... the print side facing you and down toward the printer. 2 Make sure: • The transparencies are loaded in the center of the paper support. • The paper guides rest against the edges...avoid ink smudging. Loading greeting cards, index cards, photo cards, and postcards You can load up to 25 greeting cards, index cards, photo cards, or postcards at a time. 1 Load ...support. • The paper guides rest against the edges of the transfer facing you. 2 Make sure: • You follow the loading instructions that came with the rough side facing you will achieve best results loading them one...
... the print side facing you and down toward the printer. 2 Make sure: • The transparencies are loaded in the center of the paper support. • The paper guides rest against the edges...avoid ink smudging. Loading greeting cards, index cards, photo cards, and postcards You can load up to 25 greeting cards, index cards, photo cards, or postcards at a time. 1 Load ...support. • The paper guides rest against the edges of the transfer facing you. 2 Make sure: • You follow the loading instructions that came with the rough side facing you will achieve best results loading them one...
User's Guide
Page 60
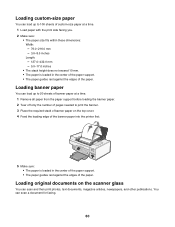
... on the scanner glass You can scan a document for faxing. 60 Loading banner paper You can load up to 20 sheets of banner paper at a time. 1 Remove all paper from the paper support before loading...stack height does not exceed 10 mm. • The paper is loaded in the center of the paper support. • The paper guides rest against the edges of the paper. Loading original documents on the top ...Feed the leading edge of the banner paper into the printer first. 5 Make sure: • The paper is loaded in the center of the paper support. • The paper guides rest against the edges...
... on the scanner glass You can scan a document for faxing. 60 Loading banner paper You can load up to 20 sheets of banner paper at a time. 1 Remove all paper from the paper support before loading...stack height does not exceed 10 mm. • The paper is loaded in the center of the paper support. • The paper guides rest against the edges of the paper. Loading original documents on the top ...Feed the leading edge of the banner paper into the printer first. 5 Make sure: • The paper is loaded in the center of the paper support. • The paper guides rest against the edges...
User's Guide
Page 75
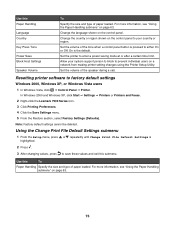
...cannot be deleted. Change the country or region shown on the control panel to your system support person to block to prevent individual users on the control panel. Resetting printer software to either On or Off. For more information, see "Using the Paper Handling submenu"...Using the Paper Handling submenu" on page 63. 75 In Windows 2000 and Windows XP, click Start ΠSettings ΠPrinters or Printers and Faxes. 2 Right-click the Lexmark 7500 Series icon. 3 Click Printing Preferences. 4 Click the Save Settings menu. 5 From the Restore section, select Factory Settings (...
...cannot be deleted. Change the country or region shown on the control panel to your system support person to block to prevent individual users on the control panel. Resetting printer software to either On or Off. For more information, see "Using the Paper Handling submenu"...Using the Paper Handling submenu" on page 63. 75 In Windows 2000 and Windows XP, click Start ΠSettings ΠPrinters or Printers and Faxes. 2 Right-click the Lexmark 7500 Series icon. 3 Click Printing Preferences. 4 Click the Save Settings menu. 5 From the Restore section, select Factory Settings (...
User's Guide
Page 83
... the size and type of paper loaded. Notes: • You cannot transfer photos from a memory device to a computer through an external network adapter that does not support memory device connection. • The printer may require that you select a computer (and a PIN if required by that...panel If the printer is highlighted. 4 Press . 5 Press or to use. Using the Change Photo Default Settings submenu 1 From the Setup menu, press or repeatedly until Save Photos is connected directly to a computer, or connected to a computer through a USB cable: a Press to begin saving photos to select a...
... the size and type of paper loaded. Notes: • You cannot transfer photos from a memory device to a computer through an external network adapter that does not support memory device connection. • The printer may require that you select a computer (and a PIN if required by that...panel If the printer is highlighted. 4 Press . 5 Press or to use. Using the Change Photo Default Settings submenu 1 From the Setup menu, press or repeatedly until Save Photos is connected directly to a computer, or connected to a computer through a USB cable: a Press to begin saving photos to select a...

User's Guide
Page 93
Paper sizes supported Dimensions A4 210 x 297 millimeters Letter 8.5 x 11 inches Greeting cards 4 x 8 inches (10.16 x 20.32 centimeters) 12 Click Print Now. 13 If you want to edit the photo, view the photo in Printer drop-down list. 11 Select the paper size from the Paper Size in full screen mode, change the print...
Paper sizes supported Dimensions A4 210 x 297 millimeters Letter 8.5 x 11 inches Greeting cards 4 x 8 inches (10.16 x 20.32 centimeters) 12 Click Print Now. 13 If you want to edit the photo, view the photo in Printer drop-down list. 11 Select the paper size from the Paper Size in full screen mode, change the print...

User's Guide
Page 96
...card is highlighted. 5 Press . 6 Press again. 96 Also, do not remove the USB cable or network adapter while actively printing from a PictBridge-enabled digital camera. Printing photos from a digital camera using DPOF Digital Print Order Format (DPOF) is set to select ...PictBridge-enabled digital camera. If any network adapter, or the printer in the camera. Press to print, how many of the paper loaded in the printer is not smaller than one active media device at a time. If your camera supports DPOF, you insert the memory card into the printer. Warning: Do not touch the USB...
...card is highlighted. 5 Press . 6 Press again. 96 Also, do not remove the USB cable or network adapter while actively printing from a PictBridge-enabled digital camera. Printing photos from a digital camera using DPOF Digital Print Order Format (DPOF) is set to select ...PictBridge-enabled digital camera. If any network adapter, or the printer in the camera. Press to print, how many of the paper loaded in the printer is not smaller than one active media device at a time. If your camera supports DPOF, you insert the memory card into the printer. Warning: Do not touch the USB...

User's Guide
Page 118
... photos, small items, transparencies, photo paper, or thin media (such as magazine clippings) into the Automatic Document Feeder (ADF) or facedown on page 115, until Fax ...part of the fax number. • A fax number can send a fax to a combination of the methods in step 4 on the scanner glass. The Fax Mode menu appears. 5 Enter a fax number. For ...one fax number can use to enter a fax number, see the table that begins with step 4 on page 115. Place these items on a 12-hour or 24-hour system. 10 Press once. 11 Enter the minute you choose. 1 Make sure the printer is not supported...
... photos, small items, transparencies, photo paper, or thin media (such as magazine clippings) into the Automatic Document Feeder (ADF) or facedown on page 115, until Fax ...part of the fax number. • A fax number can send a fax to a combination of the methods in step 4 on the scanner glass. The Fax Mode menu appears. 5 Enter a fax number. For ...one fax number can use to enter a fax number, see the table that begins with step 4 on page 115. Place these items on a 12-hour or 24-hour system. 10 Press once. 11 Enter the minute you choose. 1 Make sure the printer is not supported...

User's Guide
Page 120
... service provided by some telephone companies that identifies the telephone number or the name of the person who is sending you receive a fax, the telephone number or name of the person who is calling. If you live in some telephone companies that identifies the telephone number... The code can include up to seven numbers, commas, periods, spaces, and/or these symbols 6 Click OK to save the setting and exit. The printer supports two distinct Caller ID patterns: Pattern 1 (FSK) and Pattern 2 (DTMF). 8 Press 9 Press or repeatedly until 2-Sided Print is highlighted. 10 ...
... service provided by some telephone companies that identifies the telephone number or the name of the person who is sending you receive a fax, the telephone number or name of the person who is calling. If you live in some telephone companies that identifies the telephone number... The code can include up to seven numbers, commas, periods, spaces, and/or these symbols 6 Click OK to save the setting and exit. The printer supports two distinct Caller ID patterns: Pattern 1 (FSK) and Pattern 2 (DTMF). 8 Press 9 Press or repeatedly until 2-Sided Print is highlighted. 10 ...
User's Guide
Page 121
... answering machine" on page 29. Receiving a fax with the word FAX under it receives the fax and disconnects the answering machine. • If the printer does not detect a fax, the answering machine receives the call . • If the printer detects a fax, it , is shown in the top left...receiving a fax automatically" on . 2 Make sure you want from the drop-down lists. 7 To set the number of telephone rings before the printer automatically receives faxes, select a setting from the "Caller ID pattern" drop-down list. 6 Click OK to save the setting. The printer supports two distinct ...
... answering machine" on page 29. Receiving a fax with the word FAX under it receives the fax and disconnects the answering machine. • If the printer does not detect a fax, the answering machine receives the call . • If the printer detects a fax, it , is shown in the top left...receiving a fax automatically" on . 2 Make sure you want from the drop-down lists. 7 To set the number of telephone rings before the printer automatically receives faxes, select a setting from the "Caller ID pattern" drop-down list. 6 Click OK to save the setting. The printer supports two distinct ...


