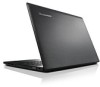
Z50 70 Keyboard - Lenovo
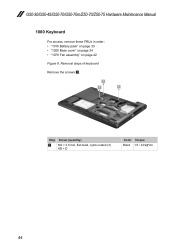
Z50 70 Keyboard
Related Manual Pages


Related Videos

How to replace/change keyboard on Lenovo Z70-80 Z50-75 Z50-70
Duration: 2:00
Total Views: 93
Duration: 2:00
Total Views: 93
Similar Questions

Keyboard
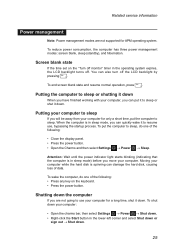
How do I activate the backlighting on the keyboard? or does this model not have one?
How do I activate the backlighting on the keyboard? or does this model not have one?
(Posted by tayhinton55 10 years ago)

G480 Keyboard Letters Change To Numbers
My Lenovo laptop model G480 keyboard letters uiojklm changes into number. how to solve this?
My Lenovo laptop model G480 keyboard letters uiojklm changes into number. how to solve this?
(Posted by izaac91 11 years ago)

Keyboard Issues
Hello. I've recently acquired a lenovo G780. My operating system has been installed without fault, a...
Hello. I've recently acquired a lenovo G780. My operating system has been installed without fault, a...
(Posted by silviuvanaero 11 years ago)
Related Terms
The following terms were also used when searching for Z50 70 Keyboard - Lenovo:- lenovo z50 70 amazon
- lenovo z50 70 backlit keyboard
- lenovo z50 70 battery
- lenovo z50 70 bios
- lenovo z50 70 bios key
- lenovo z50 70 charger
- lenovo z50 70 display
- lenovo z50 70 drivers
- lenovo z50 70 drivers for windows 7
- lenovo z50 70 gaming
- lenovo z50 70 i3
- lenovo z50 70 i5
- lenovo z50 70 i7 price
- lenovo z50 70 i7 review
- lenovo z50 70 keyboard
- lenovo z50 70 maximum ram support
- lenovo z50 70 motherboard
- lenovo z50 70 price in india
- lenovo z50 70 ram
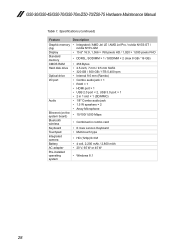
- lenovo z50 70 specs
- lenovo z50-70 amazon
- lenovo z50-70 charger
- lenovo z50-70 drivers
- lenovo z50-70 gaming
- lenovo z50-70 i5
- lenovo z50-70 keyboard
- lenovo z50-70 laptop
- lenovo z50-70 laptop amazon
- lenovo z50-70 laptop computer
- lenovo z50-70 laptop review
- lenovo z50-70 laptop specs
- lenovo z50-70 manual
- lenovo z50-70 model 20354
- lenovo z50-70 price
- lenovo z50-70 ram
- lenovo z50-70 review
- lenovo z50-70 reviews
- lenovo z50-70 screen replacement
- lenovo z50-70 spec
- lenovo z50-70 specification
- lenovo z50-70 specs
- lenovo z50-70/g50
- lenovo z500
- lenovo z570
- lenovo z570 i7
- z50 70 20354
- z50 70 amazon
- z50 70 battery
- z50 70 bios
- z50 70 bios key
- z50 70 charger
- z50 70 driver
- z50 70 drivers
- z50 70 drivers for windows 7
- z50 70 gaming
- z50 70 i7 price
- z50 70 keyboard
- z50 70 lenovo
- z50 70 lenovo drivers
- z50 70 lenovo i5
- z50 70 lenovo i7
- z50 70 maximum ram support
- z50 70 motherboard
- z50 70 price
- z50 70 price in india
- z50 70 reviews
- z50 70 white
- z50-70 amazon
- z50-70 battery
- z50-70 bios
- z50-70 charger
- z50-70 drivers
- z50-70 hardware maintenance manual
- z50-70 i7 review
- z50-70 i7 specs
- z50-70 keyboard
- z50-70 laptop
- z50-70 laptop (lenovo)
- z50-70 laptop amazon
- z50-70 laptop review
- z50-70 laptop specs
- z50-70 lenovo
- z50-70 lenovo avis
- z50-70 lenovo i5
- z50-70 lenovo review
- z50-70 manual
- z50-70 model 20354
- z50-70 motherboard
- z50-70 notebook
- z50-70 price
- z50-70 ram
- z50-70 review
- z50-70 reviews
- z50-70 screen
- z50-70 screen replacement
- z50-70 specification
- z50-70 specs
- z50-70 ssd upgrade
- z50-70 support
- z50-70/g50
- z5070 battery
- z5070 driver
- z5070 keyboard
- z5070 lenovo i5
- z5070 lenovo i7
- z5070 lenovo laptop
- z5070 lenovo price
- z5070 lenovo review
- z5070 review
- z5070 spec
- z5070 specs