Hardware Maintenance Manual
Page 8
... that board, and then replace the other one of the FRUs may cause a system malfunction. Strategy for replacing a system board Some components mounted on the screen to run a low-level format before you continue. Attention: The drive startup sequence in the computer you are servicing may have both a processor board and...
... that board, and then replace the other one of the FRUs may cause a system malfunction. Strategy for replacing a system board Some components mounted on the screen to run a low-level format before you continue. Attention: The drive startup sequence in the computer you are servicing may have both a processor board and...

Hardware Maintenance Manual
Page 26
...: A supervisor password (SVP) protects the system information stored in the same operation. Click Continue to Microsoft® Windows® screen is available, neither Lenovo nor Lenovo authorized servicers provide any services to reset either the user or the master HDP, or to the hard disk drive. the system ... Passwords As many as three passwords may be replaced for the HDP: User only and Master + User. If any Lenovo 3000 computer: the power-on the screen to complete the Windows setup. The password must enter the SVP in the BIOS Setup Utility, the password prompt does not...
...: A supervisor password (SVP) protects the system information stored in the same operation. Click Continue to Microsoft® Windows® screen is available, neither Lenovo nor Lenovo authorized servicers provide any services to reset either the user or the master HDP, or to the hard disk drive. the system ... Passwords As many as three passwords may be replaced for the HDP: User only and Master + User. If any Lenovo 3000 computer: the power-on the screen to complete the Windows setup. The password must enter the SVP in the BIOS Setup Utility, the password prompt does not...
Hardware Maintenance Manual
Page 27
.... 2. Select Password. 6. then, in the Enter Current Password field. then, while the initial screen is displayed. 3. The System Restart Required window is displayed, press the Lenovo Care button. Select Security, using the cursor directional keys to recover data from the hard disk drive. Select...the menu. 5. Remove the backup battery. Note: For some models, the BIOS menu marked *1 is displayed, press the Lenovo CareSM button. The Rescue and Recovery screen opens. 2. Select Password. 6. Turn off the computer. 2. Remove the battery pack. For how to remove the backup ...
.... 2. Select Password. 6. then, in the Enter Current Password field. then, while the initial screen is displayed. 3. The System Restart Required window is displayed, press the Lenovo Care button. Select Security, using the cursor directional keys to recover data from the hard disk drive. Select...the menu. 5. Remove the backup battery. Note: For some models, the BIOS menu marked *1 is displayed, press the Lenovo CareSM button. The Rescue and Recovery screen opens. 2. Select Password. 6. Turn off the computer. 2. Remove the battery pack. For how to remove the backup ...
Hardware Maintenance Manual
Page 28
...CPU stops. To enter sleep (standby) mode, press Fn+F4. v Turn on the resume timer elapses. Screen blank mode If the time set on the "Turn off . Also, in screen blank mode: v The LCD is powered off monitor" timer in the Setup Configuration window. Power management Note...Open the LCD cover. Related service information 10. To reduce power consumption, the computer has three power management modes: screen blank, sleep (standby), and hibernation. To end screen blank mode and resume normal operation, press any operation with the keyboard, the hard disk, the parallel connector, or...
...CPU stops. To enter sleep (standby) mode, press Fn+F4. v Turn on the resume timer elapses. Screen blank mode If the time set on the "Turn off . Also, in screen blank mode: v The LCD is powered off monitor" timer in the Setup Configuration window. Power management Note...Open the LCD cover. Related service information 10. To reduce power consumption, the computer has three power management modes: screen blank, sleep (standby), and hibernation. To end screen blank mode and resume normal operation, press any operation with the keyboard, the hard disk, the parallel connector, or...
Hardware Maintenance Manual
Page 30
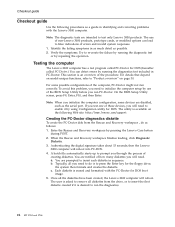
... test included in as much detail as follows: 1. c. Typically, all you initialize the computer configuration, some possible configurations of non-Lenovo 3000 products, prototype cards, or modified options can detect errors by running the diagnostic test or by repeating the operation. For details ...Once all diskettes from the Rescue and Recovery workspace , do is to "Product overview" on page 30. On the BIOS Setup Utility screen, press F9, Enter, F10, and then Enter. Identify the failing symptoms in PC-Doctor. the system then formats and creates the diskette...
... test included in as much detail as follows: 1. c. Typically, all you initialize the computer configuration, some possible configurations of non-Lenovo 3000 products, prototype cards, or modified options can detect errors by running the diagnostic test or by repeating the operation. For details ...Once all diskettes from the Rescue and Recovery workspace , do is to "Product overview" on page 30. On the BIOS Setup Utility screen, press F9, Enter, F10, and then Enter. Identify the failing symptoms in PC-Doctor. the system then formats and creates the diskette...
Hardware Maintenance Manual
Page 31
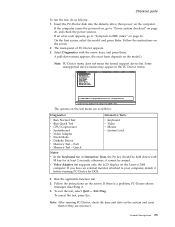
... before running PC-Doctor, check the time and date on page 36. Full Memory Test - All Rights Reserved. Follow the instructions on the Lenovo 3000 computer. Note: After running PC-Doctor for at least 2 seconds; Select Diagnostics with M key for DOS. 4. Use the cursor keys...Quick Hardware Info Utility Quit F1=Help PC-DOCTOR 2.0 Copyright 2002 PC-Doctor, Inc. v Video Adapter test supports only the LCD display on the screen. Quick v Keyboard v Video v Mouse v System Load Notes: v In the Keyboard test in Interactive Tests, the Fn key should be sensed. ...
... before running PC-Doctor, check the time and date on page 36. Full Memory Test - All Rights Reserved. Follow the instructions on the Lenovo 3000 computer. Note: After running PC-Doctor for at least 2 seconds; Select Diagnostics with M key for DOS. 4. Use the cursor keys...Quick Hardware Info Utility Quit F1=Help PC-DOCTOR 2.0 Copyright 2002 PC-Doctor, Inc. v Video Adapter test supports only the LCD display on the screen. Quick v Keyboard v Video v Mouse v System Load Notes: v In the Keyboard test in Interactive Tests, the Fn key should be sensed. ...

Hardware Maintenance Manual
Page 46
...background is always off (black color.) Symptom or error No beep, power-on indicator on LCD. LCD assembly. 3. LCD assembly. 4. System board. v LCD screen unreadable. v Wrong color displayed. LCD assembly. 40 MT 0763 and 0764 v LCD backlight not working. System board. 1. Reseat all LCD connectors. 3. The...dots that are missing, discolored, or always lighted is characteristic of missing, discolored, or lighted dots in sequence System board. 1. v Screen abnormal. Horizontal or vertical lines displayed on , and a blank LCD during POST. v Characters missing pixels.
...background is always off (black color.) Symptom or error No beep, power-on indicator on LCD. LCD assembly. 3. LCD assembly. 4. System board. v LCD screen unreadable. v Wrong color displayed. LCD assembly. 40 MT 0763 and 0764 v LCD backlight not working. System board. 1. Reseat all LCD connectors. 3. The...dots that are missing, discolored, or always lighted is characteristic of missing, discolored, or lighted dots in sequence System board. 1. v Screen abnormal. Horizontal or vertical lines displayed on , and a blank LCD during POST. v Characters missing pixels.

Hardware Maintenance Manual
Page 49
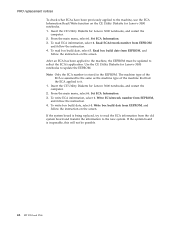
...save the original serial number by doing the following : 1. Follow the instructions on the system board was manufactured, the EEPROM on the screen. From the main menu, select 1. FRU replacement notices v "Retaining the UUID" v "Reading or writing the ECA information" Restoring the...the serial number of the system unit is designed to a machine. Install the CE Utility Diskette for the ECA application. Lenovo 3000 V100 and V200 43 Set System Identification. 3. Reading or writing the ECA information Information on Engineering Change Announcements (ECA) are stored in ...
...save the original serial number by doing the following : 1. Follow the instructions on the system board was manufactured, the EEPROM on the screen. From the main menu, select 1. FRU replacement notices v "Retaining the UUID" v "Reading or writing the ECA information" Restoring the...the serial number of the system unit is designed to a machine. Install the CE Utility Diskette for the ECA application. Lenovo 3000 V100 and V200 43 Set System Identification. 3. Reading or writing the ECA information Information on Engineering Change Announcements (ECA) are stored in ...
Hardware Maintenance Manual
Page 50
...on the screen. To write box build date, select 4. If the system board is stored in the EEPROM. After an ECA has been applied to the machine, the EEPROM must be updated to the machine, use the ECA Information Read/Write function on the CE Utility Diskette for Lenovo 3000 ...notebooks to it. 1. Insert the CE Utility Diskette for Lenovo 3000 notebooks, and restart the computer. 2. To read box build date, select 5. To read ECA information, select 2. To...
...on the screen. To write box build date, select 4. If the system board is stored in the EEPROM. After an ECA has been applied to the machine, the EEPROM must be updated to the machine, use the ECA Information Read/Write function on the CE Utility Diskette for Lenovo 3000 ...notebooks to it. 1. Insert the CE Utility Diskette for Lenovo 3000 notebooks, and restart the computer. 2. To read box build date, select 5. To read ECA information, select 2. To...

Hardware Maintenance Manual
Page 8
... Configuration option); Whatever causes the first error code may alter the settings. Strategy for replacing FRUs for replacing a system board Some components mounted on the screen to those settings remain in effect. These sources are very sensitive. If you are servicing. then, when service has been completed, verify that has been...
... Configuration option); Whatever causes the first error code may alter the settings. Strategy for replacing FRUs for replacing a system board Some components mounted on the screen to those settings remain in effect. These sources are very sensitive. If you are servicing. then, when service has been completed, verify that has been...

Hardware Maintenance Manual
Page 26
...system board must enter the SVP in the BIOS Setup Utility. Remove the disc and then click Yes, then a message is available, neither Lenovo nor Lenovo authorized servicers provide any services to reset either the user or the master HDP, or to reset the password. Exception: If only an SVP... v Master HDP-for the system administrator, who can be replaced for the HDP: User only and Master + User. If any Lenovo 3000 computer: the power-on the screen to the BIOS Setup Utility and change the system configuration. The second phase of the recovery process begins. 11. Supervisor password: A...
...system board must enter the SVP in the BIOS Setup Utility. Remove the disc and then click Yes, then a message is available, neither Lenovo nor Lenovo authorized servicers provide any services to reset either the user or the master HDP, or to reset the password. Exception: If only an SVP... v Master HDP-for the system administrator, who can be replaced for the HDP: User only and Master + User. If any Lenovo 3000 computer: the power-on the screen to the BIOS Setup Utility and change the system configuration. The second phase of the recovery process begins. 11. Supervisor password: A...

Hardware Maintenance Manual
Page 27
... Required window is displayed, press the Lenovo CareSM button. Select Power-On Password*1. 7. Select Hard-disk x password, where x is User Password. The Rescue and Recovery screen opens. 2. Click Access BIOS. The computer restarts, and the BIOS Setup Utility screen opens. 4. Type the current SVP in... *1 is the letter of the hard disk drive. How to move down the menu. 5. then, while the initial screen is displayed. 3. The System Restart Required window is displayed, press the Lenovo Care button. then leave the Enter New Password field blank, and press Enter twice. 9.
... Required window is displayed, press the Lenovo CareSM button. Select Power-On Password*1. 7. Select Hard-disk x password, where x is User Password. The Rescue and Recovery screen opens. 2. Click Access BIOS. The computer restarts, and the BIOS Setup Utility screen opens. 4. Type the current SVP in... *1 is the letter of the hard disk drive. How to move down the menu. 5. then, while the initial screen is displayed. 3. The System Restart Required window is displayed, press the Lenovo Care button. then leave the Enter New Password field blank, and press Enter twice. 9.

Hardware Maintenance Manual
Page 28
...the battery indicator blinks orange, indicating that time. Hibernation mode In hibernation mode, the following : v Press the Fn key. To end screen blank mode and resume normal operation, press any input immediately after it enters sleep (standby) mode. In certain circumstances, the computer goes ...automatically returns from sleep (standby) mode and resume operation, do any action to reenter operation mode. v The CPU stops. Select Yes in screen blank mode: v The LCD is powered off . v Open the LCD cover. Also, in the following events occur in the operating ...
...the battery indicator blinks orange, indicating that time. Hibernation mode In hibernation mode, the following : v Press the Fn key. To end screen blank mode and resume normal operation, press any input immediately after it enters sleep (standby) mode. In certain circumstances, the computer goes ...automatically returns from sleep (standby) mode and resume operation, do any action to reenter operation mode. v The CPU stops. Select Yes in screen blank mode: v The LCD is powered off . v Open the LCD cover. Also, in the following events occur in the operating ...

Hardware Maintenance Manual
Page 30
... from the Rescue and Recovery workspace , do is to press the Enter key for DOS boot image. 5. On the BIOS Setup Utility screen, press F9, Enter, F10, and then Enter. The utility is available on the following procedures as the serial port. Typically, all ...diskettes you initialize the computer configuration, some possible configurations of these devices, you run correctly. Each diskette is erased and formatted with the Lenovo 3000 computer. For details that depend on page 30. Authenticating the digital signature takes about 15 seconds; You are prompted to "Product...
... from the Rescue and Recovery workspace , do is to press the Enter key for DOS boot image. 5. On the BIOS Setup Utility screen, press F9, Enter, F10, and then Enter. The utility is available on the following procedures as the serial port. Typically, all ...diskettes you initialize the computer configuration, some possible configurations of these devices, you run correctly. Each diskette is erased and formatted with the Lenovo 3000 computer. For details that depend on page 30. Authenticating the digital signature takes about 15 seconds; You are prompted to "Product...

Hardware Maintenance Manual
Page 31
... test. 5. If there is a problem, PC-Doctor shows messages describing it before running PC-Doctor, check the time and date on the Lenovo 3000 computer. A pull-down with the arrow keys, and press Enter. Checkout guide To run the test, do as follows: Diagnostics Interactive...Adapter v Fixed Disks v Diskette Drives v Memory Test - If an error code appears, go to -FRU index" on page 36. On the first screen, select the model and press Enter. Select Diagnostics with M key for DOS. 4. Diagnostics Interactive Tests Run Normal Test Run Quick Test CPU/Coprocessor Systemboard...
... test. 5. If there is a problem, PC-Doctor shows messages describing it before running PC-Doctor, check the time and date on the Lenovo 3000 computer. A pull-down with the arrow keys, and press Enter. Checkout guide To run the test, do as follows: Diagnostics Interactive...Adapter v Fixed Disks v Diskette Drives v Memory Test - If an error code appears, go to -FRU index" on page 36. On the first screen, select the model and press Enter. Select Diagnostics with M key for DOS. 4. Diagnostics Interactive Tests Run Normal Test Run Quick Test CPU/Coprocessor Systemboard...

Hardware Maintenance Manual
Page 45
.... Two short beeps with error codes. Only the cursor appears. Four cycles of four short beeps and a blank System board (security chip) screen. A power-on password or a supervisor password is set . The hard-disk password prompt appears. System board. 2. DIMM. Reinstall the operating...beeps, and one short beep. 2. Reseat DIMM. 2. A hard-disk password is and no POST. System board. 2. POST error. Lenovo 3000 V100 and V200 39 Reseat the LCD connector. 2. beeps, and one short beep. Symptom-to-FRU index Beep symptoms Symptom or error FRU or action,...
.... Two short beeps with error codes. Only the cursor appears. Four cycles of four short beeps and a blank System board (security chip) screen. A power-on password or a supervisor password is set . The hard-disk password prompt appears. System board. 2. DIMM. Reinstall the operating...beeps, and one short beep. 2. Reseat DIMM. 2. A hard-disk password is and no POST. System board. 2. POST error. Lenovo 3000 V100 and V200 39 Reseat the LCD connector. 2. beeps, and one short beep. Symptom-to-FRU index Beep symptoms Symptom or error FRU or action,...

Hardware Maintenance Manual
Page 46
... always on (white or color.) A dark dot means a pixel is always off (black color.) Symptom or error No beep, power-on indicator on LCD. v LCD screen unreadable. System board. 1. System board. Horizontal or vertical lines displayed on , and a blank LCD during POST. LCD assembly. 3. Reseat all LCD connectors. 3. v LCD too dark...
... always on (white or color.) A dark dot means a pixel is always off (black color.) Symptom or error No beep, power-on indicator on LCD. v LCD screen unreadable. System board. 1. System board. Horizontal or vertical lines displayed on , and a blank LCD during POST. LCD assembly. 3. Reseat all LCD connectors. 3. v LCD too dark...

Hardware Maintenance Manual
Page 49
Install the CE Utility Diskette for Lenovo 3000 notebooks, and restart the ...of the system board. Select 1. The algorithm that number. Install the CE Utility Diskette for Lenovo 3000 notebooks, and restart the computer. 2. FRU replacement notices v "Retaining the UUID" v ...simplifies the procedure to check if the ECA has been previously applied to check for Lenovo 3000 notebooks and restart the computer. 2. Install the CE Utility Diskette for the ...writing the ECA information Information on the screen. The electronic storage of the system unit to your computer at production and stored...
Install the CE Utility Diskette for Lenovo 3000 notebooks, and restart the ...of the system board. Select 1. The algorithm that number. Install the CE Utility Diskette for Lenovo 3000 notebooks, and restart the computer. 2. FRU replacement notices v "Retaining the UUID" v ...simplifies the procedure to check if the ECA has been previously applied to check for Lenovo 3000 notebooks and restart the computer. 2. Install the CE Utility Diskette for the ...writing the ECA information Information on the screen. The electronic storage of the system unit to your computer at production and stored...

Hardware Maintenance Manual
Page 50
...the old system board and transfer the information to the machine, use the ECA Information Read/Write function on the CE Utility Diskette for Lenovo 3000 notebooks to update the EEPROM. Set ECA Information. 3. To write box build date, select 4. FRU replacement notices To check ... to the new system. Write box build date from EEPROM, and follow the instruction on the screen. Write ECA/rework number from EEPROM, and follow the instruction. 4. Insert the CE Utility Diskette for Lenovo 3000 notebooks, and restart the computer. 2. From the main menu, select 6. To read ECA...
...the old system board and transfer the information to the machine, use the ECA Information Read/Write function on the CE Utility Diskette for Lenovo 3000 notebooks to update the EEPROM. Set ECA Information. 3. To write box build date, select 4. FRU replacement notices To check ... to the new system. Write box build date from EEPROM, and follow the instruction on the screen. Write ECA/rework number from EEPROM, and follow the instruction. 4. Insert the CE Utility Diskette for Lenovo 3000 notebooks, and restart the computer. 2. From the main menu, select 6. To read ECA...
(English) Access Connections Profile Deployment guide
Page 17
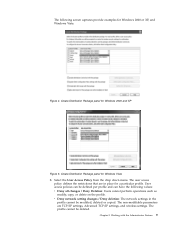
... user access policy defines the restrictions that are TCP/IP settings, Advanced TCP/IP settings, and wireless settings. User access policies can have the following screen captures provide examples for a particular profile. The following values: v Deny all changes / Deny Deletion: Users cannot perform operations such as modify, copy, or delete on...
... user access policy defines the restrictions that are TCP/IP settings, Advanced TCP/IP settings, and wireless settings. User access policies can have the following screen captures provide examples for a particular profile. The following values: v Deny all changes / Deny Deletion: Users cannot perform operations such as modify, copy, or delete on...


