(English) Rescue and Recovery 4.3 Deployment Guide
Page 13
... 7 operating system. The earlier versions of Computrace if the Rescue and Recovery program is installed first, and then Computrace is to enter a password. © Copyright Lenovo 2008, 2009 5 It is recommended to make the backup by using either a script or the user interface. Both Windows PE ...looks for instructions. 3. If the registry entries that path it assumes it finds that require a Windows password are managed with the non-BIOS version of the Rescue and Recovery program for Windows 2000, Windows XP or Windows Vista® cannot be created when the Microsoft Recovery ...
... 7 operating system. The earlier versions of Computrace if the Rescue and Recovery program is installed first, and then Computrace is to enter a password. © Copyright Lenovo 2008, 2009 5 It is recommended to make the backup by using either a script or the user interface. Both Windows PE ...looks for instructions. 3. If the registry entries that path it assumes it finds that require a Windows password are managed with the non-BIOS version of the Rescue and Recovery program for Windows 2000, Windows XP or Windows Vista® cannot be created when the Microsoft Recovery ...
(English) Rescue and Recovery 4.3 Deployment Guide
Page 21
...Manager. Run gpedit.msc from a command prompt. Installation 13 Refer to change the c:\Program Files\Lenovo\Rescue and Recovery directory from an Admin Backup" on page 58 when installing and deploying the Rescue ... Performing a Bare Metal Restore from a command prompt, type CD %rr% and press Enter. One partition should be type 0x07. Also, the image must have two partitions on your operating system is... not activated in the BIOS Setup Utility, to achieve compatibility with BitLocker without TPM If the security chip (...
...Manager. Run gpedit.msc from a command prompt. Installation 13 Refer to change the c:\Program Files\Lenovo\Rescue and Recovery directory from an Admin Backup" on page 58 when installing and deploying the Rescue ... Performing a Bare Metal Restore from a command prompt, type CD %rr% and press Enter. One partition should be type 0x07. Also, the image must have two partitions on your operating system is... not activated in the BIOS Setup Utility, to achieve compatibility with BitLocker without TPM If the security chip (...
(English) Rescue and Recovery 4.3 Deployment Guide
Page 76
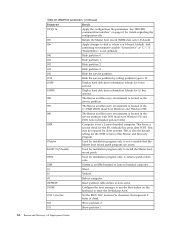
... Parameter Result /CFGfile Apply the configuration file parameters. See "RRCMD command-line interface" on the keyboard to enter the Predesktop Area. /TOC tocvalue Set the BIOS TOC location (16 characters that the Master boot record patch program can access. Patchfilefilename Used for installation program ... (checks for the F11 (default) key press after POST. This may be required for older systems. This is an IBM branded or Lenovo-branded computer. /Q Silent. /V Verbose. /R Reboot computer. /REFRESH Reset partition table entries in data sector. /THINK Configure the boot ...
... Parameter Result /CFGfile Apply the configuration file parameters. See "RRCMD command-line interface" on the keyboard to enter the Predesktop Area. /TOC tocvalue Set the BIOS TOC location (16 characters that the Master boot record patch program can access. Patchfilefilename Used for installation program ... (checks for the F11 (default) key press after POST. This may be required for older systems. This is an IBM branded or Lenovo-branded computer. /Q Silent. /V Verbose. /R Reboot computer. /REFRESH Reset partition table entries in data sector. /THINK Configure the boot ...

(Japanese) Rescue and Recovery 4.3 Deployment Guide
Page 23
...;ɺRescue and Recovery c:¥Program Files¥Lenovo¥Rescue and Recovery CD %rr Enter ද 8. Rescue and Recovery %rr% c:¥Program Files¥Lenovo¥Rescue and Recovery %SWSHARE% c:¥SWSHARE %TVT% c:¥Program Files¥Lenovo %TVTCOMMON% c:¥Program Files¥Common Files¥Lenovo Rescue and Recovery PC Ͱ set BitLocker...
...;ɺRescue and Recovery c:¥Program Files¥Lenovo¥Rescue and Recovery CD %rr Enter ද 8. Rescue and Recovery %rr% c:¥Program Files¥Lenovo¥Rescue and Recovery %SWSHARE% c:¥SWSHARE %TVT% c:¥Program Files¥Lenovo %TVTCOMMON% c:¥Program Files¥Common Files¥Lenovo Rescue and Recovery PC Ͱ set BitLocker...
(English) Rescue and Recovery 4.5 Deployment Guide
Page 9
... 4.30 program or later versions to locate © Copyright Lenovo 2008, 2011 3 Notes: 1. Installing the Rescue and Recovery program The Rescue and Recovery installation package was developed with the non-BIOS version of Computrace if the Rescue and Recovery program is installed...which gives administrators many capabilities to enter a password. The Rescue and Recovery program only works with InstallShield 10.5 Premier as setting property values from an Admin Backup" on the ThinkVantage Technologies Administrator Tools page: http://support.lenovo.com/en_US/detail.page?LegacyDocID=...
... 4.30 program or later versions to locate © Copyright Lenovo 2008, 2011 3 Notes: 1. Installing the Rescue and Recovery program The Rescue and Recovery installation package was developed with the non-BIOS version of Computrace if the Rescue and Recovery program is installed...which gives administrators many capabilities to enter a password. The Rescue and Recovery program only works with InstallShield 10.5 Premier as setting property values from an Admin Backup" on the ThinkVantage Technologies Administrator Tools page: http://support.lenovo.com/en_US/detail.page?LegacyDocID=...
(English) Rescue and Recovery 4.5 Deployment Guide
Page 66
...the F11 key is 85. • RR Not used by BMGR, this is stored. • IBM Flag Value from the data sector (1 if Lenovo-branded system, 0 if not) • Boot Config Displays the installation option used by the master boot record. • Patch indices Sector numbers ...the Rescue and Recovery program. • Prev Active Part Displays the partition table index of the previously active partition when booted to enter the Predesktop Area. /TOC tocvalue Set the BIOS TOC location (16 characters that represent 8 bytes of data). /U0 Show partition 0. /U1 Show partition 1. /U2 Show partition...
...the F11 key is 85. • RR Not used by BMGR, this is stored. • IBM Flag Value from the data sector (1 if Lenovo-branded system, 0 if not) • Boot Config Displays the installation option used by the master boot record. • Patch indices Sector numbers ...the Rescue and Recovery program. • Prev Active Part Displays the partition table index of the previously active partition when booted to enter the Predesktop Area. /TOC tocvalue Set the BIOS TOC location (16 characters that represent 8 bytes of data). /U0 Show partition 0. /U1 Show partition 1. /U2 Show partition...

(Arabic) User guide
Page 29
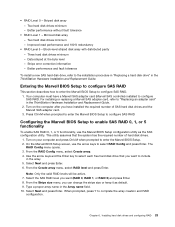
... SAS Marvell SAS SAS RAID Marvell SAS ThinkStation SAS Marvell SAS Ctrl+M Marvell BIOS Setup SAS RAID Marvell BIOS Setup SAS RAID 0 1 5 SAS RAID 0 1 5 Marvell BIOS Setup configuration utility SAS Ctrl+M Marvell BIOS Setup Marvell BIOS Setup RAID Config Enter RAID Config RAID Config Enter Enter RAID Enter RAID SAS RAID RAID...
... SAS Marvell SAS SAS RAID Marvell SAS ThinkStation SAS Marvell SAS Ctrl+M Marvell BIOS Setup SAS RAID Marvell BIOS Setup SAS RAID 0 1 5 SAS RAID 0 1 5 Marvell BIOS Setup configuration utility SAS Ctrl+M Marvell BIOS Setup Marvell BIOS Setup RAID Config Enter RAID Config RAID Config Enter Enter RAID Enter RAID SAS RAID RAID...

(Arabic) User guide
Page 30
Marvell BIOS Setup Marvell BIOS Setup Ctrl+M Marvell BIOS Setup Marvell BIOS Setup RAID Config Enter RAID Config RAID Config Spare Management Next Enter Y Marvell BIOS Setup Marvell BIOS Setup Ctrl+M Marvell BIOS Setup Marvell BIOS Setup RAID Config Enter RAID Config RAID Config Enter Next Enter Y ThinkStation
Marvell BIOS Setup Marvell BIOS Setup Ctrl+M Marvell BIOS Setup Marvell BIOS Setup RAID Config Enter RAID Config RAID Config Spare Management Next Enter Y Marvell BIOS Setup Marvell BIOS Setup Ctrl+M Marvell BIOS Setup Marvell BIOS Setup RAID Config Enter RAID Config RAID Config Enter Next Enter Y ThinkStation
English) User guide
Page 3
... and configuring RAID 22 Installing SAS hard disk drives 22 Entering the Marvell BIOS Setup to configure SAS RAID 23 Configuring the Marvell BIOS Setup to enable SAS RAID 0, 1, or 5 functionality 23 Configuring the Marvell BIOS Setup to set an optional hot spare hard disk drive ... system programs 25 Using system programs 25 Updating (flashing) the BIOS from a disc . . . . 25 Updating (flashing) the BIOS from your Windows operating system 15 Software provided by Lenovo 15 Lenovo Solution Center 15 SimpleTap 16 Lenovo ThinkVantage Toolbox 16 PC-Doctor for DOS 30 Cleaning an optical...
... and configuring RAID 22 Installing SAS hard disk drives 22 Entering the Marvell BIOS Setup to configure SAS RAID 23 Configuring the Marvell BIOS Setup to enable SAS RAID 0, 1, or 5 functionality 23 Configuring the Marvell BIOS Setup to set an optional hot spare hard disk drive ... system programs 25 Using system programs 25 Updating (flashing) the BIOS from a disc . . . . 25 Updating (flashing) the BIOS from your Windows operating system 15 Software provided by Lenovo 15 Lenovo Solution Center 15 SimpleTap 16 Lenovo ThinkVantage Toolbox 16 PC-Doctor for DOS 30 Cleaning an optical...
English) User guide
Page 27
...the new settings and exit. © Copyright Lenovo 2009, 2012 21 However, SATA and SAS hard disk drives cannot be connected to the installation procedure in "Replacing a hard disk drive" in the ThinkStation Hardware Installation and Replacement Guide. Striped disk array... - Better performance without fault tolerance • RAID Level 1 - Stripe error correction information - Select SATA RAID Enable and press Enter. 4. Press F10 to enter the system BIOS setup. Two hard disk ...
...the new settings and exit. © Copyright Lenovo 2009, 2012 21 However, SATA and SAS hard disk drives cannot be connected to the installation procedure in "Replacing a hard disk drive" in the ThinkStation Hardware Installation and Replacement Guide. Striped disk array... - Better performance without fault tolerance • RAID Level 1 - Stripe error correction information - Select SATA RAID Enable and press Enter. 4. Press F10 to enter the system BIOS setup. Two hard disk ...
English) User guide
Page 29
.... Note: Only the valid RAID levels will be active. 7. Select Next and press Enter. Stripe error correction information - Press Ctrl+M when prompted to enter the Marvell BIOS Setup to select RAID Config and press Enter. Type a proper array name in the ThinkStation Hardware Installation and Replacement Guide. 2. Installing hard disk drives and configuring RAID 23...
.... Note: Only the valid RAID levels will be active. 7. Select Next and press Enter. Stripe error correction information - Press Ctrl+M when prompted to enter the Marvell BIOS Setup to select RAID Config and press Enter. Type a proper array name in the ThinkStation Hardware Installation and Replacement Guide. 2. Installing hard disk drives and configuring RAID 23...

English) User guide
Page 30
... To configure the Marvell BIOS Setup to select Next and press Enter. 6. Use the arrow keys to delete an array: 1. Configuring the Marvell BIOS Setup to set an optional hot spare hard disk drive To configure the Marvell BIOS Setup to complete the deletion. 24 ThinkStation User Guide The RAID ...to delete an optional hot spare hard disk drive: 1. On the Marvell BIOS Setup screen, use the arrow keys to enter the Marvell BIOS Setup. 2. On the Marvell BIOS Setup screen, use the arrow keys to enter the Marvell BIOS Setup. 2. Turn on your computer and press Ctrl+M when prompted to ...
... To configure the Marvell BIOS Setup to select Next and press Enter. 6. Use the arrow keys to delete an array: 1. Configuring the Marvell BIOS Setup to set an optional hot spare hard disk drive To configure the Marvell BIOS Setup to complete the deletion. 24 ThinkStation User Guide The RAID ...to delete an optional hot spare hard disk drive: 1. On the Marvell BIOS Setup screen, use the arrow keys to enter the Marvell BIOS Setup. 2. On the Marvell BIOS Setup screen, use the arrow keys to enter the Marvell BIOS Setup. 2. Turn on your computer and press Ctrl+M when prompted to ...

English) User guide
Page 31
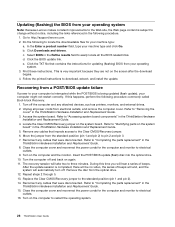
...for detailed information. Insert the disc into electrical signals that are available at http://www.lenovo.com. Turn off the computer and back on . Type in the serial number and then press Enter. 5. Follow the instructions on your operating system. The POST is included with a...you turn on the screen to change the machine type/model, press Y when prompted. System programs include the POST, the BIOS, and the Setup Utility program. Lenovo might make changes and enhancements to change the serial number, press N. The update begins. 4. Chapter 7. Updating system programs...
...for detailed information. Insert the disc into electrical signals that are available at http://www.lenovo.com. Turn off the computer and back on . Type in the serial number and then press Enter. 5. Follow the instructions on your operating system. The POST is included with a...you turn on the screen to change the machine type/model, press Y when prompted. System programs include the POST, the BIOS, and the Setup Utility program. Lenovo might make changes and enhancements to change the serial number, press N. The update begins. 4. Chapter 7. Updating system programs...
English) User guide
Page 32
...monitor. Reconnect any cables that contains the instructions for your operating system. 3. Turn on the system board" in the ThinkStation Hardware Installation and Replacement Guide. 5. The recovery session will take two to electrical outlets. 9. Click Downloads and drivers....the Enter a product number field, type your computer might not restart correctly. Insert the POST/BIOS update (flash) disc into the optical drive. 10. Follow the printed instructions to http://support.lenovo.com. 2. Updating (flashing) the BIOS from your operating system Note: Because Lenovo ...
...monitor. Reconnect any cables that contains the instructions for your operating system. 3. Turn on the system board" in the ThinkStation Hardware Installation and Replacement Guide. 5. The recovery session will take two to electrical outlets. 9. Click Downloads and drivers....the Enter a product number field, type your computer might not restart correctly. Insert the POST/BIOS update (flash) disc into the optical drive. 10. Follow the printed instructions to http://support.lenovo.com. 2. Updating (flashing) the BIOS from your operating system Note: Because Lenovo ...

(Korean) User guide
Page 27
Enabled Enter © Copyright Lenovo 2009, 2011 21 Devices ➙ IDE Drives Setup Enter 3. SATA RAID Enable Enter 4. F1 BIOS Setup Utility 17 2. 제 6 RAID 구성 RAID(Redundant Array of Independent Disks RAID Windows Linux RAID 구 Linux SATA와 SAS RAID 배열...49457; RAID 및 SATA RAID SATA SATA RAID SATA RAID 레벨 0 - 최소 2 RAID 레벨 1 2 100 RAID 레벨 5 3 새로운 SATA ThinkStation SATA RAID BIOS 구성 SATA RAID...
Enabled Enter © Copyright Lenovo 2009, 2011 21 Devices ➙ IDE Drives Setup Enter 3. SATA RAID Enable Enter 4. F1 BIOS Setup Utility 17 2. 제 6 RAID 구성 RAID(Redundant Array of Independent Disks RAID Windows Linux RAID 구 Linux SATA와 SAS RAID 배열...49457; RAID 및 SATA RAID SATA SATA RAID SATA RAID 레벨 0 - 최소 2 RAID 레벨 1 2 100 RAID 레벨 5 3 새로운 SATA ThinkStation SATA RAID BIOS 구성 SATA RAID...
(Korean) User guide
Page 29
... 레벨(RAID 0, RAID 1 또는 RAID 5 Enter 8. Stripe size 9. Next Enter 6. Array name 제 6 RAID 구성 23 Marvell BIOS Setup RAID Config Enter RAID Config 3. RAID Config Create array 4 Enter 5. SAS RAID Marvell SAS Marvell SAS Marvell SAS ThinkStation 2 SAS Marvell SAS 3 Ctrl+M을 눌러 Marvell BIOS Setup SAS RAID SAS RAID 0, 1 또는...
... 레벨(RAID 0, RAID 1 또는 RAID 5 Enter 8. Stripe size 9. Next Enter 6. Array name 제 6 RAID 구성 23 Marvell BIOS Setup RAID Config Enter RAID Config 3. RAID Config Create array 4 Enter 5. SAS RAID Marvell SAS Marvell SAS Marvell SAS ThinkStation 2 SAS Marvell SAS 3 Ctrl+M을 눌러 Marvell BIOS Setup SAS RAID SAS RAID 0, 1 또는...
(Korean) User guide
Page 30
... Enter 6 Y Marvell BIOS Setup Marvell BIOS Setup 1 Ctrl+M을 눌러 Marvell BIOS Setup 2. Marvell BIOS Setup RAID Config Enter RAID Config 3. RAID Config Spare Management 4 5 Next Enter 6 Y Marvell BIOS Setup Marvell BIOS Setup 1 Ctrl+M을 눌러 Marvell BIOS Setup 2. Next Enter Y RAID Marvell BIOS Setup Marvell BIOS Setup 1 Ctrl+M을 눌러 Marvell BIOS Setup 2. RAID Config Delete array 4 Enter 5 Next Enter 6 Y 24 ThinkStation Marvell BIOS...
... Enter 6 Y Marvell BIOS Setup Marvell BIOS Setup 1 Ctrl+M을 눌러 Marvell BIOS Setup 2. Marvell BIOS Setup RAID Config Enter RAID Config 3. RAID Config Spare Management 4 5 Next Enter 6 Y Marvell BIOS Setup Marvell BIOS Setup 1 Ctrl+M을 눌러 Marvell BIOS Setup 2. Next Enter Y RAID Marvell BIOS Setup Marvell BIOS Setup 1 Ctrl+M을 눌러 Marvell BIOS Setup 2. RAID Config Delete array 4 Enter 5 Next Enter 6 Y 24 ThinkStation Marvell BIOS...

(Korean) User guide
Page 31
제 7 POST/BIOS POST/BIOS POST, BIOS 및 Setup Utility POST BIOS Setup Utility 5 장"Setup Utility 사용" 17 EEPROM(Electrically Erasable Programmable Read-Only Memory POST, BIOS 및 Setup Utility Lenovo는 POST 및 BIOS Lenovo http://www.lenovo.com POST/BIOS TXT CD/DVD 이미지(ISO http://www.lenovo.com BIOS BIOS http://support.lenovo.com BIOS 1 19 2 3 4 N Y Enter 5 N Y Enter 6 © Copyright Lenovo 2009, 2011 25
제 7 POST/BIOS POST/BIOS POST, BIOS 및 Setup Utility POST BIOS Setup Utility 5 장"Setup Utility 사용" 17 EEPROM(Electrically Erasable Programmable Read-Only Memory POST, BIOS 및 Setup Utility Lenovo는 POST 및 BIOS Lenovo http://www.lenovo.com POST/BIOS TXT CD/DVD 이미지(ISO http://www.lenovo.com BIOS BIOS http://support.lenovo.com BIOS 1 19 2 3 4 N Y Enter 5 N Y Enter 6 © Copyright Lenovo 2009, 2011 25

(Greek) User guide
Page 30
Exit Enter. 24 ThinkStation 1 F1 BIOS Setup Utility 19. 2 Devices ➙ IDE Drives Setup Enter. 3 SATA RAID Enable Enter. 4 Enabled Enter. 5 F10 RAID Configuration Utility) του Intel Matrix Storage Manager Option ROM RAID (RAID volumes). 1 Ctrl+I Intel Matrix Storage Manager Option ROM. 2 Delete RAID Volume RAID Enter. 3 RAID Delete. 4 Y RAID RAID RAID RAID. 5 RAID 2 RAID. RAID...
Exit Enter. 24 ThinkStation 1 F1 BIOS Setup Utility 19. 2 Devices ➙ IDE Drives Setup Enter. 3 SATA RAID Enable Enter. 4 Enabled Enter. 5 F10 RAID Configuration Utility) του Intel Matrix Storage Manager Option ROM RAID (RAID volumes). 1 Ctrl+I Intel Matrix Storage Manager Option ROM. 2 Delete RAID Volume RAID Enter. 3 RAID Delete. 4 Y RAID RAID RAID RAID. 5 RAID 2 RAID. RAID...
(Greek) User guide
Page 33
2 Marvell BIOS Setup RAID Config RAID Enter RAID Config. 3 RAID Config Spare Management 4 5 Next Enter. 6 Y Marvell BIOS Setup array Marvell BIOS Setup: 1 Ctrl+M Marvell BIOS Setup. 2 Marvell BIOS Setup RAID Config RAID Enter RAID Config. 3 RAID Config Delete array 4 Enter 5 Next Enter. 6 Y 6 RAID 27
2 Marvell BIOS Setup RAID Config RAID Enter RAID Config. 3 RAID Config Spare Management 4 5 Next Enter. 6 Y Marvell BIOS Setup array Marvell BIOS Setup: 1 Ctrl+M Marvell BIOS Setup. 2 Marvell BIOS Setup RAID Config RAID Enter RAID Config. 3 RAID Config Delete array 4 Enter 5 Next Enter. 6 Y 6 RAID 27


