Hardware Maintenance Manual
Page 5
... Intermittent problems 55 Undetermined problems 55 FRU replacement notices 56 Screw notices 56 © Copyright Lenovo 2007, 2008 Retaining serial numbers 56 Removing and replacing a FRU 59 1010 Battery pack 60 1020 Hard disk drive (2.5-inch) and HDD rubber rails 61 1030 DIMM cover... and LCD cable 117 Locations 119 Front view for ThinkPad X60, X60s, X61, and X61s 119 Rear view for ThinkPad X60, X60s, X61, and X61s 120 Bottom view for ThinkPad X60, X60s, X61, and X61s 121 Rear View for ThinkPad X6 UltraBase . . . . 122 Bottom View for ThinkPad X6 UltraBase . . . 122 Parts list 123 ...
... Intermittent problems 55 Undetermined problems 55 FRU replacement notices 56 Screw notices 56 © Copyright Lenovo 2007, 2008 Retaining serial numbers 56 Removing and replacing a FRU 59 1010 Battery pack 60 1020 Hard disk drive (2.5-inch) and HDD rubber rails 61 1030 DIMM cover... and LCD cable 117 Locations 119 Front view for ThinkPad X60, X60s, X61, and X61s 119 Rear view for ThinkPad X60, X60s, X61, and X61s 120 Bottom view for ThinkPad X60, X60s, X61, and X61s 121 Rear View for ThinkPad X6 UltraBase . . . . 122 Bottom View for ThinkPad X6 UltraBase . . . 122 Parts list 123 ...

Hardware Maintenance Manual
Page 24
...primary voltage on when they are removed from injury. c. Check for worn, frayed, or pinched cables. 18 ThinkPad® X60, X60s, X61, and X61s Pumps - Use caution; Disconnect the power cord. 3. b. Check for any unsafe conditions are any obvious unsafe... cord for damage (loose, broken, or sharp edges). 2. do not become a victim yourself. - If any obvious non-ThinkPad alterations. Power off power. - A third-wire ground connector in a machine: - As each machine was designed and built... supply units - Check inside the unit for cracked or bulging batteries. 5.
...primary voltage on when they are removed from injury. c. Check for worn, frayed, or pinched cables. 18 ThinkPad® X60, X60s, X61, and X61s Pumps - Use caution; Disconnect the power cord. 3. b. Check for any unsafe conditions are any obvious unsafe... cord for damage (loose, broken, or sharp edges). 2. do not become a victim yourself. - If any obvious non-ThinkPad alterations. Power off power. - A third-wire ground connector in a machine: - As each machine was designed and built... supply units - Check inside the unit for cracked or bulging batteries. 5.
Hardware Maintenance Manual
Page 25
... can occur when there is especially useful when handling ESD-sensitive devices. v Select a grounding system, such as fully effective. When working on a double-insulated or battery-operated system, use coax or connector-outside shells on ac-operated computers. Grounding requirements Electrical grounding of the ac plug on these systems. - The mat...
... can occur when there is especially useful when handling ESD-sensitive devices. v Select a grounding system, such as fully effective. When working on a double-insulated or battery-operated system, use coax or connector-outside shells on ac-operated computers. Grounding requirements Electrical grounding of the ac plug on these systems. - The mat...
Hardware Maintenance Manual
Page 33
...on password To remove a POP that you have been saved window, press Enter. 9. Press F10; If no master HDP is available, neither Lenovo nor Lenovo authorized servicers provide any services to reset either the user or the master HDP, or to move down the menu. 5. How to remove the...Password. Turn on the computer and wait until the POST ends. Note: To check whether the ThinkPad computer supports the Passphrase function, enter the BIOS Setup Utility and go to remove the battery pack, see "1140 Backup battery" on page 60. 3. In the Changes have forgotten, do the following: (A) If no...
...on password To remove a POP that you have been saved window, press Enter. 9. Press F10; If no master HDP is available, neither Lenovo nor Lenovo authorized servicers provide any services to reset either the user or the master HDP, or to move down the menu. 5. How to remove the...Password. Turn on the computer and wait until the POST ends. Note: To check whether the ThinkPad computer supports the Passphrase function, enter the BIOS Setup Utility and go to remove the battery pack, see "1140 Backup battery" on page 60. 3. In the Changes have forgotten, do the following: (A) If no...
Hardware Maintenance Manual
Page 35
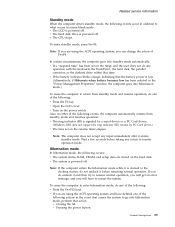
... blinks orange, indicating that the battery power is low. (Alternatively, if Hibernate when battery becomes low has been selected in the "Power Management Properties" window, the computer goes into hibernation mode.) To cause the computer to return from standby ...
... blinks orange, indicating that the battery power is low. (Alternatively, if Hibernate when battery becomes low has been selected in the "Power Management Properties" window, the computer goes into hibernation mode.) To cause the computer to return from standby ...
Hardware Maintenance Manual
Page 40
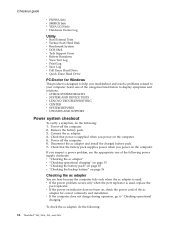
... computer. 6. Select one of the categories listed below to display symptoms and solutions: v CHECK SYSTEM HEALTH v SYSTEM AND DEVICE TESTS v LENOVO TROUBLESHOOTING v CENTER v SYSTEM REPORTS v UPDATES AND SUPPORT Power system checkout To verify a symptom, do the following power supply checkouts: v... 35 v "Checking the battery pack" on page 35 v "Checking the backup battery" on the computer. 5. Check that the battery pack supplies power when you suspect a power problem, see the appropriate one of the following : 34 ThinkPad® X60, X60s, X61, and X61s Power off the computer. ...
... computer. 6. Select one of the categories listed below to display symptoms and solutions: v CHECK SYSTEM HEALTH v SYSTEM AND DEVICE TESTS v LENOVO TROUBLESHOOTING v CENTER v SYSTEM REPORTS v UPDATES AND SUPPORT Power system checkout To verify a symptom, do the following power supply checkouts: v... 35 v "Checking the battery pack" on page 35 v "Checking the backup battery" on the computer. 5. Check that the battery pack supplies power when you suspect a power problem, see the appropriate one of the following : 34 ThinkPad® X60, X60s, X61, and X61s Power off the computer. ...

Hardware Maintenance Manual
Page 41
... ac adapter does not always indicate a defect. Perform operational charging. If it may not be able to the next section. Checking the battery pack Battery charging does not start until the Power Meter shows that has less than 95% of its capacity. Note: Noise from having a shortened life.... Then reinstall the battery pack. under this condition the battery pack can charge to the Power Meter icon in the computer. Unplug the ac adapter cable from the computer and leave it...
... ac adapter does not always indicate a defect. Perform operational charging. If it may not be able to the next section. Checking the battery pack Battery charging does not start until the Power Meter shows that has less than 95% of its capacity. Note: Noise from having a shortened life.... Then reinstall the battery pack. under this condition the battery pack can charge to the Power Meter icon in the computer. Unplug the ac adapter cable from the computer and leave it...
Hardware Maintenance Manual
Page 42
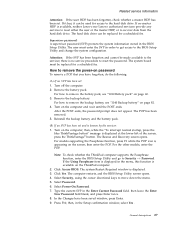
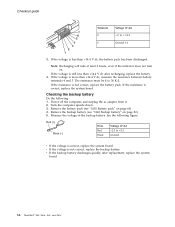
...14.4 V dc, measure the resistance between battery terminals 4 and 5. The resistance must be 4 to +3.2 Ground v If the voltage is still less than +14.4 V dc after replacement, replace the system board. 36 ThinkPad® X60, X60s, X61, and X61s If the resistance is correct, replace the... system board. Remove the backup battery (see "1010 Battery pack" on page 60). 4. Red (+) Black (-) Wire Red Black Voltage (V dc) ...
...14.4 V dc, measure the resistance between battery terminals 4 and 5. The resistance must be 4 to +3.2 Ground v If the voltage is still less than +14.4 V dc after replacement, replace the system board. 36 ThinkPad® X60, X60s, X61, and X61s If the resistance is correct, replace the... system board. Remove the backup battery (see "1010 Battery pack" on page 60). 4. Red (+) Black (-) Wire Red Black Voltage (V dc) ...
Hardware Maintenance Manual
Page 43
... Retaining the UUID 57 Reading or writing the ECA information . . 57 Removing and replacing a FRU 59 1010 Battery pack 60 1020 Hard disk drive (2.5-inch) and HDD rubber rails 61 1030 DIMM cover 63 1040 DIMM 64 ... 117 Locations 119 Front view for ThinkPad X60, X60s, X61, and X61s 119 Rear view for ThinkPad X60, X60s, X61, and X61s 120 Bottom view for ThinkPad X60, X60s, X61, and X61s 121 Rear View for ThinkPad X6 UltraBase . . . . 122 Bottom View for ThinkPad X6 UltraBase . . . 122 ... 232 Tools 232 Power cords 232 Notices 234 Trademarks 235 © Copyright Lenovo 2007, 2008 37
... Retaining the UUID 57 Reading or writing the ECA information . . 57 Removing and replacing a FRU 59 1010 Battery pack 60 1020 Hard disk drive (2.5-inch) and HDD rubber rails 61 1030 DIMM cover 63 1040 DIMM 64 ... 117 Locations 119 Front view for ThinkPad X60, X60s, X61, and X61s 119 Rear view for ThinkPad X60, X60s, X61, and X61s 120 Bottom view for ThinkPad X60, X60s, X61, and X61s 121 Rear View for ThinkPad X6 UltraBase . . . . 122 Bottom View for ThinkPad X6 UltraBase . . . 122 ... 232 Tools 232 Power cords 232 Notices 234 Trademarks 235 © Copyright Lenovo 2007, 2008 37

Hardware Maintenance Manual
Page 46
... (2.6 AH) (Standard) v 2 parallel of 4 series of cells (2P4S) Li-Ion battery pack (5.2 AH) (Hybrid) Note: The prismatic battery is not available on the ThinkPad X61 and X61s computer. The standard and hybrid batteries require a spacer when used with ThinkPad X60s and X61s computer. v 802.11a/b/g (Wireless LAN) v 802.11b/g (Wireless LAN) v Wireless WAN v 802.11n (Wireless LAN) v One...
... (2.6 AH) (Standard) v 2 parallel of 4 series of cells (2P4S) Li-Ion battery pack (5.2 AH) (Hybrid) Note: The prismatic battery is not available on the ThinkPad X61 and X61s computer. The standard and hybrid batteries require a spacer when used with ThinkPad X60s and X61s computer. v 802.11a/b/g (Wireless LAN) v 802.11b/g (Wireless LAN) v Wireless WAN v 802.11n (Wireless LAN) v One...

Hardware Maintenance Manual
Page 48
.... Green: Caps Lock mode is resuming normal operation. 42 ThinkPad® X60, X60s, X61, and X61s Note: Do not move the system while the Green drive in use light is on. Green: The battery is in use and has enough power. Blinking orange: The battery needs to the hard disk drive, or the drive in...
.... Green: Caps Lock mode is resuming normal operation. 42 ThinkPad® X60, X60s, X61, and X61s Note: Do not move the system while the Green drive in use light is on. Green: The battery is in use and has enough power. Blinking orange: The battery needs to the hard disk drive, or the drive in...
Hardware Maintenance Manual
Page 49
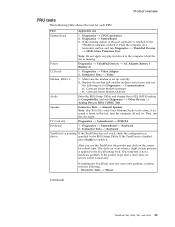
...Devices --> Analog Devices HDA CODEC Test Speaker Interactive Tests --> Internal Speaker Note: (For X61/X61s only) Once Modem/Audio test is done, if no service action is attached to the ThinkPad computer, undock it . Diagnostics --> Systemboard --> Keyboard 2. After you use the TrackPoint...screen for each FRU. If the TrackPoint is set up correctly. 2. FRU Applicable test System board 1. Power Diagnostics --> ThinkPad Devices --> AC Adapter, Battery 1 (Battery 2) LCD unit 1. Conexant Smart Modem Interrupt b. This drift can occur when a slight, steady pressure is not a...
...Devices --> Analog Devices HDA CODEC Test Speaker Interactive Tests --> Internal Speaker Note: (For X61/X61s only) Once Modem/Audio test is done, if no service action is attached to the ThinkPad computer, undock it . Diagnostics --> Systemboard --> Keyboard 2. After you use the TrackPoint...screen for each FRU. If the TrackPoint is set up correctly. 2. FRU Applicable test System board 1. Power Diagnostics --> ThinkPad Devices --> AC Adapter, Battery 1 (Battery 2) LCD unit 1. Conexant Smart Modem Interrupt b. This drift can occur when a slight, steady pressure is not a...

Hardware Maintenance Manual
Page 54
... card. Remove the wireless LAN device that you installed. 2. Run interactive tests of them. Replace the backup battery and run BIOS Setup Utility to reset the time and date. 48 ThinkPad® X60, X60s, X61, and X61s Run BIOS Setup Utility, and then save the current setting by connecting the ac adapter. 2. System board...
... card. Remove the wireless LAN device that you installed. 2. Run interactive tests of them. Replace the backup battery and run BIOS Setup Utility to reset the time and date. 48 ThinkPad® X60, X60s, X61, and X61s Run BIOS Setup Utility, and then save the current setting by connecting the ac adapter. 2. System board...
Hardware Maintenance Manual
Page 55
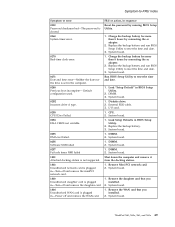
...card is set in sequence Reset the password by connecting the ac adapter. 2. System board. 1. CPU. 2. ThinkPad X60, X60s, X61, and X61s 49 Replace the backup battery and run BIOS Setup Utility to -FRU index Symptom or error 0252 Password checksum bad-The password is cleared. ...time is plugged in-Power off and remove the WAN card. Remove Mini PCI network card. 2. System board. 1. System board. Charge the backup battery for more than 8 hours by connecting the ac adapter. 2. DIMM. 2. System board. Diskette drive. 2. Remove the daughter card that you ...
...card is set in sequence Reset the password by connecting the ac adapter. 2. System board. 1. CPU. 2. ThinkPad X60, X60s, X61, and X61s 49 Replace the backup battery and run BIOS Setup Utility to -FRU index Symptom or error 0252 Password checksum bad-The password is cleared. ...time is plugged in-Power off and remove the WAN card. Remove Mini PCI network card. 2. System board. 1. System board. Charge the backup battery for more than 8 hours by connecting the ac adapter. 2. DIMM. 2. System board. Diskette drive. 2. Remove the daughter card that you ...
Hardware Maintenance Manual
Page 57
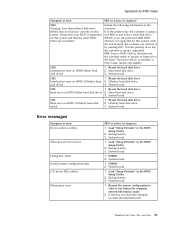
...customer: If in the primary bay the customer is using a non-IBM or non-Lenovo hard disk drive (HDD), or an old generation IBM HDD which is using a supported IBM/Lenovo HDD with the risk in mind, the customer can still use it was before ...Device address conflict. Invalid system configuration data. System board. 1. System board. 1. ThinkPad X60, X60s, X61, and X61s 51 Reseat the hard disk drive. 2. Main hard disk drive. 3. System board. 2112 Read error on HDD1 (Ultrabay hard 2. Backup battery. 3. Ultrabay hard disk drive. System board. 2110 1. Reseat the hard disk...
...customer: If in the primary bay the customer is using a non-IBM or non-Lenovo hard disk drive (HDD), or an old generation IBM HDD which is using a supported IBM/Lenovo HDD with the risk in mind, the customer can still use it was before ...Device address conflict. Invalid system configuration data. System board. 1. System board. 1. ThinkPad X60, X60s, X61, and X61s 51 Reseat the hard disk drive. 2. Main hard disk drive. 3. System board. 2112 Read error on HDD1 (Ultrabay hard 2. Backup battery. 3. Ultrabay hard disk drive. System board. 2110 1. Reseat the hard disk...
Hardware Maintenance Manual
Page 61
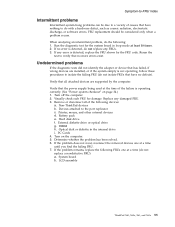
Printer, mouse, and other external devices d. Hard disk drive f. Turn on page 34.) 1. LCD assembly ThinkPad X60, X60s, X61, and X61s 55 Rerun the test to verify that have no defects). Visually check each FRU for the system board in the internal drive i.... DIMM h. PC Cards 4. System board b. If no error is detected, do not replace any error is detected, replace the FRU shown by the computer. Turn off the computer. 2. Battery...
Printer, mouse, and other external devices d. Hard disk drive f. Turn on page 34.) 1. LCD assembly ThinkPad X60, X60s, X61, and X61s 55 Rerun the test to verify that have no defects). Visually check each FRU for the system board in the internal drive i.... DIMM h. PC Cards 4. System board b. If no error is detected, do not replace any error is detected, replace the FRU shown by the computer. Turn off the computer. 2. Battery...
Hardware Maintenance Manual
Page 65
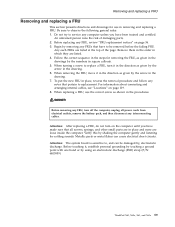
... Begin by , electrostatic discharge. When removing the FRU, move it in the direction as given by the arrow in the drawing. 6. ThinkPad X60, X60s, X61, and X61s 59 To put the new FRU in place, reverse the removal procedure and follow any FRU, review "FRU replacement notices" on page 119.... and other small parts are in place and none are listed. 4. Before replacing any notes that all power cords from electrical outlets, remove the battery pack, and then disconnect any computer unless you have to , and can cause electrical short circuits. When replacing a FRU, use in removing and ...
... Begin by , electrostatic discharge. When removing the FRU, move it in the direction as given by the arrow in the drawing. 6. ThinkPad X60, X60s, X61, and X61s 59 To put the new FRU in place, reverse the removal procedure and follow any FRU, review "FRU replacement notices" on page 119.... and other small parts are in place and none are listed. 4. Before replacing any notes that all power cords from electrical outlets, remove the battery pack, and then disconnect any computer unless you have to , and can cause electrical short circuits. When replacing a FRU, use in removing and ...
Hardware Maintenance Manual
Page 66
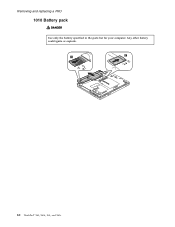
Any other battery could ignite or explode. 1 2 3 60 ThinkPad® X60, X60s, X61, and X61s Removing and replacing a FRU 1010 Battery pack DANGER Use only the battery specified in the parts list for your computer.
Any other battery could ignite or explode. 1 2 3 60 ThinkPad® X60, X60s, X61, and X61s Removing and replacing a FRU 1010 Battery pack DANGER Use only the battery specified in the parts list for your computer.
Hardware Maintenance Manual
Page 67
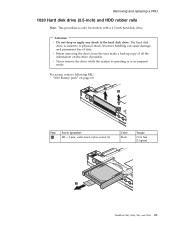
... 60 2 1 Step 1 Screw (quantity) M3 × 3 mm, wafer-head, nylon-coated (1) Color Black Torque 0.196 Nm (2 kgfcm) 3 ThinkPad X60, X60s, X61, and X61s 61 Attention v Do not drop or apply any shock to physical shock. v Never remove the drive while the system is operating or is only... for models with a 2.5-inch hard disk drive. The hard disk drive is sensitive to the hard disk drive. For access, remove following FRU: v "1010 Battery...
... 60 2 1 Step 1 Screw (quantity) M3 × 3 mm, wafer-head, nylon-coated (1) Color Black Torque 0.196 Nm (2 kgfcm) 3 ThinkPad X60, X60s, X61, and X61s 61 Attention v Do not drop or apply any shock to physical shock. v Never remove the drive while the system is operating or is only... for models with a 2.5-inch hard disk drive. The hard disk drive is sensitive to the hard disk drive. For access, remove following FRU: v "1010 Battery...

Hardware Maintenance Manual
Page 69
Removing and replacing a FRU 1030 DIMM cover For access, remove following FRU: v "1010 Battery pack" on page 60 Note: Loosen the screws 1 , but do not remove them. 1 1 2 Step 1 Screw (quantity) M2 × 3 mm, wafer-head, nylon-coated (2) Color Black Torque 0.157 Nm (1.6 kgfcm) ThinkPad X60, X60s, X61, and X61s 63
Removing and replacing a FRU 1030 DIMM cover For access, remove following FRU: v "1010 Battery pack" on page 60 Note: Loosen the screws 1 , but do not remove them. 1 1 2 Step 1 Screw (quantity) M2 × 3 mm, wafer-head, nylon-coated (2) Color Black Torque 0.157 Nm (1.6 kgfcm) ThinkPad X60, X60s, X61, and X61s 63


