
Hardware Maintenance Manual
Page 1
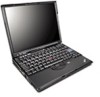
ThinkPad® X60, X60s, X61, and X61s Hardware Maintenance Manual This manual supports: ThinkPad X60 (MT 1706, 1707, 1708, 1709, 2509, and 2510) ThinkPad X60s (MT 1702, 1703, 1704, 1705, 2507, 2508, 2533, and 2534) ThinkPad X61 (MT 7673, 7674, 7675, 7676, 7678, and 7679) ThinkPad X61s (MT 7666, 7667, 7668, 7669, 7670, and 7671)
ThinkPad® X60, X60s, X61, and X61s Hardware Maintenance Manual This manual supports: ThinkPad X60 (MT 1706, 1707, 1708, 1709, 2509, and 2510) ThinkPad X60s (MT 1702, 1703, 1704, 1705, 2507, 2508, 2533, and 2534) ThinkPad X61 (MT 7673, 7674, 7675, 7676, 7678, and 7679) ThinkPad X61s (MT 7666, 7667, 7668, 7669, 7670, and 7671)
Hardware Maintenance Manual
Page 3
ThinkPad® X60, X60s, X61, and X61s Hardware Maintenance Manual
ThinkPad® X60, X60s, X61, and X61s Hardware Maintenance Manual
Hardware Maintenance Manual
Page 5
Contents About this manual 1 Introduction 3 Important service ...X61, and X61s . . 41 FRU tests 43 Fn key combinations 45 Symptom-to-FRU index 47 Numeric error codes 47 Error messages 51 Beep symptoms 53 No-beep symptoms 53 LCD-related symptoms 54 Intermittent problems 55 Undetermined problems 55 FRU replacement notices 56 Screw notices 56 © Copyright Lenovo...ThinkPad X60, X60s, X61, and X61s 119 Rear view for ThinkPad X60, X60s, X61, and X61s 120 Bottom view for ThinkPad X60, X60s, X61, and X61s 121 Rear View for ThinkPad X6 UltraBase . . . . 122 Bottom View for ThinkPad...
Contents About this manual 1 Introduction 3 Important service ...X61, and X61s . . 41 FRU tests 43 Fn key combinations 45 Symptom-to-FRU index 47 Numeric error codes 47 Error messages 51 Beep symptoms 53 No-beep symptoms 53 LCD-related symptoms 54 Intermittent problems 55 Undetermined problems 55 FRU replacement notices 56 Screw notices 56 © Copyright Lenovo...ThinkPad X60, X60s, X61, and X61s 119 Rear view for ThinkPad X60, X60s, X61, and X61s 120 Bottom view for ThinkPad X60, X60s, X61, and X61s 121 Rear View for ThinkPad X6 UltraBase . . . . 122 Bottom View for ThinkPad...
Hardware Maintenance Manual
Page 7
..." on page 8, "Safety information" on page 16, and "Laser compliance statement" on page 20. © Copyright Lenovo 2007, 2008 1 Important This manual is divided into sections as follows: v The common sections provide general information, guidelines, and safety information required in servicing ...servicing a ThinkPad product, be sure to troubleshoot problems. The manual is intended for ThinkPad X60 (MT 1706, 1707, 1708, 1709, 2509, and 2510), ThinkPad X60s (MT 1702, 1703, 1704, 1705, 2507, 2508, 2533, and 2534), ThinkPad X61 (MT 7673, 7674, 7675, 7676, 7678, and 7679), and ThinkPad X61s (MT...
..." on page 8, "Safety information" on page 16, and "Laser compliance statement" on page 20. © Copyright Lenovo 2007, 2008 1 Important This manual is divided into sections as follows: v The common sections provide general information, guidelines, and safety information required in servicing ...servicing a ThinkPad product, be sure to troubleshoot problems. The manual is intended for ThinkPad X60 (MT 1706, 1707, 1708, 1709, 2509, and 2510), ThinkPad X60s (MT 1702, 1703, 1704, 1705, 2507, 2508, 2533, and 2534), ThinkPad X61 (MT 7673, 7674, 7675, 7676, 7678, and 7679), and ThinkPad X61s (MT...
Hardware Maintenance Manual
Page 9
...see if the symptoms change. Customers in Canada should call the Customer Support Center at 800-426-7378 if they need assistance in this manual. Go to replace either the processor board or the system board, and replacing one of them does not correct the problem, reinstall ...that changed the symptoms. © Copyright Lenovo 2007, 2008 3 Select Downloads and drivers. 4. v Some computers have both a processor board and a system board. If you are instructed to replace a...
...see if the symptoms change. Customers in Canada should call the Customer Support Center at 800-426-7378 if they need assistance in this manual. Go to replace either the processor board or the system board, and replacing one of them does not correct the problem, reinstall ...that changed the symptoms. © Copyright Lenovo 2007, 2008 3 Select Downloads and drivers. 4. v Some computers have both a processor board and a system board. If you are instructed to replace a...
Hardware Maintenance Manual
Page 14
... in place and are provided in this section. Las piezas metálicas pueden causar cortocircuitos eléctricos. 8 ThinkPad® X60, X60s, X61, and X61s Safety notices Safety notices: multilingual translations In this manual, safety notices appear in English with a page number reference to the appropriate multilingual, translated safety notice found in English...
... in place and are provided in this section. Las piezas metálicas pueden causar cortocircuitos eléctricos. 8 ThinkPad® X60, X60s, X61, and X61s Safety notices Safety notices: multilingual translations In this manual, safety notices appear in English with a page number reference to the appropriate multilingual, translated safety notice found in English...
Hardware Maintenance Manual
Page 53
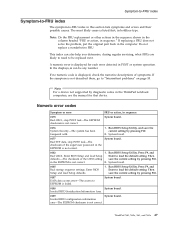
... been tampered with. 1. Then defaults.-The checksum of the supervisor password in the ThinkPad notebook computers, see the manual for each error detected in POST or system operation. Press F9, and Enter to be any number. ThinkPad X60, X60s, X61, and X61s 47 Run BIOS Setup Utility, and save the current setting by pressing F10...
... been tampered with. 1. Then defaults.-The checksum of the supervisor password in the ThinkPad notebook computers, see the manual for each error detected in POST or system operation. Press F9, and Enter to be any number. ThinkPad X60, X60s, X61, and X61s 47 Run BIOS Setup Utility, and save the current setting by pressing F10...
Hardware Maintenance Manual
Page 71
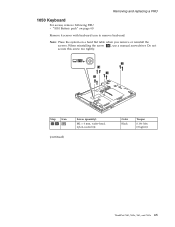
When reinstalling the screw 1a , use a manual screwdriver. Do not secure this screw too tightly. 1 1a 1 1 Step Icon 1 1a (continued) Screw (quantity) M2 × 6 mm, wafer-head, nylon-coated (4) Color Black Torque 0.196 Nm (2 kgfcm) ThinkPad X60, X60s, X61, and X61s 65 Removing and replacing a FRU 1050 Keyboard For access, remove following FRU: v "1010 Battery pack" on a hard flat table when you remove or reinstall the screws. Note: Place the system on page 60 Remove 4 screws with keyboard icon to remove keyboard.
When reinstalling the screw 1a , use a manual screwdriver. Do not secure this screw too tightly. 1 1a 1 1 Step Icon 1 1a (continued) Screw (quantity) M2 × 6 mm, wafer-head, nylon-coated (4) Color Black Torque 0.196 Nm (2 kgfcm) ThinkPad X60, X60s, X61, and X61s 65 Removing and replacing a FRU 1050 Keyboard For access, remove following FRU: v "1010 Battery pack" on a hard flat table when you remove or reinstall the screws. Note: Place the system on page 60 Remove 4 screws with keyboard icon to remove keyboard.
(English) Rescue and Recovery 4.3 Deployment Guide
Page 5
...BitLocker 13 Chapter 3. Performing a Bare Metal Restore from an Admin Backup 58 Scenario 7 - Notices 85 Trademarks 86 © Copyright Lenovo 2008, 2009 iii Overview 1 Predesktop Area 1 Windows environment 2 Rejuvenating 2 Hints and Tips 3 Chapter 2. Contents Preface v Chapter... and Recovery program in the Windows environment 26 Working with the Predesktop Area 29 Working with WIM files and Windows 7 56 Scenario 4 - Manually creating the Service Partition of S drive 58 Appendix A. Standalone install for hard drive setup: Option 2 . . 55 Scenario 3 - Administrative...
...BitLocker 13 Chapter 3. Performing a Bare Metal Restore from an Admin Backup 58 Scenario 7 - Notices 85 Trademarks 86 © Copyright Lenovo 2008, 2009 iii Overview 1 Predesktop Area 1 Windows environment 2 Rejuvenating 2 Hints and Tips 3 Chapter 2. Contents Preface v Chapter... and Recovery program in the Windows environment 26 Working with the Predesktop Area 29 Working with WIM files and Windows 7 56 Scenario 4 - Manually creating the Service Partition of S drive 58 Appendix A. Standalone install for hard drive setup: Option 2 . . 55 Scenario 3 - Administrative...
(English) Rescue and Recovery 4.3 Deployment Guide
Page 26
... the settings with manifest files. Manifest files have to create personalization files. The Base Software Administrator program can use the Base Software Administrator program to manually validate the Time Zone settings. In addition, manifest files contain meta-data, such as applications, device drivers, and the operating system. The full factory recovery...
... the settings with manifest files. Manifest files have to create personalization files. The Base Software Administrator program can use the Base Software Administrator program to manually validate the Time Zone settings. In addition, manifest files contain meta-data, such as applications, device drivers, and the operating system. The full factory recovery...
(English) Rescue and Recovery 4.3 Deployment Guide
Page 37
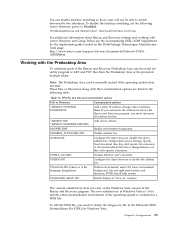
...the Opera browser or disable the address bar. Note: The Predesktop Area can disable interface switching so that a user will not be manually started if the operating system does not start. To disable the interface switching, set the following table: Table 14. The \minint subdirectory... does not exist on the ThinkVantage Technologies Administrator Tools page: http://www.lenovo.com/support/site.wss/document.do?lndocid=TVANADMIN#rnr Working with the Predesktop Area To customize parts of the operating system is the...
...the Opera browser or disable the address bar. Note: The Predesktop Area can disable interface switching so that a user will not be manually started if the operating system does not start. To disable the interface switching, set the following table: Table 14. The \minint subdirectory... does not exist on the ThinkVantage Technologies Administrator Tools page: http://www.lenovo.com/support/site.wss/document.do?lndocid=TVANADMIN#rnr Working with the Predesktop Area To customize parts of the operating system is the...

(English) Rescue and Recovery 4.3 Deployment Guide
Page 44
... are compatible and tested with the Rescue and Recovery environment: v Courier v Times New Roman v Comic Sans MS Other fonts might be compatible, but have to manually apply some configuration applications or settings as registry updates. 6. The preceding instructions apply to any device driver that is displayed. With the limitation of the...
... are compatible and tested with the Rescue and Recovery environment: v Courier v Times New Roman v Comic Sans MS Other fonts might be compatible, but have to manually apply some configuration applications or settings as registry updates. 6. The preceding instructions apply to any device driver that is displayed. With the limitation of the...

(English) Rescue and Recovery 4.3 Deployment Guide
Page 59
... will erase the entire contents of the InstallShield executable to the directory c:\SWTOOLS for an :: administrative installation. © Copyright Lenovo 2008, 2009 51 Build your donor system as second hard disk drives, USB hard disk drives, USB memory keys and PC..."Scenario 6 - Install the operating system and applications. Remove all storage devices, such as though you will find the following command: CLEANDRV /HDD=0 4. Manually creating the Service Partition of your enterprise. Boot the diskette (only one -half. 1. Chapter 4. New rollouts" v "Scenario 2 - After running, ...
... will erase the entire contents of the InstallShield executable to the directory c:\SWTOOLS for an :: administrative installation. © Copyright Lenovo 2008, 2009 51 Build your donor system as second hard disk drives, USB hard disk drives, USB memory keys and PC..."Scenario 6 - Install the operating system and applications. Remove all storage devices, such as though you will find the following command: CLEANDRV /HDD=0 4. Manually creating the Service Partition of your enterprise. Boot the diskette (only one -half. 1. Chapter 4. New rollouts" v "Scenario 2 - After running, ...

(English) Rescue and Recovery 4.3 Deployment Guide
Page 66
... the system by using the following restoring process. Diskpart>sel par 1 5. This can be run and make sure reporting is captured. Manually creating the Service Partition of S drive To manually create the Service Partition (SP) of the name parameter to create backups to take backups, delete backups, schedule options, and password restrictions...
... the system by using the following restoring process. Diskpart>sel par 1 5. This can be run and make sure reporting is captured. Manually creating the Service Partition of S drive To manually create the Service Partition (SP) of the name parameter to create backups to take backups, delete backups, schedule options, and password restrictions...
(English) Rescue and Recovery 4.3 Deployment Guide
Page 74
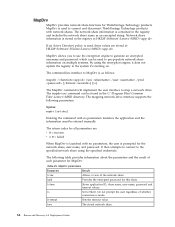
... [/s] The MapDrv command will implement the user interface to map a network drive. Network share information is contained in the registry at : HKLM\Software\Policies\Lenovo\MND\. If an Active Directory policy is used, these values are : v 0 = success v > 0 = failed When MapDrv is launched with no...the encryption engine, it 's running on. The mapdrv.exe command can be entered manually. Do not prompt the user regardless of each parameter for all parameters are stored at HKLM\Software\Lenovo\MND\. The following parameters: Syntax: mapdrv [switches] Entering the command with no...
... [/s] The MapDrv command will implement the user interface to map a network drive. Network share information is contained in the registry at : HKLM\Software\Policies\Lenovo\MND\. If an Active Directory policy is used, these values are : v 0 = success v > 0 = failed When MapDrv is launched with no...the encryption engine, it 's running on. The mapdrv.exe command can be entered manually. Do not prompt the user regardless of each parameter for all parameters are stored at HKLM\Software\Lenovo\MND\. The following parameters: Syntax: mapdrv [switches] Entering the command with no...

(English) Rescue and Recovery 4.3 Deployment Guide
Page 85
... from the failed backup. 2. Administrative tools 77 Notes: 1. If a service partition backup fails due to insufficient space, manually delete the failed backup before making another backup or attempting to external media, set the following registry key before restoring your system... with the Rescue and Recovery program: HKLM\Software\Lenovo\ Rescue and Recovery\ Settings\Backup\ BackupSPNetwork=1 Enable or disable Backup USB as a selected destination for backup. Default: Disabled. ...
... from the failed backup. 2. Administrative tools 77 Notes: 1. If a service partition backup fails due to insufficient space, manually delete the failed backup before making another backup or attempting to external media, set the following registry key before restoring your system... with the Rescue and Recovery program: HKLM\Software\Lenovo\ Rescue and Recovery\ Settings\Backup\ BackupSPNetwork=1 Enable or disable Backup USB as a selected destination for backup. Default: Disabled. ...

(English) Rescue and Recovery 4.3 Deployment Guide
Page 86
...1. To get the binary value 00010100. Default: 0xFFFFFFFF. Notes: 1. Default: 1. Entering a zero has a meaning similar to insufficient space, manually delete the failed backup before entering a value. Default: available free space. 78 Rescue and Recovery 4.3 Deployment Guide Table 33. \Rescue and ... back them up . A DWORD (double word) is 20. Note: Convert your system with the Rescue and Recovery program: HKLM\Software\Lenovo\ Rescue and Recovery\ Settings\Backup\ BackupSPNetwork=1 Set the partition number for backup. The maximum backup size (in the backup. Valid values:...
...1. To get the binary value 00010100. Default: 0xFFFFFFFF. Notes: 1. Default: 1. Entering a zero has a meaning similar to insufficient space, manually delete the failed backup before entering a value. Default: available free space. 78 Rescue and Recovery 4.3 Deployment Guide Table 33. \Rescue and ... back them up . A DWORD (double word) is 20. Note: Convert your system with the Rescue and Recovery program: HKLM\Software\Lenovo\ Rescue and Recovery\ Settings\Backup\ BackupSPNetwork=1 Set the partition number for backup. The maximum backup size (in the backup. Valid values:...
(English) Rescue and Recovery 4.5 Deployment Guide
Page 3
... Working with the Predesktop Area 25 Working with BitLocker 10 Chapter 3. Working with WIM files and Windows 7 48 Scenario 3 - Manually creating the Service Partition of S drive 50 Appendix A. Administrative tools . . . 53 Command line support 53 AWizard.exe 53 .... 62 Group Policy settings 63 Appendix B. User tasks 75 Windows 7 75 Create rescue media 75 Rescue and Recovery user interface switching . . 75 © Copyright Lenovo 2008, 2011 i Best practices 45 Scenario 1 - Installing with Active Directory and ADM files 49 Corporate Active Directory Rollout . . . . . 49 Scenario 5 ...
... Working with the Predesktop Area 25 Working with BitLocker 10 Chapter 3. Working with WIM files and Windows 7 48 Scenario 3 - Manually creating the Service Partition of S drive 50 Appendix A. Administrative tools . . . 53 Command line support 53 AWizard.exe 53 .... 62 Group Policy settings 63 Appendix B. User tasks 75 Windows 7 75 Create rescue media 75 Rescue and Recovery user interface switching . . 75 © Copyright Lenovo 2008, 2011 i Best practices 45 Scenario 1 - Installing with Active Directory and ADM files 49 Corporate Active Directory Rollout . . . . . 49 Scenario 5 ...
(English) Rescue and Recovery 4.5 Deployment Guide
Page 22
... used to assign the computer name, administrator password and the workgroup or domain of setting that personalization file to a users computer; Manifest files have to manually validate the Time Zone settings. Sets the encrypted administrator password. • Required components are always installed upon recovery, and are not displayed to the end...
... used to assign the computer name, administrator password and the workgroup or domain of setting that personalization file to a users computer; Manifest files have to manually validate the Time Zone settings. Sets the encrypted administrator password. • Required components are always installed upon recovery, and are not displayed to the end...

(English) Rescue and Recovery 4.5 Deployment Guide
Page 31
... will see the accompanying XML/ADM Supplement for the deployment guide located on the ThinkVantage Technologies Administrator Tools page: http://support.lenovo.com/en_US/detail.page?LegacyDocID=TVAN-ADMIN#rnr Working with their customization options are stored in problem determination. You can disable the...following table: Chapter 3. Output from both the Rescue and Recovery environment and operating system - Note: The Predesktop Area can be manually started unless the setting is directed to GET and PUT files from the end user creates the Req 115 Trouble Ticket XML file...
... will see the accompanying XML/ADM Supplement for the deployment guide located on the ThinkVantage Technologies Administrator Tools page: http://support.lenovo.com/en_US/detail.page?LegacyDocID=TVAN-ADMIN#rnr Working with their customization options are stored in problem determination. You can disable the...following table: Chapter 3. Output from both the Rescue and Recovery environment and operating system - Note: The Predesktop Area can be manually started unless the setting is directed to GET and PUT files from the end user creates the Req 115 Trouble Ticket XML file...


