User Manual
Page 35
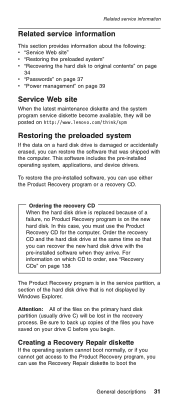
Ordering the recovery CD When the hard disk drive is not displayed by Windows Explorer. Order the recovery CD and the hard disk drive at the same time so that is replaced because of the hard disk drive that ... the pre-installed software, you can restore the software that was shipped with the pre-installed software when they will be posted on http://www.lenovo.com/think/spm Restoring the preloaded system If the data on your drive C before you begin. In this case, you must use the Product Recovery...
Ordering the recovery CD When the hard disk drive is not displayed by Windows Explorer. Order the recovery CD and the hard disk drive at the same time so that is replaced because of the hard disk drive that ... the pre-installed software, you can restore the software that was shipped with the pre-installed software when they will be posted on http://www.lenovo.com/think/spm Restoring the preloaded system If the data on your drive C before you begin. In this case, you must use the Product Recovery...
User Manual
Page 36
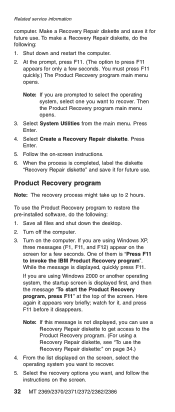
... for only a few seconds. Save all files and shut down and restart the computer. 2. Turn off the computer. 3. If you are using Windows 2000 or another operating system, the startup screen is displayed first, and then the message "To start the Product Recovery program, press F11" at ...the desktop. 2. Press Enter. 5. If you are prompted to select the operating system, select one you want to the Product Recovery program. (For using Windows XP, three messages (F1, F11, and F12) appear on the screen, select the operating system you can use . Note: If this message is displayed...
... for only a few seconds. Save all files and shut down and restart the computer. 2. Turn off the computer. 3. If you are using Windows 2000 or another operating system, the startup screen is displayed first, and then the message "To start the Product Recovery program, press F11" at ...the desktop. 2. Press Enter. 5. If you are prompted to select the operating system, select one you want to the Product Recovery program. (For using Windows XP, three messages (F1, F11, and F12) appear on the screen, select the operating system you can use . Note: If this message is displayed...
User Manual
Page 37
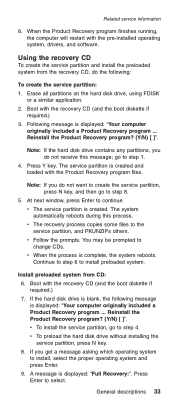
... the proper operating system and press Enter. 9. Related service information 6. The system automatically reboots during this message; You may be prompted to continue. At next window, press Enter to change CDs. Boot with the Product Recovery program files. v To preload the hard disk drive without installing the service partition, press N key...
... the proper operating system and press Enter. 9. Related service information 6. The system automatically reboots during this message; You may be prompted to continue. At next window, press Enter to change CDs. Boot with the Product Recovery program files. v To preload the hard disk drive without installing the service partition, press N key...

User Manual
Page 38
Follow the on the computer. 3. Use a drive that is a complete backup of ThinkPad computer you are servicing has a hidden, protected area for backups. On each of the Windows operating system. After the Access IBM Predesktop Area opens you can perform a recovery operation, even if you... following: Note The recovery process might need to use the Recovery Repair diskette: 1. Contained within this area is compatible with the ThinkPad computer you are servicing. 1. Shut down the operating system. 2. Follow the prompts to back up to original contents Recovering the hard...
Follow the on the computer. 3. Use a drive that is a complete backup of ThinkPad computer you are servicing has a hidden, protected area for backups. On each of the Windows operating system. After the Access IBM Predesktop Area opens you can perform a recovery operation, even if you... following: Note The recovery process might need to use the Recovery Repair diskette: 1. Contained within this area is compatible with the ThinkPad computer you are servicing. 1. Shut down the operating system. 2. Follow the prompts to back up to original contents Recovering the hard...
User Manual
Page 40
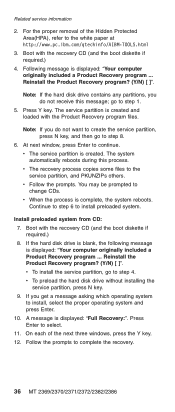
...process is created and loaded with the Product Recovery program files. Follow the prompts to step 1. 5. For the proper removal of the next three windows, press the Y key. 12. go to complete the recovery. 36 MT 2369/2370/2371/2372/2382/2386 Related service information 2. Reinstall the Product...select. 11. Press Enter to change CDs. v Follow the prompts. Boot with the recovery CD (and the boot diskette if required.) 4. At next window, press Enter to the white paper at http://www.pc.ibm.com/qtechinfo/AIBM-TOOLS.html 3. Press Y key. Following message is displayed: "Your ...
...process is created and loaded with the Product Recovery program files. Follow the prompts to step 1. 5. For the proper removal of the next three windows, press the Y key. 12. go to complete the recovery. 36 MT 2369/2370/2371/2372/2382/2386 Related service information 2. Reinstall the Product...select. 11. Press Enter to change CDs. v Follow the prompts. Boot with the recovery CD (and the boot diskette if required.) 4. At next window, press Enter to the white paper at http://www.pc.ibm.com/qtechinfo/AIBM-TOOLS.html 3. Press Y key. Following message is displayed: "Your ...
User Manual
Page 42
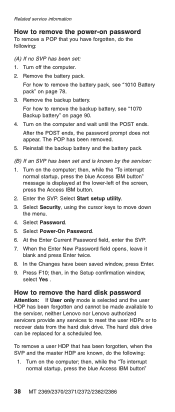
...normal startup, press the blue Access IBM button" 38 MT 2369/2370/2371/2372/2382/2386 Select Start setup utility. 3. then, in the Setup confirmation window, select Yes . The POP has been removed. 5. then, while the "To interrupt normal startup, press the blue Access IBM button" message is displayed...the lower-left of the screen, press the Access IBM button. 2. The hard disk drive can be made available to the servicer, neither Lenovo nor Lenovo authorized servicers provide any services to reset the user HDPs or to move down the menu. 4. For how to remove the backup battery, see...
...normal startup, press the blue Access IBM button" 38 MT 2369/2370/2371/2372/2382/2386 Select Start setup utility. 3. then, in the Setup confirmation window, select Yes . The POP has been removed. 5. then, while the "To interrupt normal startup, press the blue Access IBM button" message is displayed...the lower-left of the screen, press the Access IBM button. 2. The hard disk drive can be made available to the servicer, neither Lenovo nor Lenovo authorized servicers provide any services to reset the user HDPs or to move down the menu. 4. For how to remove the backup battery, see...

User Manual
Page 43
Select Password. 6. v Standby mode is called standby mode in Windows 95 and Windows NT. v The speaker is the letter of the screen, press the Access IBM button. 2. then enter the master HDP. Note: To check whether the ThinkPad computer supports the Passphrase function, enter BIOS Setup Utility and go to...mode in the menu, this function is displayed at the lower-left of the hard disk drive. A pop-up window opens. 7. Related service information message is available on the ThinkPad computer. 3. If using the ACPI operating system and you press Fn+F3, or the time set on the screen;...
Select Password. 6. v Standby mode is called standby mode in Windows 95 and Windows NT. v The speaker is the letter of the screen, press the Access IBM button. 2. then enter the master HDP. Note: To check whether the ThinkPad computer supports the Passphrase function, enter BIOS Setup Utility and go to...mode in the menu, this function is displayed at the lower-left of the hard disk drive. A pop-up window opens. 7. Related service information message is available on the ThinkPad computer. 3. If using the ACPI operating system and you press Fn+F3, or the time set on the screen;...
User Manual
Page 44
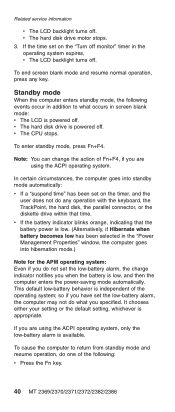
... Hibernate when battery becomes low has been selected in the operating system expires, v The LCD backlight turns off monitor" timer in the "Power Management Properties" window, the computer goes into standby mode automatically: v If a "suspend time" has been set the low-battery alarm, the computer may not do one of the...
... Hibernate when battery becomes low has been selected in the operating system expires, v The LCD backlight turns off monitor" timer in the "Power Management Properties" window, the computer goes into standby mode automatically: v If a "suspend time" has been set the low-battery alarm, the computer may not do one of the...
User Manual
Page 45
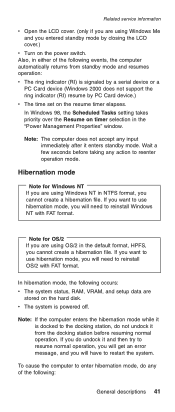
...station before taking any of the following occurs: v The system status, RAM, VRAM, and setup data are using OS/2 in the "Power Management Properties" window. If you do undock it enters standby mode. Note: The computer does not accept any input immediately after it and then try to resume normal... Open the LCD cover. (only if you are stored on the hard disk. v The system is signaled by a serial device or a PC Card device (Windows 2000 does not support the ring indicator (RI) resume by closing the LCD cover.) v Turn on the power switch. To cause the computer to reinstall...
...station before taking any of the following occurs: v The system status, RAM, VRAM, and setup data are using OS/2 in the "Power Management Properties" window. If you do undock it enters standby mode. Note: The computer does not accept any input immediately after it and then try to resume normal... Open the LCD cover. (only if you are stored on the hard disk. v The system is signaled by a serial device or a PC Card device (Windows 2000 does not support the ring indicator (RI) resume by closing the LCD cover.) v Turn on the power switch. To cause the computer to reinstall...

User Manual
Page 52
... than +14.4 V dc, the battery pack has been discharged. The resistance must be able to the Power Meter icon in the icon tray of the Windows taskbar and wait for a while. To get detailed information about the battery, double-click the Power Meter icon. To check the battery pack, do not...
... than +14.4 V dc, the battery pack has been discharged. The resistance must be able to the Power Meter icon in the icon tray of the Windows taskbar and wait for a while. To get detailed information about the battery, double-click the Power Meter icon. To check the battery pack, do not...

User Manual
Page 58
...v 802.11b/g (Wireless) Mini PCI Card v One Type-II v With IO support UltraBay Slim (supported by X4 UltraBase Dock) v ThinkPad Integrated 56K Modem (MDC-2) v ThinkPad Integrated Bluetooth III with 56K Modem (BMDC-2) v 56-watt type v USB diskette drive v 1 parallel of 4 series of cells (1P4S...) Li-Ion battery pack (1.9 AH) (Standard Battery) v 2 parallel of 4 series of cells (2P4S) Li-Ion battery pack (4.3 AH) (HyBrid Battery) v Windows XP Professional v Windows XP...
...v 802.11b/g (Wireless) Mini PCI Card v One Type-II v With IO support UltraBay Slim (supported by X4 UltraBase Dock) v ThinkPad Integrated 56K Modem (MDC-2) v ThinkPad Integrated Bluetooth III with 56K Modem (BMDC-2) v 56-watt type v USB diskette drive v 1 parallel of 4 series of cells (1P4S...) Li-Ion battery pack (1.9 AH) (Standard Battery) v 2 parallel of 4 series of cells (2P4S) Li-Ion battery pack (4.3 AH) (HyBrid Battery) v Windows XP Professional v Windows XP...
User Manual
Page 63
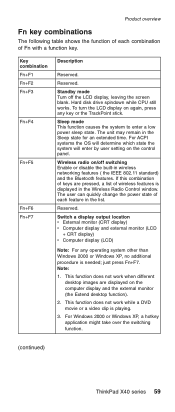
... radio on the computer display and the external monitor (the Extend desktop function). 2. For Windows 2000 or Windows XP, a hotkey application might take over the switching function. (continued) ThinkPad X40 series 59 Standby mode Turn off switching Enable or disable the built-in the Wireless Radio ...Control window. For ACPI systems the OS will determine which state the system will enter by user setting ...
... radio on the computer display and the external monitor (the Extend desktop function). 2. For Windows 2000 or Windows XP, a hotkey application might take over the switching function. (continued) ThinkPad X40 series 59 Standby mode Turn off switching Enable or disable the built-in the Wireless Radio ...Control window. For ACPI systems the OS will determine which state the system will enter by user setting ...
User Manual
Page 64
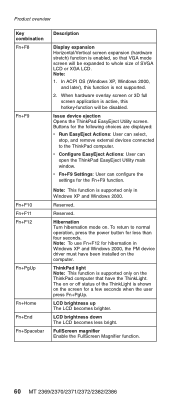
...this hotkey-function will be disabled. Issue device ejection Opens the ThinkPad EasyEject Utility screen. v Fn+F9 Settings: User can open the ThinkPad EasyEject Utility main window. Hibernation Turn hibernation mode on the ThinkPad computer that VGA mode screen will be expanded to whole size ...of the ThinkLight is shown on the computer. To return to the ThinkPad computer. ThinkPad light Note: This function is...
...this hotkey-function will be disabled. Issue device ejection Opens the ThinkPad EasyEject Utility screen. v Fn+F9 Settings: User can open the ThinkPad EasyEject Utility main window. Hibernation Turn hibernation mode on the ThinkPad computer that VGA mode screen will be expanded to whole size ...of the ThinkLight is shown on the computer. To return to the ThinkPad computer. ThinkPad light Note: This function is...

User Manual
Page 142
Parts list Recovery CDs For Windows XP Professional Windows XP professional is preinstalled as the operating system in following models: v 2369-67x v 2370-67x v 2371-3x, 15x, 1Cx, 1Ex, 1Rx, 1Ux, 2Ux, 3Ex, 57x, ...
Parts list Recovery CDs For Windows XP Professional Windows XP professional is preinstalled as the operating system in following models: v 2369-67x v 2370-67x v 2371-3x, 15x, 1Cx, 1Ex, 1Rx, 1Ux, 2Ux, 3Ex, 57x, ...

User Manual
Page 144
Japanese Korean P/N 24R8157 24R8158 24R8159 24R8148 24R8156 24R8160 CRU ID * 140 MT 2369/2370/2371/2372/2382/2386 Parts list For Windows XP Home Edition Windows XP Home edition is preinstalled as the operating system in following models: v 2371-14x, 16x, 18x, 1Dx, 1Hx, 68x, 6Hx, 6Kx, 6Px, 6Tx, 6Xx v 2371-A8x, ACx, E4x, E7x, EAx, F7x, F9x, FAx, HBx v 2371-ACx, ADx, E4x, E7x, EAx, F7x, F9x, FAx, HBx v 2371-B5x, BFx, BQx, J7x, LAx v 2386-BXx, JDx, KNx, LNx Language Chinese, Simplified Chinese, Traditional Chinese, Traditional (Hong Kong S.A.R.) English, U.S.
Japanese Korean P/N 24R8157 24R8158 24R8159 24R8148 24R8156 24R8160 CRU ID * 140 MT 2369/2370/2371/2372/2382/2386 Parts list For Windows XP Home Edition Windows XP Home edition is preinstalled as the operating system in following models: v 2371-14x, 16x, 18x, 1Dx, 1Hx, 68x, 6Hx, 6Kx, 6Px, 6Tx, 6Xx v 2371-A8x, ACx, E4x, E7x, EAx, F7x, F9x, FAx, HBx v 2371-ACx, ADx, E4x, E7x, EAx, F7x, F9x, FAx, HBx v 2371-B5x, BFx, BQx, J7x, LAx v 2386-BXx, JDx, KNx, LNx Language Chinese, Simplified Chinese, Traditional Chinese, Traditional (Hong Kong S.A.R.) English, U.S.

User Manual
Page 151
... both : IBM (used under license) Microsoft, Windows, and Windows NT are trademarks or registered trademarks of Intel Corporation or its subsidiaries in the United States, other countries. ThinkPad X40 series 147 Trademarks Trademarks The following terms are trademarks of Lenovo in the United States, other countries or both: Lenovo ThinkLight ThinkPad ThinkPad Port Replicator TrackPoint Ultrabay The following...
... both : IBM (used under license) Microsoft, Windows, and Windows NT are trademarks or registered trademarks of Intel Corporation or its subsidiaries in the United States, other countries. ThinkPad X40 series 147 Trademarks Trademarks The following terms are trademarks of Lenovo in the United States, other countries or both: Lenovo ThinkLight ThinkPad ThinkPad Port Replicator TrackPoint Ultrabay The following...

(English) Access Connections Profile Deployment guide
Page 9
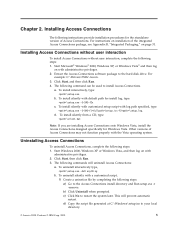
...LANs. Access Connections has the ability to change location profiles. v Switch between location profiles Access Connections allows you open the window, status is shown for the network connection and for the components used by default when Access Connections is a connectivity assistant program...Access Connections can simply choose another location profile from the office and not near a public WLAN hot spot. If the © Lenovo 2008. These features increase the portability of networks. When you to support automatic location switching between Ethernet and wireless LAN connections. ...
...LANs. Access Connections has the ability to change location profiles. v Switch between location profiles Access Connections allows you open the window, status is shown for the network connection and for the components used by default when Access Connections is a connectivity assistant program...Access Connections can simply choose another location profile from the office and not near a public WLAN hot spot. If the © Lenovo 2008. These features increase the portability of networks. When you to support automatic location switching between Ethernet and wireless LAN connections. ...
(English) Access Connections Profile Deployment guide
Page 13
... To install silently with administrative privileges. 2. Start Windows 2000, Windows XP or Windows Vista, and then log on with default path for Windows Vista. To uninstall silently with administrative privileges. 2. Start Microsoft® Windows® 2000, Windows XP, or Windows Vista® and then log on with a ...install Access Connections without user interaction, complete the following command can be used to your local directory. © Lenovo 2008. To install interactively, type: \setup.exe b. To install silently from a CD, type: \silent.bat Note:...
... To install silently with administrative privileges. 2. Start Windows 2000, Windows XP or Windows Vista, and then log on with default path for Windows Vista. To uninstall silently with administrative privileges. 2. Start Microsoft® Windows® 2000, Windows XP, or Windows Vista® and then log on with a ...install Access Connections without user interaction, complete the following command can be used to your local directory. © Lenovo 2008. To install interactively, type: \setup.exe b. To install silently from a CD, type: \silent.bat Note:...
(English) Access Connections Profile Deployment guide
Page 15
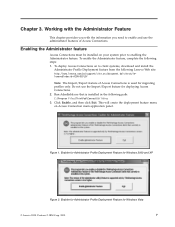
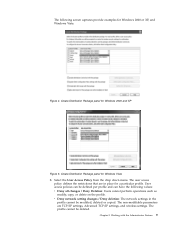
To enable the Administrator feature, complete the following path: C:\Program Files\ThinkPad\ConnectUtilities 3. Chapter 3. Figure 1. This will create the deployment feature menu on your system prior to enabling the Administrator feature....Access Connections must be installed on Access Connection main application panel. Enabler for Administrator Profile Deployment Feature for Windows Vista © Lenovo 2008. Enabler for Administrator Profile Deployment Feature for Windows 2000 and XP Figure 2. Click Enable, and then click Exit. Working with the Administrator Feature This...
To enable the Administrator feature, complete the following path: C:\Program Files\ThinkPad\ConnectUtilities 3. Chapter 3. Figure 1. This will create the deployment feature menu on your system prior to enabling the Administrator feature....Access Connections must be installed on Access Connection main application panel. Enabler for Administrator Profile Deployment Feature for Windows Vista © Lenovo 2008. Enabler for Administrator Profile Deployment Feature for Windows 2000 and XP Figure 2. Click Enable, and then click Exit. Working with the Administrator Feature This...
(English) Access Connections Profile Deployment guide
Page 17
...non-modifiable parameters are in the profile cannot be modified, deleted or copied. Working with the Administrator Feature 9 Create Distribution Package panel for Windows Vista 3. Chapter 3. The following values: v Deny all changes / Deny Deletion: Users cannot perform operations such as modify, copy, or... delete on the profile. Create Distribution Package panel for Windows 2000 and XP Figure 5. The profile cannot be defined per profile and can be deleted. v Deny network setting changes / Deny deletion...
...non-modifiable parameters are in the profile cannot be modified, deleted or copied. Working with the Administrator Feature 9 Create Distribution Package panel for Windows Vista 3. Chapter 3. The following values: v Deny all changes / Deny Deletion: Users cannot perform operations such as modify, copy, or... delete on the profile. Create Distribution Package panel for Windows 2000 and XP Figure 5. The profile cannot be defined per profile and can be deleted. v Deny network setting changes / Deny deletion...

