User Manual
Page 4
... disk drive 79 1030 DIMM cover 80 1040 Mini PCI adapter, DIMM, MDC-2, and BMDC-2 81 1050 Keyboard 84 1060 Upper case 87 1070 Backup battery 90 1080 LCD module 91 1090 Hard disk housing assembly 94 1100 Top shielding 95 1110 Lower case 96 1120 Fansink 100 2010 LCD bezel... 2040 Antenna L and antenna R 107 2050 Hinge L and hinge R 111 2060 Bluetooth antenna cable 113 Locations 114 Front view for X40 series 114 Rear view for X40 series 115 Bottom view for X40 series 116 Front View for X4 UltraBase Dock . . . . . 117 Rear View for X4 UltraBase Dock 118 Parts list 119 Overall...
... disk drive 79 1030 DIMM cover 80 1040 Mini PCI adapter, DIMM, MDC-2, and BMDC-2 81 1050 Keyboard 84 1060 Upper case 87 1070 Backup battery 90 1080 LCD module 91 1090 Hard disk housing assembly 94 1100 Top shielding 95 1110 Lower case 96 1120 Fansink 100 2010 LCD bezel... 2040 Antenna L and antenna R 107 2050 Hinge L and hinge R 111 2060 Bluetooth antenna cable 113 Locations 114 Front view for X40 series 114 Rear view for X40 series 115 Bottom view for X40 series 116 Front View for X4 UltraBase Dock . . . . . 117 Rear View for X4 UltraBase Dock 118 Parts list 119 Overall...

User Manual
Page 28
... requirement. v Prevent the part from touching your skin to electrostatic discharge (ESD.) ESD damage can use coax or connector-outside shells on a double-insulated or battery-operated system, use an ESD common ground or reference point. Attach the ESD ground clip to provide a static-free work surface. Notes 1. v Avoid contact with...
... requirement. v Prevent the part from touching your skin to electrostatic discharge (ESD.) ESD damage can use coax or connector-outside shells on a double-insulated or battery-operated system, use an ESD common ground or reference point. Attach the ESD ground clip to provide a static-free work surface. Notes 1. v Avoid contact with...
User Manual
Page 42
...been set and is known by the servicer: 1. Turn on the computer; Select Security, using the cursor keys to remove the backup battery, see "1010 Battery pack" on the computer; At the Enter Current Password field, enter the SVP. 7. then, in the Setup confirmation window, select Yes...hard disk drive can be made available to the servicer, neither Lenovo nor Lenovo authorized servicers provide any services to reset the user HDPs or to remove the battery pack, see "1070 Backup battery" on page 90. 4. Remove the battery pack. When the Enter New Password field opens, leave it ...
...been set and is known by the servicer: 1. Turn on the computer; Select Security, using the cursor keys to remove the backup battery, see "1010 Battery pack" on the computer; At the Enter Current Password field, enter the SVP. 7. then, in the Setup confirmation window, select Yes...hard disk drive can be made available to the servicer, neither Lenovo nor Lenovo authorized servicers provide any services to reset the user HDPs or to remove the battery pack, see "1070 Backup battery" on page 90. 4. Remove the battery pack. When the Enter New Password field opens, leave it ...
User Manual
Page 44
... operating system expires, v The LCD backlight turns off . v The CPU stops. v The hard disk drive is powered off . v If the battery indicator blinks orange, indicating that time. To end screen blank mode and resume normal operation, press any operation with the keyboard, the TrackPoint, the hard...Fn+F4. In certain circumstances, the computer goes into hibernation mode.) Note for the APM operating system: Even if you when the battery is independent of the following events occur in addition to return from standby mode and resume operation, do what occurs in the "Power ...
... operating system expires, v The LCD backlight turns off . v The CPU stops. v The hard disk drive is powered off . v If the battery indicator blinks orange, indicating that time. To end screen blank mode and resume normal operation, press any operation with the keyboard, the TrackPoint, the hard...Fn+F4. In certain circumstances, the computer goes into hibernation mode.) Note for the APM operating system: Even if you when the battery is independent of the following events occur in addition to return from standby mode and resume operation, do what occurs in the "Power ...
User Manual
Page 46
..., the TrackPoint, the hard disk drive, the parallel connector, or the diskette drive within that causes the system to test only ThinkPad products. This section is restored from hibernation mode and resumes operation. When the power is turned on the hard disk drive is ...has been set on model-unique functions, refer to Hibernate when battery becomes low, and the battery charge becomes critically low. v If the timer conditions are intended to go into hibernation mode automatically in either of non-ThinkPad products, prototype cards, or modified options can detect errors by repeating...
..., the TrackPoint, the hard disk drive, the parallel connector, or the diskette drive within that causes the system to test only ThinkPad products. This section is restored from hibernation mode and resumes operation. When the power is turned on the hard disk drive is ...has been set on model-unique functions, refer to Hibernate when battery becomes low, and the battery charge becomes critically low. v If the timer conditions are intended to go into hibernation mode automatically in either of non-ThinkPad products, prototype cards, or modified options can detect errors by repeating...
User Manual
Page 50
... 46 MT 2369/2370/2371/2372/2382/2386 Disconnect the ac adapter and install the charged battery pack. 7. If there is supplied when you power on the screen. Connect the ac adapter. 4. Remove the battery pack. 3. Power off the computer. 2. To exit the test, select Quit - Note... Info v VESA LCD Info v Hardware Events Log Utility v Run External Tests v Surface Scan Hard Disk v Benchmark System v DOS Shell v Tech Support Form v Battery Rundown v View Test Log v Print Log v Save Log v Full Erase Hard Drive v Quick Erase Hard Drive Power system checkout To verify a symptom, do the...
... 46 MT 2369/2370/2371/2372/2382/2386 Disconnect the ac adapter and install the charged battery pack. 7. If there is supplied when you power on the screen. Connect the ac adapter. 4. Remove the battery pack. 3. Power off the computer. 2. To exit the test, select Quit - Note... Info v VESA LCD Info v Hardware Events Log Utility v Run External Tests v Surface Scan Hard Disk v Benchmark System v DOS Shell v Tech Support Form v Battery Rundown v View Test Log v Print Log v Save Log v Full Erase Hard Drive v Quick Erase Hard Drive Power system checkout To verify a symptom, do the...

User Manual
Page 51
... the port replicator is used, replace the port replicator. v If the computer does not charge during operation, use a discharged battery pack or a battery pack that has less than 50% of the total power remaining when installed in the computer. If the voltage is acceptable, ...not correct, replace the ac adapter. 4. Note: Noise from the computer. 2. General descriptions 47 Checking operational charging To check whether the battery charges properly during operation, go to room temperature. Unplug the ac adapter cable from the ac adapter does not always indicate a defect. ...
... the port replicator is used, replace the port replicator. v If the computer does not charge during operation, use a discharged battery pack or a battery pack that has less than 50% of the total power remaining when installed in the computer. If the voltage is acceptable, ...not correct, replace the ac adapter. 4. Note: Noise from the computer. 2. General descriptions 47 Checking operational charging To check whether the battery charges properly during operation, go to room temperature. Unplug the ac adapter cable from the ac adapter does not always indicate a defect. ...

User Manual
Page 52
...After it cools down, reinstall and recharge it may not be 4 to the next section. If the voltage is not correct, replace the battery pack. If the resistance is less than 95% of its capacity. If it at least 3 hours, even if the indicator does not turn...;) 3. Power off the computer. 2. If the resistance is correct, replace the system board. Then reinstall the battery pack. To get detailed information about the battery, double-click the Power Meter icon. Checking the battery pack Battery charging does not start until the Power Meter shows that less than +14.4 V dc, the...
...After it cools down, reinstall and recharge it may not be 4 to the next section. If the voltage is not correct, replace the battery pack. If the resistance is less than 95% of its capacity. If it at least 3 hours, even if the indicator does not turn...;) 3. Power off the computer. 2. If the resistance is correct, replace the system board. Then reinstall the battery pack. To get detailed information about the battery, double-click the Power Meter icon. Checking the battery pack Battery charging does not start until the Power Meter shows that less than +14.4 V dc, the...

User Manual
Page 53
... (+) Black (-) Wire Voltage (V dc) Red +2.5 to +3.2 Black Ground v If the voltage is not correct, replace the backup battery. See the following figure. Remove the backup battery (see "1010 Battery pack" on page 48). 5. v If the backup battery discharges quickly after replacement, replace the system board. Power off the computer, and unplug the ac adapter...
... (+) Black (-) Wire Voltage (V dc) Red +2.5 to +3.2 Black Ground v If the voltage is not correct, replace the backup battery. See the following figure. Remove the backup battery (see "1010 Battery pack" on page 48). 5. v If the backup battery discharges quickly after replacement, replace the system board. Power off the computer, and unplug the ac adapter...
User Manual
Page 55
.... 2005. 51 ThinkPad X40 series Product overview 53 Specifications 53 Status indicators for X40 55 FRU tests ...writing the ECA information . . . 75 Removing and replacing a FRU 77 1010 Battery pack 78 1020 Hard disk drive 79 1030 DIMM cover 80 1040 Mini PCI adapter... and BMDC-2 81 1050 Keyboard 84 1060 Upper case 87 1070 Backup battery 90 1080 LCD module 91 1090 Hard disk housing assembly 94 1100 Top... 111 2060 Bluetooth antenna cable 113 Locations 114 Front view for X40 series 114 Rear view for X40 series 115 Bottom view for X40 series 116 Front View for X4 UltraBase Dock . . ....
.... 2005. 51 ThinkPad X40 series Product overview 53 Specifications 53 Status indicators for X40 55 FRU tests ...writing the ECA information . . . 75 Removing and replacing a FRU 77 1010 Battery pack 78 1020 Hard disk drive 79 1030 DIMM cover 80 1040 Mini PCI adapter... and BMDC-2 81 1050 Keyboard 84 1060 Upper case 87 1070 Backup battery 90 1080 LCD module 91 1090 Hard disk housing assembly 94 1100 Top... 111 2060 Bluetooth antenna cable 113 Locations 114 Front view for X40 series 114 Rear view for X40 series 115 Bottom view for X40 series 116 Front View for X4 UltraBase Dock . . ....

User Manual
Page 58
...) Internal modem Audio Infrared transfer Mini PCI card PC card SD card Ultrabay device Communication daughter card (CDC) AC adapter Diskette drive (external) Battery pack (main) Preinstalled operating system Description v 20.0 GB, 1.8-inch, IDE interface v 40.0 GB, 1.8-inch, IDE interface v 60.0 GB... (MDC-2) v ThinkPad Integrated Bluetooth III with 56K Modem (BMDC-2) v 56-watt type v USB diskette drive v 1 parallel of 4 series of cells (1P4S) Li-Ion battery pack (1.9 AH) (Standard Battery) v 2 parallel of 4 series of cells (2P4S) Li-Ion battery pack (4.3 AH) (HyBrid Battery) v Windows XP...
...) Internal modem Audio Infrared transfer Mini PCI card PC card SD card Ultrabay device Communication daughter card (CDC) AC adapter Diskette drive (external) Battery pack (main) Preinstalled operating system Description v 20.0 GB, 1.8-inch, IDE interface v 40.0 GB, 1.8-inch, IDE interface v 60.0 GB... (MDC-2) v ThinkPad Integrated Bluetooth III with 56K Modem (BMDC-2) v 56-watt type v USB diskette drive v 1 parallel of 4 series of cells (1P4S) Li-Ion battery pack (1.9 AH) (Standard Battery) v 2 parallel of 4 series of cells (2P4S) Li-Ion battery pack (4.3 AH) (HyBrid Battery) v Windows XP...

User Manual
Page 60
...hold the Shift key, and press the NumLk (ScrLk) key. Sudden physical shock could cause drive errors. The ac adapter has charged the battery completely. Blinking orange: The battery needs to operate. (At regular intervals, the indicator light turns off the computer. 6 Power on the keyboard is in standby mode. Green... is on and is on, do not put the computer into standby mode or turn off briefly.) Orange: The battery is being read from or written to use. Green: The battery is enabled. To enable or disable Caps Lock mode, press the Caps Lock key. Green: Data is being charged...
...hold the Shift key, and press the NumLk (ScrLk) key. Sudden physical shock could cause drive errors. The ac adapter has charged the battery completely. Blinking orange: The battery needs to operate. (At regular intervals, the indicator light turns off the computer. 6 Power on the keyboard is in standby mode. Green... is on and is on, do not put the computer into standby mode or turn off briefly.) Orange: The battery is being read from or written to use. Green: The battery is enabled. To enable or disable Caps Lock mode, press the Caps Lock key. Green: Data is being charged...
User Manual
Page 61
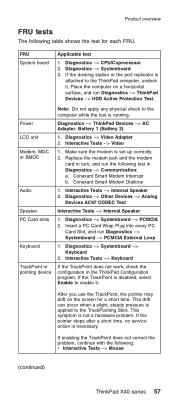
If the docking station or the port replicator is set up correctly. 2. Diagnostics --> ThinkPad Devices --> AC Adapter, Battery 1 (Battery 2) 1. Replace the modem jack and the modem card in turn, and run the following : v Interactive Tests --> Mouse (continued) ThinkPad X40 series 57 Conexant Smart Modem Dialtone 1. Diagnostics --> Systemboard --> PCMCIA 2. Insert a PC Card Wrap Plug into every PC...
If the docking station or the port replicator is set up correctly. 2. Diagnostics --> ThinkPad Devices --> AC Adapter, Battery 1 (Battery 2) 1. Replace the modem jack and the modem card in turn, and run the following : v Interactive Tests --> Mouse (continued) ThinkPad X40 series 57 Conexant Smart Modem Dialtone 1. Diagnostics --> Systemboard --> PCMCIA 2. Insert a PC Card Wrap Plug into every PC...

User Manual
Page 66
Then save current setting by pressing F10. Then save current setting by pressing F10. 2. Replace planar. Charge the battery pack. 2. Press F9, and Enter to -FRU index Symptom or error 0182 Bad CRC2. Box serial number needs to be reinstalled. 1. Run BIOS ..., in the EEPROM is not correct. 0185 Bad startup sequence settings. System board. System board. (continued) 62 MT 2369/2370/2371/2372/2382/2386 Battery pack. 1. Symptom-to load the default setting. Replace planar. Press F9, and Enter to be reinstalled. System board. Enter BIOS Setup and load Setup...
Then save current setting by pressing F10. Then save current setting by pressing F10. 2. Replace planar. Charge the battery pack. 2. Press F9, and Enter to -FRU index Symptom or error 0182 Bad CRC2. Box serial number needs to be reinstalled. 1. Run BIOS ..., in the EEPROM is not correct. 0185 Bad startup sequence settings. System board. System board. (continued) 62 MT 2369/2370/2371/2372/2382/2386 Battery pack. 1. Symptom-to load the default setting. Replace planar. Press F9, and Enter to be reinstalled. System board. Enter BIOS Setup and load Setup...
User Manual
Page 68
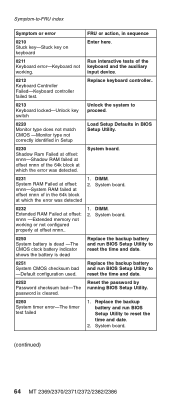
.... 0251 System CMOS checksum bad -Default configuration used. System board. (continued) 64 MT 2369/2370/2371/2372/2382/2386 Replace the backup battery and run BIOS Setup Utility to reset the time and date. 0252 Reset the password by Password checksum bad-The running BIOS Setup Utility. ...Replace the backup battery and run BIOS Setup Utility to reset the time and date. 2. System board. 0231 System RAM Failed at offset: nnnn-System RAM ...
.... 0251 System CMOS checksum bad -Default configuration used. System board. (continued) 64 MT 2369/2370/2371/2372/2382/2386 Replace the backup battery and run BIOS Setup Utility to reset the time and date. 0252 Reset the password by Password checksum bad-The running BIOS Setup Utility. ...Replace the backup battery and run BIOS Setup Utility to reset the time and date. 2. System board. 0231 System RAM Failed at offset: nnnn-System RAM ...
User Manual
Page 69
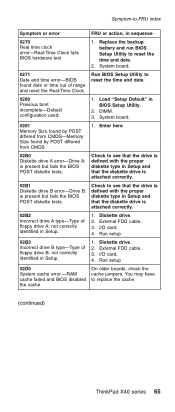
... BIOS POST diskette tests. Replace the backup battery and run BIOS Setup Utility to reset the time and date. 0280 Previous boot incomplete-Default configuration used. 1. Run BIOS Setup Utility to reset the time and date. 2. I /O card. 4. Diskette drive. 2. Check to replace the cache (continued) ThinkPad X40 series 65 I /O card. 4. System board. 0271...
... BIOS POST diskette tests. Replace the backup battery and run BIOS Setup Utility to reset the time and date. 0280 Previous boot incomplete-Default configuration used. 1. Run BIOS Setup Utility to reset the time and date. 2. I /O card. 4. Diskette drive. 2. Check to replace the cache (continued) ThinkPad X40 series 65 I /O card. 4. System board. 0271...
User Manual
Page 70
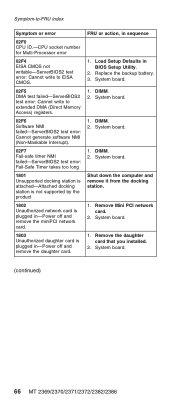
... PCI network card. 2. FRU or action, in BIOS Setup Utility. 2. Remove the daughter card that you installed. 2. Load Setup Defaults in sequence 1. Replace the backup battery. 3. System board. 1. Symptom-to-FRU index Symptom or error 02F0 CPU ID.-CPU socket number for Multi-Processor error 02F4 EISA CMOS not writable-ServerBIOS2...
... PCI network card. 2. FRU or action, in BIOS Setup Utility. 2. Remove the daughter card that you installed. 2. Load Setup Defaults in sequence 1. Replace the backup battery. 3. System board. 1. Symptom-to-FRU index Symptom or error 02F0 CPU ID.-CPU socket number for Multi-Processor error 02F4 EISA CMOS not writable-ServerBIOS2...

User Manual
Page 72
... Defaults" in BIOS Setup Utility. 2. System board. 1. Reinstall the operating system. 5. Fan. Symptom-to resume. Thermal sensing error. Backup battery. 3. Hard disk drive. 7. System board. (continued) 68 MT 2369/2370/2371/2372/2382/2386 Fan error. Load "Setup Defaults" in... BIOS Setup Utility. 2. System board. 1. Backup battery. 3. Diskette drive. 6. Restore the system configuration to what it from a recovery CD. 1. DIMM. 2. System board. 1. Operating system not...
... Defaults" in BIOS Setup Utility. 2. System board. 1. Reinstall the operating system. 5. Fan. Symptom-to resume. Thermal sensing error. Backup battery. 3. Hard disk drive. 7. System board. (continued) 68 MT 2369/2370/2371/2372/2382/2386 Fan error. Load "Setup Defaults" in... BIOS Setup Utility. 2. System board. 1. Backup battery. 3. Diskette drive. 6. Restore the system configuration to what it from a recovery CD. 1. DIMM. 2. System board. 1. Operating system not...
User Manual
Page 76
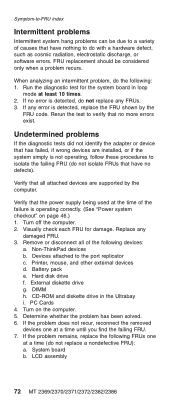
... external devices d. DIMM h. Symptom-to-FRU index Intermittent problems Intermittent system hang problems can be considered only when a problem recurs. Non-ThinkPad devices b. PC Cards 4. Verify that have no defects). Visually check each FRU for the system board in the Ultrabay i. Hard disk ...detected, do not replace a nondefective FRU): a. If no more errors exist. FRU replacement should be due to the port replicator c. Battery pack e. When analyzing an intermittent problem, do with a hardware defect, such as cosmic radiation, electrostatic discharge, or software errors. ...
... external devices d. DIMM h. Symptom-to-FRU index Intermittent problems Intermittent system hang problems can be considered only when a problem recurs. Non-ThinkPad devices b. PC Cards 4. Verify that have no defects). Visually check each FRU for the system board in the Ultrabay i. Hard disk ...detected, do not replace a nondefective FRU): a. If no more errors exist. FRU replacement should be due to the port replicator c. Battery pack e. When analyzing an intermittent problem, do with a hardware defect, such as cosmic radiation, electrostatic discharge, or software errors. ...
User Manual
Page 81
... sounds. To put the new FRU in place, reverse the removal procedure and follow any notes that all power cords from electrical outlets, remove the battery pack, and then disconnect any computer unless you have been trained and certified. Attention: After replacing a FRU, do not turn it in which they are...) strap (P/N 6405959). When turning a screw to replace a FRU, turn on the computer until you have made sure that pertain to observe the following general rules: 1. ThinkPad X40 series 77
... sounds. To put the new FRU in place, reverse the removal procedure and follow any notes that all power cords from electrical outlets, remove the battery pack, and then disconnect any computer unless you have been trained and certified. Attention: After replacing a FRU, do not turn it in which they are...) strap (P/N 6405959). When turning a screw to replace a FRU, turn on the computer until you have made sure that pertain to observe the following general rules: 1. ThinkPad X40 series 77


