
Hardware Maintenance Manual
Page 3
... . 30 Power management 30 Screen blank mode 30 Sleep mode 31 Hibernation mode 31 Symptom-to do first 21 Checkout guide 22 Lenovo Solution Center 22 Quick test programs 22 UEFI diagnostic program 23 Bootable diagnostic programs 23 Power system checkout 24 Checking the ac power ... . . . 41 Chapter 6. Removing or replacing a FRU 59 General guidelines 59 Before servicing the computer 60 Removing the SIM card 60 1010 Tablet Digitizer Pen 60 1020 Battery pack 61 1030 Hard disk drive or solid-state drive . . . . 61 1040 Memory module 63 1050 Hinge cap 65 i Important service ...
... . 30 Power management 30 Screen blank mode 30 Sleep mode 31 Hibernation mode 31 Symptom-to do first 21 Checkout guide 22 Lenovo Solution Center 22 Quick test programs 22 UEFI diagnostic program 23 Bootable diagnostic programs 23 Power system checkout 24 Checking the ac power ... . . . 41 Chapter 6. Removing or replacing a FRU 59 General guidelines 59 Before servicing the computer 60 Removing the SIM card 60 1010 Tablet Digitizer Pen 60 1020 Battery pack 61 1030 Hard disk drive or solid-state drive . . . . 61 1040 Memory module 63 1050 Hinge cap 65 i Important service ...

Hardware Maintenance Manual
Page 4
Notices 107 Electronic emission notices 108 Trademarks 108 ii Hardware Maintenance Manual 1060 Keyboard 65 1070 Palm rest 68 1080 Backup battery 70 1090 PCI Express Mini Card for wireless LAN/WiMAX 71 1100 PCI Express Mini Card for wireless WAN or mSATA solid-state drive 74 ...1110 Bluetooth daughter card 77 1120 Keyboard bezel 78 1130 LCD unit 81 1140 DC-in connector, Tablet Digitizer Pen case and switch assembly, and base cover . . . . . 84 1150 ExpressCard slot assembly, thermal fan assembly, and system board 87 2010 Button bezel and...
Notices 107 Electronic emission notices 108 Trademarks 108 ii Hardware Maintenance Manual 1060 Keyboard 65 1070 Palm rest 68 1080 Backup battery 70 1090 PCI Express Mini Card for wireless LAN/WiMAX 71 1100 PCI Express Mini Card for wireless WAN or mSATA solid-state drive 74 ...1110 Bluetooth daughter card 77 1120 Keyboard bezel 78 1130 LCD unit 81 1140 DC-in connector, Tablet Digitizer Pen case and switch assembly, and base cover . . . . . 84 1150 ExpressCard slot assembly, thermal fan assembly, and system board 87 2010 Button bezel and...

Hardware Maintenance Manual
Page 56
FRU description Self-service CRU Optional-service CRU 1 LCD unit No No 2 Keyboard bezel No No 3 Tablet Digitizer Pen Yes No 4 PCI Express Mini Card for wireless WAN (on some No Yes models) 4 mSATA solid-state drive (on some models) No No 5 PCI Express Mini Card for wireless LAN/WiMAX No Yes 6 Backup battery No Yes 7 Bluetooth daughter card No No 50 Hardware Maintenance Manual Major FRUs and CRUs 1 22 21 20 2 19 3 4 18 5 17 6 7 16 8 9 10 15 14 11 13 12 No.
FRU description Self-service CRU Optional-service CRU 1 LCD unit No No 2 Keyboard bezel No No 3 Tablet Digitizer Pen Yes No 4 PCI Express Mini Card for wireless WAN (on some No Yes models) 4 mSATA solid-state drive (on some models) No No 5 PCI Express Mini Card for wireless LAN/WiMAX No Yes 6 Backup battery No Yes 7 Bluetooth daughter card No No 50 Hardware Maintenance Manual Major FRUs and CRUs 1 22 21 20 2 19 3 4 18 5 17 6 7 16 8 9 10 15 14 11 13 12 No.

Hardware Maintenance Manual
Page 57
FRU description Self-service CRU Optional-service CRU 8 Battery pack Yes No 9 Tablet Digitizer Pen case and switch assembly No No 10 Base cover assembly No No 11 Hard disk drive rubber rails or solid-state drive Yes ...
FRU description Self-service CRU Optional-service CRU 8 Battery pack Yes No 9 Tablet Digitizer Pen case and switch assembly No No 10 Base cover assembly No No 11 Hard disk drive rubber rails or solid-state drive Yes ...

Hardware Maintenance Manual
Page 66
...If the computer you are servicing might have the SIM card that you insert the card back into the slot firmly. 1010 Tablet Digitizer Pen Removal steps of Tablet Digitizer Pen 60 Hardware Maintenance Manual 2 1 Removing the SIM card Some models you are servicing has the SIM card installed,... remove it before servicing the computer. See "1020 Battery pack" on page 61. Before servicing the computer Carefully read this topic before you ...
...If the computer you are servicing might have the SIM card that you insert the card back into the slot firmly. 1010 Tablet Digitizer Pen Removal steps of Tablet Digitizer Pen 60 Hardware Maintenance Manual 2 1 Removing the SIM card Some models you are servicing has the SIM card installed,... remove it before servicing the computer. See "1020 Battery pack" on page 61. Before servicing the computer Carefully read this topic before you ...

Hardware Maintenance Manual
Page 90
... Pen case and switch assembly, and base cover For access, remove these FRUs in order: • "1010 Tablet Digitizer Pen" on page 60 • "1020 Battery pack" on page 61 • "1030 Hard disk drive or solid-state drive" on page 61 • "1060 Keyboard" on page 65 • "1070 Palm ... daughter card" on page 77 • "1120 Keyboard bezel" on page 78 • "1130 LCD unit" on page 81 Removal steps of DC-in connector, Tablet Digitizer Pen case and switch assembly, and base cover Step 1 Screw (quantity) HEX nut washer&nylok #4R (2) 1 1 Color Silver Torque 0.392 Nm (4 kgfcm) 84 ...
... Pen case and switch assembly, and base cover For access, remove these FRUs in order: • "1010 Tablet Digitizer Pen" on page 60 • "1020 Battery pack" on page 61 • "1030 Hard disk drive or solid-state drive" on page 61 • "1060 Keyboard" on page 65 • "1070 Palm ... daughter card" on page 77 • "1120 Keyboard bezel" on page 78 • "1130 LCD unit" on page 81 Removal steps of DC-in connector, Tablet Digitizer Pen case and switch assembly, and base cover Step 1 Screw (quantity) HEX nut washer&nylok #4R (2) 1 1 Color Silver Torque 0.392 Nm (4 kgfcm) 84 ...

Hardware Maintenance Manual
Page 93
... stack the system board. • If you put a system board down, be sure to document the drop in order: • "1010 Tablet Digitizer Pen" on page 60 • "1020 Battery pack" on page 61 • "1030 Hard disk drive or solid-state drive" on page 61 • "1040 Memory module" on page...
... stack the system board. • If you put a system board down, be sure to document the drop in order: • "1010 Tablet Digitizer Pen" on page 60 • "1020 Battery pack" on page 61 • "1030 Hard disk drive or solid-state drive" on page 61 • "1040 Memory module" on page...

Hardware Maintenance Manual
Page 94
• "1070 Palm rest" on page 68 • "1080 Backup battery" on page 70 • "1090 PCI Express Mini Card for wireless LAN/WiMAX" on page 71 • "1100 PCI Express Mini Card for wireless WAN ... Bluetooth daughter card" on page 77 • "1120 Keyboard bezel" on page 78 • "1130 LCD unit" on page 81 • "1140 DC-in connector, Tablet Digitizer Pen case and switch assembly, and base cover" on page 84 Removal steps of ExpressCard slot assembly 1 1 Step 1 Screw (quantity) M2 × 3.5 mm, wafer...
• "1070 Palm rest" on page 68 • "1080 Backup battery" on page 70 • "1090 PCI Express Mini Card for wireless LAN/WiMAX" on page 71 • "1100 PCI Express Mini Card for wireless WAN ... Bluetooth daughter card" on page 77 • "1120 Keyboard bezel" on page 78 • "1130 LCD unit" on page 81 • "1140 DC-in connector, Tablet Digitizer Pen case and switch assembly, and base cover" on page 84 Removal steps of ExpressCard slot assembly 1 1 Step 1 Screw (quantity) M2 × 3.5 mm, wafer...

(English) User Guide
Page 3
...Windows notification area 33 Power management 33 Checking the battery status 33 Using the ac power adapter 33 Charging the battery 34 Maximizing the battery life 34 Managing the battery power 34 Power-saving modes 35 Handling the battery 36 Connecting to ThinkVantage programs . . . 15... 65 © Copyright Lenovo 2012 i Using your computer . . . 19 Registering your computer 19 Frequently asked questions 19 Tablet mode 21 Using tablet mode 21 Using the Tablet Digitizer Pen 23 Using the touch panel 24 Using the tablet buttons 26 Using the Tablet Shortcut Menu 26 Special keys...
...Windows notification area 33 Power management 33 Checking the battery status 33 Using the ac power adapter 33 Charging the battery 34 Maximizing the battery life 34 Managing the battery power 34 Power-saving modes 35 Handling the battery 36 Connecting to ThinkVantage programs . . . 15... 65 © Copyright Lenovo 2012 i Using your computer . . . 19 Registering your computer 19 Frequently asked questions 19 Tablet mode 21 Using tablet mode 21 Using the Tablet Digitizer Pen 23 Using the touch panel 24 Using the tablet buttons 26 Using the Tablet Shortcut Menu 26 Special keys...

(English) User Guide
Page 18
...LAN/WiMAX card 8 TrackPoint® pointing stick 10 Touch pad 12 Volume control buttons 14 Tablet buttons 1 Built-in microphones The built-in microphones capture sound and voice when used with ...an application program capable of your fingerprint to start the computer, enter the ThinkPad® Setup program, or enter the Windows® operating system. If your computer stops responding... on the computer. If the computer still is not responding, remove the ac power adapter and the battery to turn off , press and hold a video conference. To turn on the Windows® 7...
...LAN/WiMAX card 8 TrackPoint® pointing stick 10 Touch pad 12 Volume control buttons 14 Tablet buttons 1 Built-in microphones The built-in microphones capture sound and voice when used with ...an application program capable of your fingerprint to start the computer, enter the ThinkPad® Setup program, or enter the Windows® operating system. If your computer stops responding... on the computer. If the computer still is not responding, remove the ac power adapter and the battery to turn off , press and hold a video conference. To turn on the Windows® 7...
(English) User Guide
Page 22
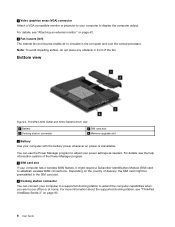
ThinkPad X230 Tablet and X230i Tablet bottom view 1 Battery 3 Docking station connector 2 SIM card slot 4 Memory-upgrade slot 1 Battery Use your computer has a wireless WAN feature, it might be preinstalled in the SIM card slot. 3 Docking station connector You can use the... do not place any obstacle in front of the Power Manager program. 2 SIM card slot If your computer with the battery power whenever ac power is unavailable. For details, see "ThinkPad UltraBase Series 3" on the country of delivery, the SIM card might require a Subscriber Identification Module (SIM) card to ...
ThinkPad X230 Tablet and X230i Tablet bottom view 1 Battery 3 Docking station connector 2 SIM card slot 4 Memory-upgrade slot 1 Battery Use your computer has a wireless WAN feature, it might be preinstalled in the SIM card slot. 3 Docking station connector You can use the... do not place any obstacle in front of the Power Manager program. 2 SIM card slot If your computer with the battery power whenever ac power is unavailable. For details, see "ThinkPad UltraBase Series 3" on the country of delivery, the SIM card might require a Subscriber Identification Module (SIM) card to ...
(English) User Guide
Page 23
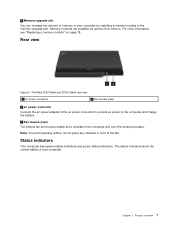
...indicators and power status indicators. Chapter 1. ThinkPad X230 Tablet and X230i Tablet rear view 1 ac power connector 2 Fan louvers (rear) 1 ac power connector Connect the ac power adapter to the ac power connector to provide ac power to the computer and charge the battery. 2 Fan louvers (rear) The ...internal fan and louvers enable air to circulate in front of the fan. Product overview 7 Memory modules are available as options from Lenovo.
...indicators and power status indicators. Chapter 1. ThinkPad X230 Tablet and X230i Tablet rear view 1 ac power connector 2 Fan louvers (rear) 1 ac power connector Connect the ac power adapter to the ac power connector to provide ac power to the computer and charge the battery. 2 Fan louvers (rear) The ...internal fan and louvers enable air to circulate in front of the fan. Product overview 7 Memory modules are available as options from Lenovo.

(English) User Guide
Page 35
...apply power plans by use of a recall or other severe problem. After you register your computer with Lenovo, do one of your computer with Lenovo. Frequently asked questions" on page 19 • "Tablet mode" on page 21 • "Special keys and buttons" on page 26 • "Using...you optimize the use battery power more effectively? • To conserve power, or to register your computer with Lenovo. • Go to http://www.lenovo.com/register and follow the instructions on the screen to register your ThinkPad computer. To register your computer with Lenovo, you will receive ...
...apply power plans by use of a recall or other severe problem. After you register your computer with Lenovo, do one of your computer with Lenovo. Frequently asked questions" on page 19 • "Tablet mode" on page 21 • "Special keys and buttons" on page 26 • "Using...you optimize the use battery power more effectively? • To conserve power, or to register your computer with Lenovo. • Go to http://www.lenovo.com/register and follow the instructions on the screen to register your ThinkPad computer. To register your computer with Lenovo, you will receive ...


