
(English) Access Connections Profile Deployment guide
Page 19
... capabilities. You can be created by an asset management system if it is being sent to prevent others from enabling the Administrator Feature on page 12. This optional step is designed primarily for manual importing. The Distribution Control List helps reduce unauthorized network access.
... capabilities. You can be created by an asset management system if it is being sent to prevent others from enabling the Administrator Feature on page 12. This optional step is designed primarily for manual importing. The Distribution Control List helps reduce unauthorized network access.
(English) Access Connections Profile Deployment guide
Page 20
... Policy Marking the box beside Do not allow clients to complete the following tasks: v Create, import and export location profiles. The Ethernet port will remain 12 Access Connections Deployment Guide
... Policy Marking the box beside Do not allow clients to complete the following tasks: v Create, import and export location profiles. The Ethernet port will remain 12 Access Connections Deployment Guide

(English) Access Connections Profile Deployment guide
Page 24
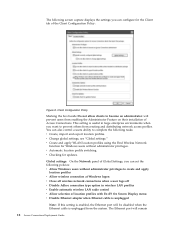
... Settings, you can set the following policies: v Security settings v Start applications automatically v Set default printer v Use VPN connection v Override TCP/IP and DNS defaults Figure 12. Define Location Profiles Additional Settings for Windows XP: Using the Windows XP operating system, you can set the following policies on the Additional Settings tab...
... Settings, you can set the following policies: v Security settings v Start applications automatically v Set default printer v Use VPN connection v Override TCP/IP and DNS defaults Figure 12. Define Location Profiles Additional Settings for Windows XP: Using the Windows XP operating system, you can set the following policies on the Additional Settings tab...

Hardware Maintenance Manual
Page 18
12 Hardware Maintenance Manual
12 Hardware Maintenance Manual

Hardware Maintenance Manual
Page 53
... 8 Combo audio jack 9 Ethernet connector 10 Always On USB connector 7 8 9 11 10 5 6 11 Media card reader slot 12 TrackPoint pointing stick 13 TrackPoint buttons 14 Touch pad 15 UltraNav® pointing device 16 Volume control buttons 17 Black button 18 Status indicators... (see Chapter 5 "Status indicators" on page 41) 19 Tablet buttons © Copyright Lenovo 2012 47 Locating computer controls, connectors, and indicators This topic introduces the locations of the computer hardware components. Locations This chapter ...
... 8 Combo audio jack 9 Ethernet connector 10 Always On USB connector 7 8 9 11 10 5 6 11 Media card reader slot 12 TrackPoint pointing stick 13 TrackPoint buttons 14 Touch pad 15 UltraNav® pointing device 16 Volume control buttons 17 Black button 18 Status indicators... (see Chapter 5 "Status indicators" on page 41) 19 Tablet buttons © Copyright Lenovo 2012 47 Locating computer controls, connectors, and indicators This topic introduces the locations of the computer hardware components. Locations This chapter ...

Hardware Maintenance Manual
Page 56
Major FRUs and CRUs 1 22 21 20 2 19 3 4 18 5 17 6 7 16 8 9 10 15 14 11 13 12 No. FRU description Self-service CRU Optional-service CRU 1 LCD unit No No 2 Keyboard bezel No No 3 Tablet Digitizer Pen Yes No 4 PCI Express Mini Card for wireless WAN (on some No Yes models) 4 mSATA solid-state drive (on some models) No No 5 PCI Express Mini Card for wireless LAN/WiMAX No Yes 6 Backup battery No Yes 7 Bluetooth daughter card No No 50 Hardware Maintenance Manual
Major FRUs and CRUs 1 22 21 20 2 19 3 4 18 5 17 6 7 16 8 9 10 15 14 11 13 12 No. FRU description Self-service CRU Optional-service CRU 1 LCD unit No No 2 Keyboard bezel No No 3 Tablet Digitizer Pen Yes No 4 PCI Express Mini Card for wireless WAN (on some No Yes models) 4 mSATA solid-state drive (on some models) No No 5 PCI Express Mini Card for wireless LAN/WiMAX No Yes 6 Backup battery No Yes 7 Bluetooth daughter card No No 50 Hardware Maintenance Manual

Hardware Maintenance Manual
Page 57
... case and switch assembly No No 10 Base cover assembly No No 11 Hard disk drive rubber rails or solid-state drive Yes No spacers 12 Hard disk drive or solid-state drive Yes No 13 Hard disk drive or solid-state drive cover Yes No 14 Memory module slot cover...
... case and switch assembly No No 10 Base cover assembly No No 11 Hard disk drive rubber rails or solid-state drive Yes No spacers 12 Hard disk drive or solid-state drive Yes No 13 Hard disk drive or solid-state drive cover Yes No 14 Memory module slot cover...

(Hebrew) User Guide
Page 26
- LCD: 1366 x 768 1600 x 2560 LED 6 6 UltraNav TrackPoint Fn VGAו(DisplayPort USB 3.0 Always On USBאחד • RJ45 ExpressCard 4ב1- LAN Bluetooth WAN WiMAX Tablet 305.0 12 228.7 9 27 31.3 1.06עד 1.23 222 Btu/hr) 65 W 307 Btu/hr) 90 W 10
- LCD: 1366 x 768 1600 x 2560 LED 6 6 UltraNav TrackPoint Fn VGAו(DisplayPort USB 3.0 Always On USBאחד • RJ45 ExpressCard 4ב1- LAN Bluetooth WAN WiMAX Tablet 305.0 12 228.7 9 27 31.3 1.06עד 1.23 222 Btu/hr) 65 W 307 Btu/hr) 90 W 10

(Hebrew) User Guide
Page 28
...8236; Fingerprint Software 12 Lenovo ThinkVantage Tools 1 Lenovo ThinkVantage Tools 3 Access Connections Active Protection System Client Security Solution Communications Utility Fingerprint Software Lenovo Solution Center Mobile Broadband Connect Password ...8236; SimpleTap System Update Tablet Shortcut Menu Lenovo ThinkVantage Tools Lenovo Lenovo -
...8236; Fingerprint Software 12 Lenovo ThinkVantage Tools 1 Lenovo ThinkVantage Tools 3 Access Connections Active Protection System Client Security Solution Communications Utility Fingerprint Software Lenovo Solution Center Mobile Broadband Connect Password ...8236; SimpleTap System Update Tablet Shortcut Menu Lenovo ThinkVantage Tools Lenovo Lenovo -

(Hebrew) User Guide
Page 113
...; .4 5 6 .7 8 .9 10 .11 C:\SWTOOLS\DRIVERS\MONITOR INF 12 .13 14 .15 16 .17 C:\SWTOOLS\DRIVERS C:\SWTOOLS\APPS 60 http://www.lenovo.com/ThinkPadDrivers ThinkPad Setup ThinkPad Setup ThinkPad Setup 1 F1 ThinkPad Setup 8 97
...; .4 5 6 .7 8 .9 10 .11 C:\SWTOOLS\DRIVERS\MONITOR INF 12 .13 14 .15 16 .17 C:\SWTOOLS\DRIVERS C:\SWTOOLS\APPS 60 http://www.lenovo.com/ThinkPadDrivers ThinkPad Setup ThinkPad Setup ThinkPad Setup 1 F1 ThinkPad Setup 8 97

(Hebrew) User Guide
Page 120
Enter supervisor Supervisor 49 ThinkPad Setup ) Supervisor .Disabled ThinkPad Setup Password at unattended boot Wake on LAN Disabledלא...8234;Password at restart • Disabled Password length options • )x characters (4≤x≤12 • Disabled Enabled Set Minimum Length Power-On Password 6 Security Password...
Enter supervisor Supervisor 49 ThinkPad Setup ) Supervisor .Disabled ThinkPad Setup Password at unattended boot Wake on LAN Disabledלא...8234;Password at restart • Disabled Password length options • )x characters (4≤x≤12 • Disabled Enabled Set Minimum Length Power-On Password 6 Security Password...

(English) User Guide
Page 3
...the UltraNav pointing device 30 Using the TrackPoint pointing device . . . . 30 Using the touch pad 32 Behavior of Authenticity label 10 Features 11 Specifications 12 Operating environment 13 ThinkVantage programs 13 Accessing ThinkVantage programs on deleting data from your hard disk drive or solid-state drive 63 Using firewalls 64... data against viruses 64 Chapter 5. Contents Read this first v Important safety information vi Conditions that require immediate action . . Recovery overview . . . . 65 © Copyright Lenovo 2012 i vii Safety guidelines vii Chapter 1.
...the UltraNav pointing device 30 Using the TrackPoint pointing device . . . . 30 Using the touch pad 32 Behavior of Authenticity label 10 Features 11 Specifications 12 Operating environment 13 ThinkVantage programs 13 Accessing ThinkVantage programs on deleting data from your hard disk drive or solid-state drive 63 Using firewalls 64... data against viruses 64 Chapter 5. Contents Read this first v Important safety information vi Conditions that require immediate action . . Recovery overview . . . . 65 © Copyright Lenovo 2012 i vii Safety guidelines vii Chapter 1.
(English) User Guide
Page 17
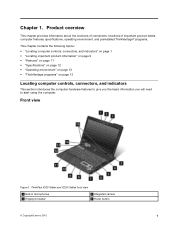
...page 12 • "Operating environment" on page 13 • "ThinkVantage programs" on page 13 Locating computer controls, connectors, and indicators This section introduces the computer hardware features to give you the basic information you will need to start using the computer. Front view Figure 1. ThinkPad X230 ...Tablet and X230i Tablet front view 1 Built-in microphones 3 Fingerprint reader 2 Integrated camera 4 Power button © Copyright Lenovo 2012 1 Chapter 1.
...page 12 • "Operating environment" on page 13 • "ThinkVantage programs" on page 13 Locating computer controls, connectors, and indicators This section introduces the computer hardware features to give you the basic information you will need to start using the computer. Front view Figure 1. ThinkPad X230 ...Tablet and X230i Tablet front view 1 Built-in microphones 3 Fingerprint reader 2 Integrated camera 4 Power button © Copyright Lenovo 2012 1 Chapter 1.

(English) User Guide
Page 18
... 15 Built-in stereo speakers 6 PCI Express Mini Card slot for wireless LAN/WiMAX card 8 TrackPoint® pointing stick 10 Touch pad 12 Volume control buttons 14 Tablet buttons 1 Built-in microphones The built-in microphones capture sound and voice when used with an application program capable...take pictures or hold the power button for four seconds or more. The fingerprint authentication technology enables you to start the computer, enter the ThinkPad® Setup program, or enter the Windows® operating system. The power button also can use the black button to interrupt the ...
... 15 Built-in stereo speakers 6 PCI Express Mini Card slot for wireless LAN/WiMAX card 8 TrackPoint® pointing stick 10 Touch pad 12 Volume control buttons 14 Tablet buttons 1 Built-in microphones The built-in microphones capture sound and voice when used with an application program capable...take pictures or hold the power button for four seconds or more. The fingerprint authentication technology enables you to start the computer, enter the ThinkPad® Setup program, or enter the Windows® operating system. The power button also can use the black button to interrupt the ...
(English) User Guide
Page 19
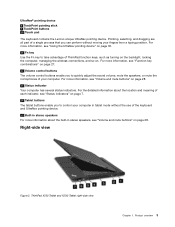
...on page 27. 12 Volume control buttons The volume control buttons enable you to quickly adjust the sound volume, mute the speakers, or mute the microphones of ThinkPad function keys, such ... advantage of your fingers from a typing position. Product overview 3 Right-side view Figure 2. ThinkPad X230 Tablet and X230i Tablet right-side view Chapter 1. Pointing, selecting, and dragging are all part...TrackPoint buttons 10 Touch pad The keyboard contains the Lenovo unique UltraNav pointing device. For the detailed information about the built-in tablet mode without moving ...
...on page 27. 12 Volume control buttons The volume control buttons enable you to quickly adjust the sound volume, mute the speakers, or mute the microphones of ThinkPad function keys, such ... advantage of your fingers from a typing position. Product overview 3 Right-side view Figure 2. ThinkPad X230 Tablet and X230i Tablet right-side view Chapter 1. Pointing, selecting, and dragging are all part...TrackPoint buttons 10 Touch pad The keyboard contains the Lenovo unique UltraNav pointing device. For the detailed information about the built-in tablet mode without moving ...

(English) User Guide
Page 27
... (7 mm height) solid-state drive System performance • mSATA solid-state drive Display The color display uses the Thin Film Transistor (TFT) technology. • Size: 12.5 inches (317.5 mm) • Resolution: - LCD: 1366-by -1600 • LED backlight • Brightness control • Integrated camera • Built-in microphones Chapter 1. Product overview...
... (7 mm height) solid-state drive System performance • mSATA solid-state drive Display The color display uses the Thin Film Transistor (TFT) technology. • Size: 12.5 inches (317.5 mm) • Resolution: - LCD: 1366-by -1600 • LED backlight • Brightness control • Integrated camera • Built-in microphones Chapter 1. Product overview...
(English) User Guide
Page 28
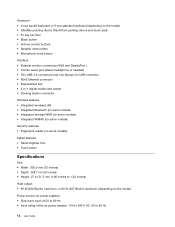
... models) Tablet features • Tablet Digitizer Pen • Touch panel Specifications Size • Width: 305.0 mm (12 inches) • Depth: 228.7 mm (9 inches) • Height: 27 to 31.3 mm (1.06 inches to 60 Hz 12 User Guide Power source (ac power adapter) • Sine-wave input at 50 to 60 Hz •...
... models) Tablet features • Tablet Digitizer Pen • Touch panel Specifications Size • Width: 305.0 mm (12 inches) • Depth: 228.7 mm (9 inches) • Height: 27 to 31.3 mm (1.06 inches to 60 Hz 12 User Guide Power source (ac power adapter) • Sine-wave input at 50 to 60 Hz •...

(English) User Guide
Page 59
Click the Driver tab. 10. If you can attach a data projector to your computer through the VGA connector on my computer. 12. Note: If your monitor. 14. Using your computer. Click the Monitor tab. If it is correct. If more than the resolution you are using on ...
Click the Driver tab. 10. If you can attach a data projector to your computer through the VGA connector on my computer. 12. Note: If your monitor. 14. Using your computer. Click the Monitor tab. If it is correct. If more than the resolution you are using on ...

(English) User Guide
Page 96
... in the slot and cannot be moved easily. 10. Turn the computer on page 72 12. Reinstall the battery. When the logo screen is displayed, press F1. Connect the ac power adapter and all cables. The ThinkPad Setup program main menu opens. 7. With the notched end of the memory module toward the...
... in the slot and cannot be moved easily. 10. Turn the computer on page 72 12. Reinstall the battery. When the logo screen is displayed, press F1. Connect the ac power adapter and all cables. The ThinkPad Setup program main menu opens. 7. With the notched end of the memory module toward the...

(English) User Guide
Page 100
... avoid shock hazard, disconnect the cables before opening the cover of the computer cools. 2. Remove the battery. Turn the computer over and reinstall the screws. 12. Turn the computer over again. Reinstall the battery. To remove the palm rest, do the following: 1. See "Replacing the battery" on page 72. 4. Wait for...
... avoid shock hazard, disconnect the cables before opening the cover of the computer cools. 2. Remove the battery. Turn the computer over and reinstall the screws. 12. Turn the computer over again. Reinstall the battery. To remove the palm rest, do the following: 1. See "Replacing the battery" on page 72. 4. Wait for...

