Hardware Maintenance Manual
Page 3
... Chapter 3. Fn key combinations . . . 53 Chapter 7. Removing and replacing a FRU 59 Before servicing ThinkPad X200 Tablet and X201 Tablet 60 1010 Digitizer pen 61 1020 Battery pack 61 1030 Hard disk drive (HDD) cover, HDD, ...and HDD rubber rails or solid state drive (SSD) and storage ...discs 33 Restoring the factory contents by using PC-Doctor for DOS. . . . 24 Lenovo ThinkVantage Toolbox (Lenovo System Toolbox 27 PC-Doctor for Windows 27 PC-Doctor for wireless WAN . . 78 1120...
... Chapter 3. Fn key combinations . . . 53 Chapter 7. Removing and replacing a FRU 59 Before servicing ThinkPad X200 Tablet and X201 Tablet 60 1010 Digitizer pen 61 1020 Battery pack 61 1030 Hard disk drive (HDD) cover, HDD, ...and HDD rubber rails or solid state drive (SSD) and storage ...discs 33 Restoring the factory contents by using PC-Doctor for DOS. . . . 24 Lenovo ThinkVantage Toolbox (Lenovo System Toolbox 27 PC-Doctor for Windows 27 PC-Doctor for wireless WAN . . 78 1120...

Hardware Maintenance Manual
Page 39
... agree with a Supplemental Recovery Disc. Insert the Operating System Recovery Disc when prompted and click Yes to complete the Windows setup. © Copyright Lenovo 2008, 2011 33 When all recovery disc sets come with the terms, select I accept these terms and conditions and then click Next. 4. The...page 33 • "Restoring the factory contents by using Product Recovery discs When the hard disk drive (HDD) or solid state drive (SSD) is replaced because of the recovery process is fully automated and no Product Recovery program is apparent on the screen to begin the operating ...
... agree with a Supplemental Recovery Disc. Insert the Operating System Recovery Disc when prompted and click Yes to complete the Windows setup. © Copyright Lenovo 2008, 2011 33 When all recovery disc sets come with the terms, select I accept these terms and conditions and then click Next. 4. The...page 33 • "Restoring the factory contents by using Product Recovery discs When the hard disk drive (HDD) or solid state drive (SSD) is replaced because of the recovery process is fully automated and no Product Recovery program is apparent on the screen to begin the operating ...
Hardware Maintenance Manual
Page 40
... and conditions and then click Next. Restoring the factory contents by using Recovery Disc Set When the hard disk drive (HDD) or solid state drive (SSD) is replaced because of a failure, no product recovery program is displayed or if you hear repeating beeps, release the F1 key. Insert the Applications and...
... and conditions and then click Next. Restoring the factory contents by using Recovery Disc Set When the hard disk drive (HDD) or solid state drive (SSD) is replaced because of a failure, no product recovery program is displayed or if you hear repeating beeps, release the F1 key. Insert the Applications and...
Hardware Maintenance Manual
Page 49
... customer needs to update its firmware to Slot-0 or the lower slot. Place the ThinkPad Notebook on HDD0 (Main hard disk drive) 1. The latest version is available at http://www.lenovo.com/support. 201x The solid state drive you have installed has not passed qualification for... BIOS Setup Utility. 2. Reseat the hard disk drive. 2. Load "Setup Defaults" in the primary drive bay the customer is using a non qualified SSD which is installed. Press to the computer. 3. Ultrabay hard disk drive. 3. System board. 2102 Initialization error on this system. System board. 2112 ...
... customer needs to update its firmware to Slot-0 or the lower slot. Place the ThinkPad Notebook on HDD0 (Main hard disk drive) 1. The latest version is available at http://www.lenovo.com/support. 201x The solid state drive you have installed has not passed qualification for... BIOS Setup Utility. 2. Reseat the hard disk drive. 2. Load "Setup Defaults" in the primary drive bay the customer is using a non qualified SSD which is installed. Press to the computer. 3. Ultrabay hard disk drive. 3. System board. 2102 Initialization error on this system. System board. 2112 ...

Hardware Maintenance Manual
Page 68
... unlocked position 1 , remove the battery pack in the locked position. 1030 Hard disk drive (HDD) cover, HDD, and HDD rubber rails or solid state drive (SSD) and storage converter For access, remove this FRU: • "1020 Battery pack" on it . Removal steps of the slot.
... unlocked position 1 , remove the battery pack in the locked position. 1030 Hard disk drive (HDD) cover, HDD, and HDD rubber rails or solid state drive (SSD) and storage converter For access, remove this FRU: • "1020 Battery pack" on it . Removal steps of the slot.

Hardware Maintenance Manual
Page 69
• Never remove the drive while the system is operating or is in suspend mode. Table 11. Removal steps of HDD cover, HDD, and HDD drive rubber rails or SSD and storage converter Step 1 Screw (quantity) Color Hard disk drive screw, M3 × 3 mm, wafer-head, nylon-coated (1) Black Torque 0.392 Nm (4 kgfcm) Chapter 8. Removing and replacing a FRU 63
• Never remove the drive while the system is operating or is in suspend mode. Table 11. Removal steps of HDD cover, HDD, and HDD drive rubber rails or SSD and storage converter Step 1 Screw (quantity) Color Hard disk drive screw, M3 × 3 mm, wafer-head, nylon-coated (1) Black Torque 0.392 Nm (4 kgfcm) Chapter 8. Removing and replacing a FRU 63

Hardware Maintenance Manual
Page 70
HDD and HDD rubber rails: Note: When installing: The rubber rails on the hard disk drive must be installed properly. Removal steps of HDD cover, HDD, and HDD drive rubber rails or SSD and storage converter (continued) Note: When installing: Make sure that the HDD connector or SSD connector is attached firmly. SSD and storage converter: 64 Hardware Maintenance Manual Table 11. Otherwise the drive cannot be attached to the replacement drive.
HDD and HDD rubber rails: Note: When installing: The rubber rails on the hard disk drive must be installed properly. Removal steps of HDD cover, HDD, and HDD drive rubber rails or SSD and storage converter (continued) Note: When installing: Make sure that the HDD connector or SSD connector is attached firmly. SSD and storage converter: 64 Hardware Maintenance Manual Table 11. Otherwise the drive cannot be attached to the replacement drive.

Hardware Maintenance Manual
Page 71
Table 11. Removal steps of HDD cover, HDD, and HDD drive rubber rails or SSD and storage converter (continued) When installing: When you install the SSD in this FRU in order: • "1020 Battery pack" on page 61 Table 12. Removing and replacing a FRU 65 Note: Loosen the screws 1 , but do as shown in the storage converter, do not remove them. Chapter 8. Removal steps of dimm Remove the DIMM slot cover as follows. 1040 DIMM For access, remove this figure.
Table 11. Removal steps of HDD cover, HDD, and HDD drive rubber rails or SSD and storage converter (continued) When installing: When you install the SSD in this FRU in order: • "1020 Battery pack" on page 61 Table 12. Removing and replacing a FRU 65 Note: Loosen the screws 1 , but do as shown in the storage converter, do not remove them. Chapter 8. Removal steps of dimm Remove the DIMM slot cover as follows. 1040 DIMM For access, remove this figure.

Hardware Maintenance Manual
Page 129
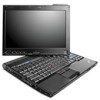
... latch 2 Integrated camera (for some models) 3 Universal serial bus (USB) connector 4 Tablet digitizer pen 5 Hard disk drive (HDD) or solid state drive (SSD) 6 RJ-11 (modem) connector (for some models) 7 Microphone jack 8 Stereo headphone jack 9 Universal serial bus (USB) connector 10 TrackPoint pointing stick 11 Trackpoint... 13 Touch pad 14 UltraNav® 15 Volume control buttons 16 ThinkVantage button 17 Power switch © Copyright Lenovo 2008, 2011 123 Locations This chapter presents the location of ThinkPad X200 Tablet and X201 Tablet features and hardware.
... latch 2 Integrated camera (for some models) 3 Universal serial bus (USB) connector 4 Tablet digitizer pen 5 Hard disk drive (HDD) or solid state drive (SSD) 6 RJ-11 (modem) connector (for some models) 7 Microphone jack 8 Stereo headphone jack 9 Universal serial bus (USB) connector 10 TrackPoint pointing stick 11 Trackpoint... 13 Touch pad 14 UltraNav® 15 Volume control buttons 16 ThinkVantage button 17 Power switch © Copyright Lenovo 2008, 2011 123 Locations This chapter presents the location of ThinkPad X200 Tablet and X201 Tablet features and hardware.

(Greek) Service and Troubleshooting Guide
Page 39
Access Help X SSD) Μν μη X X X X Tablet (*1) CRU X X PCI Express Mini Card για X δ κτυο LAN/WiMAX PCI Express Mini Card για X δ κτυο WAN Hardware Maintenance Manual X X X X X X X X *1 ThinkPad X201 Tablet μ νο CRU) 25
Access Help X SSD) Μν μη X X X X Tablet (*1) CRU X X PCI Express Mini Card για X δ κτυο LAN/WiMAX PCI Express Mini Card για X δ κτυο WAN Hardware Maintenance Manual X X X X X X X X *1 ThinkPad X201 Tablet μ νο CRU) 25

(English) Service and Troubleshooting Guide
Page 34
...Setup Instructions Access Help AC adapter Power cord for AC adapter TrackPoint® cap Battery Storage device (HDD or SSD) Memory Optical drive Tablet digitizer pen (*1) Keyboard Palm rest PCI Express Mini Card for wireless LAN/WiMAX PCI ...page 7. Note: Use only computer parts provided by Lenovo. For the telephone number of CRUs for wireless WAN Self-service CRUs X X X X X X X X X X Optional-service CRUs X X X X Online Hardware Maintenance Manual X X X X X X X X X *1 ThinkPad X201 Tablet model only 20 ThinkPad X201, X201s, and X201 Tablet Service and Troubleshooting Guide
...Setup Instructions Access Help AC adapter Power cord for AC adapter TrackPoint® cap Battery Storage device (HDD or SSD) Memory Optical drive Tablet digitizer pen (*1) Keyboard Palm rest PCI Express Mini Card for wireless LAN/WiMAX PCI ...page 7. Note: Use only computer parts provided by Lenovo. For the telephone number of CRUs for wireless WAN Self-service CRUs X X X X X X X X X X Optional-service CRUs X X X X Online Hardware Maintenance Manual X X X X X X X X X *1 ThinkPad X201 Tablet model only 20 ThinkPad X201, X201s, and X201 Tablet Service and Troubleshooting Guide
(Korean) Service and Troubleshooting Guide
Page 42
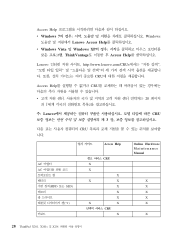
Access Help ANW%; wJN ,/OJC@. Lenovo Access Help& ,/OJC@. GQ, 3! !LeB )/ _dQ CRU! W vx!- Kv", "p( 8T TB" W "eSYn W 1C"G < !v Kv C[ IG; &xUO Y. Access Help& G`R v xE* CRU& 3M. v Windows Vista W Windows XPG fl: C[; ,/Om 6l: wNM& pg ANW%, ThinkVantageN L?Q D Access Help& ,/OJC@. gkZG 9! W vx; Windows 5r; kQ v'; &xUOY. W v*G m4 vx >M ,t3B 20 dLv G : C[OAi Y=z 0L OJC@. v Windows 7G fl: C[, 5r; Lenovo NM] vx gL., http://www.lenovo.com/CRUs!-B "Z?
Access Help ANW%; wJN ,/OJC@. Lenovo Access Help& ,/OJC@. GQ, 3! !LeB )/ _dQ CRU! W vx!- Kv", "p( 8T TB" W "eSYn W 1C"G < !v Kv C[ IG; &xUO Y. Access Help& G`R v xE* CRU& 3M. v Windows Vista W Windows XPG fl: C[; ,/Om 6l: wNM& pg ANW%, ThinkVantageN L?Q D Access Help& ,/OJC@. gkZG 9! W vx; Windows 5r; kQ v'; &xUOY. W v*G m4 vx >M ,t3B 20 dLv G : C[OAi Y=z 0L OJC@. v Windows 7G fl: C[, 5r; Lenovo NM] vx gL., http://www.lenovo.com/CRUs!-B "Z?

(Japanese) Service and Troubleshooting Guide
Page 34
...; SSD) ϝϞϦʔ X X X X ʔɾϖϯ (*1) Optional-service CRU ΩʔϘʔυ X ύʔϜϨετ X PCI Express ϛχɾ X LAN/WiMAX ༻) PCI Express X (ϫΠϠϨε WAN ༻) Web X X X X X X X X X *1 ThinkPad X201 Tablet ϞσϧͷΈ 20 ThinkPad X201ɺX201sɺ...
...; SSD) ϝϞϦʔ X X X X ʔɾϖϯ (*1) Optional-service CRU ΩʔϘʔυ X ύʔϜϨετ X PCI Express ϛχɾ X LAN/WiMAX ༻) PCI Express X (ϫΠϠϨε WAN ༻) Web X X X X X X X X X *1 ThinkPad X201 Tablet ϞσϧͷΈ 20 ThinkPad X201ɺX201sɺ...


