Hardware Maintenance Manual
Page 3
...Chapter 5. Status indicators . . . . . 59 Chapter 6. Removing and replacing a FRU 69 Before servicing ThinkPad X200, X200s, X200si, X201, X201i, and X201s 70 1010 Battery pack 71 1020 Hard disk drive (HDD) cover, HDD, and... HDD rubber rails or solid state drive (SSD) and storage converter 71 1030 DIMM 74 1040 Keyboard 77 1050 Palm rest or palm rest...WiMAX 83 1080 PCI Express Mini Card for DOS diagnostics program 34 System supporting the Lenovo diagnostics programs 39 Power system checkout 41 Checking the ac adapter 41 Checking operational charging...
...Chapter 5. Status indicators . . . . . 59 Chapter 6. Removing and replacing a FRU 69 Before servicing ThinkPad X200, X200s, X200si, X201, X201i, and X201s 70 1010 Battery pack 71 1020 Hard disk drive (HDD) cover, HDD, and... HDD rubber rails or solid state drive (SSD) and storage converter 71 1030 DIMM 74 1040 Keyboard 77 1050 Palm rest or palm rest...WiMAX 83 1080 PCI Express Mini Card for DOS diagnostics program 34 System supporting the Lenovo diagnostics programs 39 Power system checkout 41 Checking the ac adapter 41 Checking operational charging...

Hardware Maintenance Manual
Page 101
...: • "1010 Battery pack" on page 71 • "1020 Hard disk drive (HDD) cover, HDD, and HDD rubber rails or solid state drive (SSD) and storage converter" on page 71 • "1030 DIMM" on page 74 • "1040 Keyboard" on page 77 • "1050 Palm rest or ...page 87 • "1100 Keyboard bezel" on page 88 • "1110 Monaural speaker assembly (for ThinkPad X200, X201, and X201i ThinkPad X200, X201, and X201 Remove the top shielding assembly at first. Removal steps of base cover assembly for X200, X200s, X201s, and X201si)" on page 89 • "1120 I/O card assembly" on page 90 &#...
...: • "1010 Battery pack" on page 71 • "1020 Hard disk drive (HDD) cover, HDD, and HDD rubber rails or solid state drive (SSD) and storage converter" on page 71 • "1030 DIMM" on page 74 • "1040 Keyboard" on page 77 • "1050 Palm rest or ...page 87 • "1100 Keyboard bezel" on page 88 • "1110 Monaural speaker assembly (for ThinkPad X200, X201, and X201i ThinkPad X200, X201, and X201 Remove the top shielding assembly at first. Removal steps of base cover assembly for X200, X200s, X201s, and X201si)" on page 89 • "1120 I/O card assembly" on page 90 &#...
Hardware Maintenance Manual
Page 107
...accelerometer to make sure that HDD Active Protection still functions. Important notices for X200, X200s, X201s, and X201si)" on page 89 • "1120 I/O card...the system board, bear the following web site: http://www.lenovo.com/support/site.wss/document.do?lndocid=LOOK-WARNTY Select ...Input the machine type and the serial number. Run Diagnostics ➙ ThinkPad Devices ➙ HDD Active Protection Test. 60Y3787 60Y3839 60Y3790 60Y3840 System ...drive (HDD) cover, HDD, and HDD rubber rails or solid state drive (SSD) and storage converter" on page 71 • "1030 DIMM" on page 74...
...accelerometer to make sure that HDD Active Protection still functions. Important notices for X200, X200s, X201s, and X201si)" on page 89 • "1120 I/O card...the system board, bear the following web site: http://www.lenovo.com/support/site.wss/document.do?lndocid=LOOK-WARNTY Select ...Input the machine type and the serial number. Run Diagnostics ➙ ThinkPad Devices ➙ HDD Active Protection Test. 60Y3787 60Y3839 60Y3790 60Y3840 System ...drive (HDD) cover, HDD, and HDD rubber rails or solid state drive (SSD) and storage converter" on page 71 • "1030 DIMM" on page 74...
Hardware Maintenance Manual
Page 137
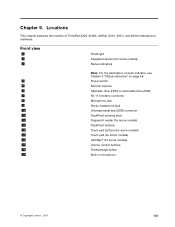
... models) Status indicators Note: For the description of ThinkPad X200, X200s, X200si, X201, X201i, and X201s features and hardware. Locations This chapter presents the location of each indicator, see Chapter 5 "Status indicators" on page 59. 4 Power switch 5 Security keyhole 6 Hard disk drive (HDD) or solid state drive (SSD) 7 RJ-11 (modem) connector 8 Microphone jack 9 Stereo...) 15 Touch pad (for some models) 16 UltraNav® (for some models) 17 Volume control buttons 18 ThinkVantage button 19 Built-in microphone © Copyright Lenovo , 2011 131 Chapter 9.
... models) Status indicators Note: For the description of ThinkPad X200, X200s, X200si, X201, X201i, and X201s features and hardware. Locations This chapter presents the location of each indicator, see Chapter 5 "Status indicators" on page 59. 4 Power switch 5 Security keyhole 6 Hard disk drive (HDD) or solid state drive (SSD) 7 RJ-11 (modem) connector 8 Microphone jack 9 Stereo...) 15 Touch pad (for some models) 16 UltraNav® (for some models) 17 Volume control buttons 18 ThinkVantage button 19 Built-in microphone © Copyright Lenovo , 2011 131 Chapter 9.

Hardware Maintenance Manual
Page 139
... LCD cover latch Built-in speaker 5-in-1 Media Card Reader or 3-in-1 Media Card Reader slot Hard disk drive (HDD) or solid state drive (SSD) 8 1 2 3 7 6 5 4 Rear view (ThinkPad X200 UltraBase) 1 AC power connector 2 Universal serial bus (USB) connectors 3 External monitor connector 4 DisplayPort connector 5 Headphone jack 6 Microphone jack 7 RJ-45 (Ethernet) connector 8 Security keyhole...
... LCD cover latch Built-in speaker 5-in-1 Media Card Reader or 3-in-1 Media Card Reader slot Hard disk drive (HDD) or solid state drive (SSD) 8 1 2 3 7 6 5 4 Rear view (ThinkPad X200 UltraBase) 1 AC power connector 2 Universal serial bus (USB) connectors 3 External monitor connector 4 DisplayPort connector 5 Headphone jack 6 Microphone jack 7 RJ-45 (Ethernet) connector 8 Security keyhole...


