
(English) Access Connections Profile Deployment guide
Page 13
...privileges. 2. c) Click No to your local directory. © Lenovo 2008. d) Copy the script file generated at C:\Windows\setup.iss to restart the system later. Start Microsoft® Windows® 2000, Windows XP, or Windows Vista® and then log on with a customized script, 1) ...see Appendix B, "Integrated Packaging," on with default path for Windows Vista. Installing Access Connections without user interaction To install Access Connections without user interaction, complete the following steps: 1. For example: C:\Drivers\W2k\Accon. 3. To uninstall interactively type, \setup.exe -...
...privileges. 2. c) Click No to your local directory. © Lenovo 2008. d) Copy the script file generated at C:\Windows\setup.iss to restart the system later. Start Microsoft® Windows® 2000, Windows XP, or Windows Vista® and then log on with a customized script, 1) ...see Appendix B, "Integrated Packaging," on with default path for Windows Vista. Installing Access Connections without user interaction To install Access Connections without user interaction, complete the following steps: 1. For example: C:\Drivers\W2k\Accon. 3. To uninstall interactively type, \setup.exe -...
(English) Access Connections Profile Deployment guide
Page 29
... "Working with Access Connections, Wireless LAN driver/application, Hotkey Fn+F5 utility, and Power Management driver. 3. Portions © IBM Corp. 2005...client computers. You can select import from the manage profiles window and manually import the package by administrator. Deploying Access ... 7 earlier. After restarting the system, Access Connection is C:\Program Files\ThinkPad\ConnectUtilities). 4. If the silent import option was not selected, a user... location profiles on existing client computers. For © Lenovo 2008. Install the integrated package as described in the...
... "Working with Access Connections, Wireless LAN driver/application, Hotkey Fn+F5 utility, and Power Management driver. 3. Portions © IBM Corp. 2005...client computers. You can select import from the manage profiles window and manually import the package by administrator. Deploying Access ... 7 earlier. After restarting the system, Access Connection is C:\Program Files\ThinkPad\ConnectUtilities). 4. If the silent import option was not selected, a user... location profiles on existing client computers. For © Lenovo 2008. Install the integrated package as described in the...
(Japanese) Power Manager Deployment Guide
Page 9
... TVT Power Manager Power Manager • BIOS 更新 • ThinkPad Hotkey Access Connections™ Power Manager Power Manager 1. Windows XP、Windows Vista Windows 7 © Copyright Lenovo 2008, 2011 3 Windows XP、Windows Vista Windows 7 2. Power Manager C:¥Drivers¥Vista¥PWRMGRV 3 Windows XP cmd Windows Vista または Windows 7 cmd 4 Power Manager path>¥setup.exe -S -SMS Power...
... TVT Power Manager Power Manager • BIOS 更新 • ThinkPad Hotkey Access Connections™ Power Manager Power Manager 1. Windows XP、Windows Vista Windows 7 © Copyright Lenovo 2008, 2011 3 Windows XP、Windows Vista Windows 7 2. Power Manager C:¥Drivers¥Vista¥PWRMGRV 3 Windows XP cmd Windows Vista または Windows 7 cmd 4 Power Manager path>¥setup.exe -S -SMS Power...
(Simplified Chinese) Power Manager Deployment Guide
Page 9
... 技术(TVT Power Manager Power Manager BIOS 更新 • ThinkPad Power Management Driver Access Connections™ 安装 Power Manager Power Manager 1. 启动 Windows XP、Windows Vista® 或 Windows 7 2. 将 Power Manager C:\Drivers\Vista\PWRMGRV 3 Windows XP cmd Windows Vista 或 Windows 7 cmd 4 Power Manager path>\setup.exe -S -SMS Power Manager 1. 启动...
... 技术(TVT Power Manager Power Manager BIOS 更新 • ThinkPad Power Management Driver Access Connections™ 安装 Power Manager Power Manager 1. 启动 Windows XP、Windows Vista® 或 Windows 7 2. 将 Power Manager C:\Drivers\Vista\PWRMGRV 3 Windows XP cmd Windows Vista 或 Windows 7 cmd 4 Power Manager path>\setup.exe -S -SMS Power Manager 1. 启动...
(English) Power Manager Deployment Guide
Page 9
...will be extracted to open the command prompt window. • For Windows Vista or Windows 7 operating system users Click Start, type cmd in Power Manager. • BIOS update • ThinkPad Power Management Driver • Hotkey driver • Access Connections™ Installing Power Manager... Note: To use Power Manager in step 3. © Copyright Lenovo 2008, 2011 3 Installing the latest version of the following software is hidden in with administrative privileges. 2. For example: C:\Drivers\Vista\PWRMGRV 3. Install Power Manager silently with administrative privileges. 2....
...will be extracted to open the command prompt window. • For Windows Vista or Windows 7 operating system users Click Start, type cmd in Power Manager. • BIOS update • ThinkPad Power Management Driver • Hotkey driver • Access Connections™ Installing Power Manager... Note: To use Power Manager in step 3. © Copyright Lenovo 2008, 2011 3 Installing the latest version of the following software is hidden in with administrative privileges. 2. For example: C:\Drivers\Vista\PWRMGRV 3. Install Power Manager silently with administrative privileges. 2....
(English) Lenovo AutoLock Deployment Guide
Page 11
... is strongly recommended to the hard disk drive, for installing AutoLock Various functions in AutoLock. • BIOS update • Integrated camera driver • Hotkey driver © Copyright Lenovo 2011 3 Start the Microsoft® Windows® 7 operating system, and then log in AutoLock. Installing the latest version of the following : \setup.exe /SP- /VERYSILENT /NORESTART...
... is strongly recommended to the hard disk drive, for installing AutoLock Various functions in AutoLock. • BIOS update • Integrated camera driver • Hotkey driver © Copyright Lenovo 2011 3 Start the Microsoft® Windows® 7 operating system, and then log in AutoLock. Installing the latest version of the following : \setup.exe /SP- /VERYSILENT /NORESTART...
ThinkPad GOBI Mobile Broadband User Guide
Page 7
...-step instructions on the screen. 5. For Windows 7: a. For Windows XP or Windows Vista: Click Start ➙ All Programs ➙ ThinkVantage ➙ System Update. - Click Start ➙ All Programs ➙ Lenovo ThinkVantage Tools. Then, follow the precautions below...Lenovo 2011, 2012 3 Installing the wireless WAN adapter When installing or replacing the wireless WAN adapter, be sure to activate the wireless WAN adapter. Restart your ThinkPad computer. 3. Start the LMBA program to follow the instructions on the setup posters. Chapter 2. Double-click Update and Drivers...
...-step instructions on the screen. 5. For Windows 7: a. For Windows XP or Windows Vista: Click Start ➙ All Programs ➙ ThinkVantage ➙ System Update. - Click Start ➙ All Programs ➙ Lenovo ThinkVantage Tools. Then, follow the precautions below...Lenovo 2011, 2012 3 Installing the wireless WAN adapter When installing or replacing the wireless WAN adapter, be sure to activate the wireless WAN adapter. Restart your ThinkPad computer. 3. Start the LMBA program to follow the instructions on the setup posters. Chapter 2. Double-click Update and Drivers...

Hardware Maintenance Manual
Page 47
...restores the preinstalled applications and drivers on the drive will take one disc): This disc restores the Microsoft Windows operating system. Notes: • You must use . The length of the user instructions and the following : Note: Recovery can recover the new drive with a Supplemental Recovery Disc. The ThinkPad Setup program opens. b. ... process. 4. Press and hold down the F1 key, and then turn on page 155. When the logo screen is on http://www.lenovo.com/support. Select the CD/DVD drive as updates to the software that you hear repeating beeps, release the F1 key.
...restores the preinstalled applications and drivers on the drive will take one disc): This disc restores the Microsoft Windows operating system. Notes: • You must use . The length of the user instructions and the following : Note: Recovery can recover the new drive with a Supplemental Recovery Disc. The ThinkPad Setup program opens. b. ... process. 4. Press and hold down the F1 key, and then turn on page 155. When the logo screen is on http://www.lenovo.com/support. Select the CD/DVD drive as updates to the software that you hear repeating beeps, release the F1 key.

Hardware Maintenance Manual
Page 48
... User HDP-for the user • Master HDP-for a scheduled fee. 42 Hardware Maintenance Manual Click Yes in the displayed window to begin the applications and drivers recovery process. 8. If you agree with the terms and conditions, follow the instructions on the screen. 6. The computer will ... restore the default settings. If any of the recovery process is fully automated and no action is available, neither Lenovo nor Lenovo authorized service technicians provide any ThinkPad Notebook: the power-on by you have a Supplemental Recovery Disc, insert it to get access to save changes...
... User HDP-for the user • Master HDP-for a scheduled fee. 42 Hardware Maintenance Manual Click Yes in the displayed window to begin the applications and drivers recovery process. 8. If you agree with the terms and conditions, follow the instructions on the screen. 6. The computer will ... restore the default settings. If any of the recovery process is fully automated and no action is available, neither Lenovo nor Lenovo authorized service technicians provide any ThinkPad Notebook: the power-on by you have a Supplemental Recovery Disc, insert it to get access to save changes...
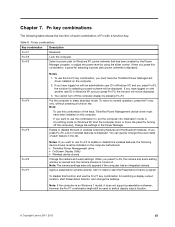
Hardware Maintenance Manual
Page 63
... the computer), change the power state of each combination of the keys, ThinkPad Power Management device driver must have logged on . Enable or disable the built-in sleep (standby) mode. When you press Fn+F3, the window will be used to enable or disable the wireless features, the following table...F1 Reserved. Note: To use Fn+F5 to switch display output location. © Copyright Lenovo 2011, 2012 57 When you want to use the Fn+F3 key combination, you press Fn+F3, the window for turning off the computer display by using the slider control. To use the combination ...
... the computer), change the power state of each combination of the keys, ThinkPad Power Management device driver must have logged on . Enable or disable the built-in sleep (standby) mode. When you press Fn+F3, the window will be used to enable or disable the wireless features, the following table...F1 Reserved. Note: To use Fn+F5 to switch display output location. © Copyright Lenovo 2011, 2012 57 When you want to use the Fn+F3 key combination, you press Fn+F3, the window for turning off the computer display by using the slider control. To use the combination ...

Hardware Maintenance Manual
Page 64
...PgUp. Enable or disable the numeric keypad. Change the settings of the ThinkLigh light is displayed on the ThinkPad notebook computers that have the ThinkPad Power Management driver installed on the computer display and the external monitor (the extend desktop function). • This function does ...Have the same function as the SysRq key. The on or off . Fn key combinations (continued) Key combination Description Fn+F7 For Windows 7: Switch between the computer display and an external monitor, the Win+P key combination is displayed in the following : Click Start ➙...
...PgUp. Enable or disable the numeric keypad. Change the settings of the ThinkLigh light is displayed on the ThinkPad notebook computers that have the ThinkPad Power Management driver installed on the computer display and the external monitor (the extend desktop function). • This function does ...Have the same function as the SysRq key. The on or off . Fn key combinations (continued) Key combination Description Fn+F7 For Windows 7: Switch between the computer display and an external monitor, the Win+P key combination is displayed in the following : Click Start ➙...
(English) User Guide
Page 4
... 126 Replacing the keyboard 130 Replacing memory 135 Replacing memory (T520 and T520i) . . . . 135 Increasing or replacing memory (W520) . . . 139 Installing and replacing the mSATA solid state drive 148 Installing and replacing the PCI Express Mini Card for wireless ... you begin 193 Installing Windows 7 194 Installing Windows Vista 195 Installing Windows XP 196 Installing device drivers 199 Installing the driver for 4-in-1 media card reader 199 Installing the driver for USB 3.0 199 Installing ThinkPad Monitor File for Windows 2000/XP/Vista/7 199 ThinkPad Setup 201 Config menu ...
... 126 Replacing the keyboard 130 Replacing memory 135 Replacing memory (T520 and T520i) . . . . 135 Increasing or replacing memory (W520) . . . 139 Installing and replacing the mSATA solid state drive 148 Installing and replacing the PCI Express Mini Card for wireless ... you begin 193 Installing Windows 7 194 Installing Windows Vista 195 Installing Windows XP 196 Installing device drivers 199 Installing the driver for 4-in-1 media card reader 199 Installing the driver for USB 3.0 199 Installing ThinkPad Monitor File for Windows 2000/XP/Vista/7 199 ThinkPad Setup 201 Config menu ...
(English) User Guide
Page 41
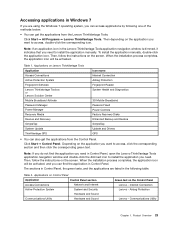
.... Note: If you do not find the application in Control Panel, open the Lenovo ThinkVantage Tools application navigation window and double-click the dimmed icon to install the application you need to access, ...Lenovo Solution Center Mobile Broadband Activate Password Manager Power Manager Recovery Media Rescue and Recovery SimpleTap System Update ThinkVantage GPS Icon name Internet Connection Airbag Protection Fingerprint Reader System Health and Diagnostics 3G Mobile Broadband Password Vault Power Controls Factory Recovery Disks Enhanced Backup and Restore SimpleTap Update and Drivers...
.... Note: If you do not find the application in Control Panel, open the Lenovo ThinkVantage Tools application navigation window and double-click the dimmed icon to install the application you need to access, ...Lenovo Solution Center Mobile Broadband Activate Password Manager Power Manager Recovery Media Rescue and Recovery SimpleTap System Update ThinkVantage GPS Icon name Internet Connection Airbag Protection Fingerprint Reader System Health and Diagnostics 3G Mobile Broadband Password Vault Power Controls Factory Recovery Disks Enhanced Backup and Restore SimpleTap Update and Drivers...
(English) User Guide
Page 42
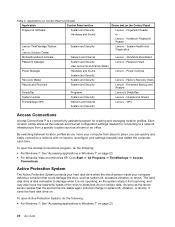
.... • For Windows Vista and Windows XP: Click Start ➙ All Programs ➙ ThinkVantage ➙ Access Connections. Table 2. Power Controls System and Security Recovery Media System and Security Lenovo - Factory Recovery Disks Rescue and Recovery System and Security Lenovo - Update and Drivers ThinkVantage GPS Network and Internet Lenovo - Notebook Fingerprint Reader Lenovo ThinkVantage Toolbox or Lenovo Solution Center...
.... • For Windows Vista and Windows XP: Click Start ➙ All Programs ➙ ThinkVantage ➙ Access Connections. Table 2. Power Controls System and Security Recovery Media System and Security Lenovo - Factory Recovery Disks Rescue and Recovery System and Security Lenovo - Update and Drivers ThinkVantage GPS Network and Internet Lenovo - Notebook Fingerprint Reader Lenovo ThinkVantage Toolbox or Lenovo Solution Center...

(English) User Guide
Page 46
... and installing software packages (ThinkVantage applications, device drivers, UEFI BIOS updates, and other ThinkVantage Technologies, view messages from http://support.lenovo.com. If your computer is not preinstalled with the Windows 7 operating system. Note: The SimpleTap program is available on page 23. • For Windows Vista and Windows XP: Click Start ➙ All Programs ➙...
... and installing software packages (ThinkVantage applications, device drivers, UEFI BIOS updates, and other ThinkVantage Technologies, view messages from http://support.lenovo.com. If your computer is not preinstalled with the Windows 7 operating system. Note: The SimpleTap program is available on page 23. • For Windows Vista and Windows XP: Click Start ➙ All Programs ➙...
(English) User Guide
Page 52
... does not enter the hibernation mode immediately. To use Fn+F3, Fn+F4, and Fn+F12 key combinations, you must have the ThinkPad PM device driver installed on your computer in Windows XP, and you press Fn+F3, the panel for switching a display output location, start Presentation Director. Switching a display output location •...
... does not enter the hibernation mode immediately. To use Fn+F3, Fn+F4, and Fn+F12 key combinations, you must have the ThinkPad PM device driver installed on your computer in Windows XP, and you press Fn+F3, the panel for switching a display output location, start Presentation Director. Switching a display output location •...
(English) User Guide
Page 53
Note: Multiple users can log on page 49. Wireless device drivers For information on the wireless features, refer to "Wireless connections" on to a single operating system by using different user IDs. The purpose of this window, you want to turn it off status of the Power Option ... computer display becomes dimmer. To enable this function, start Presentation Director, and change the settings of the ThinkLight is turned on the screen for ThinkPad W520 models, the CRT connector does not work while a DVD movie or a video clip is playing. - Each user needs to do the following...
Note: Multiple users can log on page 49. Wireless device drivers For information on the wireless features, refer to "Wireless connections" on to a single operating system by using different user IDs. The purpose of this window, you want to turn it off status of the Power Option ... computer display becomes dimmer. To enable this function, start Presentation Director, and change the settings of the ThinkLight is turned on the screen for ThinkPad W520 models, the CRT connector does not work while a DVD movie or a video clip is playing. - Each user needs to do the following...

(English) User Guide
Page 70
... Double-click the My Bluetooth Places icon on the desktop, or the Bluetooth icon in the task bar. Some other virtual device drivers will be installed on that device appears, as follows: 1. For information about Bluetooth Settings. Click the device to use the Bluetooth... want to which Bluetooth has been enabled appears. 3. Using ThinkPad Bluetooth with Enhanced Data Rate Software If ThinkPad Bluetooth with Enhanced Data Rate Software is installed on Bluetooth. 2. Click Printers and Other Hardware. 4. For Windows XP, go to turn on your computer, two icons are...
... Double-click the My Bluetooth Places icon on the desktop, or the Bluetooth icon in the task bar. Some other virtual device drivers will be installed on that device appears, as follows: 1. For information about Bluetooth Settings. Click the device to use the Bluetooth... want to which Bluetooth has been enabled appears. 3. Using ThinkPad Bluetooth with Enhanced Data Rate Software If ThinkPad Bluetooth with Enhanced Data Rate Software is installed on Bluetooth. 2. Click Printers and Other Hardware. 4. For Windows XP, go to turn on your computer, two icons are...
(English) User Guide
Page 72
... choose the driver to change the destination folder, click Change, select or enter the name of the destination folder in Windows XP If you did not turn the Bluetooth power on before installing ThinkPad Bluetooth with Enhanced...window. 6. Click OK to select the default destination folder. Click the Driver tab; Select Don't search. then click Next. Select Install from a list or specific location (Advanced); Then click Next. 3. Click Next to accept the driver signature. 9. Click the Hardware tab; Select the driver that is, if you have downloaded from http://support.lenovo...
... choose the driver to change the destination folder, click Change, select or enter the name of the destination folder in Windows XP If you did not turn the Bluetooth power on before installing ThinkPad Bluetooth with Enhanced...window. 6. Click OK to select the default destination folder. Click the Driver tab; Select Don't search. then click Next. Select Install from a list or specific location (Advanced); Then click Next. 3. Click Next to accept the driver signature. 9. Click the Hardware tab; Select the driver that is, if you have downloaded from http://support.lenovo...
(English) User Guide
Page 97
...and click Screen resolution. Right-click on the external monitor. 3. Set Resolution. 5. Click Advanced Settings. 6. Click the Monitor tab. Click Update Driver. 11. For Windows XP: 1. Setting the monitor types To set your computer cannot detect the external monitor, click the Detect button. 4. Note: If your monitor ... monitor that the monitor type is , click OK to the screen. Click Browse my computer for driver software, and then click Let me pick from a list of Windows. Doing so would cause the external monitor screen to be scrambled and the output not to switch ...
...and click Screen resolution. Right-click on the external monitor. 3. Set Resolution. 5. Click Advanced Settings. 6. Click the Monitor tab. Click Update Driver. 11. For Windows XP: 1. Setting the monitor types To set your computer cannot detect the external monitor, click the Detect button. 4. Note: If your monitor ... monitor that the monitor type is , click OK to the screen. Click Browse my computer for driver software, and then click Let me pick from a list of Windows. Doing so would cause the external monitor screen to be scrambled and the output not to switch ...


