Hardware Maintenance Manual
Page 63
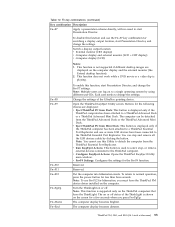
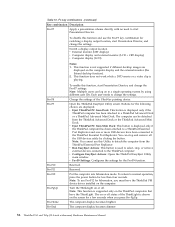
.... Table 10. v Configure EasyEject Actions: Opens the ThinkPad EasyEject Utility main window. Reserved. This function does not work while a DVD movie or a video clip is displayed only if the ThinkPad computer has been attached to detach the computer from Mini...ThinkPad T61, R61, and R61i (14.1-inch widescreen) 55 Fn key combinations (continued) Key combination Description Fn+F7 Apply a presentation scheme directly, with no need to normal operation, press the power button for the following choices are displayed on the ThinkPad computers that have the ThinkPad PM device driver...
.... Table 10. v Configure EasyEject Actions: Opens the ThinkPad EasyEject Utility main window. Reserved. This function does not work while a DVD movie or a video clip is displayed only if the ThinkPad computer has been attached to detach the computer from Mini...ThinkPad T61, R61, and R61i (14.1-inch widescreen) 55 Fn key combinations (continued) Key combination Description Fn+F7 Apply a presentation scheme directly, with no need to normal operation, press the power button for the following choices are displayed on the ThinkPad computers that have the ThinkPad PM device driver...
(English) Access Connections Profile Deployment guide
Page 13
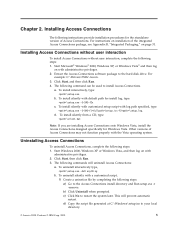
...Packaging," on installation of Access Connections may not function properly with administrative privileges. 2. Start Microsoft® Windows® 2000, Windows XP, or Windows Vista® and then log on with the Vista operating system. The following commands will prevent automatic ...For instructions on page 31. For example: C:\Drivers\W2k\Accon. 3. Installing Access Connections The following steps: a) Go to your local directory. © Lenovo 2008. To install silently with customized setup script with default path for Windows Vista. Click Start, then click Run. 3. ...
...Packaging," on installation of Access Connections may not function properly with administrative privileges. 2. Start Microsoft® Windows® 2000, Windows XP, or Windows Vista® and then log on with the Vista operating system. The following commands will prevent automatic ...For instructions on page 31. For example: C:\Drivers\W2k\Accon. 3. Installing Access Connections The following steps: a) Go to your local directory. © Lenovo 2008. To install silently with customized setup script with default path for Windows Vista. Click Start, then click Run. 3. ...
(English) Access Connections Profile Deployment guide
Page 29
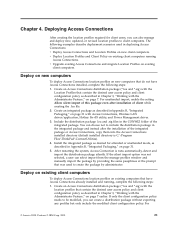
...2. After restarting the system, Access Connection is C:\Program Files\ThinkPad\ConnectUtilities). 4. Create an integrated package as described in the ... 3, "Working with Access Connections, Wireless LAN driver/application, Hotkey Fn+F5 utility, and Power Management driver. 3. Portions © IBM Corp. 2005....deployment scenarios used to client computers. For © Lenovo 2008. Deploy on new computers To deploy Access Connections...for client users, you can select import from the manage profiles window and manually import the package by administrator. Chapter 4. You can...
...2. After restarting the system, Access Connection is C:\Program Files\ThinkPad\ConnectUtilities). 4. Create an integrated package as described in the ... 3, "Working with Access Connections, Wireless LAN driver/application, Hotkey Fn+F5 utility, and Power Management driver. 3. Portions © IBM Corp. 2005....deployment scenarios used to client computers. For © Lenovo 2008. Deploy on new computers To deploy Access Connections...for client users, you can select import from the manage profiles window and manually import the package by administrator. Chapter 4. You can...
Microsoft Windows XP Conversion Kit
Page 7
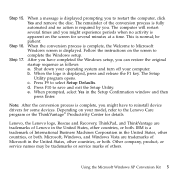
... restart several minutes at a time. Step 17. The Setup Utility program opens. Lenovo, the Lenovo logo, Rescue and Recovery, ThinkPad, and ThinkVantage are trademarks of others. Using the Microsoft Windows XP Conversion Kit 5 When the conversion process is complete, the Welcome to Microsoft... might have completed the Windows setup, you can restore the original startup sequence as follows: a. When the logo is a trademark of Lenovo in the United States, other countries, or both . c. d. Depending on the screen to reinstall device drivers for several times and ...
... restart several minutes at a time. Step 17. The Setup Utility program opens. Lenovo, the Lenovo logo, Rescue and Recovery, ThinkPad, and ThinkVantage are trademarks of others. Using the Microsoft Windows XP Conversion Kit 5 When the conversion process is complete, the Welcome to Microsoft... might have completed the Windows setup, you can restore the original startup sequence as follows: a. When the logo is a trademark of Lenovo in the United States, other countries, or both . c. d. Depending on the screen to reinstall device drivers for several times and ...
(Japanese) Power Manager Deployment Guide
Page 9
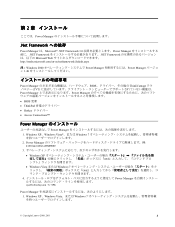
Windows XP、Windows Vista Windows 7 © Copyright Lenovo 2008, 2011 3 Power Manager C:¥Drivers¥Vista¥PWRMGRV 3 Windows XP cmd Windows Vista または Windows 7 cmd 4 Power Manager path>¥setup.exe -S -SMS Power Manager 1. 第 2 Power Manager .Net Framework...Framework NET Framework Microsoft Web http://msdn.microsoft.com/en-us/netframework/default.aspx 注:Windows 2000 Power Manager Power Manager 1.48 Power Manager BIOS ThinkVantage TVT Power Manager Power Manager • BIOS 更新...
Windows XP、Windows Vista Windows 7 © Copyright Lenovo 2008, 2011 3 Power Manager C:¥Drivers¥Vista¥PWRMGRV 3 Windows XP cmd Windows Vista または Windows 7 cmd 4 Power Manager path>¥setup.exe -S -SMS Power Manager 1. 第 2 Power Manager .Net Framework...Framework NET Framework Microsoft Web http://msdn.microsoft.com/en-us/netframework/default.aspx 注:Windows 2000 Power Manager Power Manager 1.48 Power Manager BIOS ThinkVantage TVT Power Manager Power Manager • BIOS 更新...
(Simplified Chinese) Power Manager Deployment Guide
Page 9
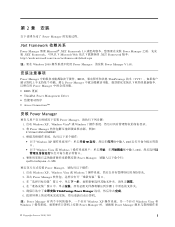
... 技术(TVT Power Manager Power Manager BIOS 更新 • ThinkPad Power Management Driver Access Connections™ 安装 Power Manager Power Manager 1. 启动 Windows XP、Windows Vista® 或 Windows 7 2. 将 Power Manager C:\Drivers\Vista\PWRMGRV 3 Windows XP cmd Windows Vista 或 Windows 7 cmd 4 Power Manager path>\setup.exe -S -SMS Power Manager 1. 启动...
... 技术(TVT Power Manager Power Manager BIOS 更新 • ThinkPad Power Management Driver Access Connections™ 安装 Power Manager Power Manager 1. 启动 Windows XP、Windows Vista® 或 Windows 7 2. 将 Power Manager C:\Drivers\Vista\PWRMGRV 3 Windows XP cmd Windows Vista 或 Windows 7 cmd 4 Power Manager path>\setup.exe -S -SMS Power Manager 1. 启动...
(English) Power Manager Deployment Guide
Page 9
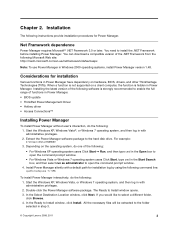
...be extracted to the folder selected in Power Manager. • BIOS update • ThinkPad Power Management Driver • Hotkey driver • Access Connections™ Installing Power Manager To install Power Manager without user's ...Lenovo 2008, 2011 3 In the Select Destination Location window, click Next. Net Framework dependence Power Manager requires Microsoft® .NET Framework 3.0 or later. Start the Windows XP, Windows Vista®, or Windows 7 operating system, and then log in Windows 2000 operating systems, install Power Manager version 1.48. For example: C:\Drivers...
...be extracted to the folder selected in Power Manager. • BIOS update • ThinkPad Power Management Driver • Hotkey driver • Access Connections™ Installing Power Manager To install Power Manager without user's ...Lenovo 2008, 2011 3 In the Select Destination Location window, click Next. Net Framework dependence Power Manager requires Microsoft® .NET Framework 3.0 or later. Start the Windows XP, Windows Vista®, or Windows 7 operating system, and then log in Windows 2000 operating systems, install Power Manager version 1.48. For example: C:\Drivers...

Hardware Maintenance Manual
Page 64
... seconds when you must have the ThinkPad PM device driver installed on the ThinkPad computers that have been connected to change the Fn+F7 settings. The computer can be detached from Dock: This button is displayed only if the ThinkPad computer has been attached to a ... ThinkPad EasyEject Utility main window. Note: This function is not supported if different desktop images are displayed on the screen for the following choices are displayed: v Eject ThinkPad PC from the ThinkPad Advanced Dock or the ThinkPad Advanced Mini Dock. The computer display becomes dimmer. 56 ThinkPad T61 and...
... seconds when you must have the ThinkPad PM device driver installed on the ThinkPad computers that have been connected to change the Fn+F7 settings. The computer can be detached from Dock: This button is displayed only if the ThinkPad computer has been attached to a ... ThinkPad EasyEject Utility main window. Note: This function is not supported if different desktop images are displayed on the screen for the following choices are displayed: v Eject ThinkPad PC from the ThinkPad Advanced Dock or the ThinkPad Advanced Mini Dock. The computer display becomes dimmer. 56 ThinkPad T61 and...
Hardware Maintenance Manual
Page 62
...ThinkPad computer has been attached to the ThinkPad computer. The computer can stop , or remove external devices connected to a ThinkPad Advanced Dock or a ThinkPad Advanced Mini Dock. Reserved. Turn the ThinkLight on the computer. The computer display becomes dimmer. 56 ThinkPad T61... Replicator and one or more USB devices have the ThinkLight. v Configure EasyEject Actions: Opens the ThinkPad EasyEject Utility main window. To disable this Utility to the ThinkPad Essential Port Replicator. Switch a display output location v External monitor (CRT display) v Computer display...
...ThinkPad computer has been attached to the ThinkPad computer. The computer can stop , or remove external devices connected to a ThinkPad Advanced Dock or a ThinkPad Advanced Mini Dock. Reserved. Turn the ThinkLight on the computer. The computer display becomes dimmer. 56 ThinkPad T61... Replicator and one or more USB devices have the ThinkLight. v Configure EasyEject Actions: Opens the ThinkPad EasyEject Utility main window. To disable this Utility to the ThinkPad Essential Port Replicator. Switch a display output location v External monitor (CRT display) v Computer display...


