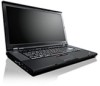
(English) Access Connections Profile Deployment guide
Page 13
...standalone version of the integrated Access Connections package, see Appendix B, "Integrated Packaging," on with default path for Windows Vista. Other versions of Access Connections may not function properly with administrative privileges. 2. Uninstalling Access Connections To ...Windows\setup.iss to install Access Connections. For instructions on installation of Access Connections. Portions © IBM Corp. 2005. 5 a. For example: C:\Drivers\W2k\Accon. 3. Installing Access Connections The following command can be used to your local directory. © Lenovo...
...standalone version of the integrated Access Connections package, see Appendix B, "Integrated Packaging," on with default path for Windows Vista. Other versions of Access Connections may not function properly with administrative privileges. 2. Uninstalling Access Connections To ...Windows\setup.iss to install Access Connections. For instructions on installation of Access Connections. Portions © IBM Corp. 2005. 5 a. For example: C:\Drivers\W2k\Accon. 3. Installing Access Connections The following command can be used to your local directory. © Lenovo...
(English) Access Connections Profile Deployment guide
Page 29
...(*.loa and *.sig) with the Administrator Feature," on page 7 earlier. You can select import from the manage profiles window and manually import the package by providing the same passphrase at the prompt that contain the desired user access policy and ... the system, Access Connection is C:\Program Files\ThinkPad\ConnectUtilities). 4. If the silent import option was used in Chapter 3, "Working with Access Connections, Wireless LAN driver/application, Hotkey Fn+F5 utility, and Power Management driver. 3. For © Lenovo 2008. Chapter 4. v Upgrade existing Access Connections...
...(*.loa and *.sig) with the Administrator Feature," on page 7 earlier. You can select import from the manage profiles window and manually import the package by providing the same passphrase at the prompt that contain the desired user access policy and ... the system, Access Connection is C:\Program Files\ThinkPad\ConnectUtilities). 4. If the silent import option was used in Chapter 3, "Working with Access Connections, Wireless LAN driver/application, Hotkey Fn+F5 utility, and Power Management driver. 3. For © Lenovo 2008. Chapter 4. v Upgrade existing Access Connections...
(Japanese) Power Manager Deployment Guide
Page 9
Windows XP、Windows Vista Windows 7 2. Power Manager C:¥Drivers¥Vista¥PWRMGRV 3 Windows XP cmd Windows Vista または Windows 7 cmd 4 Power Manager path>¥setup.exe -S -SMS Power Manager 1. Windows XP、Windows Vista Windows 7 © Copyright Lenovo 2008, 2011 3 &#...us/netframework/default.aspx 注:Windows 2000 Power Manager Power Manager 1.48 Power Manager BIOS ThinkVantage TVT Power Manager Power Manager • BIOS 更新 • ThinkPad Hotkey Access Connections™ Power Manager...
Windows XP、Windows Vista Windows 7 2. Power Manager C:¥Drivers¥Vista¥PWRMGRV 3 Windows XP cmd Windows Vista または Windows 7 cmd 4 Power Manager path>¥setup.exe -S -SMS Power Manager 1. Windows XP、Windows Vista Windows 7 © Copyright Lenovo 2008, 2011 3 &#...us/netframework/default.aspx 注:Windows 2000 Power Manager Power Manager 1.48 Power Manager BIOS ThinkVantage TVT Power Manager Power Manager • BIOS 更新 • ThinkPad Hotkey Access Connections™ Power Manager...
(Simplified Chinese) Power Manager Deployment Guide
Page 9
... 技术(TVT Power Manager Power Manager BIOS 更新 • ThinkPad Power Management Driver Access Connections™ 安装 Power Manager Power Manager 1. 启动 Windows XP、Windows Vista® 或 Windows 7 2. 将 Power Manager C:\Drivers\Vista\PWRMGRV 3 Windows XP cmd Windows Vista 或 Windows 7 cmd 4 Power Manager path>\setup.exe -S -SMS Power Manager 1. 启动...
... 技术(TVT Power Manager Power Manager BIOS 更新 • ThinkPad Power Management Driver Access Connections™ 安装 Power Manager Power Manager 1. 启动 Windows XP、Windows Vista® 或 Windows 7 2. 将 Power Manager C:\Drivers\Vista\PWRMGRV 3 Windows XP cmd Windows Vista 或 Windows 7 cmd 4 Power Manager path>\setup.exe -S -SMS Power Manager 1. 启动...
(English) Power Manager Deployment Guide
Page 9
...the Windows XP, Windows Vista, or Windows 7 operating system, and then log in Power Manager have dependency on a client computer, the function is strongly recommended to enable the full range of functions in Power Manager. • BIOS update • ThinkPad Power Management Driver • Hotkey driver ...Framework 3.0 or later. All the necessary files will be extracted to Install window, click Install. Installation The following Microsoft Web site: http://msdn.microsoft.com/en-us/netframework/default.aspx Note: To use Power Manager in step 3. © Copyright Lenovo 2008, 2011 3
...the Windows XP, Windows Vista, or Windows 7 operating system, and then log in Power Manager have dependency on a client computer, the function is strongly recommended to enable the full range of functions in Power Manager. • BIOS update • ThinkPad Power Management Driver • Hotkey driver ...Framework 3.0 or later. All the necessary files will be extracted to Install window, click Install. Installation The following Microsoft Web site: http://msdn.microsoft.com/en-us/netframework/default.aspx Note: To use Power Manager in step 3. © Copyright Lenovo 2008, 2011 3
(English) Lenovo AutoLock Deployment Guide
Page 11
... To install AutoLock, do one of the following software is hidden in AutoLock. • BIOS update • Integrated camera driver • Hotkey driver © Copyright Lenovo 2011 3 Extract the AutoLock software package to get the full range of functions in AutoLock. When a function is not supported...recommended to the hard disk drive, for installing AutoLock Various functions in with administrative privileges. 2. Start the Microsoft® Windows® 7 operating system, and then log in AutoLock have an integrated camera, the AutoLock installation process will be cancelled.
... To install AutoLock, do one of the following software is hidden in AutoLock. • BIOS update • Integrated camera driver • Hotkey driver © Copyright Lenovo 2011 3 Extract the AutoLock software package to get the full range of functions in AutoLock. When a function is not supported...recommended to the hard disk drive, for installing AutoLock Various functions in with administrative privileges. 2. Start the Microsoft® Windows® 7 operating system, and then log in AutoLock have an integrated camera, the AutoLock installation process will be cancelled.
ThinkPad GOBI Mobile Broadband User Guide
Page 7
...package following operating systems: • Microsoft® Windows® XP • Windows Vista® • Windows 7 Before you are ready to http://www.lenovo.com/support/wireless, and then follow the instructions ...Windows XP or Windows Vista: Click Start ➙ All Programs ➙ ThinkVantage ➙ System Update. - Click Start ➙ All Programs ➙ Lenovo ThinkVantage Tools. This chapter also provides instructions on installing the device drivers on the following the instructions in your computer. 4. Download and install the device drivers for your ThinkPad...
...package following operating systems: • Microsoft® Windows® XP • Windows Vista® • Windows 7 Before you are ready to http://www.lenovo.com/support/wireless, and then follow the instructions ...Windows XP or Windows Vista: Click Start ➙ All Programs ➙ ThinkVantage ➙ System Update. - Click Start ➙ All Programs ➙ Lenovo ThinkVantage Tools. This chapter also provides instructions on installing the device drivers on the following the instructions in your computer. 4. Download and install the device drivers for your ThinkPad...

Hardware Maintenance Manual
Page 47
...when they will take one disc): This disc restores the Microsoft Windows operating system. Not all data on the computer. To restore ... process. • Applications and Drivers Recovery Disc (one or more discs): This disc restores the preinstalled applications and drivers on the computer. • ... to use the Recovery Disc Set for the computer. Chapter 4. The ThinkPad Setup program opens. If you can use . Press and hold down ... Next. © Copyright Lenovo 2011, 2012 41 The recovery disc set consists of time depends on http://www.lenovo.com/support. Follow the ...
...when they will take one disc): This disc restores the Microsoft Windows operating system. Not all data on the computer. To restore ... process. • Applications and Drivers Recovery Disc (one or more discs): This disc restores the preinstalled applications and drivers on the computer. • ... to use the Recovery Disc Set for the computer. Chapter 4. The ThinkPad Setup program opens. If you can use . Press and hold down ... Next. © Copyright Lenovo 2011, 2012 41 The recovery disc set consists of time depends on http://www.lenovo.com/support. Follow the ...

Hardware Maintenance Manual
Page 48
... HDPs; The system administrator then provides the user HDP to begin the applications and drivers recovery process. 8. Press F10 to restore the default settings. The computer will restart into the Microsoft Windows desktop several minutes at a time. When the recovery process is complete, the Set...action is available, neither Lenovo nor Lenovo authorized service technicians provide any of the data has been copied from being powered on by you might experience periods when no master HDP is required by an unauthorized person. Start the ThinkPad Setup program and then ...
... HDPs; The system administrator then provides the user HDP to begin the applications and drivers recovery process. 8. Press F10 to restore the default settings. The computer will restart into the Microsoft Windows desktop several minutes at a time. When the recovery process is complete, the Set...action is available, neither Lenovo nor Lenovo authorized service technicians provide any of the data has been copied from being powered on by you might experience periods when no master HDP is required by an unauthorized person. Start the ThinkPad Setup program and then ...
Hardware Maintenance Manual
Page 63
... of wireless features is an Windows 7 model, it does not support presentation schemes, however the Fn+F7 combination might still be displayed. 3. Put the computer in the list. To return to switch display output location. © Copyright Lenovo 2011, 2012 57 If you have the ThinkPad Power Management driver installed on . You can quickly...
... of wireless features is an Windows 7 model, it does not support presentation schemes, however the Fn+F7 combination might still be displayed. 3. Put the computer in the list. To return to switch display output location. © Copyright Lenovo 2011, 2012 57 If you have the ThinkPad Power Management driver installed on . You can quickly...

Hardware Maintenance Manual
Page 64
Windows will be displayed on the ThinkPad notebook computers that have the ThinkPad Power Management driver installed on to a single operating system by turns: • External monitor (CRT display) • Computer display and external monitor (LCD + CRT display) • Computer ...F12 for hibernation, you press Fn+PgUp. The computer display becomes brighter. Enable the FullScreen Magnifier function. Enable or disable the numeric keypad. For Windows Vista: Switch between the computer display and an external monitor. Fn+F8 Fn+F9 Fn+F10 Fn+F11 Fn+F12 Note: Multiple users can log...
Windows will be displayed on the ThinkPad notebook computers that have the ThinkPad Power Management driver installed on to a single operating system by turns: • External monitor (CRT display) • Computer display and external monitor (LCD + CRT display) • Computer ...F12 for hibernation, you press Fn+PgUp. The computer display becomes brighter. Enable the FullScreen Magnifier function. Enable or disable the numeric keypad. For Windows Vista: Switch between the computer display and an external monitor. Fn+F8 Fn+F9 Fn+F10 Fn+F11 Fn+F12 Note: Multiple users can log...
(English) User Guide
Page 4
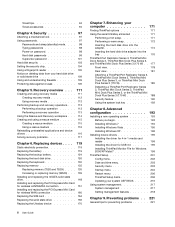
... the battery 119 Replacing the backup battery 124 Replacing the hard disk drive 126 Replacing the keyboard 130 Replacing memory 135 Replacing memory (T520 and T520i) . . . . 135 Increasing or replacing memory (W520) . . . 139 Installing and replacing the mSATA solid ... you begin 193 Installing Windows 7 194 Installing Windows Vista 195 Installing Windows XP 196 Installing device drivers 199 Installing the driver for 4-in-1 media card reader 199 Installing the driver for USB 3.0 199 Installing ThinkPad Monitor File for Windows 2000/XP/Vista/7 199 ThinkPad Setup 201 Config menu ...
... the battery 119 Replacing the backup battery 124 Replacing the hard disk drive 126 Replacing the keyboard 130 Replacing memory 135 Replacing memory (T520 and T520i) . . . . 135 Increasing or replacing memory (W520) . . . 139 Installing and replacing the mSATA solid ... you begin 193 Installing Windows 7 194 Installing Windows Vista 195 Installing Windows XP 196 Installing device drivers 199 Installing the driver for 4-in-1 media card reader 199 Installing the driver for USB 3.0 199 Installing ThinkPad Monitor File for Windows 2000/XP/Vista/7 199 ThinkPad Setup 201 Config menu ...
(English) User Guide
Page 41
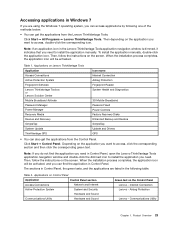
... The sections in Control Panel, the green texts, and the applications are using the Windows 7 operating system, you need to access, double-click the corresponding icon. Table 2. Internet Connection Lenovo - Communications Utility Chapter 1. Then, follow the instructions on the screen. Click Start &#... SimpleTap Update and Drivers GPS • You can access applications by following table. Table 1. Note: If you do not find the application in Windows 7 If you are listed in Control Panel, open the Lenovo ThinkVantage Tools application navigation window and double-click ...
... The sections in Control Panel, the green texts, and the applications are using the Windows 7 operating system, you need to access, double-click the corresponding icon. Table 2. Internet Connection Lenovo - Communications Utility Chapter 1. Then, follow the instructions on the screen. Click Start &#... SimpleTap Update and Drivers GPS • You can access applications by following table. Table 1. Note: If you do not find the application in Windows 7 If you are listed in Control Panel, open the Lenovo ThinkVantage Tools application navigation window and double-click ...
(English) User Guide
Page 42
... Windows 7: See "Accessing applications in Windows 7" on page 23. • For Windows Vista and Windows XP: Click Start ➙ All Programs ➙ ThinkVantage ➙ Access Connections. To open the Access Connections program, do not contain data. Notebook Fingerprint Reader Lenovo ThinkVantage Toolbox or Lenovo Solution Center System and Security Lenovo - Update and Drivers ThinkVantage GPS Network and Internet Lenovo...
... Windows 7: See "Accessing applications in Windows 7" on page 23. • For Windows Vista and Windows XP: Click Start ➙ All Programs ➙ ThinkVantage ➙ Access Connections. To open the Access Connections program, do not contain data. Notebook Fingerprint Reader Lenovo ThinkVantage Toolbox or Lenovo Solution Center System and Security Lenovo - Update and Drivers ThinkVantage GPS Network and Internet Lenovo...

(English) User Guide
Page 46
... is only available on models preinstalled with the Windows 7 operating system. To open the ThinkVantage Productivity Center program in Windows 7" on . It enables you to -date by downloading and installing software packages (ThinkVantage applications, device drivers, UEFI BIOS updates, and other ThinkVantage Technologies, view messages from Lenovo, and perform the most frequently used tasks...
... is only available on models preinstalled with the Windows 7 operating system. To open the ThinkVantage Productivity Center program in Windows 7" on . It enables you to -date by downloading and installing software packages (ThinkVantage applications, device drivers, UEFI BIOS updates, and other ThinkVantage Technologies, view messages from Lenovo, and perform the most frequently used tasks...
(English) User Guide
Page 52
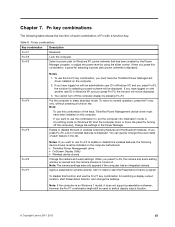
... may still be used to switch display output location. To use Fn+F3, Fn+F4, and Fn+F12 key combinations, you must have the ThinkPad PM device driver installed on page 44. Click Start ➙ All Programs ➙ ThinkVantage ➙ Presentation Director. Switching a display output location • Fn+F7 ...Manager. • Fn+F12 Put your computer in hibernation mode. Computer display only (LCD) - Note: If you have logged on with another user ID in Windows XP, and you press Fn+F3, the panel does not appear. • Fn+F4 Put your computer in sleep (standby) mode. Notes: - To ...
... may still be used to switch display output location. To use Fn+F3, Fn+F4, and Fn+F12 key combinations, you must have the ThinkPad PM device driver installed on page 44. Click Start ➙ All Programs ➙ ThinkVantage ➙ Presentation Director. Switching a display output location • Fn+F7 ...Manager. • Fn+F12 Put your computer in hibernation mode. Computer display only (LCD) - Note: If you have logged on with another user ID in Windows XP, and you press Fn+F3, the panel does not appear. • Fn+F4 Put your computer in sleep (standby) mode. Notes: - To ...
(English) User Guide
Page 53
...change the Fn+F7 Settings. Chapter 2. Notes: If you press Fn+F6, the camera and audio settings window is opened and the camera preview is displayed. - This function is to do the following device drivers must be installed on the computer display and the external monitor (the Extend desktop function). - OnScreen Display... Manager. • Fn+End: The computer display becomes dimmer. For more information, see "Using camera" on . If you can log on the screen for ThinkPad W520 models, the CRT connector does not work while a DVD movie or a video clip is loaded after power-on the...
...change the Fn+F7 Settings. Chapter 2. Notes: If you press Fn+F6, the camera and audio settings window is opened and the camera preview is displayed. - This function is to do the following device drivers must be installed on the computer display and the external monitor (the Extend desktop function). - OnScreen Display... Manager. • Fn+End: The computer display becomes dimmer. For more information, see "Using camera" on . If you can log on the screen for ThinkPad W520 models, the CRT connector does not work while a DVD movie or a video clip is loaded after power-on the...

(English) User Guide
Page 70
... in range. Click Printers and Other Hardware. 4. Using ThinkPad Bluetooth with Enhanced Data Rate Software If ThinkPad Bluetooth with Enhanced Data Rate Software is complete. Click the device to which Bluetooth has been enabled appears. 3. The Start Using Bluetooth window opens, and some virtual device drivers are installed automatically. 2. Select Start Using Bluetooth. The...
... in range. Click Printers and Other Hardware. 4. Using ThinkPad Bluetooth with Enhanced Data Rate Software If ThinkPad Bluetooth with Enhanced Data Rate Software is complete. Click the device to which Bluetooth has been enabled appears. 3. The Start Using Bluetooth window opens, and some virtual device drivers are installed automatically. 2. Select Start Using Bluetooth. The...
(English) User Guide
Page 72
....11 standard) of your computer simultaneously with Enhanced Data Rate Software in which you did not turn the Bluetooth power on before installing ThinkPad Bluetooth with Enhanced Data Rate Software, that has no "Digital Signed" icon; d. Then click Next. 3. Restart the computer if necessary... Finish. Select No, not this location in the search:, and type C:\SWTOOLS\Drivers\MSBTooth, or specify the location in Windows XP If you have downloaded from http://support.lenovo.com); Type C:\SWTOOLS\Drivers\TPBTooth\Setup.exe (or specify the full path to the setup.exe file you...
....11 standard) of your computer simultaneously with Enhanced Data Rate Software in which you did not turn the Bluetooth power on before installing ThinkPad Bluetooth with Enhanced Data Rate Software, that has no "Digital Signed" icon; d. Then click Next. 3. Restart the computer if necessary... Finish. Select No, not this location in the search:, and type C:\SWTOOLS\Drivers\MSBTooth, or specify the location in Windows XP If you have downloaded from http://support.lenovo.com); Type C:\SWTOOLS\Drivers\TPBTooth\Setup.exe (or specify the full path to the setup.exe file you...
(English) User Guide
Page 97
... then click OK. • Duplicate my desktop on all displays (mirrored) • Show different parts of Windows. Check the monitor information window to switch between viewing output on the external monitor and the computer. 4. Click Update Driver. 11. 3. Close the application before changing the display output location, or change the display output location...
... then click OK. • Duplicate my desktop on all displays (mirrored) • Show different parts of Windows. Check the monitor information window to switch between viewing output on the external monitor and the computer. 4. Click Update Driver. 11. 3. Close the application before changing the display output location, or change the display output location...


