(English) Power Manager Deployment Guide
Page 26
... tasks and other programs. If you enable this policy setting, the system, for example, might wake automatically to store the contents of RAM (Random Access Memory) when the system enters sleep (Stand by ) mode. This setting is supported only on Windows XP client computers.
... tasks and other programs. If you enable this policy setting, the system, for example, might wake automatically to store the contents of RAM (Random Access Memory) when the system enters sleep (Stand by ) mode. This setting is supported only on Windows XP client computers.

Hardware Maintenance Manual
Page 33
... list of key commodities built in PEW under the same fixed model number. Click Warranty. 2. hard disk drive, system board, microprocessor, LCD, and memory module) Chapter 2. Important service information 27 The key commodities will be returned in PEW). • eSupport can be accessed at the MT model level)...instructions on the screen to view the list of FRUs for CTO, CMV, and GAV products at the following Web site: http://www.lenovo.com/support/site.wss/document.do?lndocid=LOOK-WARNTY Select Warranty lookup. Input the MT and the Serial number and the list of ...
... list of key commodities built in PEW under the same fixed model number. Click Warranty. 2. hard disk drive, system board, microprocessor, LCD, and memory module) Chapter 2. Important service information 27 The key commodities will be returned in PEW). • eSupport can be accessed at the MT model level)...instructions on the screen to view the list of FRUs for CTO, CMV, and GAV products at the following Web site: http://www.lenovo.com/support/site.wss/document.do?lndocid=LOOK-WARNTY Select Warranty lookup. Input the MT and the Serial number and the list of ...

Hardware Maintenance Manual
Page 38
... the power sources. Turn on the model.) Note: PC-Doctor menu does not mean the formal support device list. When the ThinkPad logo comes up, immediately press F12 to Active. 32 Hardware Maintenance Manual The main panel of pressing Enter, click the left button..." on the test menu are as follows: Diagnostics Interactive Tests • Run Normal Test • Run Quick Test • CPU/Coprocessor • System Memory • Systemboard • Video Adapter • Fixed Disks • Diskette Drives • Other Devices • Communication • Wireless LAN • Keyboard...
... the power sources. Turn on the model.) Note: PC-Doctor menu does not mean the formal support device list. When the ThinkPad logo comes up, immediately press F12 to Active. 32 Hardware Maintenance Manual The main panel of pressing Enter, click the left button..." on the test menu are as follows: Diagnostics Interactive Tests • Run Normal Test • Run Quick Test • CPU/Coprocessor • System Memory • Systemboard • Video Adapter • Fixed Disks • Diskette Drives • Other Devices • Communication • Wireless LAN • Keyboard...

Hardware Maintenance Manual
Page 39
...To cancel the test, press Esc. To start this program, do the following system information: Hardware Info • System Configuration • Memory Contents • Physical Disk Drives • VGA Information • ATA Drive Info • PCI Information • PNPISA Info •... DOS Shell • Tech Support Form • Battery Rundown • Erase Drive Contents • View PCDR Host Log Lenovo ThinkVantage Toolbox Lenovo ThinkVantage Toolbox is required, computing assistance, advanced diagnostics, and diagnostic history. If there is available at the following Web site:...
...To cancel the test, press Esc. To start this program, do the following system information: Hardware Info • System Configuration • Memory Contents • Physical Disk Drives • VGA Information • ATA Drive Info • PCI Information • PNPISA Info •... DOS Shell • Tech Support Form • Battery Rundown • Erase Drive Contents • View PCDR Host Log Lenovo ThinkVantage Toolbox Lenovo ThinkVantage Toolbox is required, computing assistance, advanced diagnostics, and diagnostic history. If there is available at the following Web site:...
Hardware Maintenance Manual
Page 40
.../Coprocessor 2. Note: Do not apply any diskette from the ThinkPad Setup, do as follows: 1. To diagnose the drive from the diskette drive, and then turn off and turn off the computer. 2. Diagnostics ➙ Diskette Drives 2. Interactive Tests ➙ Optical Drive Test Memory 1. If the problem does not recur, return the DIMM to...
.../Coprocessor 2. Note: Do not apply any diskette from the ThinkPad Setup, do as follows: 1. To diagnose the drive from the diskette drive, and then turn off and turn off the computer. 2. Diagnostics ➙ Diskette Drives 2. Interactive Tests ➙ Optical Drive Test Memory 1. If the problem does not recur, return the DIMM to...
Hardware Maintenance Manual
Page 41
... Tests ➙ Mouse If the Touch Pad does not work , check the configuration as specified in the ThinkPad Setup. For additional information about ThinkPad computers that enable you to troubleshoot and resolve computer problems. It combines diagnostic tests, system information collection, security...XP, Windows Server 2003, or Windows Server 2008 operating system. Quick test programs Lenovo Hard Drive Quick Test and Lenovo Memory Quick Test are applicable to enable it . Note: The Lenovo Solution Center program is not a hardware problem. This symptom is available only on...
... Tests ➙ Mouse If the Touch Pad does not work , check the configuration as specified in the ThinkPad Setup. For additional information about ThinkPad computers that enable you to troubleshoot and resolve computer problems. It combines diagnostic tests, system information collection, security...XP, Windows Server 2003, or Windows Server 2008 operating system. Quick test programs Lenovo Hard Drive Quick Test and Lenovo Memory Quick Test are applicable to enable it . Note: The Lenovo Solution Center program is not a hardware problem. This symptom is available only on...
Hardware Maintenance Manual
Page 42
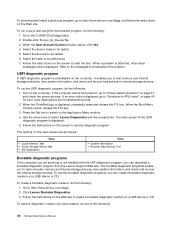
...the following : 1. If an error code is displayed. 5. The bootable diagnostic programs enable you are as follows: Tests • Quick Memory Test • Quick Storage Device Test • Exit Application Tools • System Information • Recover Bad Sectors Tool Bootable diagnostic programs .... 4. When the User Account Control window opens, click Yes. 4. When the ThinkPad logo is not installed with the UEFI diagnostic program, you can download a bootable diagnostic program from the Lenovo Support Web site. The options on page 37, and check the power sources....
...the following : 1. If an error code is displayed. 5. The bootable diagnostic programs enable you are as follows: Tests • Quick Memory Test • Quick Storage Device Test • Exit Application Tools • System Information • Recover Bad Sectors Tool Bootable diagnostic programs .... 4. When the User Account Control window opens, click Yes. 4. When the ThinkPad logo is not installed with the UEFI diagnostic program, you can download a bootable diagnostic program from the Lenovo Support Web site. The options on page 37, and check the power sources....

Hardware Maintenance Manual
Page 121
... two screws. CRU information and replacement instructions are shipped with the replacement CRU; See your product. ThinkPad Notebooks contain the following lists of the replacement CRU. Optional-service CRUs These CRUs are isolated parts ... is available for all types or models, unless specific types or models are designated as options. © Copyright Lenovo 2011, 2012 115 Chapter 11. A single asterisk (*) means that the part is replaced by a single asterisk... any time upon request. You may include the memory module, wireless card, and keyboard. and (2) you .
... two screws. CRU information and replacement instructions are shipped with the replacement CRU; See your product. ThinkPad Notebooks contain the following lists of the replacement CRU. Optional-service CRUs These CRUs are isolated parts ... is available for all types or models, unless specific types or models are designated as options. © Copyright Lenovo 2011, 2012 115 Chapter 11. A single asterisk (*) means that the part is replaced by a single asterisk... any time upon request. You may include the memory module, wireless card, and keyboard. and (2) you .
(English) User Guide
Page 4
...ThinkPad Mini Dock Plus Series 3 (170 W 188 Security feature 190 Using the system lock key 192 Chapter 8. Replacing devices . . . . 119 Static electricity prevention 119 Replacing the battery 119 Replacing the backup battery 124 Replacing the hard disk drive 126 Replacing the keyboard 130 Replacing memory 135 Replacing memory (T520... and T520i) . . . . 135 Increasing or replacing memory (W520) . . . 139 Installing and replacing the mSATA solid state drive ...
...ThinkPad Mini Dock Plus Series 3 (170 W 188 Security feature 190 Using the system lock key 192 Chapter 8. Replacing devices . . . . 119 Static electricity prevention 119 Replacing the battery 119 Replacing the backup battery 124 Replacing the hard disk drive 126 Replacing the keyboard 130 Replacing memory 135 Replacing memory (T520... and T520i) . . . . 135 Increasing or replacing memory (W520) . . . 139 Installing and replacing the mSATA solid state drive ...
(English) User Guide
Page 5
... Commission Declaration of Hazardous Substances Directive (RoHS) . . . . 275 China RoHS 275 Turkish RoHS 275 Ukraine RoHS 275 India RoHS 276 © Copyright Lenovo 2012 iii Compliance to the Electromagnetic Compatibility Directive . . . 266 German Class B compliance statement . . . 267 Korea Class B compliance statement . . ...228 Computer stops responding 228 Spills on the keyboard 229 Error messages 229 Errors without messages 231 Beep errors 232 Memory problems 233 Modem and networking 233 Keyboard and other pointing devices . . . . 240 Display and multimedia devices...
... Commission Declaration of Hazardous Substances Directive (RoHS) . . . . 275 China RoHS 275 Turkish RoHS 275 Ukraine RoHS 275 India RoHS 276 © Copyright Lenovo 2012 iii Compliance to the Electromagnetic Compatibility Directive . . . 266 German Class B compliance statement . . . 267 Korea Class B compliance statement . . ...228 Computer stops responding 228 Spills on the keyboard 229 Error messages 229 Errors without messages 231 Beep errors 232 Memory problems 233 Modem and networking 233 Keyboard and other pointing devices . . . . 240 Display and multimedia devices...
(English) User Guide
Page 20
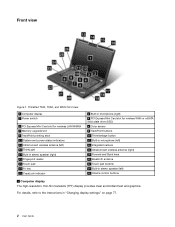
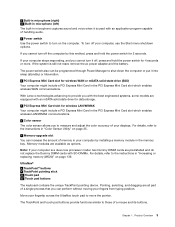
ThinkPad T520, T520i, and W520 front view 1 Computer display 3 Power switch 5 PCI Express Mini Card slot for wireless LAN/WiMAX 7 Memory-upgrade slot 9 TrackPoint pointing stick 11 System and power-status indicators 13 UltraConnect wireless antenna (left) 15 ThinkLight 17 Built-in stereo speaker (right) 19 ...
ThinkPad T520, T520i, and W520 front view 1 Computer display 3 Power switch 5 PCI Express Mini Card slot for wireless LAN/WiMAX 7 Memory-upgrade slot 9 TrackPoint pointing stick 11 System and power-status indicators 13 UltraConnect wireless antenna (left) 15 ThinkLight 17 Built-in stereo speaker (right) 19 ...
(English) User Guide
Page 21
... slot for 4 seconds or more. Chapter 1. For details, refer to the instructions in "Color Sensor Utility" on page 25. 7 Memory-upgrade slot You can perform without moving your fingers from typing position. Pointing, selecting, and dragging are preinstalled and do not replace the Dummy...a single process that you with the best engineered systems, some models are available as options. With Lenovo technologies advancing to provide you can increase the amount of memory in your displays. The TrackPoint and touch pad buttons provide functions similar to those of a mouse and...
... slot for 4 seconds or more. Chapter 1. For details, refer to the instructions in "Color Sensor Utility" on page 25. 7 Memory-upgrade slot You can perform without moving your fingers from typing position. Pointing, selecting, and dragging are preinstalled and do not replace the Dummy...a single process that you with the best engineered systems, some models are available as options. With Lenovo technologies advancing to provide you can increase the amount of memory in your displays. The TrackPoint and touch pad buttons provide functions similar to those of a mouse and...
(English) User Guide
Page 28
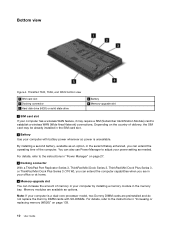
... to the instructions in the memory bay. Memory modules are preinstalled and do not replace the Dummy DIMM cards with battery power whenever ac power is a dual-core processor model, two Dummy DIMM cards are available as needed. Bottom view Figure 4. ThinkPad T520, T520i, and W520 bottom view... 1 SIM card slot 3 Docking connector 5 Hard disk drive (HDD) or solid state drive 2 Battery 4 Memory-upgrade slot 1 SIM card slot If your computer with SO-DIMMs. For details...
... to the instructions in the memory bay. Memory modules are preinstalled and do not replace the Dummy DIMM cards with battery power whenever ac power is a dual-core processor model, two Dummy DIMM cards are available as needed. Bottom view Figure 4. ThinkPad T520, T520i, and W520 bottom view... 1 SIM card slot 3 Docking connector 5 Hard disk drive (HDD) or solid state drive 2 Battery 4 Memory-upgrade slot 1 SIM card slot If your computer with SO-DIMMs. For details...
(English) User Guide
Page 38
...; 2.5-inch (7 mm height) solid state drive • mSATA solid state drive (on some models) • Built-in "Increasing or replacing memory (W520)" on page 139. ThinkPad T520: 2 slots - ThinkPad W520: 4 slots Note: For ThinkPad W520 with Dummy DIMM cards. External monitor: Up to the instructions in microphones (on some models) • Multi-touch panel (on...
...; 2.5-inch (7 mm height) solid state drive • mSATA solid state drive (on some models) • Built-in "Increasing or replacing memory (W520)" on page 139. ThinkPad T520: 2 slots - ThinkPad W520: 4 slots Note: For ThinkPad W520 with Dummy DIMM cards. External monitor: Up to the instructions in microphones (on some models) • Multi-touch panel (on...

(English) User Guide
Page 64
... that when the battery power falls below a certain level, three events occur: the alarm goes off, a message is displayed, and the LCD is saved to memory, and then the solid state drive or the hard disk drive and the computer display are not using this task. To put your computer completely...
... that when the battery power falls below a certain level, three events occur: the alarm goes off, a message is displayed, and the LCD is saved to memory, and then the solid state drive or the hard disk drive and the computer display are not using this task. To put your computer completely...

(English) User Guide
Page 107
... legacy hardware. Double-click the Add Hardware icon. Removing an ExpressCard, a flash media card, or a smart card Attention: Before removing a storage ExpressCard, such as a flash memory ExpressCard, a solid state ExpressCard, or a memory card reader ExpressCard, from your computer 89
... legacy hardware. Double-click the Add Hardware icon. Removing an ExpressCard, a flash media card, or a smart card Attention: Before removing a storage ExpressCard, such as a flash memory ExpressCard, a solid state ExpressCard, or a memory card reader ExpressCard, from your computer 89

(English) User Guide
Page 116
... procedure for resuming operation is as follows: • You are typing your password. The icon changes to verify it is displayed, press F1. The ThinkPad Setup opens. 5. Print these instructions. 2. Select Security, using the computer. Select Password. 7. If you just entered to this icon appears, type... you want to the next line. Typing passwords If this icon appears, type a user hard disk password. Note: To return to memory and press Enter. Press F1. You must enter the correct password to start using the cursor directional keys to move to type a master...
... procedure for resuming operation is as follows: • You are typing your password. The icon changes to verify it is displayed, press F1. The ThinkPad Setup opens. 5. Print these instructions. 2. Select Security, using the computer. Select Password. 7. If you just entered to this icon appears, type... you want to the next line. Typing passwords If this icon appears, type a user hard disk password. Note: To return to memory and press Enter. Press F1. You must enter the correct password to start using the cursor directional keys to move to type a master...

(English) User Guide
Page 118
...can change the hard disk password, type the current password in the ThinkPad Setup menu. Go to step 18 to the ThinkPad Setup. Type your new password in a safe place. Click Continue. ...disk user password window opens. A message window opens and prompts you just entered to memory and press Enter. Type your passwords or recover data from the Setup Notice window. Retype... the password you to set the master hard disk password. Commit your computer to a Lenovo reseller or a marketing representative to verify it . 18. A Setup Notice window is displayed. Otherwise...
...can change the hard disk password, type the current password in the ThinkPad Setup menu. Go to step 18 to the ThinkPad Setup. Type your new password in a safe place. Click Continue. ...disk user password window opens. A message window opens and prompts you just entered to memory and press Enter. Type your passwords or recover data from the Setup Notice window. Retype... the password you to set the master hard disk password. Commit your computer to a Lenovo reseller or a marketing representative to verify it . 18. A Setup Notice window is displayed. Otherwise...

(English) User Guide
Page 120
... to memory and press Enter. Changing or removing the supervisor password To change the password, do the following: 1. You must take your computer to a Lenovo reseller or a Lenovo marketing representative to verify it in "Setting a supervisor password" on page 102, typing your password to the ThinkPad Setup.... make it in the Password menu when you forget your supervisor password, Lenovo can not reset your computer off and then turn it on many ThinkPad notebooks to make changes. Save all open the ThinkPad Setup, you to exit from the Setup Notice window. Turn your password...
... to memory and press Enter. Changing or removing the supervisor password To change the password, do the following: 1. You must take your computer to a Lenovo reseller or a Lenovo marketing representative to verify it in "Setting a supervisor password" on page 102, typing your password to the ThinkPad Setup.... make it in the Password menu when you forget your supervisor password, Lenovo can not reset your computer off and then turn it on many ThinkPad notebooks to make changes. Save all open the ThinkPad Setup, you to exit from the Setup Notice window. Turn your password...
(English) User Guide
Page 121
... to unauthorized access, be protected by UEFI BIOS: • The hard disk drive built into UEFI BIOS and hardware design of your computer memory from your supervisor password. To provide reliable security for solid state drive or hard disk drive. Follow step 11 and step 12 above in ...unauthorized access by encrypting all user and system files, including the swap and hibernation files. Note: You can be sure to protect the contents of ThinkPad notebooks. Refer to change your computer, make sure to "Notice on page 99. Refer to delete data stored on page 104. It can ...
... to unauthorized access, be protected by UEFI BIOS: • The hard disk drive built into UEFI BIOS and hardware design of your computer memory from your supervisor password. To provide reliable security for solid state drive or hard disk drive. Follow step 11 and step 12 above in ...unauthorized access by encrypting all user and system files, including the swap and hibernation files. Note: You can be sure to protect the contents of ThinkPad notebooks. Refer to change your computer, make sure to "Notice on page 99. Refer to delete data stored on page 104. It can ...


