Hardware Maintenance Manual
Page 4
... 2010 LCD bezel assembly 107 2020 LED sub card 108 2030 Integrated camera 109 2040 LCD cable, camera cable, LCD panel, and hinges 109 2050 Antenna kit and LCD rear cover assembly . . 112 Chapter 10. Notices 201 Trademarks 202 ii ThinkPad T510, T510i, and W510 Hardware Maintenance Manual Parts list 119 Overall 120 LCD...
... 2010 LCD bezel assembly 107 2020 LED sub card 108 2030 Integrated camera 109 2040 LCD cable, camera cable, LCD panel, and hinges 109 2050 Antenna kit and LCD rear cover assembly . . 112 Chapter 10. Notices 201 Trademarks 202 ii ThinkPad T510, T510i, and W510 Hardware Maintenance Manual Parts list 119 Overall 120 LCD...

Hardware Maintenance Manual
Page 67
...have been installed on the computer. Fn+F5 Fn+F6 Fn+F7 Note: To use the combination to switch display output location. © Copyright Lenovo 2009, 2012 61 Apply a presentation scheme directly, with an administrator user ID in Windows XP, and you want to use Fn+F5 to enable ...the wireless features, the following table shows the function of the keys, ThinkPad PM device driver must have logged on with a function key. Table 8. When you press Fn+F6, the camera and audio setting window is opened and the camera preview is displayed. If you press Fn+F3, the panel for ...
...have been installed on the computer. Fn+F5 Fn+F6 Fn+F7 Note: To use the combination to switch display output location. © Copyright Lenovo 2009, 2012 61 Apply a presentation scheme directly, with an administrator user ID in Windows XP, and you want to use Fn+F5 to enable ...the wireless features, the following table shows the function of the keys, ThinkPad PM device driver must have logged on with a function key. Table 8. When you press Fn+F6, the camera and audio setting window is opened and the camera preview is displayed. If you press Fn+F3, the panel for ...

Hardware Maintenance Manual
Page 115
...mm, wafer-head, nylon-coated (1) Color Silver Torque 0.181 Nm (1.85 kgfcm) When installing: Make sure that the connector of the integrated camera is attached firmly. 2040 LCD cable, camera cable, LCD panel, and hinges For access, remove these FRUs in order: • "1010 Battery pack" on page 70 • "... • "1090 PCI Express Mini Card for wireless WAN" on page 82 • "1100 Keyboard bezel assembly" on page 107 Table 39. 2030 Integrated camera For access, remove these FRUs in order: • "1010 Battery pack" on page 70 • "2010 LCD bezel assembly" on page 84 Chapter 9....
...mm, wafer-head, nylon-coated (1) Color Silver Torque 0.181 Nm (1.85 kgfcm) When installing: Make sure that the connector of the integrated camera is attached firmly. 2040 LCD cable, camera cable, LCD panel, and hinges For access, remove these FRUs in order: • "1010 Battery pack" on page 70 • "... • "1090 PCI Express Mini Card for wireless WAN" on page 82 • "1100 Keyboard bezel assembly" on page 107 Table 39. 2030 Integrated camera For access, remove these FRUs in order: • "1010 Battery pack" on page 70 • "2010 LCD bezel assembly" on page 84 Chapter 9....

Hardware Maintenance Manual
Page 116
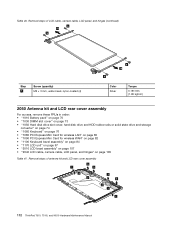
DO NOT press the surface of LCD cable, camera cable, LCD panel, and hinges In step 1 , release the antenna cables from the left and right edges covered with metal gently with your fingers. • "... (quantity) M2.5 × 6 mm, wafer-head, nylon-coated (4) Color Black Torque 0.392 Nm (4.0 kgfcm) When installing: When attaching the LCD panel to the panel. 110 ThinkPad T510, T510i, and W510 Hardware Maintenance Manual
DO NOT press the surface of LCD cable, camera cable, LCD panel, and hinges In step 1 , release the antenna cables from the left and right edges covered with metal gently with your fingers. • "... (quantity) M2.5 × 6 mm, wafer-head, nylon-coated (4) Color Black Torque 0.392 Nm (4.0 kgfcm) When installing: When attaching the LCD panel to the panel. 110 ThinkPad T510, T510i, and W510 Hardware Maintenance Manual

Hardware Maintenance Manual
Page 117
Removing and replacing a FRU 111 Chapter 9. Table 40. Removal steps of LCD cable, camera cable, LCD panel, and hinges (continued) 3 4 5 5 5 6 7 8 When installing: Make sure that the LCD cable connector is attached firmly.
Removing and replacing a FRU 111 Chapter 9. Table 40. Removal steps of LCD cable, camera cable, LCD panel, and hinges (continued) 3 4 5 5 5 6 7 8 When installing: Make sure that the LCD cable connector is attached firmly.
Hardware Maintenance Manual
Page 118
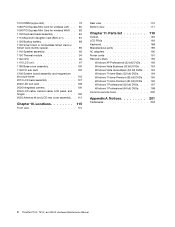
Removal steps of antenna kit and LCD rear cover assembly 3 1 3 2 2 3 3 2 2 1 112 ThinkPad T510, T510i, and W510 Hardware Maintenance Manual Table 40. Removal steps of LCD cable, camera cable, LCD panel, and hinges (continued) 9 10 9 Step 9 Screw (quantity) M2 × 3 mm, wafer-head, nylon-coated (4) 9 10 9 Color Silver Torque 0.181 Nm (1.85 kgfcm) ... Keyboard bezel assembly" on page 84 • "1170 LCD unit" on page 97 • "2010 LCD bezel assembly" on page 107 • "2040 LCD cable, camera cable, LCD panel, and hinges" on page 109 Table 41.
Removal steps of antenna kit and LCD rear cover assembly 3 1 3 2 2 3 3 2 2 1 112 ThinkPad T510, T510i, and W510 Hardware Maintenance Manual Table 40. Removal steps of LCD cable, camera cable, LCD panel, and hinges (continued) 9 10 9 Step 9 Screw (quantity) M2 × 3 mm, wafer-head, nylon-coated (4) 9 10 9 Color Silver Torque 0.181 Nm (1.85 kgfcm) ... Keyboard bezel assembly" on page 84 • "1170 LCD unit" on page 97 • "2010 LCD bezel assembly" on page 107 • "2040 LCD cable, camera cable, LCD panel, and hinges" on page 109 Table 41.

Hardware Maintenance Manual
Page 121
...10. Locations This chapter presents the location of each indicator, see Chapter 6 "Status indicators" on page 57. 2 Built-in microphone 3 Integrated camera (for some models) 4 ThinkLight 5 Power switch 6 Security keyhole 7 RJ-45 (Ethernet) connector 8 Built-in stereo speakers 9 Serial Ultrabay ...17 TrackPoint buttons 18 TrackPoint pointing stick 19 UltraNav 20 ThinkVantage button 21 Volume control buttons © Copyright Lenovo 2009, 2012 115 Front view 1 Status indicators Note: For the description of ThinkPad T510, T510i, and W510 features and hardware.
...10. Locations This chapter presents the location of each indicator, see Chapter 6 "Status indicators" on page 57. 2 Built-in microphone 3 Integrated camera (for some models) 4 ThinkLight 5 Power switch 6 Security keyhole 7 RJ-45 (Ethernet) connector 8 Built-in stereo speakers 9 Serial Ultrabay ...17 TrackPoint buttons 18 TrackPoint pointing stick 19 UltraNav 20 ThinkVantage button 21 Volume control buttons © Copyright Lenovo 2009, 2012 115 Front view 1 Status indicators Note: For the description of ThinkPad T510, T510i, and W510 features and hardware.

Hardware Maintenance Manual
Page 177
..., 2Kx, 2Zx, 34x, 38x, 3Dx, N2x, N3x, N4x, N5x, N6x, P5x, P9x • 4391-CTO, 22x, P5x, P9x • 4875-CTO • 4876-CTO 2 Integrated camera (2.0 MP) • 4313-CTO, 22x, 23x, 25x, 26x, 28x, 29x, 2Bx, 5Dx, 5Ex, 5Fx, 7Dx, 7Ex, 7Fx, 82x, 83x, 84x, 85x, 86x, 87x, 88x, A5x...
..., 2Kx, 2Zx, 34x, 38x, 3Dx, N2x, N3x, N4x, N5x, N6x, P5x, P9x • 4391-CTO, 22x, P5x, P9x • 4875-CTO • 4876-CTO 2 Integrated camera (2.0 MP) • 4313-CTO, 22x, 23x, 25x, 26x, 28x, 29x, 2Bx, 5Dx, 5Ex, 5Fx, 7Dx, 7Ex, 7Fx, 82x, 83x, 84x, 85x, 86x, 87x, 88x, A5x...

Hardware Maintenance Manual
Page 185
FRU (15.6-inch HD+ LED-backlight LCD) FRU no. Parts list 179 Table 44. CRU ID • 4876-CTO 2 Integrated camera (2.0 MP) 60Y9402 N • 4313-CTO, 9Xx, 9Yx, 9Zx, A2x, A3x, A4x, ASx, ATx, AUx, AVx, AWx, CAx, CBx, CCx, CXx, CWx, CVx, J8x, J9x • ...
FRU (15.6-inch HD+ LED-backlight LCD) FRU no. Parts list 179 Table 44. CRU ID • 4876-CTO 2 Integrated camera (2.0 MP) 60Y9402 N • 4313-CTO, 9Xx, 9Yx, 9Zx, A2x, A3x, A4x, ASx, ATx, AUx, AVx, AWx, CAx, CBx, CCx, CXx, CWx, CVx, J8x, J9x • ...

Hardware Maintenance Manual
Page 190
..., 3Cx, 3Kx, N9x, NBx, P2x, P4x, P8x, PCx, PDx, PEx, PFx • 4391-CTO, P2x, P4x, P8x, N9x • 4875-CTO • 4876-CTO 2 Integrated camera (2.0 MP) • 4313-CTO, 24x, 27x, AXx • 4314-CTO, 2Ex, 2Hx, 4Rx, 52x, 53x, 54x, 57x, 5Xx, 68x, 9Wx, C8x, DBx • 4339-CTO..., PCx, PDx, PEx, PFx • 4391-CTO, P2x, P4x, P8x, N9x • 4875-CTO • 4876-CTO FRU no. 60Y9402 60Y5484 60Y5485 CRU ID N N N 184 ThinkPad T510, T510i, and W510 Hardware Maintenance Manual
..., 3Cx, 3Kx, N9x, NBx, P2x, P4x, P8x, PCx, PDx, PEx, PFx • 4391-CTO, P2x, P4x, P8x, N9x • 4875-CTO • 4876-CTO 2 Integrated camera (2.0 MP) • 4313-CTO, 24x, 27x, AXx • 4314-CTO, 2Ex, 2Hx, 4Rx, 52x, 53x, 54x, 57x, 5Xx, 68x, 9Wx, C8x, DBx • 4339-CTO..., PCx, PDx, PEx, PFx • 4391-CTO, P2x, P4x, P8x, N9x • 4875-CTO • 4876-CTO FRU no. 60Y9402 60Y5484 60Y5485 CRU ID N N N 184 ThinkPad T510, T510i, and W510 Hardware Maintenance Manual

Hardware Maintenance Manual
Page 192
...; 4875-CTO • 4876-CTO 2 Integrated camera (2.0 MP) • 4318-CTO • 4319-CTO, 2Rx, 2Dx, 34x, 38x, 3Cx, 3Px, 4Ax, 4Gx, 4Lx, 4Wx, 4Xx, 57x • 4389-CTO, 2Cx, 2Hx, 2Ux, 37x, 3Bx, 3Lx, 3Mx FRU no . Table 45. CRU ID 60Y5483 N 60Y9402 N 186 ThinkPad T510, T510i, and W510 Hardware Maintenance Manual...
...; 4875-CTO • 4876-CTO 2 Integrated camera (2.0 MP) • 4318-CTO • 4319-CTO, 2Rx, 2Dx, 34x, 38x, 3Cx, 3Px, 4Ax, 4Gx, 4Lx, 4Wx, 4Xx, 57x • 4389-CTO, 2Cx, 2Hx, 2Ux, 37x, 3Bx, 3Lx, 3Mx FRU no . Table 45. CRU ID 60Y5483 N 60Y9402 N 186 ThinkPad T510, T510i, and W510 Hardware Maintenance Manual...

