
Hardware Maintenance Manual
Page 3
... sensitive to do first 23 Checkout guide 24 Lenovo Solution Center 24 Quick test programs 24 UEFI diagnostic program 25 Bootable diagnostic programs 25 Power system checkout 26 Checking the ac power adapter 26 Checking the built-in battery 56 Removing the SIM card 56 1010 Base... Windows 7 operating system only 33 Sleep mode 33 Hibernation mode 34 Symptom-to remove the hard disk password . . . 32 © Copyright Lenovo 2013 Power management 33 Screen blank mode (for CTO, special-bid, and standard models 20 Product definition 20 FRU identification 20 Chapter 3. Function keys...
... sensitive to do first 23 Checkout guide 24 Lenovo Solution Center 24 Quick test programs 24 UEFI diagnostic program 25 Bootable diagnostic programs 25 Power system checkout 26 Checking the ac power adapter 26 Checking the built-in battery 56 Removing the SIM card 56 1010 Base... Windows 7 operating system only 33 Sleep mode 33 Hibernation mode 34 Symptom-to remove the hard disk password . . . 32 © Copyright Lenovo 2013 Power management 33 Screen blank mode (for CTO, special-bid, and standard models 20 Product definition 20 FRU identification 20 Chapter 3. Function keys...
Hardware Maintenance Manual
Page 4
1040 M.2 wireless WAN card 60 1050 Memory module 61 1060 Backup battery 62 1070 Battery pack 63 1080 Keyboard 64 1090 Thermal fan assembly 68 1100 Hard disk drive or solid-state drive sub card 70 1110 Speaker assembly 70 ...
1040 M.2 wireless WAN card 60 1050 Memory module 61 1060 Backup battery 62 1070 Battery pack 63 1080 Keyboard 64 1090 Thermal fan assembly 68 1100 Hard disk drive or solid-state drive sub card 70 1110 Speaker assembly 70 ...
Hardware Maintenance Manual
Page 9
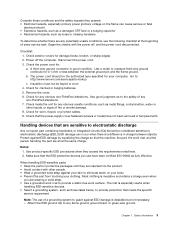
...; Prevent the part from touching your computer. Begin the checks with . Check exterior covers for cracked or bulging batteries. 5. Disconnect the power cord. 3. A third-wire ground connector in charge between the external ground pin and ...that are sensitive to provide a static-free work mat, and the person handling the part are any non-ThinkPad alterations. 7. Make sure that meets the specific service requirement. Most clothing is especially useful when handling ESD-.... Attach the ESD ground clip to : http://www.lenovo.com/serviceparts-lookup c. Chapter 1. Safety information 3
...; Prevent the part from touching your computer. Begin the checks with . Check exterior covers for cracked or bulging batteries. 5. Disconnect the power cord. 3. A third-wire ground connector in charge between the external ground pin and ...that are sensitive to provide a static-free work mat, and the person handling the part are any non-ThinkPad alterations. 7. Make sure that meets the specific service requirement. Most clothing is especially useful when handling ESD-.... Attach the ESD ground clip to : http://www.lenovo.com/serviceparts-lookup c. Chapter 1. Safety information 3
Hardware Maintenance Manual
Page 10
... of the electrical outlet can use an ESD common ground or reference point. Grounding requirements Electrical grounding of the ac plug on a double-insulated or battery-operated system, use coax or connector-outside shells on these systems. - Use the round ground prong of the computer is required for operator safety and...
... of the electrical outlet can use an ESD common ground or reference point. Grounding requirements Electrical grounding of the ac plug on a double-insulated or battery-operated system, use coax or connector-outside shells on these systems. - Use the round ground prong of the computer is required for operator safety and...
Hardware Maintenance Manual
Page 32
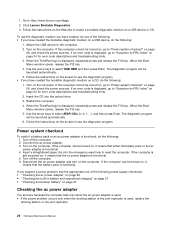
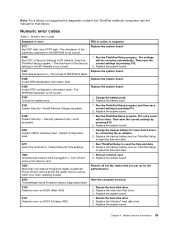
... and release the F12 key. The diagnostic program will be launched automatically. 5. When the ThinkPad logo is displayed, repeatedly press and release the F12 key. Turn on , it means that the battery pack is functional. Turn off the computer. 2. If the computer can be turned on ... page 34 for error code descriptions and troubleshooting hints. 2. Insert the CD into the emergency reset hole to http://www.lenovo.com/diags. 2. Power system checkout To verify if a battery pack or an ac power adapter is functional. 5. Attach the USB device to select ATAPI CDx (x: 0, 1, ...) ...
... and release the F12 key. The diagnostic program will be launched automatically. 5. When the ThinkPad logo is displayed, repeatedly press and release the F12 key. Turn on , it means that the battery pack is functional. Turn off the computer. 2. If the computer can be turned on ... page 34 for error code descriptions and troubleshooting hints. 2. Insert the CD into the emergency reset hole to http://www.lenovo.com/diags. 2. Power system checkout To verify if a battery pack or an ac power adapter is functional. 5. Attach the USB device to select ATAPI CDx (x: 0, 1, ...) ...
Hardware Maintenance Manual
Page 33
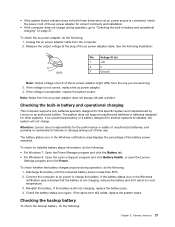
... the following : • For Windows 7: Open the Power Manager program and click the Battery tab. • For Windows 8: Open the Lenovo Support program and click Battery Health, or open the Lenovo Settings program and click Power. If the battery status icon in battery and operational charging" on page 27. Unplug the ac power adapter cable from...
... the following : • For Windows 7: Open the Power Manager program and click the Battery tab. • For Windows 8: Open the Lenovo Support program and click Battery Health, or open the Lenovo Settings program and click Power. If the battery status icon in battery and operational charging" on page 27. Unplug the ac power adapter cable from...

Hardware Maintenance Manual
Page 34
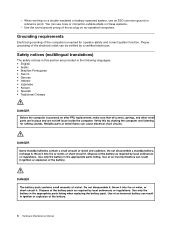
See "1070 Battery pack" on page 56. 2. Disable the built-in battery" on page 63. 3. See "Disabling the built-in battery. Remove the backup battery. See the following illustration. Wire Red Black Voltage (V dc) +2.5 to +3.2 Ground • If the voltage is correct, replace the system board. • If the voltage is not correct, replace the backup battery. • If the backup battery discharges quickly after replacement, replace the system board. 28 Hardware Maintenance Manual 1. Measure the voltage of the backup battery.
See "1070 Battery pack" on page 56. 2. Disable the built-in battery" on page 63. 3. See "Disabling the built-in battery. Remove the backup battery. See the following illustration. Wire Red Black Voltage (V dc) +2.5 to +3.2 Ground • If the voltage is correct, replace the system board. • If the voltage is not correct, replace the backup battery. • If the backup battery discharges quickly after replacement, replace the system board. 28 Hardware Maintenance Manual 1. Measure the voltage of the backup battery.
Hardware Maintenance Manual
Page 38
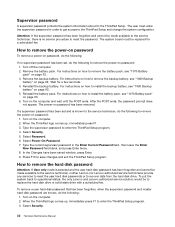
... supervisor password and master hard disk password are known, do the following to enter the ThinkPad Setup program. 3. Select Security. 32 Hardware Maintenance Manual Remove the backup battery. When the ThinkPad logo comes up , immediately press F1 to remove the power-on the computer and wait...on how to remove the backup battery, see "1070 Battery pack" on page 62. For instructions on how to remove the battery pack, see "1060 Backup battery" on page 63. 3. To put the system back to operational status, the only Lenovo and Lenovo-authorized service solution would be made ...
... supervisor password and master hard disk password are known, do the following to enter the ThinkPad Setup program. 3. Select Security. 32 Hardware Maintenance Manual Remove the backup battery. When the ThinkPad logo comes up , immediately press F1 to remove the power-on the computer and wait...on how to remove the backup battery, see "1070 Battery pack" on page 62. For instructions on how to remove the battery pack, see "1060 Backup battery" on page 63. 3. To put the system back to operational status, the only Lenovo and Lenovo-authorized service solution would be made ...
Hardware Maintenance Manual
Page 39
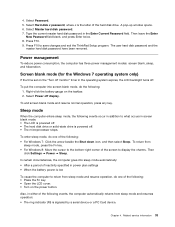
... If the time set on the "Turn off monitor" timer in the operating system expires, the LCD backlight turns off display. Right-click the battery gauge on the power button. In certain circumstances, the computer goes into screen blank mode, do one of the following: • For Windows ... modes: screen blank, sleep, and hibernation. Related service information 33 Type the current master hard disk password in addition to save changes and exit the ThinkPad Setup program. To enter sleep mode, do the following : • Press the Fn key. • Open the LCD cover. • Turn on ...
... If the time set on the "Turn off monitor" timer in the operating system expires, the LCD backlight turns off display. Right-click the battery gauge on the power button. In certain circumstances, the computer goes into screen blank mode, do one of the following: • For Windows ... modes: screen blank, sleep, and hibernation. Related service information 33 Type the current master hard disk password in addition to save changes and exit the ThinkPad Setup program. To enter sleep mode, do the following : • Press the Fn key. • Open the LCD cover. • Turn on ...
Hardware Maintenance Manual
Page 41
...1. Replace the system board. 0199 System Security- Replace the system board. 0251 System CMOS checksum bad - Replace the backup battery and run ThinkPad Setup to reset the time and date 2. Replace the system board. 1820 More than 8 hours by connecting the ac adapter...access error-The access to reset the time and date. 0271 Real-Time Clock Error. Charge the battery pack. 2. Replace the battery pack. 0191 System Security-Invalid Remote Change requested. 1. Run the ThinkPad Setup program, and then save current setting by pressing F10. 2. Security password retry count exceeded....
...1. Replace the system board. 0199 System Security- Replace the system board. 0251 System CMOS checksum bad - Replace the backup battery and run ThinkPad Setup to reset the time and date 2. Replace the system board. 1820 More than 8 hours by connecting the ac adapter...access error-The access to reset the time and date. 0271 Real-Time Clock Error. Charge the battery pack. 2. Replace the battery pack. 0191 System Security-Invalid Remote Change requested. 1. Run the ThinkPad Setup program, and then save current setting by pressing F10. 2. Security password retry count exceeded....
Hardware Maintenance Manual
Page 42
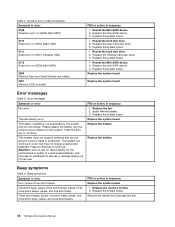
... Mini SATA device. 2. Error messages Symptom or error Fan error. Thermal sensing error. Please replace the battery with the correct Lenovo battery for failures or damage arising out of their use. This system does not support batteries that are invalid. 2201 Machine UUID is not supported by this system. FRU or action, in sequence...
... Mini SATA device. 2. Error messages Symptom or error Fan error. Thermal sensing error. Please replace the battery with the correct Lenovo battery for failures or damage arising out of their use. This system does not support batteries that are invalid. 2201 Machine UUID is not supported by this system. FRU or action, in sequence...
Hardware Maintenance Manual
Page 44
... that all of the following devices: a. Visually check each FRU for the system board in loop mode at a time until you find the failing FRU. 7. Battery pack e. If the problem does not recur, reconnect the removed devices one at the time of causes that have no more errors exist. If no... d. Remove or disconnect all attached devices are installed, or if the system simply is detected, do the following FRUs one at least 10 times. 2. Non-ThinkPad devices b. FRU replacement should be due to a variety of the failure is detected, replace the FRU shown by the computer.
... that all of the following devices: a. Visually check each FRU for the system board in loop mode at a time until you find the failing FRU. 7. Battery pack e. If the problem does not recur, reconnect the removed devices one at the time of causes that have no more errors exist. If no... d. Remove or disconnect all attached devices are installed, or if the system simply is detected, do the following FRUs one at least 10 times. 2. Non-ThinkPad devices b. FRU replacement should be due to a variety of the failure is detected, replace the FRU shown by the computer.
Hardware Maintenance Manual
Page 53
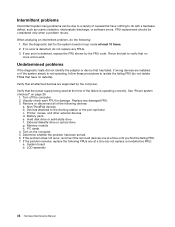
Table 9. FRU descriptions 13 Battery pack 14 Hard disk drive or solid-state drive sub card 15 Backup battery 16 M.2 wireless WAN card 17 M.2 wireless LAN card 18 Media card reader slot 19 System board 20 VGA connector 21 VGA connector bracket 22 Clickpad 23 Smart card bezel 24 DC-in cable 25 Keyboard Self-service CRU No No No No No No No No No No No No No Optional service CRU No No Yes Yes Yes No No No No No No No Yes Chapter 7. Locations 47 Major FRUs (continued) No.
Table 9. FRU descriptions 13 Battery pack 14 Hard disk drive or solid-state drive sub card 15 Backup battery 16 M.2 wireless WAN card 17 M.2 wireless LAN card 18 Media card reader slot 19 System board 20 VGA connector 21 VGA connector bracket 22 Clickpad 23 Smart card bezel 24 DC-in cable 25 Keyboard Self-service CRU No No No No No No No No No No No No No Optional service CRU No No Yes Yes Yes No No No No No No No Yes Chapter 7. Locations 47 Major FRUs (continued) No.
Hardware Maintenance Manual
Page 61
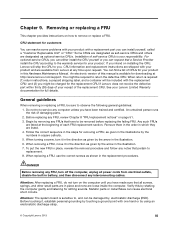
... from electrical outlets, disable the built-in this Hardware Maintenance Manual. See your product in battery, and then disconnect any notes that all power cords from Lenovo at http://www.lenovo.com/support. Remove them in the order in place, reverse the removal procedure and follow...this manual is required: (1) return instructions, a prepaid shipping label, and a container will ship the CRU to the warranty service for your Lenovo Limited Warranty documentation for downloading at any FRU, turn off the computer, unplug all screws, springs, and other small parts are in the ...
... from electrical outlets, disable the built-in this Hardware Maintenance Manual. See your product in battery, and then disconnect any notes that all power cords from Lenovo at http://www.lenovo.com/support. Remove them in the order in place, reverse the removal procedure and follow...this manual is required: (1) return instructions, a prepaid shipping label, and a container will ship the CRU to the warranty service for your Lenovo Limited Warranty documentation for downloading at any FRU, turn off the computer, unplug all screws, springs, and other small parts are in the ...
Hardware Maintenance Manual
Page 62
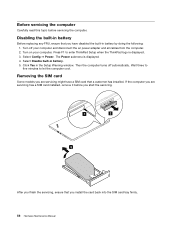
...turns off your computer. If the computer you are servicing might have a SIM card that you have disabled the built-in battery Before replacing any FRU, ensure that a customer has installed. Turn on your computer and disconnect the ac power adapter and all...before servicing the computer. The Power submenu is displayed. 3. Wait three to five minutes to enter ThinkPad Setup when the ThinkPad logo is displayed. 4. Click Yes in battery. 5. Disabling the built-in battery by doing the following: 1. Before servicing the computer Carefully read this topic before you start the...
...turns off your computer. If the computer you are servicing might have a SIM card that you have disabled the built-in battery Before replacing any FRU, ensure that a customer has installed. Turn on your computer and disconnect the ac power adapter and all...before servicing the computer. The Power submenu is displayed. 3. Wait three to five minutes to enter ThinkPad Setup when the ThinkPad logo is displayed. 4. Click Yes in battery. 5. Disabling the built-in battery by doing the following: 1. Before servicing the computer Carefully read this topic before you start the...
Hardware Maintenance Manual
Page 68
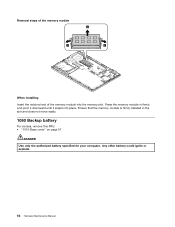
Removal steps of the memory module 1 2 1 When installing: Insert the notched end of the memory module into place. Any other battery could ignite or explode. 62 Hardware Maintenance Manual Ensure that the memory module is firmly installed in firmly, and pivot it downward until it snaps into the memory slot. Press the memory module in the slot and does not move easily. 1060 Backup battery For access, remove this FRU: • "1010 Base cover" on page 57 DANGER Use only the authorized battery specified for your computer.
Removal steps of the memory module 1 2 1 When installing: Insert the notched end of the memory module into place. Any other battery could ignite or explode. 62 Hardware Maintenance Manual Ensure that the memory module is firmly installed in firmly, and pivot it downward until it snaps into the memory slot. Press the memory module in the slot and does not move easily. 1060 Backup battery For access, remove this FRU: • "1010 Base cover" on page 57 DANGER Use only the authorized battery specified for your computer.
Hardware Maintenance Manual
Page 69
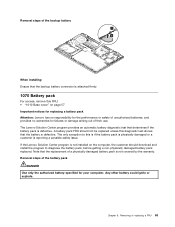
... ignite or explode. Removal steps of the backup battery 1 2 When installing: Ensure that the backup battery connector is defective. The Lenovo Solution Center program provides an automatic battery diagnostic test that the battery is not installed on page 57 Important notices for replacing a battery pack Attention: Lenovo has no responsibility for the performance or safety of unauthorized...
... ignite or explode. Removal steps of the backup battery 1 2 When installing: Ensure that the backup battery connector is defective. The Lenovo Solution Center program provides an automatic battery diagnostic test that the battery is not installed on page 57 Important notices for replacing a battery pack Attention: Lenovo has no responsibility for the performance or safety of unauthorized...

Hardware Maintenance Manual
Page 70
2 1 1 1 1 Step 1 Screw (quantity) M2 × 3 mm, small-head, nylon-coated (4) When installing: Ensure that the battery pack connector is attached firmly. 3 Color Silver Torque 0.181 Nm (1.85 kgf-cm) 1080 Keyboard Removal steps of keyboard To reveal the screw heads beneath the frame, use the flat end of the multi-tool in the shipping package of the new keyboard to slide the keyboard forward by 2.5mm (0.1 inch). 64 Hardware Maintenance Manual
2 1 1 1 1 Step 1 Screw (quantity) M2 × 3 mm, small-head, nylon-coated (4) When installing: Ensure that the battery pack connector is attached firmly. 3 Color Silver Torque 0.181 Nm (1.85 kgf-cm) 1080 Keyboard Removal steps of keyboard To reveal the screw heads beneath the frame, use the flat end of the multi-tool in the shipping package of the new keyboard to slide the keyboard forward by 2.5mm (0.1 inch). 64 Hardware Maintenance Manual
Hardware Maintenance Manual
Page 78
... card" on page 59 • "1040 M.2 wireless WAN card" on page 60 • "1050 Memory module" on page 61 • "1060 Backup battery" on page 62 • "1070 Battery pack" on page 63 • "1090 Thermal fan assembly" on a hard bench can be sure to put it only on a padded surface such...
... card" on page 59 • "1040 M.2 wireless WAN card" on page 60 • "1050 Memory module" on page 61 • "1060 Backup battery" on page 62 • "1070 Battery pack" on page 63 • "1090 Thermal fan assembly" on a hard bench can be sure to put it only on a padded surface such...
Hardware Maintenance Manual
Page 81
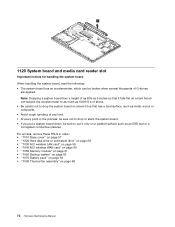
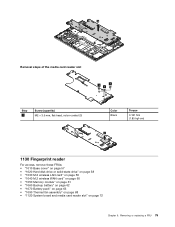
... card" on page 59 • "1040 M.2 wireless WAN card" on page 60 • "1050 Memory module" on page 61 • "1060 Backup battery" on page 62 • "1070 Battery pack" on page 63 • "1090 Thermal fan assembly" on page 68 • "1120 System board and media card reader slot" on page...
... card" on page 59 • "1040 M.2 wireless WAN card" on page 60 • "1050 Memory module" on page 61 • "1060 Backup battery" on page 62 • "1070 Battery pack" on page 63 • "1090 Thermal fan assembly" on page 68 • "1120 System board and media card reader slot" on page...


