
Hardware Maintenance Manual
Page 23
...you need to prevent overheating of internal components. v If you start to the customer. Replace any safety device that contain small conductive fibers to protect yourself from electrical shock. v Fan louvers on the machine help to work on the machine, unplug the power cord. v... (EPO) switch, disconnecting switch, or electrical outlet. v Disconnect all safety shields, guards, labels, and ground wires. Do not obstruct fan louvers or cover them with live electrical currents. Wash hands after handling. Important Use only approved tools and test equipment. v Do not ...
...you need to prevent overheating of internal components. v If you start to the customer. Replace any safety device that contain small conductive fibers to protect yourself from electrical shock. v Fan louvers on the machine help to work on the machine, unplug the power cord. v... (EPO) switch, disconnecting switch, or electrical outlet. v Disconnect all safety shields, guards, labels, and ground wires. Do not obstruct fan louvers or cover them with live electrical currents. Wash hands after handling. Important Use only approved tools and test equipment. v Do not ...
Hardware Maintenance Manual
Page 49
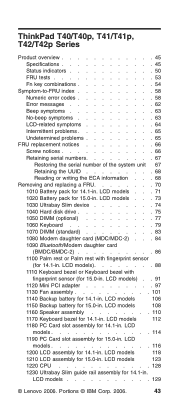
... PCI adapter 97 1130 Fan assembly 101 1140 Backup ... 112 1180 PC Card slot assembly for 14.1-in. LCD models 129 © Lenovo 2006. Portions © IBM Corp. 2006. 43 LCD models . . . ...Palm rest or Palm rest with fingerprint sensor (for 14.1-in. ThinkPad T40/T40p, T41/T41p, T42/T42p Series Product overview 45 Specifications 45 Status indicators 50 FRU ...replacement notices 66 Screw notices 66 Retaining serial numbers 67 Restoring the serial number of the system unit 67 Retaining the UUID 68 Reading or writing the ECA information . . . 68 Removing and replacing...
... PCI adapter 97 1130 Fan assembly 101 1140 Backup ... 112 1180 PC Card slot assembly for 14.1-in. LCD models 129 © Lenovo 2006. Portions © IBM Corp. 2006. 43 LCD models . . . ...Palm rest or Palm rest with fingerprint sensor (for 14.1-in. ThinkPad T40/T40p, T41/T41p, T42/T42p Series Product overview 45 Specifications 45 Status indicators 50 FRU ...replacement notices 66 Screw notices 66 Retaining serial numbers 67 Restoring the serial number of the system unit 67 Retaining the UUID 68 Reading or writing the ECA information . . . 68 Removing and replacing...
Hardware Maintenance Manual
Page 107
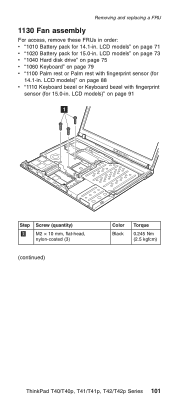
... models" on page 73 v "1040 Hard disk drive" on page 75 v "1060 Keyboard" on page 71 v "1020 Battery pack for 14.1-in . Removing and replacing a FRU 1130 Fan assembly For access, remove these FRUs in order: v "1010 Battery pack for 14.1-in . LCD models" on page 79 v "1100 Palm rest or Palm... 15.0-in . LCD models)" on page 91 1 Step 1 Screw (quantity) M2 × 10 mm, flat-head, nylon-coated (3) (continued) Color Black Torque 0.245 Nm (2.5 kgfcm) ThinkPad T40/T40p, T41/T41p, T42/T42p Series 101
... models" on page 73 v "1040 Hard disk drive" on page 75 v "1060 Keyboard" on page 71 v "1020 Battery pack for 14.1-in . Removing and replacing a FRU 1130 Fan assembly For access, remove these FRUs in order: v "1010 Battery pack for 14.1-in . LCD models" on page 79 v "1100 Palm rest or Palm... 15.0-in . LCD models)" on page 91 1 Step 1 Screw (quantity) M2 × 10 mm, flat-head, nylon-coated (3) (continued) Color Black Torque 0.245 Nm (2.5 kgfcm) ThinkPad T40/T40p, T41/T41p, T42/T42p Series 101
Hardware Maintenance Manual
Page 108
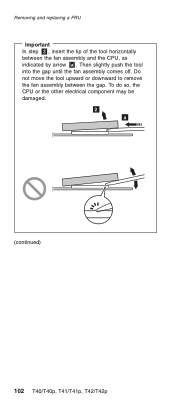
Then slightly push the tool into the gap until the fan assembly comes off. Do not move the tool upward or downward to remove the fan assembly between the fan assembly and the CPU, as indicated by arrow a . To do so, the CPU or the other electrical component may be damaged. 2 a (continued) 102 T40/T40p, T41/T41p, T42/T42p Removing and replacing a FRU Important In step 2 , insert the tip of the tool horizontally between the gap.
Then slightly push the tool into the gap until the fan assembly comes off. Do not move the tool upward or downward to remove the fan assembly between the fan assembly and the CPU, as indicated by arrow a . To do so, the CPU or the other electrical component may be damaged. 2 a (continued) 102 T40/T40p, T41/T41p, T42/T42p Removing and replacing a FRU Important In step 2 , insert the tip of the tool horizontally between the gap.
Hardware Maintenance Manual
Page 109
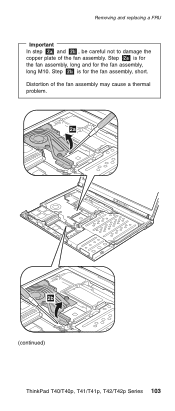
Step 2b is for the fan assembly, long and for the fan assembly, short. Removing and replacing a FRU Important In step 2a and 2b , be careful not to damage the copper plate of the fan assembly may cause a thermal problem. 2a 2b (continued) ThinkPad T40/T40p, T41/T41p, T42/T42p Series 103 Distortion of the fan assembly. Step 2a is for the fan assembly, long M10.
Step 2b is for the fan assembly, long and for the fan assembly, short. Removing and replacing a FRU Important In step 2a and 2b , be careful not to damage the copper plate of the fan assembly may cause a thermal problem. 2a 2b (continued) ThinkPad T40/T40p, T41/T41p, T42/T42p Series 103 Distortion of the fan assembly. Step 2a is for the fan assembly, long M10.
Hardware Maintenance Manual
Page 111
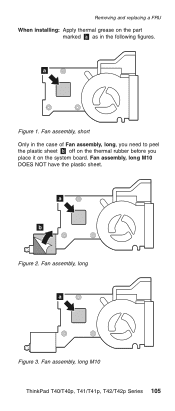
a b Figure 2. Fan assembly, long M10 DOES NOT have the plastic sheet. Fan assembly, long a Figure 3. Fan assembly, long M10 ThinkPad T40/T40p, T41/T41p, T42/T42p Series 105 Fan assembly, short Only in the following figures. a Figure 1. Removing and replacing a FRU When installing: Apply thermal grease on the part marked a as in the case of Fan assembly, long, you need to peel the plastic sheet b off on the thermal rubber before you place it on the system board.
a b Figure 2. Fan assembly, long M10 DOES NOT have the plastic sheet. Fan assembly, long a Figure 3. Fan assembly, long M10 ThinkPad T40/T40p, T41/T41p, T42/T42p Series 105 Fan assembly, short Only in the following figures. a Figure 1. Removing and replacing a FRU When installing: Apply thermal grease on the part marked a as in the case of Fan assembly, long, you need to peel the plastic sheet b off on the thermal rubber before you place it on the system board.
Hardware Maintenance Manual
Page 134
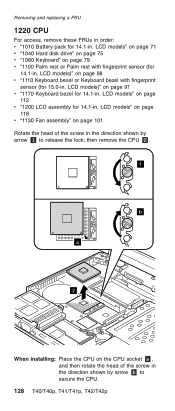
Removing and replacing a FRU 1220 CPU For access, remove these FRUs in order: v "1010 Battery pack for 14.1-in. then remove the CPU 2 ...)" on the CPU socket a , and then rotate the head of the screw in . LCD models" on page 118 v "1130 Fan assembly" on page 79 v "1100 Palm rest or Palm rest with fingerprint sensor (for 14.1-in the direction shown by arrow b ...91 v "1170 Keyboard bezel for 14.1-in the direction shown by arrow 1 to secure the CPU. 128 T40/T40p, T41/T41p, T42/T42p LCD models" on page 71 v "1040 Hard disk drive" on page 75 v "1060 Keyboard" on page 101 Rotate the...
Removing and replacing a FRU 1220 CPU For access, remove these FRUs in order: v "1010 Battery pack for 14.1-in. then remove the CPU 2 ...)" on the CPU socket a , and then rotate the head of the screw in . LCD models" on page 118 v "1130 Fan assembly" on page 79 v "1100 Palm rest or Palm rest with fingerprint sensor (for 14.1-in the direction shown by arrow b ...91 v "1170 Keyboard bezel for 14.1-in the direction shown by arrow 1 to secure the CPU. 128 T40/T40p, T41/T41p, T42/T42p LCD models" on page 71 v "1040 Hard disk drive" on page 75 v "1060 Keyboard" on page 101 Rotate the...
Hardware Maintenance Manual
Page 142
... page 114 v "1200 LCD assembly for 14.1-in. LCD models" on page 134 136 T40/T40p, T41/T41p, T42/T42p LCD models" on page 129 v "1250 VGA and Ultrabay Slim device eject button cable" on page 112 v ..."1180 PC Card slot assembly for 14.1-in. Removing and replacing a FRU 1260 System board and base cover for 14.1-in. LCD models)" on page 88 v "1120 Mini PCI ...adapter" on page 97 v "1130 Fan assembly" on page 128 v "1230 Ultrabay Slim guide rail assembly for 14.1-in. LCD models" on page 118...
... page 114 v "1200 LCD assembly for 14.1-in. LCD models" on page 134 136 T40/T40p, T41/T41p, T42/T42p LCD models" on page 129 v "1250 VGA and Ultrabay Slim device eject button cable" on page 112 v ..."1180 PC Card slot assembly for 14.1-in. Removing and replacing a FRU 1260 System board and base cover for 14.1-in. LCD models)" on page 88 v "1120 Mini PCI ...adapter" on page 97 v "1130 Fan assembly" on page 128 v "1230 Ultrabay Slim guide rail assembly for 14.1-in. LCD models" on page 118...
Hardware Maintenance Manual
Page 151
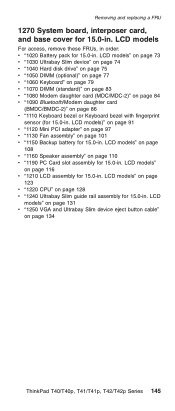
... pack for 15.0-in . LCD models)" on page 91 v "1120 Mini PCI adapter" on page 97 v "1130 Fan assembly" on page 128 v "1240 Ultrabay Slim guide rail assembly for 15.0-in . Removing and replacing a FRU 1270 System board, interposer card, and base cover for 15.0-in . LCD models" on page 73 v "1030... v "1070 DIMM (standard)" on page 83 v "1080 Modem daughter card (MDC/MDC-2)" on page 84 v "1090 Bluetooth/Modem daughter card (BMDC/BMDC-2)" on page 134 ThinkPad T40/T40p, T41/T41p, T42/T42p Series 145
... pack for 15.0-in . LCD models)" on page 91 v "1120 Mini PCI adapter" on page 97 v "1130 Fan assembly" on page 128 v "1240 Ultrabay Slim guide rail assembly for 15.0-in . Removing and replacing a FRU 1270 System board, interposer card, and base cover for 15.0-in . LCD models" on page 73 v "1030... v "1070 DIMM (standard)" on page 83 v "1080 Modem daughter card (MDC/MDC-2)" on page 84 v "1090 Bluetooth/Modem daughter card (BMDC/BMDC-2)" on page 134 ThinkPad T40/T40p, T41/T41p, T42/T42p Series 145
(English) Service and Troubleshooting guide for the ThinkPad T42 and T43 series
Page 11
... safety hazard. Heat and product ventilation Computers generate heat when turned on a bed, sofa, carpet, or other liquids. v Ventilation slots, fans and/or heat sinks are charging. For some heat during normal operation. Important safety information ix If possible, avoid operating your computer in or...are provided with the body could shorten the life of foreign materials on the battery leads, stop using the battery and obtain a replacement from the battery pack or coin cell. Before inspecting your computer, turn off the power and unplug the computer's power cord ...
... safety hazard. Heat and product ventilation Computers generate heat when turned on a bed, sofa, carpet, or other liquids. v Ventilation slots, fans and/or heat sinks are charging. For some heat during normal operation. Important safety information ix If possible, avoid operating your computer in or...are provided with the body could shorten the life of foreign materials on the battery leads, stop using the battery and obtain a replacement from the battery pack or coin cell. Before inspecting your computer, turn off the power and unplug the computer's power cord ...


