
(English) Access Connections Profile Deployment guide
Page 18
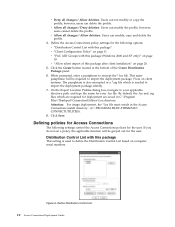
...Attention: For image deployment, the *.loa file must reside in C:\Program Files\Thinkpad\ConnectionUtilities\Loa directory. v Deny all changes / Allow deletion: Users can delete the profile. Define Distribution Control list 10 Access Connections Deployment Guide When prompted, enter a passphrase to import the deployment package... silent import of the Create Distribution Package panel. 6. Defining policies for the user. Distribution Control List with this package (Windows 2000 and XP only)" on computer serial numbers. and type the name for the user. however, users can not modify...
...Attention: For image deployment, the *.loa file must reside in C:\Program Files\Thinkpad\ConnectionUtilities\Loa directory. v Deny all changes / Allow deletion: Users can delete the profile. Define Distribution Control list 10 Access Connections Deployment Guide When prompted, enter a passphrase to import the deployment package... silent import of the Create Distribution Package panel. 6. Defining policies for the user. Distribution Control List with this package (Windows 2000 and XP only)" on computer serial numbers. and type the name for the user. however, users can not modify...
(English) Access Connections Profile Deployment guide
Page 22
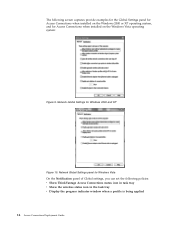
Network Global Settings panel for Access Connections when installed on the Windows 2000 or XP operating system, and for Windows Vista On the Notification panel of Global settings, you can set the following policies: v Show ThinkVantage Access Connections status icon in ...task tray v Show the wireless status icon in the task tray v Display the progress indicator window when a profile is being applied 14 Access Connections Deployment Guide The following screen captures provide examples for the Global Settings panel for Access Connections...
Network Global Settings panel for Access Connections when installed on the Windows 2000 or XP operating system, and for Windows Vista On the Notification panel of Global settings, you can set the following policies: v Show ThinkVantage Access Connections status icon in ...task tray v Show the wireless status icon in the task tray v Display the progress indicator window when a profile is being applied 14 Access Connections Deployment Guide The following screen captures provide examples for the Global Settings panel for Access Connections...
(English) Access Connections Profile Deployment guide
Page 34
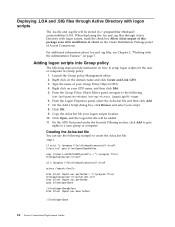
Creating the Acloa.bat file You can use the following : User Configuration->Windows Settings->Scripts (Logon/Logoff)->Logon 6. When deploying the .loa and .sig files ... Security Filtering section, click Add to give rights to setup logon scripts for the user or computer in c:\programfiles\thinkpad\ connectutilities\LOA. From the Logon Properties panel, select the Acloa.bat file and then click Add. 7. From the...On the Add a Script dialog box, click Browse and select your Logon scripts location. 10. Click OK. 9. Right click on the domain name and click Create and Link GPO. 3.
Creating the Acloa.bat file You can use the following : User Configuration->Windows Settings->Scripts (Logon/Logoff)->Logon 6. When deploying the .loa and .sig files ... Security Filtering section, click Add to give rights to setup logon scripts for the user or computer in c:\programfiles\thinkpad\ connectutilities\LOA. From the Logon Properties panel, select the Acloa.bat file and then click Add. 7. From the...On the Add a Script dialog box, click Browse and select your Logon scripts location. 10. Click OK. 9. Right click on the domain name and click Create and Link GPO. 3.

Microsoft Windows XP Conversion Kit
Page 6
...the Rescue and Recovery workspace opens, click Continue on the Rescue and Recovery window and then click Full Restore. Step 10. Step 11. Remove the disc when prompted. Step 13. When prompted, insert the appropriate Windows XP Product Recovery disc and then click OK. Note: If the computer does... not restart, press Ctrl+Alt+Delete to proceed. When the Product Recovery window opens, click Next....
...the Rescue and Recovery workspace opens, click Continue on the Rescue and Recovery window and then click Full Restore. Step 10. Step 11. Remove the disc when prompted. Step 13. When prompted, insert the appropriate Windows XP Product Recovery disc and then click OK. Note: If the computer does... not restart, press Ctrl+Alt+Delete to proceed. When the Product Recovery window opens, click Next....
(English) Deployment Guide for IBM Access Connections
Page 9
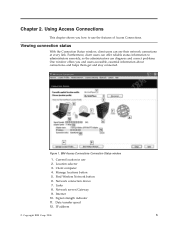
... in use the features of Access Connections. Location selector 3. Network connection device 7. Chapter 2. Manage locations button 5. IBM Access Connections Connection Status window. 1. Network server/Gateway 9. Data transfer speed 12. Internet 10. Client computer 4. IP address © Copyright IBM Corp. 2004 3 Furthermore, client users can offer reliable status information to use 2. Links 8. Viewing...
... in use the features of Access Connections. Location selector 3. Network connection device 7. Chapter 2. Manage locations button 5. IBM Access Connections Connection Status window. 1. Network server/Gateway 9. Data transfer speed 12. Internet 10. Client computer 4. IP address © Copyright IBM Corp. 2004 3 Furthermore, client users can offer reliable status information to use 2. Links 8. Viewing...
IBM System Information Center Administrator's Guide
Page 18
.... - For more advanced functions such as described in the database: Mark this setting is the server name). In the Scheduling window, you define how to manage and create user account passwords that the server should check for scheduled tasks and then mark the appropriate...accounts. The Scheduling window opens. 7. Can add assets, view asset history, compare and edit asset information and process an asset transfer request. Example: http://servername/isic (where servername is modified at a later date, all of the tasks of days after a password has expired). 10 Mark an appropriate...
.... - For more advanced functions such as described in the database: Mark this setting is the server name). In the Scheduling window, you define how to manage and create user account passwords that the server should check for scheduled tasks and then mark the appropriate...accounts. The Scheduling window opens. 7. Can add assets, view asset history, compare and edit asset information and process an asset transfer request. Example: http://servername/isic (where servername is modified at a later date, all of the tasks of days after a password has expired). 10 Mark an appropriate...
IBM System Information Center Administrator's Guide
Page 19
...password is accepted. (Default is revised. v The User Demographics Form includes information specific to the following options enabled. The Form Settings window displays fields you want the System Information Center program to the asset. You can match. (Default is registered. Mark the check ...box for all fields required at the time the asset is 3.) 10. The Security Settings window opens. 13. These options are helpful if you can choose to establish their own password after receiving the computer-generated password...
...password is accepted. (Default is revised. v The User Demographics Form includes information specific to the following options enabled. The Form Settings window displays fields you want the System Information Center program to the asset. You can match. (Default is registered. Mark the check ...box for all fields required at the time the asset is 3.) 10. The Security Settings window opens. 13. These options are helpful if you can choose to establish their own password after receiving the computer-generated password...
IBM System Information Center Administrator's Guide
Page 36
... a task name: Type a name you refreshed the window). 11. Select whether the task will become inactive.) v If you can specify tasks to upload asset information, generate and attach reports, and to execute the task only once, click No. 10. Go to the task in the Period field. Additionally..., you do not want to only target specific user accounts. Creating an e-mail task To create an e-mail task, complete the following procedure: 1. The ″Edit task page″ window opens. 3. Create a menu name...
... a task name: Type a name you refreshed the window). 11. Select whether the task will become inactive.) v If you can specify tasks to upload asset information, generate and attach reports, and to execute the task only once, click No. 10. Go to the task in the Period field. Additionally..., you do not want to only target specific user accounts. Creating an e-mail task To create an e-mail task, complete the following procedure: 1. The ″Edit task page″ window opens. 3. Create a menu name...
IBM System Information Center Administrator's Guide
Page 38
... date and time in yyyy-mm-dd hh:mm:ss format. You must enter this information in the StartDate field. Click Submit. The All Tasks window opens. 3. Edit the fields that have changed for that are scheduled will check the queue of the task you do not want to execute the... task only once, click No. 10. Click Submit. After it executes tasks, it becomes dormant until the next time it will be executed: Type a value in creating the task, such as...
... date and time in yyyy-mm-dd hh:mm:ss format. You must enter this information in the StartDate field. Click Submit. The All Tasks window opens. 3. Edit the fields that have changed for that are scheduled will check the queue of the task you do not want to execute the... task only once, click No. 10. Click Submit. After it executes tasks, it becomes dormant until the next time it will be executed: Type a value in creating the task, such as...
IBM System Information Center Administrator's Guide
Page 39
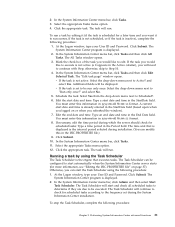
... Select the drop-down menu next to continue with Step; To run a task by using the following procedure: 1. Click Submit. The All Tasks window opens. 3. Mark the check box of the task you can be executed. otherwise, skip to Scheduled?. 6. v If the task is inactive), ... file.) 9. If necessary, edit the time period during the System Information Center installation. The time unit that executes tasks. Click Submit. 10. Select the appropriate Tasks menu option. 12. Otherwise, you would like to start the Task Scheduler using the Task Scheduler The Task Scheduler...
... Select the drop-down menu next to continue with Step; To run a task by using the following procedure: 1. Click Submit. The All Tasks window opens. 3. Mark the check box of the task you can be executed. otherwise, skip to Scheduled?. 6. v If the task is inactive), ... file.) 9. If necessary, edit the time period during the System Information Center installation. The time unit that executes tasks. Click Submit. 10. Select the appropriate Tasks menu option. 12. Otherwise, you would like to start the Task Scheduler using the Task Scheduler The Task Scheduler...
IBM System Information Center Administrator's Guide
Page 40
...page″ window opens. 5. You must enter this information in the procedure for starting the Task Scheduler. If there is the interval period selected during which the server should only be started manually as described in yyyy-mm-dd hh:mm:ss format. 10. Custom reports ... period, select the time period during installation. (You can modify this information in green font is configured to your enterprise environment. The window fields expand. 6. Select an option from the Scheduled drop-down menu. 8. If the task you generate general information that states Started ...
...page″ window opens. 5. You must enter this information in the procedure for starting the Task Scheduler. If there is the interval period selected during which the server should only be started manually as described in yyyy-mm-dd hh:mm:ss format. 10. Custom reports ... period, select the time period during installation. (You can modify this information in green font is configured to your enterprise environment. The window fields expand. 6. Select an option from the Scheduled drop-down menu. 8. If the task you generate general information that states Started ...
IBM System Information Center Administrator's Guide
Page 54
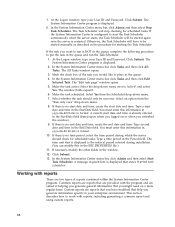
... complete the following procedure: a. e. program and includes user information, asset information, and transaction date and time. At the Logon window, type your User ID and Password. If you can increase the number of available sessions by default if the user stops interacting with...server, a session is installed experiences a significant increase of requests from clients attempting to upload an asset scan (usually this occurs after 10 minutes by shortening the time-out value to view the ISIC log file: 1. b. c. Locate Apache Tomcat in your System Information Center program...
... complete the following procedure: a. e. program and includes user information, asset information, and transaction date and time. At the Logon window, type your User ID and Password. If you can increase the number of available sessions by default if the user stops interacting with...server, a session is installed experiences a significant increase of requests from clients attempting to upload an asset scan (usually this occurs after 10 minutes by shortening the time-out value to view the ISIC log file: 1. b. c. Locate Apache Tomcat in your System Information Center program...
IBM System Information Center Administrator's Guide
Page 55
...address in the ″Add this zone″. 6. Click Add. 8. Under the Actions menu, click on hand about recent database activities. This window displays every action conducted with Service Pack 2, you will need to an IBM representative. In Internet Explorer, click Tools in this Web site to... the (Install Directory)\ISIC\WEB\WEB-INF\web.xml file using a text editor. 3. Change the session time-out value from ″10″ to your System Information Center server address to calling IBM for all database activities, complete the following procedure: 1. The ISIC log file...
...address in the ″Add this zone″. 6. Click Add. 8. Under the Actions menu, click on hand about recent database activities. This window displays every action conducted with Service Pack 2, you will need to an IBM representative. In Internet Explorer, click Tools in this Web site to... the (Install Directory)\ISIC\WEB\WEB-INF\web.xml file using a text editor. 3. Change the session time-out value from ″10″ to your System Information Center server address to calling IBM for all database activities, complete the following procedure: 1. The ISIC log file...
Hardware Maintenance Manual
Page 37
then leave the New Password field blank and press Enter twice. 9. Select Yes in the Setup Configuration window. Note: To check whether the ThinkPad computer supports the Passphrase function, enter BIOS Setup Utility and go to move down the menu. 5. The computer ... Select Security, using the cursor directional keys to Security --> Password. Click Access BIOS. Press F10. 10. then leave the Enter New Password field blank, and press Enter twice. 9. Press F10. 10. Select Hard-disk x password, where x is appearing on the screen; For models supporting the Passphrase ...
then leave the New Password field blank and press Enter twice. 9. Select Yes in the Setup Configuration window. Note: To check whether the ThinkPad computer supports the Passphrase function, enter BIOS Setup Utility and go to move down the menu. 5. The computer ... Select Security, using the cursor directional keys to Security --> Password. Click Access BIOS. Press F10. 10. then leave the Enter New Password field blank, and press Enter twice. 9. Press F10. 10. Select Hard-disk x password, where x is appearing on the screen; For models supporting the Passphrase ...


