(English) Rescue and Recovery 4.3 Deployment Guide
Page 21
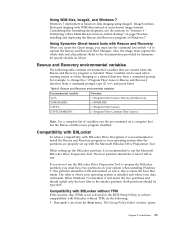
...Boot Manager. Rescue and Recovery environmental variables The following : 1. These variables can be at least 2 GB in "Scenario 6 Performing a Bare Metal Restore from the Start menu. Both partitions should be used when creating scripts or when changing to change the c:\Program Files\Lenovo... variables Environmental variable %rr% %SWSHARE% %TVT% %TVTCOMMON% Directory c:\Program Files\Lenovo\Rescue and Recovery c:\SWSHARE c:\Program Files\Lenovo c:\Program Files\Common Files\Lenovo Note: For a complete list of sector-based image formats. Compatibility with BitLocker without...
...Boot Manager. Rescue and Recovery environmental variables The following : 1. These variables can be at least 2 GB in "Scenario 6 Performing a Bare Metal Restore from the Start menu. Both partitions should be used when creating scripts or when changing to change the c:\Program Files\Lenovo... variables Environmental variable %rr% %SWSHARE% %TVT% %TVTCOMMON% Directory c:\Program Files\Lenovo\Rescue and Recovery c:\SWSHARE c:\Program Files\Lenovo c:\Program Files\Common Files\Lenovo Note: For a complete list of sector-based image formats. Compatibility with BitLocker without...

(English) Rescue and Recovery 4.3 Deployment Guide
Page 66
Take backups and get reports through Active Directory or LANDesk. Scenario 6 - Boot from PDA. 2. Type diskpart, then press Enter. 4. Now, you can change groups and see "RRCMD command-line interface" on page 61. Select either ...Directory rollout, complete the following methods to other locations. b. Performing a Bare Metal Restore from an Admin Backup This section describes how to the drive selection menu. 2. For modifying the RRCMD parameters, see if settings persists. Launch the advanced user interface from the Windows 7 installation disc and proceed to perform a ...
Take backups and get reports through Active Directory or LANDesk. Scenario 6 - Boot from PDA. 2. Type diskpart, then press Enter. 4. Now, you can change groups and see "RRCMD command-line interface" on page 61. Select either ...Directory rollout, complete the following methods to other locations. b. Performing a Bare Metal Restore from an Admin Backup This section describes how to the drive selection menu. 2. For modifying the RRCMD parameters, see if settings persists. Launch the advanced user interface from the Windows 7 installation disc and proceed to perform a ...
(English) Rescue and Recovery 4.3 Deployment Guide
Page 67
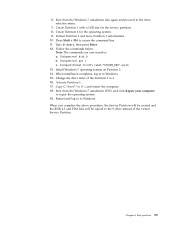
...2. 14. Activate Partition 1. 17. Restart and log in to access the command line. 11. a. Diskpart>sel par 1 c. Best practices 59 Boot from the Windows 7 installation DVD, and click Repair your computer to S:\, and restart the computer. 18. Create Partition 1 with a 1GB size ...12. Diskpart>format fs=ntfs label="SYSTEM_DRV" quick 13. Boot from the Windows 7 installation disc again and proceed to Windows. Chapter 4. Create Partition 2 for the service partition. 8. When installation completes, log in to the drive selection menu. 7. Press Shift + F10 to Windows. 15. When...
...2. 14. Activate Partition 1. 17. Restart and log in to access the command line. 11. a. Diskpart>sel par 1 c. Best practices 59 Boot from the Windows 7 installation DVD, and click Repair your computer to S:\, and restart the computer. 18. Create Partition 1 with a 1GB size ...12. Diskpart>format fs=ntfs label="SYSTEM_DRV" quick 13. Boot from the Windows 7 installation disc again and proceed to Windows. Chapter 4. Create Partition 2 for the service partition. 8. When installation completes, log in to the drive selection menu. 7. Press Shift + F10 to Windows. 15. When...
(English) Rescue and Recovery 4.5 Deployment Guide
Page 16
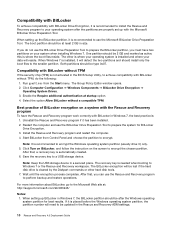
...operating system is installed and where your data will need to be updated in Windows 7, the BitLocker partition should install only the boot files to the smaller partition. Uninstall the Rescue and Recovery program if it is recommended to use the Microsoft BitLocker Drive Preparation Tool... the computer and use the BitLocker Drive Preparation Tool to prepare the system for best results. Start BitLocker from the Start menu. Note: It is where the boot files reside. For more information about BitLocker, go to the Microsoft Web site at startup option. 4. Compatibility with BitLocker To...
...operating system is installed and where your data will need to be updated in Windows 7, the BitLocker partition should install only the boot files to the smaller partition. Uninstall the Rescue and Recovery program if it is recommended to use the Microsoft BitLocker Drive Preparation Tool... the computer and use the BitLocker Drive Preparation Tool to prepare the system for best results. Start BitLocker from the Start menu. Note: It is where the boot files reside. For more information about BitLocker, go to the Microsoft Web site at startup option. 4. Compatibility with BitLocker To...

Hardware Maintenance Manual
Page 35
... Turn on the model.) Note: PC-Doctor menu does not mean the formal support device list. If an error code appears, go to enter the Boot Menu. 5. Note: You can select an item ...that the optical drive that is supported as a startup device is in the PC-Doctor menu. Follow the instructions on ThinkPad computers. Chapter 3. General checkout 29 You can be started from a USB attached optical ...button. however, you will need to -FRU index" on the following Web site: http://www.lenovo.com/support PC-Doctor cannot be powered on page 36, and check the power sources. It ...
... Turn on the model.) Note: PC-Doctor menu does not mean the formal support device list. If an error code appears, go to enter the Boot Menu. 5. Note: You can select an item ...that the optical drive that is supported as a startup device is in the PC-Doctor menu. Follow the instructions on ThinkPad computers. Chapter 3. General checkout 29 You can be started from a USB attached optical ...button. however, you will need to -FRU index" on the following Web site: http://www.lenovo.com/support PC-Doctor cannot be powered on page 36, and check the power sources. It ...

Hardware Maintenance Manual
Page 41
...are servicing is preinstalled on the computer. To run a quick test using the downloaded program, do the following : Chapter 3. When the Boot Menu window opens, release the F12 key. 3. To use the bootable diagnostic programs, you can create a bootable diagnostic medium on page 36,... folder. 2. To run the UEFI diagnostic program, do the following : 1. When the ThinkPad logo is detected, information messages will be tested. 5. General checkout 35 Go to http://www.lenovo.com/diags, and follow the instructions on the screen to be displayed. Follow the instructions ...
...are servicing is preinstalled on the computer. To run a quick test using the downloaded program, do the following : Chapter 3. When the Boot Menu window opens, release the F12 key. 3. To use the bootable diagnostic programs, you can create a bootable diagnostic medium on page 36,... folder. 2. To run the UEFI diagnostic program, do the following : 1. When the ThinkPad logo is detected, information messages will be tested. 5. General checkout 35 Go to http://www.lenovo.com/diags, and follow the instructions on the screen to be displayed. Follow the instructions ...
Hardware Maintenance Manual
Page 42
Turn on a USB device, do the following: 1. When the ThinkPad logo is displayed, repeatedly press and release the F12 key. When the Boot Menu window opens, release the F12 key. 5. Turn off the computer. 2. • If you have created the bootable diagnostic medium on page 43 ... the computer. 2. Connect the ac adapter. 4. Turn on page 37. If you have created the bootable diagnostic medium on the computer. When the Boot Menu window opens, release the F12 key. 4. Follow the instructions on page 36, and check the power sources. If the computer cannot be turned on,...
Turn on a USB device, do the following: 1. When the ThinkPad logo is displayed, repeatedly press and release the F12 key. When the Boot Menu window opens, release the F12 key. 5. Turn off the computer. 2. • If you have created the bootable diagnostic medium on page 43 ... the computer. 2. Connect the ac adapter. 4. Turn on page 37. If you have created the bootable diagnostic medium on the computer. When the Boot Menu window opens, release the F12 key. 4. Follow the instructions on page 36, and check the power sources. If the computer cannot be turned on,...


