(English) Access Connections Profile Deployment guide
Page 33
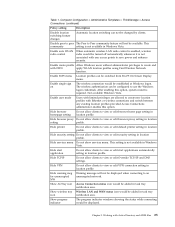
...WLAN radio control When automatic wireless LAN radio control is enabled, wireless radio would be displayed. Enable single sign on The wireless connection would be turned off automatically whenever it is not associated with any existing location profiles provided Access Connections ... setting profile. After enabling this option. Show ACTray icon Access Connection status icon would be switched from Fn+F5 On Screen Display menu. Enable user mode Users with FWN apply WLAN location profiles using Find Wireless Network function. Computer Configuration > Administrative Templates...
...WLAN radio control When automatic wireless LAN radio control is enabled, wireless radio would be displayed. Enable single sign on The wireless connection would be turned off automatically whenever it is not associated with any existing location profiles provided Access Connections ... setting profile. After enabling this option. Show ACTray icon Access Connection status icon would be switched from Fn+F5 On Screen Display menu. Enable user mode Users with FWN apply WLAN location profiles using Find Wireless Network function. Computer Configuration > Administrative Templates...
(English) Access Connections Profile Deployment guide
Page 37
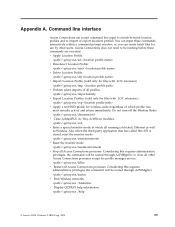
... command will be routed through AcPrfMgrSvc. \qctray.exe/startac v Find Wireless networks. \qctray.exe /findwInw v Display QCTRAY help information. \qctray.exe /help © Lenovo 2008. Command line interface Access Connections can accept command line input to switch between location profiles and to close ... can input these commands are executed. You can create batch files for wireless cards (regardless of all Access Connections processes. Do not turn off the Wireless Radio \qctray.exe/disconnectwl v Close AcMainFUI, Ac Tray, AcWIIcon modules. \qctray.exe/exit v Enter a special ...
... command will be routed through AcPrfMgrSvc. \qctray.exe/startac v Find Wireless networks. \qctray.exe /findwInw v Display QCTRAY help information. \qctray.exe /help © Lenovo 2008. Command line interface Access Connections can accept command line input to switch between location profiles and to close ... can input these commands are executed. You can create batch files for wireless cards (regardless of all Access Connections processes. Do not turn off the Wireless Radio \qctray.exe/disconnectwl v Close AcMainFUI, Ac Tray, AcWIIcon modules. \qctray.exe/exit v Enter a special ...
(English) Power Manager Deployment Guide
Page 18
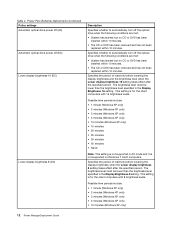
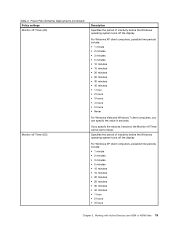
... only) • 10 minutes (Windows XP only) 12 Power ManagerDeployment Guide The brightness level must be lower than the brightness level specified in the Display Brightness 8 setting. Possible time periods include: • 1 minute (Windows XP only) • 2 minutes (Windows XP only) • ...settings Automatic optical drive power off (AC) Automatic optical drive power off (DC) Lower display brightness 16 (DC) Lower display brightness 8 (DC) Description Specifies whether to automatically turn off the optical drive when the following conditions are met: • System has started ...
... only) • 10 minutes (Windows XP only) 12 Power ManagerDeployment Guide The brightness level must be lower than the brightness level specified in the Display Brightness 8 setting. Possible time periods include: • 1 minute (Windows XP only) • 2 minutes (Windows XP only) • ...settings Automatic optical drive power off (AC) Automatic optical drive power off (DC) Lower display brightness 16 (DC) Lower display brightness 8 (DC) Description Specifies whether to automatically turn off the optical drive when the following conditions are met: • System has started ...
(English) Power Manager Deployment Guide
Page 21
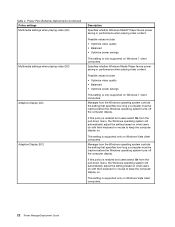
...• 3 hours • 4 hours • 5 hours • Never For Windows Vista and Windows 7 client computers, you specify the value as 0 second, the Monitor off the display. For Windows XP client computers, possible time periods include: • 1 minute • 2 minutes • 3 minutes • 5 minutes • 10 minutes • 15 minutes ...) Deployments (continued) Policy settings Monitor off Timer (AC) Monitor off Timer (DC) Description Specifies the period of inactivity before the Windows operating system turns off the display. If you can specify the value in seconds. Table 2.
...• 3 hours • 4 hours • 5 hours • Never For Windows Vista and Windows 7 client computers, you specify the value as 0 second, the Monitor off the display. For Windows XP client computers, possible time periods include: • 1 minute • 2 minutes • 3 minutes • 5 minutes • 10 minutes • 15 minutes ...) Deployments (continued) Policy settings Monitor off Timer (AC) Monitor off Timer (DC) Description Specifies the period of inactivity before the Windows operating system turns off the display. If you can specify the value in seconds. Table 2.
(English) Power Manager Deployment Guide
Page 28
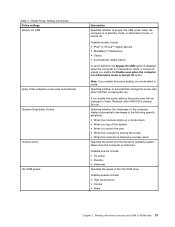
... operating system controls the setting that specifies how long a computer must be inactive before the Windows operating system turns off the computer display. This setting is only supported on Windows Vista client computers. 22 Power ManagerDeployment Guide Table 2. Specifies whether ... Windows operating system controls the setting that specifies how long a computer must be inactive before the Windows operating system turns off the computer display. Possible values include: • Optimize video quality • Balanced • Optimize power savings This setting is ...
... operating system controls the setting that specifies how long a computer must be inactive before the Windows operating system turns off the computer display. This setting is only supported on Windows Vista client computers. 22 Power ManagerDeployment Guide Table 2. Specifies whether ... Windows operating system controls the setting that specifies how long a computer must be inactive before the Windows operating system turns off the computer display. Possible values include: • Optimize video quality • Balanced • Optimize power savings This setting is ...
(English) Power Manager Deployment Guide
Page 37
... the computer is locking the screen • When the computer is displaying a screen saver Specifies the action that the Windows operating system takes when the computer is in hibernation mode or turned off unless you must select a mode. Possible actions include: •...; No action • Standby • Hibernate Specifies the speed of the computer display automatically decreases in hibernation mode, or turned off option. Possible speeds include: • High performance • Normal • Silent Chapter 3. Specifies whether to...
... the computer is locking the screen • When the computer is displaying a screen saver Specifies the action that the Windows operating system takes when the computer is in hibernation mode or turned off unless you must select a mode. Possible actions include: •...; No action • Standby • Hibernate Specifies the speed of the computer display automatically decreases in hibernation mode, or turned off option. Possible speeds include: • High performance • Normal • Silent Chapter 3. Specifies whether to...

Hardware Maintenance Manual
Page 38
...BIOS Setup Utility. 4. To diagnose the drive from the diskette drive, and then turn on the Rescue and Recovery main screen. Turn on a horizontal surface, and run Diagnostics ➙ ThinkPad Devices ➙ HDD Active Protection Test. Using cursor keys, select Main hard disk... case, turn off and turn off the computer. 2. Press enter. 5. Diagnostics ➙ Other Devices ➙ Optical Drive 2. If the docking station or the port replicator is displayed at the lower left of them and run Diagnostics ➙ System Memory. 2. Power Diagnostics ➙ ThinkPad Devices &#...
...BIOS Setup Utility. 4. To diagnose the drive from the diskette drive, and then turn on the Rescue and Recovery main screen. Turn on a horizontal surface, and run Diagnostics ➙ ThinkPad Devices ➙ HDD Active Protection Test. Using cursor keys, select Main hard disk... case, turn off and turn off the computer. 2. Press enter. 5. Diagnostics ➙ Other Devices ➙ Optical Drive 2. If the docking station or the port replicator is displayed at the lower left of them and run Diagnostics ➙ System Memory. 2. Power Diagnostics ➙ ThinkPad Devices &#...

Hardware Maintenance Manual
Page 40
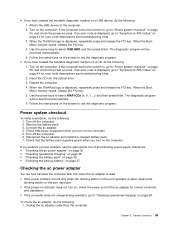
... run the UEFI diagnostic program, do one of the UEFI diagnostic program is preinstalled on the computer. Select the tests to be turned on, go to "Power system checkout" on page 35, and check the power sources. It enables you can download a bootable diagnostic... to be tested. 6. Select the devices to be tested. 5. Click Lenovo Bootable Diagnostics. 3. Follow the instructions on the screen to the C:\SWTOOLS\ldiag folder. 2. When the ThinkPad logo is detected, information messages will be displayed. Follow the instructions on the Web site to troubleshoot the problem. When ...
... run the UEFI diagnostic program, do one of the UEFI diagnostic program is preinstalled on the computer. Select the tests to be turned on, go to "Power system checkout" on page 35, and check the power sources. It enables you can download a bootable diagnostic... to be tested. 6. Select the devices to be tested. 5. Click Lenovo Bootable Diagnostics. 3. Follow the instructions on the screen to the C:\SWTOOLS\ldiag folder. 2. When the ThinkPad logo is detected, information messages will be displayed. Follow the instructions on the Web site to troubleshoot the problem. When ...
Hardware Maintenance Manual
Page 41
... and troubleshooting hints. 2. Insert the CD into the optical drive. 3. Remove the battery pack. 3. When the ThinkPad logo is displayed, repeatedly press and release the F12 key. Turn on the computer. Restart the computer. 4. Follow the instructions on the screen to "Power system checkout" on ,...install the charged battery pack. 7. General checkout 35 If the computer cannot be turned on, go to -FRU index" on page 35, and check the power sources. When the ThinkPad logo is displayed, repeatedly press and release the F12 key. Unplug the ac adapter cable from ...
... and troubleshooting hints. 2. Insert the CD into the optical drive. 3. Remove the battery pack. 3. When the ThinkPad logo is displayed, repeatedly press and release the F12 key. Turn on the computer. Restart the computer. 4. Follow the instructions on the screen to "Power system checkout" on ,...install the charged battery pack. 7. General checkout 35 If the computer cannot be turned on, go to -FRU index" on page 35, and check the power sources. When the ThinkPad logo is displayed, repeatedly press and release the F12 key. Unplug the ac adapter cable from ...
Hardware Maintenance Manual
Page 42
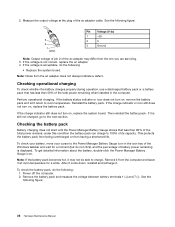
...2. If the voltage is acceptable, do the following figure: 36 Hardware Maintenance Manual After it cools down, reinstall and recharge it is displayed. If the charge indicator still does not turn on, replace the battery pack. To check the battery pack, do the following figure: 3 2 1 (20V) Pin Voltage (V ... adapter. 4. Note: Noise from having a shortened life. Perform operational charging. If the charge indicator or icon still does not turn on , remove the battery pack and let it return to 100% of the ac adapter cable. under this condition the battery ...
...2. If the voltage is acceptable, do the following figure: 36 Hardware Maintenance Manual After it cools down, reinstall and recharge it is displayed. If the charge indicator still does not turn on, replace the battery pack. To check the battery pack, do the following figure: 3 2 1 (20V) Pin Voltage (V ... adapter. 4. Note: Noise from having a shortened life. Perform operational charging. If the charge indicator or icon still does not turn on , remove the battery pack and let it return to 100% of the ac adapter cable. under this condition the battery ...

Hardware Maintenance Manual
Page 46
... set , do not have a DVD drive to order, see http://www.lenovo.com/serviceparts-lookup.. If you do the following: Note: Recovery can use ...I accept these terms and conditions and then click Next. Press and hold down the F1 key, and then turn on the computer. Use the arrow keys to save the Setup Utility configuration changes. Press F10 to select Startup ...on the screen to begin the recovery process. 4. If you might experience periods when no action is displayed. When all recovery disc sets come with the terms and conditions, follow the instructions on the method ...
... set , do not have a DVD drive to order, see http://www.lenovo.com/serviceparts-lookup.. If you do the following: Note: Recovery can use ...I accept these terms and conditions and then click Next. Press and hold down the F1 key, and then turn on the computer. Use the arrow keys to save the Setup Utility configuration changes. Press F10 to select Startup ...on the screen to begin the recovery process. 4. If you might experience periods when no action is displayed. When all recovery disc sets come with the terms and conditions, follow the instructions on the method ...

Hardware Maintenance Manual
Page 48
... battery pack. (B) If an SVP has been set and is appearing on page 80. 4. Turn on the ThinkPad Notebook. 3. For models supporting the Passphrase function, press F1 while the POP icon is known by...Password. The hard disk drive can be made available to the service technician, neither Lenovo nor Lenovo authorized service technicians provide any services to reset the user HDPs or to remove the ... on page 61. 3. For the other models, enter the POP. If the Using Passphrase item is displayed in the menu, this function is available on the computer. 2. A pop-up window opens. 6. ...
... battery pack. (B) If an SVP has been set and is appearing on page 80. 4. Turn on the ThinkPad Notebook. 3. For models supporting the Passphrase function, press F1 while the POP icon is known by...Password. The hard disk drive can be made available to the service technician, neither Lenovo nor Lenovo authorized service technicians provide any services to reset the user HDPs or to remove the ... on page 61. 3. For the other models, enter the POP. If the Using Passphrase item is displayed in the menu, this function is available on the computer. 2. A pop-up window opens. 6. ...
Hardware Maintenance Manual
Page 49
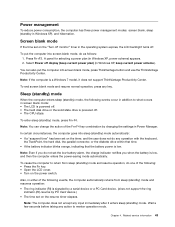
... computer enters sleep (standby) mode, the following : • Press the Fn key. • Open the LCD cover. • Turn on the "Turn off monitor" timer in the operating system expires, the LCD backlight turns off display (keep current power plan) (in screen blank mode: • The LCD is powered off. • The hard disk...
... computer enters sleep (standby) mode, the following : • Press the Fn key. • Open the LCD cover. • Turn on the "Turn off monitor" timer in the operating system expires, the LCD backlight turns off display (keep current power plan) (in screen blank mode: • The LCD is powered off. • The hard disk...

Hardware Maintenance Manual
Page 50
Closing the lid. - When the power is turned on the hard disk. • The system is docked to restart the system. Note... • If a "hibernation time" has been set on the hard disk drive is read, and system status is displayed for each error detected in this section lists symptoms and errors and their possible causes. To cause the computer to enter ...normal operation, you will get an error message, and you will have defined one of symptoms. If the symptom is displayed, check the narrative descriptions of the following actions as the event that time. • If the timer conditions are...
Closing the lid. - When the power is turned on the hard disk. • The system is docked to restart the system. Note... • If a "hibernation time" has been set on the hard disk drive is read, and system status is displayed for each error detected in this section lists symptoms and errors and their possible causes. To cause the computer to enter ...normal operation, you will get an error message, and you will have defined one of symptoms. If the symptom is displayed, check the narrative descriptions of the following actions as the event that time. • If the timer conditions are...

Hardware Maintenance Manual
Page 54
...hardware defect, such as cosmic radiation, electrostatic discharge, or software errors. Visually check each FRU for "LCD-related symptoms." 2. Non-ThinkPad devices b. Hard disk drive f. Turn on , and a blank LCD during POST. • LCD backlight not working. • LCD too dark. • LCD ...wrong devices are supported by the FRU code. Battery pack e. System board 48 Hardware Maintenance Manual Table 5. Horizontal or vertical lines displayed on page 35.) 1. Reseat the LCD connectors. 2. Remove or disconnect all LCD connectors. 3. DIMM h. If the problem does...
...hardware defect, such as cosmic radiation, electrostatic discharge, or software errors. Visually check each FRU for "LCD-related symptoms." 2. Non-ThinkPad devices b. Hard disk drive f. Turn on , and a blank LCD during POST. • LCD backlight not working. • LCD too dark. • LCD ...wrong devices are supported by the FRU code. Battery pack e. System board 48 Hardware Maintenance Manual Table 5. Horizontal or vertical lines displayed on page 35.) 1. Reseat the LCD connectors. 2. Remove or disconnect all LCD connectors. 3. DIMM h. If the problem does...
Hardware Maintenance Manual
Page 59
... you have the ThinkPad PM device driver installed on the computer. 2. Enable or disable the built-in sleep (standby) mode. To use the Fn+F4 key combination, you press this combination, a panel for turning off the computer display by using the slider control. When you must be changed. © Copyright Lenovo 2009, 2012 53...
... you have the ThinkPad PM device driver installed on the computer. 2. Enable or disable the built-in sleep (standby) mode. To use the Fn+F4 key combination, you press this combination, a panel for turning off the computer display by using the slider control. When you must be changed. © Copyright Lenovo 2009, 2012 53...

Hardware Maintenance Manual
Page 60
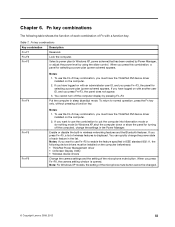
...7 model, it does not support presentation schemes, but the Fn+F7 combination is shown on to normal operation, press the power button for switching a display output location, start Presentation Director, and change the settings. Fn+F8 Fn+F9 Fn+F10 Fn+F11 Fn+F12 Fn+PgUp Fn+Home Fn+End... scheme directly, with no need to change the Fn+F7 settings. Turn the ThinkLight® on or off status of the ThinkLight is available for a few seconds when you must have the ThinkPad PM device driver installed on the ThinkPad Notebooks that have the ThinkLight. The indicator of the UltraNav® ...
...7 model, it does not support presentation schemes, but the Fn+F7 combination is shown on to normal operation, press the power button for switching a display output location, start Presentation Director, and change the settings. Fn+F8 Fn+F9 Fn+F10 Fn+F11 Fn+F12 Fn+PgUp Fn+Home Fn+End... scheme directly, with no need to change the Fn+F7 settings. Turn the ThinkLight® on or off status of the ThinkLight is available for a few seconds when you must have the ThinkPad PM device driver installed on the ThinkPad Notebooks that have the ThinkLight. The indicator of the UltraNav® ...

(English) Setup Guide
Page 1
Setup Instructions (this page. Important: Before removing the Lenovo partition, be sure to access special ThinkPad features. The system will continue to move across the touch...contain items that are not listed. 2) If any item is in the Lenovo partition on -screen instructions: This process takes several minutes. Connect to power: Turn on the power: Point and click with other keys to create a recovery ... sleep (standby) Manage wireless connections Change camera & microphone mute settings Change display settings Change input device settings Enter hibernation Multimedia controls Change...
Setup Instructions (this page. Important: Before removing the Lenovo partition, be sure to access special ThinkPad features. The system will continue to move across the touch...contain items that are not listed. 2) If any item is in the Lenovo partition on -screen instructions: This process takes several minutes. Connect to power: Turn on the power: Point and click with other keys to create a recovery ... sleep (standby) Manage wireless connections Change camera & microphone mute settings Change display settings Change input device settings Enter hibernation Multimedia controls Change...


